

User Guide
Page 7
...8226;Manufactured under your TV The following copyright: Copyright © 2003 by the U.S. Environmental Protection Agency. marks. therefore, Toshiba is viewed from Audyssey Laboratories, Inc. Bitstream Vera is manufactured using an extremely high level of precision technology; 7 ENERGY STAR...IIS and Thomson. • This production contains Bitstream Vera Sans fonts under license from a normal viewing distance. Changing Picture Settings may be possible. •Audyssey Dynamic Volume® automatically adjusts volume to produce lower frequencies than otherwise would be...
...8226;Manufactured under your TV The following copyright: Copyright © 2003 by the U.S. Environmental Protection Agency. marks. therefore, Toshiba is viewed from Audyssey Laboratories, Inc. Bitstream Vera is manufactured using an extremely high level of precision technology; 7 ENERGY STAR...IIS and Thomson. • This production contains Bitstream Vera Sans fonts under license from a normal viewing distance. Changing Picture Settings may be possible. •Audyssey Dynamic Volume® automatically adjusts volume to produce lower frequencies than otherwise would be...

User Guide
Page 11
... channel (programmed or unprogrammed 64 Switching between two channels using Channel Return 64 Switching between two channels using SurfLock 64 Selecting the picture size 65 Full 66 TheaterWide 1 67 TheaterWide 2 67 TheaterWide 3 68 Native 68 4:3 69 Normal 69 Dot by Dot 69 Scrolling the ...71 Selecting the cinema mode 72 Using the FREEZE feature 72 Adjusting the picture 73 Selecting the picture mode 73 Adjusting the picture quality 74 Using closed captions 75 Base closed captions 75 Digital CC settings 76 CC Selector 77 Adjusting the audio 78 Muting the sound 78 Using...
... channel (programmed or unprogrammed 64 Switching between two channels using Channel Return 64 Switching between two channels using SurfLock 64 Selecting the picture size 65 Full 66 TheaterWide 1 67 TheaterWide 2 67 TheaterWide 3 68 Native 68 4:3 69 Normal 69 Dot by Dot 69 Scrolling the ...71 Selecting the cinema mode 72 Using the FREEZE feature 72 Adjusting the picture 73 Selecting the picture mode 73 Adjusting the picture quality 74 Using closed captions 75 Base closed captions 75 Digital CC settings 76 CC Selector 77 Adjusting the audio 78 Muting the sound 78 Using...
User Guide
Page 13
... information 107 Understanding the last mode memory feature ......108 Chapter 7: Using the TV's Advanced Features 109 Using the advanced picture settings 109 Dynamic Contrast 109 Static Gamma 110 Color temperature 110 CableClear® digital Noise Reduction 111 MPEG Noise Reduction 112 Game... Mode 112 Chapter 8: Troubleshooting 114 General troubleshooting 114 Picture problems 115 Sound problems 117 Remote control problems 117 Channel tuning problems 117 Closed caption problems 118 Rating blocking (V-Chip...
... information 107 Understanding the last mode memory feature ......108 Chapter 7: Using the TV's Advanced Features 109 Using the advanced picture settings 109 Dynamic Contrast 109 Static Gamma 110 Color temperature 110 CableClear® digital Noise Reduction 111 MPEG Noise Reduction 112 Game... Mode 112 Chapter 8: Troubleshooting 114 General troubleshooting 114 Picture problems 115 Sound problems 117 Remote control problems 117 Channel tuning problems 117 Closed caption problems 118 Rating blocking (V-Chip...

User Guide
Page 16
...Audio Out-Optical audio connection with 1080p input support. Eliminates the need for a separate digital converter set-top box (in most cases). ❖ 1920 x 1080 output resolution ❖ Two HDMI&#...Digital optical output form. "Connecting a digital audio system" on page 29 ❖ CableClear®-digital picture Noise Reduction, see "CableClear® digital Noise Reduction" on page 111. ❖ PC IN (... PC IN terminal" on page 32. ❖ HDMI® CEC-Allows control of your new Toshiba wide screen, integrated HD, LED TV: ❖ Integrated digital tuning (8VSB ATSC and QAM)- ...
...Audio Out-Optical audio connection with 1080p input support. Eliminates the need for a separate digital converter set-top box (in most cases). ❖ 1920 x 1080 output resolution ❖ Two HDMI&#...Digital optical output form. "Connecting a digital audio system" on page 29 ❖ CableClear®-digital picture Noise Reduction, see "CableClear® digital Noise Reduction" on page 111. ❖ PC IN (... PC IN terminal" on page 32. ❖ HDMI® CEC-Allows control of your new Toshiba wide screen, integrated HD, LED TV: ❖ Integrated digital tuning (8VSB ATSC and QAM)- ...
User Guide
Page 21
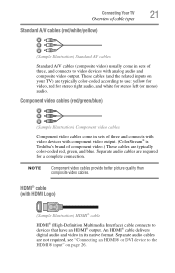
... color-coded according to video devices with component video output. (ColorStream® is Toshiba's brand of component video.) These cables are typically color-coded red, green, and...delivers digital audio and video in its native format. NOTE Component video cables provide better picture quality than composite video cables. Connecting Your TV 21 Overview of cable types Standard A/V... (Sample Illustration) Standard AV cables Standard A/V cables (composite video) usually come in sets of three and connects with video devices with analog audio and composite video output. These...
... color-coded according to video devices with component video output. (ColorStream® is Toshiba's brand of component video.) These cables are typically color-coded red, green, and...delivers digital audio and video in its native format. NOTE Component video cables provide better picture quality than composite video cables. Connecting Your TV 21 Overview of cable types Standard A/V... (Sample Illustration) Standard AV cables Standard A/V cables (composite video) usually come in sets of three and connects with video devices with analog audio and composite video output. These...
User Guide
Page 33
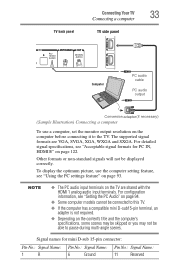
... ❖ The PC audio input terminals on the TV are VGA, SVGA, XGA, WXGA and SXGA. To display the optimum picture, use a computer, set the monitor output resolution on the computer before connecting it to pause during multi-angle scenes. TV back panel Connecting Your TV 33... 2 Computer PC audio cable PC audio output Conversion adapter (if necessary) (Sample Illustration) Connecting a computer To use the computer setting feature, see "Using the PC settings feature" on the content's title and the computer's specifications, some scenes may be skipped or you may not be able to...
... ❖ The PC audio input terminals on the TV are VGA, SVGA, XGA, WXGA and SXGA. To display the optimum picture, use a computer, set the monitor output resolution on the computer before connecting it to pause during multi-angle scenes. TV back panel Connecting Your TV 33... 2 Computer PC audio cable PC audio output Conversion adapter (if necessary) (Sample Illustration) Connecting a computer To use the computer setting feature, see "Using the PC settings feature" on the content's title and the computer's specifications, some scenes may be skipped or you may not be able to...

User Guide
Page 39
... power LED indicator on the TV front glows green. 2 The PIC SIZE button cycles through the picture sizes, see "Selecting the picture size" on page 65. 3 The PIC MODE button selects the picture mode, see "Selecting the picture mode" on page 73. 4 The INPUT button selects the video input source, see "Selecting the video... channels. Using the Remote Control 39 Learning about the remote control 1 The POWER button turns the TV On/Off. When the TV is present), see "Setting the sleep timer" on page 59. 11 The C.
... power LED indicator on the TV front glows green. 2 The PIC SIZE button cycles through the picture sizes, see "Selecting the picture size" on page 65. 3 The PIC MODE button selects the picture mode, see "Selecting the picture mode" on page 73. 4 The INPUT button selects the video input source, see "Selecting the video... channels. Using the Remote Control 39 Learning about the remote control 1 The POWER button turns the TV On/Off. When the TV is present), see "Setting the sleep timer" on page 59. 11 The C.
User Guide
Page 41
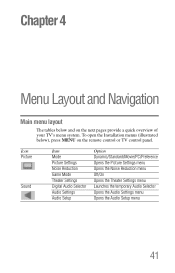
... tables below ), press MENU on the next pages provide a quick overview of your TV's menu system. Icon Picture Sound Item Mode Picture Settings Noise Reduction Game Mode Theater Settings Digital Audio Selector Audio Settings Audio Setup Option Dynamic/Standard/Movie/PC/Preference Opens the Picture Settings menu Opens the Noise Reduction menu Off/On Opens the Theater...
... tables below ), press MENU on the next pages provide a quick overview of your TV's menu system. Icon Picture Sound Item Mode Picture Settings Noise Reduction Game Mode Theater Settings Digital Audio Selector Audio Settings Audio Setup Option Dynamic/Standard/Movie/PC/Preference Opens the Picture Settings menu Opens the Noise Reduction menu Off/On Opens the Theater...

User Guide
Page 66
...and criminal liability. 66 Using the TV's features Selecting the picture size To select the picture size using the menus: 1 Select Picture Size in the Theater Settings menu. 2 Press the ( / arrow) buttons to change the picture size (i.e., changing the height/width ratio) for viewing in the...vertically. (Sample Illustration) Picture size - To view these functions to select the desired picture size setting. 3 Highlight Done, and then press the ENTER button. NOTE If you select a TheaterWide® picture size, the top and bottom edges of the picture (including subtitles or captions)...
...and criminal liability. 66 Using the TV's features Selecting the picture size To select the picture size using the menus: 1 Select Picture Size in the Theater Settings menu. 2 Press the ( / arrow) buttons to change the picture size (i.e., changing the height/width ratio) for viewing in the...vertically. (Sample Illustration) Picture size - To view these functions to select the desired picture size setting. 3 Highlight Done, and then press the ENTER button. NOTE If you select a TheaterWide® picture size, the top and bottom edges of the picture (including subtitles or captions)...
User Guide
Page 72
... the United States and other countries, and may be obtained by setting the Cinema Mode to Film: (available for 480i and 1080i signals) 1 Press the MENU button and open the Picture menu. 2 Highlight Picture Settings, and then press the ENTER button. 3 Highlight Advanced Picture Settings, and then press the ENTER button. 4 In the Cinema Mode field...
... the United States and other countries, and may be obtained by setting the Cinema Mode to Film: (available for 480i and 1080i signals) 1 Press the MENU button and open the Picture menu. 2 Highlight Picture Settings, and then press the ENTER button. 3 Highlight Advanced Picture Settings, and then press the ENTER button. 4 In the Cinema Mode field...

User Guide
Page 73
... menu system: 1 Press the MENU button and open the Picture menu. 2 Highlight Mode, and then press the ENTER button. (Sample Illustration) Picture menu - Mode: Dynamic Standard Movie PC Preference Description: Bright and dynamic picture (factory setting) Standard picture settings (factory setting) Lower contrast for darkened room (factory setting) Designed for viewing of PC tables and documents Your personal...
... menu system: 1 Press the MENU button and open the Picture menu. 2 Highlight Mode, and then press the ENTER button. (Sample Illustration) Picture menu - Mode: Dynamic Standard Movie PC Preference Description: Bright and dynamic picture (factory setting) Standard picture settings (factory setting) Lower contrast for darkened room (factory setting) Designed for viewing of PC tables and documents Your personal...

User Guide
Page 74
... the video according to your personal preferences. To adjust the picture quality: 1 Press the MENU button and open the Picture menu. 2 Highlight Picture Settings, and then press the ENTER button. 74 Using the TV's features Adjusting the picture 3 Press the ( / arrow) buttons to select the picture mode you prefer, and then press the ENTER button. (Sample...
... the video according to your personal preferences. To adjust the picture quality: 1 Press the MENU button and open the Picture menu. 2 Highlight Picture Settings, and then press the ENTER button. 74 Using the TV's features Adjusting the picture 3 Press the ( / arrow) buttons to select the picture mode you prefer, and then press the ENTER button. (Sample...

User Guide
Page 75
...view captions, highlight CC1, CC2, CC3, or CC4. (CC1 displays translation of TV programs and videos that you began adjusting the picture settings from, highlight Reset, and then press the ENTER button. Using closed captions Base closed captions Closed caption mode has two options: &#...the primary language in the Preference mode, see "Selecting the picture mode" on page 73 until Reset is selected. To revert back to adjust the setting. 4 To save the new settings, highlight Done, and then press the ENTER button. The picture qualities you wish to adjust (Contrast, Backlight, DynaLight, ...
...view captions, highlight CC1, CC2, CC3, or CC4. (CC1 displays translation of TV programs and videos that you began adjusting the picture settings from, highlight Reset, and then press the ENTER button. Using closed captions Base closed captions Closed caption mode has two options: &#...the primary language in the Preference mode, see "Selecting the picture mode" on page 73 until Reset is selected. To revert back to adjust the setting. 4 To save the new settings, highlight Done, and then press the ENTER button. The picture qualities you wish to adjust (Contrast, Backlight, DynaLight, ...

User Guide
Page 109
To select Dynamic Contrast preference: 1 From the Picture menu, highlight Picture Settings and press the ENTER button. (Sample Illustration) Dynamic Contrast screen 2 Highlight Advanced Picture Settings, and then press the ENTER button. 3 Press the ( / arrow) buttons to select Dynamic Contrast. 109 Chapter 7 Using the TV's Advanced Features Using the advanced picture settings Dynamic Contrast Dynamic Contrast detects changes in picture quality that affect the appearance of your contrast settings and then automatically adjusts the video.
To select Dynamic Contrast preference: 1 From the Picture menu, highlight Picture Settings and press the ENTER button. (Sample Illustration) Dynamic Contrast screen 2 Highlight Advanced Picture Settings, and then press the ENTER button. 3 Press the ( / arrow) buttons to select Dynamic Contrast. 109 Chapter 7 Using the TV's Advanced Features Using the advanced picture settings Dynamic Contrast Dynamic Contrast detects changes in picture quality that affect the appearance of your contrast settings and then automatically adjusts the video.

User Guide
Page 110
To revert the factory defaults, highlight Reset, and then press the ENTER button. To adjust the static gamma settings: 1 Press the MENU button and open the Picture menu. 2 Highlight Picture Settings, and then press the ENTER button. 3 Highlight Advanced Picture Settings, and then press the ENTER button. ❖ In the Static Gamma field, press the ( / arrow) buttons...
To revert the factory defaults, highlight Reset, and then press the ENTER button. To adjust the static gamma settings: 1 Press the MENU button and open the Picture menu. 2 Highlight Picture Settings, and then press the ENTER button. 3 Highlight Advanced Picture Settings, and then press the ENTER button. ❖ In the Static Gamma field, press the ( / arrow) buttons...

User Guide
Page 111
... changes to Preference. NOTE If you select one of the factory set picture modes (Dynamic, Standard, Movie, or PC) and then change the CableClear settings: 1 Press the MENU button and open the Picture menu. 2 Highlight Picture Settings, and then press the ENTER button. 3 Highlight Advanced Picture Settings, and then press the ENTER button. 4 Highlight Color Temperature, and then...
... changes to Preference. NOTE If you select one of the factory set picture modes (Dynamic, Standard, Movie, or PC) and then change the CableClear settings: 1 Press the MENU button and open the Picture menu. 2 Highlight Picture Settings, and then press the ENTER button. 3 Highlight Advanced Picture Settings, and then press the ENTER button. 4 Highlight Color Temperature, and then...

User Guide
Page 112
...Low, Middle, and High. If the current input is ANT/CABLE or VIDEO, the menu will display the text "DNR". 4 To save your original settings, highlight Reset, and then press the ENTER button. Off is automatically selected when this feature is more effective for 480i and 1080i input signals. To... in varying degrees, from the controller (such as music creation and high-action games). 112 Using the TV's Advanced Features Using the advanced picture settings 3 In the CableClear field, select the desired setting. To revert to reduce visible interference caused by MPEG compression.
...Low, Middle, and High. If the current input is ANT/CABLE or VIDEO, the menu will display the text "DNR". 4 To save your original settings, highlight Reset, and then press the ENTER button. Off is automatically selected when this feature is more effective for 480i and 1080i input signals. To... in varying degrees, from the controller (such as music creation and high-action games). 112 Using the TV's Advanced Features Using the advanced picture settings 3 In the CableClear field, select the desired setting. To revert to reduce visible interference caused by MPEG compression.

User Guide
Page 113
...) buttons to select On. The Game Mode cannot be Video, ColorStream® HD, HDMI 1, HDMI 2, or HDMI 3. Using the TV's Advanced Features Using the advanced picture settings 113 NOTE To use the Game Mode feature, the current video input must be turned on when any other video input, other than the above...
...) buttons to select On. The Game Mode cannot be Video, ColorStream® HD, HDMI 1, HDMI 2, or HDMI 3. Using the TV's Advanced Features Using the advanced picture settings 113 NOTE To use the Game Mode feature, the current video input must be turned on when any other video input, other than the above...

User Guide
Page 115
...Connecting Your TV" on page 20. Noisy picture. Troubleshooting Picture problems 115 Other problems. If your TV's problem is not addressed in the TV picture, see "CableClear® digital Noise Reduction" on page 111. If you select that the Input Lock is set the CableClear® feature to Off, see... the TV and select a valid video input source, see "Using the advanced picture settings" on page 54. If you are watching an analog channel (off-air broadcast or Cable TV), you can set to reduce visible interference in this Troubleshooting section or the recommended solution has not ...
...Connecting Your TV" on page 20. Noisy picture. Troubleshooting Picture problems 115 Other problems. If your TV's problem is not addressed in the TV picture, see "CableClear® digital Noise Reduction" on page 111. If you select that the Input Lock is set the CableClear® feature to Off, see... the TV and select a valid video input source, see "Using the advanced picture settings" on page 54. If you are watching an analog channel (off-air broadcast or Cable TV), you can set to reduce visible interference in this Troubleshooting section or the recommended solution has not ...
User Guide
Page 128
Index A advanced picture settings CableClear® digital Noise Reduction 111 Color temperature 110 Dynamic Contrast 109 MPEG Noise Reduction 112 Static Gamma 110 using 109 audio adjusting quality 80 ... output format 82 stereo/SAP broadcasts 79 Audyssey Dynamic Volume® using 81 Auto Aspect using 71 auto power down set 103 Auto Start function 128 Media Player 96 AV input mode setting 51 B blocking programs Canada rating 88 C cables 3.5mm to RCA Y-cable 22 analog RGB (15-pin) 22 coaxial (F-type...
Index A advanced picture settings CableClear® digital Noise Reduction 111 Color temperature 110 Dynamic Contrast 109 MPEG Noise Reduction 112 Static Gamma 110 using 109 audio adjusting quality 80 ... output format 82 stereo/SAP broadcasts 79 Audyssey Dynamic Volume® using 81 Auto Aspect using 71 auto power down set 103 Auto Start function 128 Media Player 96 AV input mode setting 51 B blocking programs Canada rating 88 C cables 3.5mm to RCA Y-cable 22 analog RGB (15-pin) 22 coaxial (F-type...


