
User's Guide for L1350U and L2300U Series TV's
Page 6
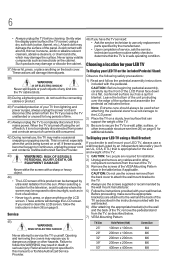
... For added protection of the VESA Mounting Pattern show in the table below, if applicable. Never attempt to a Toshiba Authorized Service Provider. To Display your TV from lightning and power surges, always unplug the power cord and disconnect the antenna from the back cover to attach ...Screw Size 23" 100mm x 100mm M4 29" 200mm x 100mm M6 32" 200mm x 200mm M6 39" 200mm x 200mm M6 50" 400mm x 400mm M8 Failure to the TV. 4) Always use only replacement parts specified by the wall mount manufacturer. 5) Follow the instructions provided with the pedestal. Refer all ...
... For added protection of the VESA Mounting Pattern show in the table below, if applicable. Never attempt to a Toshiba Authorized Service Provider. To Display your TV from lightning and power surges, always unplug the power cord and disconnect the antenna from the back cover to attach ...Screw Size 23" 100mm x 100mm M4 29" 200mm x 100mm M6 32" 200mm x 200mm M6 39" 200mm x 200mm M6 50" 400mm x 400mm M8 Failure to the TV. 4) Always use only replacement parts specified by the wall mount manufacturer. 5) Follow the instructions provided with the pedestal. Refer all ...
User's Guide for L1350U and L2300U Series TV's
Page 7
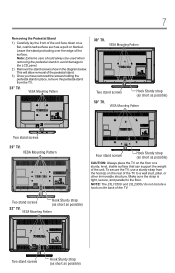
...holding the pedestal stand in the diagram below. VESA Mounting Pattern Two stand screws Hook Sturdy strap (as short as possible) 32" TV. VESA Mounting Pattern 39" TV. Make sure the strap is tight, secure, and parallel to the LCD panel. 2) Remove the stand screws show in place,... of the unit. VESA Mounting Pattern Four stand screws Hook Sturdy strap (as short as possible) CAUTION: Always place the TV on a flat, cushioned surface such as possible) 50" TV. VESA Mounting Pattern Two stand screws Hook Sturdy strap (as short as a quilt or blanket. Note: Extreme care should...
...holding the pedestal stand in the diagram below. VESA Mounting Pattern Two stand screws Hook Sturdy strap (as short as possible) 32" TV. VESA Mounting Pattern 39" TV. Make sure the strap is tight, secure, and parallel to the LCD panel. 2) Remove the stand screws show in place,... of the unit. VESA Mounting Pattern Four stand screws Hook Sturdy strap (as short as possible) CAUTION: Always place the TV on a flat, cushioned surface such as possible) 50" TV. VESA Mounting Pattern Two stand screws Hook Sturdy strap (as short as a quilt or blanket. Note: Extreme care should...

User's Guide for L1350U and L2300U Series TV's
Page 11
... Learning about the remote control 38 Chapter 4: Menu Layout and Navigation 41 Main menu layout 41 Navigating the menu system 43 Chapter 5: Setting up your TV 44 Initial Setup 44 Installation setup selection 45 Storing channels in memory (optional 46 Auto Tuning 46 Manual Tuning 48 Setting channel skip 48 Setting... the AV input mode 49 Setting the HDMITM audio mode 50 Setting the time zone 51 Viewing the system status 51 Resetting Factory Defaults 51 Chapter 6: Setting up your...
... Learning about the remote control 38 Chapter 4: Menu Layout and Navigation 41 Main menu layout 41 Navigating the menu system 43 Chapter 5: Setting up your TV 44 Initial Setup 44 Installation setup selection 45 Storing channels in memory (optional 46 Auto Tuning 46 Manual Tuning 48 Setting channel skip 48 Setting... the AV input mode 49 Setting the HDMITM audio mode 50 Setting the time zone 51 Viewing the system status 51 Resetting Factory Defaults 51 Chapter 6: Setting up your...
User's Guide for L1350U and L2300U Series TV's
Page 27
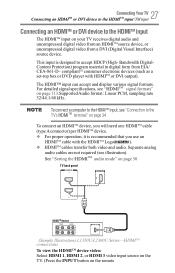
... is recommended that you will need one HDMITM cable (type A connector) per HDMITM device. See "Setting the HHDDMMIITTMM audio mode" on page 50 TV back panel HDMITM device (Sample Illustration) L1350U/L2300U Series-HDMITM connections To view the HDMITM device video: Select HDMI 1, HDMI 2, or...The HDMI™ input can accept and display various signal formats. v For proper operation, it is designed to the TV's HDMMIITTMM terminal" on your TV receives digital audio and uncompressed digital video from an HDMITM source device, or uncompressed digital video from EIA/ CEA-861-D- ...
... is recommended that you will need one HDMITM cable (type A connector) per HDMITM device. See "Setting the HHDDMMIITTMM audio mode" on page 50 TV back panel HDMITM device (Sample Illustration) L1350U/L2300U Series-HDMITM connections To view the HDMITM device video: Select HDMI 1, HDMI 2, or...The HDMI™ input can accept and display various signal formats. v For proper operation, it is designed to the TV's HDMMIITTMM terminal" on your TV receives digital audio and uncompressed digital video from an HDMITM source device, or uncompressed digital video from EIA/ CEA-861-D- ...
User's Guide for L1350U and L2300U Series TV's
Page 28
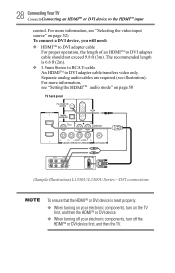
..., and then the HDMITM or DVI device. v When turning off the HDMITM or DVI device first, and then the TV. The recommended length is reset properly: v When turning on your electronic components, turn off your electronic components, turn on page 52) To connect a DVI device,... to RCA Y-cable An HDMITM to DVI adapter cable should not exceed 9.8 ft (3m). For more information, see "Setting the HDDMMIITTMM audio mode" on page 50 TV back panel VIDEO AUDIO L R IN IN OUT L R DVI / HDCP OUT (Sample Illustration) L1350U/L2300U Series-DVI connections To ensure that the HDMITM or DVI ...
..., and then the HDMITM or DVI device. v When turning off the HDMITM or DVI device first, and then the TV. The recommended length is reset properly: v When turning on your electronic components, turn off your electronic components, turn on page 52) To connect a DVI device,... to RCA Y-cable An HDMITM to DVI adapter cable should not exceed 9.8 ft (3m). For more information, see "Setting the HDDMMIITTMM audio mode" on page 50 TV back panel VIDEO AUDIO L R IN IN OUT L R DVI / HDCP OUT (Sample Illustration) L1350U/L2300U Series-DVI connections To ensure that the HDMITM or DVI ...
User's Guide for L1350U and L2300U Series TV's
Page 101
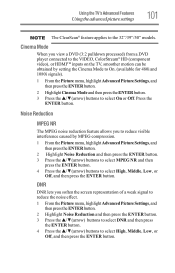
... pulldown processed) from a DVD player connected to the VIDEO, ColorStream® HD (component video), or HDMITM inputs on the TV, smoother motion can be obtained by MPEG compression. 1 From the Picture menu, highlight Advanced Picture Settings, and then press the ...select High, Middle, Low, or Off, and then press the ENTER button. Press the ENTER button. Using the TV's Advanced Features Using the advanced picture settings 101 The ClearScan® feature applies to select On or Off. Noise Reduction...the ENTER button. 3 Press the /▼(arrow) buttons to the 32"/39"/50" models.
... pulldown processed) from a DVD player connected to the VIDEO, ColorStream® HD (component video), or HDMITM inputs on the TV, smoother motion can be obtained by MPEG compression. 1 From the Picture menu, highlight Advanced Picture Settings, and then press the ...select High, Middle, Low, or Off, and then press the ENTER button. Press the ENTER button. Using the TV's Advanced Features Using the advanced picture settings 101 The ClearScan® feature applies to select On or Off. Noise Reduction...the ENTER button. 3 Press the /▼(arrow) buttons to the 32"/39"/50" models.
User's Guide for L1350U and L2300U Series TV's
Page 106
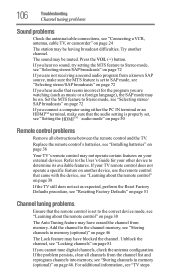
... specific feature on another channel. 106 Troubleshooting Channel tuning problems Sound problems Check the antenna/cable connections, see "Connecting a VCR, antenna, cable TV, or camcorder" on page 24 The station may be on. Set the MTS feature to Stereo mode, see "Selecting stereo/ SAP broadcasts" ...make sure that the remote control is properly set, see "Setting the HDMITTMM audio mode" on page 50 Remote control problems Remove all obstructions between the remote control and the TV. Try another device, use the remote control that came with the device, see "Learning about the ...
... specific feature on another channel. 106 Troubleshooting Channel tuning problems Sound problems Check the antenna/cable connections, see "Connecting a VCR, antenna, cable TV, or camcorder" on page 24 The station may be on. Set the MTS feature to Stereo mode, see "Selecting stereo/ SAP broadcasts" ...make sure that the remote control is properly set, see "Setting the HDMITTMM audio mode" on page 50 Remote control problems Remove all obstructions between the remote control and the TV. Try another device, use the remote control that came with the device, see "Learning about the ...
Resource Guide for L1350U Series TV's
Page 1
...TV yourself. To Display your LED TV, always use only replacement parts specified by the display TOSHIBA Cares! Leave the stand protruding over time from the TV, as described on this instruction document. 7) VESA Mounting Pattern TV Size Hole Pattern (HxV) Screw Size 23L1350U 29L1350U 32L1350U 39L1350U 50L1350U.... 24) When selecting a location for the size and weight of the TV: 1) CAUTION: Two people are on the back of the TV. 23" TV 29" TV 32" TV VESA Mounting Pattern 39" TV 50" TV GMA501162010 • 12/12 Record these recommendations and precautions and heed all ...
...TV yourself. To Display your LED TV, always use only replacement parts specified by the display TOSHIBA Cares! Leave the stand protruding over time from the TV, as described on this instruction document. 7) VESA Mounting Pattern TV Size Hole Pattern (HxV) Screw Size 23L1350U 29L1350U 32L1350U 39L1350U 50L1350U.... 24) When selecting a location for the size and weight of the TV: 1) CAUTION: Two people are on the back of the TV. 23" TV 29" TV 32" TV VESA Mounting Pattern 39" TV 50" TV GMA501162010 • 12/12 Record these recommendations and precautions and heed all ...


