

Owners Manual
Page 2
...lightning symbol in the triangle tells you that children can become excited while watching a program and can become permanently engrained in the picture tube. NOTICE OF POSSIBLE TV STAND INSTABILITY DANGER: RISK OF SERIOUS PERSONAL INJURY OR DEATH! however, they are improperly secured or... is committed to Article 820-40 of your home. As a result, TVs may result in instability, causing possible injury or death. Toshiba Cares! The Consumer Electronics Association formed the Home Entertainment Support Safety Committee, comprised of time, the image can potentially push or pull a...
...lightning symbol in the triangle tells you that children can become excited while watching a program and can become permanently engrained in the picture tube. NOTICE OF POSSIBLE TV STAND INSTABILITY DANGER: RISK OF SERIOUS PERSONAL INJURY OR DEATH! however, they are improperly secured or... is committed to Article 820-40 of your home. As a result, TVs may result in instability, causing possible injury or death. Toshiba Cares! The Consumer Electronics Association formed the Home Entertainment Support Safety Committee, comprised of time, the image can potentially push or pull a...

Owners Manual
Page 4
... a ladder or screwdriver) can make the picture appear distorted or the color appear faded. This can accidentally touch overhead power lines. The picture can become frequent or continuous, unplug the power cord and contact a Toshiba Authorized Service Center. Never use liquid or ...to allow the condensation to check for reflections on or off to evaporate. 31) For added protection of your TOSHIBA TV, follow these sounds become permanently engrained in a picture tube implosion and possible personal injury. 0303 4 or b) cables, wires, or any of the following formats ...
... a ladder or screwdriver) can make the picture appear distorted or the color appear faded. This can accidentally touch overhead power lines. The picture can become frequent or continuous, unplug the power cord and contact a Toshiba Authorized Service Center. Never use liquid or ...to allow the condensation to check for reflections on or off to evaporate. 31) For added protection of your TOSHIBA TV, follow these sounds become permanently engrained in a picture tube implosion and possible personal injury. 0303 4 or b) cables, wires, or any of the following formats ...

Owners Manual
Page 5
Important Safety Information 2-4 Introduction 6 Welcome to Toshiba 6 Exploring your new TV 6 Note regarding Quick Connect Guide 6 Connecting your TV 7 Connecting a VCR 7 Connecting a cable converter box 8 Connecting a cable converter box and VCR 8 Connecting... ..... 42 Using the flesh tone feature 43 Using the CableClear™ DNR (digital noise reduction) feature 43 Selecting the color temperature 43 Resetting your picture adjustments 44 Selecting the cinema mode 44 Selecting the video input source 45 Labeling the video input sources 45 Using the closed caption feature 46...
Important Safety Information 2-4 Introduction 6 Welcome to Toshiba 6 Exploring your new TV 6 Note regarding Quick Connect Guide 6 Connecting your TV 7 Connecting a VCR 7 Connecting a cable converter box 8 Connecting a cable converter box and VCR 8 Connecting... ..... 42 Using the flesh tone feature 43 Using the CableClear™ DNR (digital noise reduction) feature 43 Selecting the color temperature 43 Resetting your picture adjustments 44 Selecting the cinema mode 44 Selecting the video input source 45 Labeling the video input sources 45 Using the closed caption feature 46...

Owners Manual
Page 7
... When connecting video equipment to your Toshiba TV: ● For GOOD picture quality: Use a standard yellow video cable. ● For BETTER picture quality: If your equipment has an S-video input, use : yellow for video, red for stereo right audio, and white for use with S-video...● Component video cables come in any power cords until you have finished connecting all equipment. You will be unacceptable.) ● For BEST picture quality: If your TV Using the TV's Features Appendix Connecting a VCR This connection allows you to watch local channels and video programs, play or...
... When connecting video equipment to your Toshiba TV: ● For GOOD picture quality: Use a standard yellow video cable. ● For BETTER picture quality: If your equipment has an S-video input, use : yellow for video, red for stereo right audio, and white for use with S-video...● Component video cables come in any power cords until you have finished connecting all equipment. You will be unacceptable.) ● For BEST picture quality: If your TV Using the TV's Features Appendix Connecting a VCR This connection allows you to watch local channels and video programs, play or...

Owners Manual
Page 8
... ANT-1. You will be unacceptable. Do not connect a standard video cable and an S-video cable to Video-1 (or Video-2) at the same time, or the picture performance will need : • three coaxial cables TV AUDIO CENTER CHANNEL IN DVI/HDCP IN S-VIDEO OUT VAR AUDIO R L ON OFF IN For DVI/HDCP...
... ANT-1. You will be unacceptable. Do not connect a standard video cable and an S-video cable to Video-1 (or Video-2) at the same time, or the picture performance will need : • three coaxial cables TV AUDIO CENTER CHANNEL IN DVI/HDCP IN S-VIDEO OUT VAR AUDIO R L ON OFF IN For DVI/HDCP...

Owners Manual
Page 9
... Remote Control Connecting a DVD player or satellite receiver and a VCR This connection allows you to VIDEO-1 (or VIDEO-2) at the same time or the picture performance will need: • two (or three, if satellite receiver is used) coaxial cables • one set of A/V jacks on the TV. ... OUT OUT AUDIO OUT L R DVD/Player IN from ANT S-VIDEO VIDEO OUT OUT Satellite Receiver AUDIO OUT L R Note: For the highest possible picture quality from ANT OUT to civil and criminal liability. If your satellite receiver has component video, see page 10. You will be unacceptable. Setting up...
... Remote Control Connecting a DVD player or satellite receiver and a VCR This connection allows you to VIDEO-1 (or VIDEO-2) at the same time or the picture performance will need: • two (or three, if satellite receiver is used) coaxial cables • one set of A/V jacks on the TV. ... OUT OUT AUDIO OUT L R DVD/Player IN from ANT S-VIDEO VIDEO OUT OUT Satellite Receiver AUDIO OUT L R Note: For the highest possible picture quality from ANT OUT to civil and criminal liability. If your satellite receiver has component video, see page 10. You will be unacceptable. Setting up...

Owners Manual
Page 10
... channel to watch DVD, VCR, and TV programs, and record TV programs. Your TV has ColorStream® (component video) inputs. You will provide the best picture performance. The unauthorized recording, use component video cables (or a DVI-D digital single-link cable) between the TV and DVD player. AUDIO CENTER CHANNEL IN DVI...component video Setting up your TV Using the TV's Features Appendix Index 10 Introduction Connecting your TV to a DVD player with component video (such as a Toshiba DVD player with Progressive (480p, 720p) and Interlaced (480i,1080i) scan systems;
... channel to watch DVD, VCR, and TV programs, and record TV programs. Your TV has ColorStream® (component video) inputs. You will provide the best picture performance. The unauthorized recording, use component video cables (or a DVI-D digital single-link cable) between the TV and DVD player. AUDIO CENTER CHANNEL IN DVI...component video Setting up your TV Using the TV's Features Appendix Index 10 Introduction Connecting your TV to a DVD player with component video (such as a Toshiba DVD player with Progressive (480p, 720p) and Interlaced (480i,1080i) scan systems;

Owners Manual
Page 11
... from ANT OUT to record, and select ColorStream HD2 on the TV. - You will provide the best picture performance. The ColorStream HD1/HD2 and DVI/HDCP jacks can greatly enhance picture quality and realism. - You can connect component video cables to watch . If your TV Connecting a DTV...you to record, and select VIDEO 1 on the TV. - To record one set of component video cables Note: For the highest possible picture quality, use the S-video connections (plus the standard audio connections) instead (see page 9). Introduction Connecting your TV Using the Remote Control ...
... from ANT OUT to record, and select ColorStream HD2 on the TV. - You will provide the best picture performance. The ColorStream HD1/HD2 and DVI/HDCP jacks can greatly enhance picture quality and realism. - You can connect component video cables to watch . If your TV Connecting a DTV...you to record, and select VIDEO 1 on the TV. - To record one set of component video cables Note: For the highest possible picture quality, use the S-video connections (plus the standard audio connections) instead (see page 9). Introduction Connecting your TV Using the Remote Control ...

Owners Manual
Page 12
... Using the Remote Control Connecting two VCRs This connection allows you to watch video materials recorded on the TV at the same time, or the picture performance will need : • one set of standard A/V cables Note: If you to the output and input jacks on a camcorder. Introduction Connecting your ...United States and other countries, and may subject you have a camcorder with S-video, use an S-video cable instead of either the Main or POP picture (see "Selecting the antenna input" on page 51). Do not connect a standard video cable and an S-video cable at the same time, or the...
... Using the Remote Control Connecting two VCRs This connection allows you to watch video materials recorded on the TV at the same time, or the picture performance will need : • one set of standard A/V cables Note: If you to the output and input jacks on a camcorder. Introduction Connecting your ...United States and other countries, and may subject you have a camcorder with S-video, use an S-video cable instead of either the Main or POP picture (see "Selecting the antenna input" on page 51). Do not connect a standard video cable and an S-video cable at the same time, or the...

Owners Manual
Page 13
... your electronic components, turn on your TV is designed to and should not exceed 3m (9.8 ft). You will accept and display 480p, 720p, and 480i picture signals. TV AUDIO CENTER CHANNEL IN DVI/HDCP IN S-VIDEO OUT VAR AUDIO R L ON OFF IN For DVI/HDCP R L VIDEO Y L / MONO AUDIO R PB L PR R COLOR...
... your electronic components, turn on your TV is designed to and should not exceed 3m (9.8 ft). You will accept and display 480p, 720p, and 480i picture signals. TV AUDIO CENTER CHANNEL IN DVI/HDCP IN S-VIDEO OUT VAR AUDIO R L ON OFF IN For DVI/HDCP R L VIDEO Y L / MONO AUDIO R PB L PR R COLOR...

Owners Manual
Page 19
... sets programmed menu information (page 20) y z x • select or adjust programming menus (page 20) POP Channel y z selects the POP (picture-out-picture) channel (page 33) FAV z y cycles through favorite channels (page 27) FAVORITE allows access to the favorite channel search function (page 34) PIC ...SIZE cycles through the five picture sizes: Normal, Theater Wide 1, 2, 3, and Full (page 29) C.CAPT allows access to closed caption menu (page 46) EXIT exits programming ...
... sets programmed menu information (page 20) y z x • select or adjust programming menus (page 20) POP Channel y z selects the POP (picture-out-picture) channel (page 33) FAV z y cycles through favorite channels (page 27) FAVORITE allows access to the favorite channel search function (page 34) PIC ...SIZE cycles through the five picture sizes: Normal, Theater Wide 1, 2, 3, and Full (page 29) C.CAPT allows access to closed caption menu (page 46) EXIT exits programming ...

Owners Manual
Page 23
... you through the setup according to the guide displayed on . Introduction Connecting your TV Using the TV's Features Appendix ▼ ▼ Index Clock setting ▼ Picture mode selection ▼ Basic setup has been completed 23 Press x or • to highlight ADD/ERASE. 1 2 3 4 5 6 7 8 9 10 11 12 13 14 15 16 17 18...
... you through the setup according to the guide displayed on . Introduction Connecting your TV Using the TV's Features Appendix ▼ ▼ Index Clock setting ▼ Picture mode selection ▼ Basic setup has been completed 23 Press x or • to highlight ADD/ERASE. 1 2 3 4 5 6 7 8 9 10 11 12 13 14 15 16 17 18...

Owners Manual
Page 24
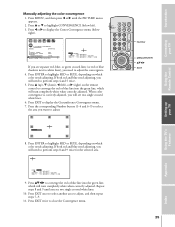
... Number buttons (0-9 and 100). Repeatedly press or hold Channel y or z for at least 30 minutes. Release the button to form a full-color picture. You can see a clear picture only when the three images converge correctly. Press and hold Channel y or z while the SpeedSurf mode is complete, the normal... picture appears. Adjusting the color convergence This projection TV uses three separate TV tubes: red, green, and blue. Using the TV's Features Appendix...
... Number buttons (0-9 and 100). Repeatedly press or hold Channel y or z for at least 30 minutes. Release the button to form a full-color picture. You can see a clear picture only when the three images converge correctly. Press and hold Channel y or z while the SpeedSurf mode is complete, the normal... picture appears. Adjusting the color convergence This projection TV uses three separate TV tubes: red, green, and blue. Using the TV's Features Appendix...
Owners Manual
Page 25
... to converge the red or blue line into the green line, which will see two single crossed white lines. 10. Repeat steps 8 and 9 until the PICTURE menu appears. 2. Press y (up your TV Using the Remote Control Setting up ), z (down), x (left ). 3. Press yzx • to adjust. 1 2 3 4 5 6 7 8 9 10 11 12 13 14 15...
... to converge the red or blue line into the green line, which will see two single crossed white lines. 10. Repeat steps 8 and 9 until the PICTURE menu appears. 2. Press y (up your TV Using the Remote Control Setting up ), z (down), x (left ). 3. Press yzx • to adjust. 1 2 3 4 5 6 7 8 9 10 11 12 13 14 15...

Owners Manual
Page 27
... • to enter one of your favorite channels. 5. Connecting your TV Using the Remote Control Setting up your TV To select your favorite channels in a 9-picture multiwindow: Press FAVORITE (see page 34). Press y or z to clear, and then press ENTER. 1 2 3 4 5 6 7 8 9 10 11 12 13 14 15 16 17 18 19 20...
... • to enter one of your favorite channels. 5. Connecting your TV Using the Remote Control Setting up your TV To select your favorite channels in a 9-picture multiwindow: Press FAVORITE (see page 34). Press y or z to clear, and then press ENTER. 1 2 3 4 5 6 7 8 9 10 11 12 13 14 15 16 17 18 19 20...

Owners Manual
Page 29
... 15 16 17 18 19 20 21 22 23 24 25 26 27 28 29 30 31 32 33 34 35 Viewing the wide-screen picture formats You can become permanently engrained in a variety of damage is NOT COVERED BY YOUR WARRANTY because it is on-screen, you can select the... desired picture size by pressing the corresponding number button. • 480i/480p signal source : 0-4 • 1080i signal source : 0-3 STILL LOCATE SWAP NOTICE OF POSSIBLE ADVERSE EFFECTS ON...
... 15 16 17 18 19 20 21 22 23 24 25 26 27 28 29 30 31 32 33 34 35 Viewing the wide-screen picture formats You can become permanently engrained in a variety of damage is NOT COVERED BY YOUR WARRANTY because it is on-screen, you can select the... desired picture size by pressing the corresponding number button. • 480i/480p signal source : 0-4 • 1080i signal source : 0-3 STILL LOCATE SWAP NOTICE OF POSSIBLE ADVERSE EFFECTS ON...

Owners Manual
Page 30
...20 21 22 23 24 25 26 27 28 29 30 31 32 33 34 35 NOTICE OF POSSIBLE ADVERSE EFFECTS ON TV PICTURE TUBE Avoid displaying stationary images on page 4. Introduction Connecting your TV Using the Remote Control Theater Wide 1 • Theater Wide 1 enlarges the... change the Theater Wide 1, 2, 3 using the menu system. See item 33 on your TV Using the TV's Features Appendix Index 30 A B C D E F G Wide-screen picture on page 32. Fixed (non-moving) images (such as the "letter box" format, with subtitles on a conventional TV screen Theater Wide 1 Theater Wide 2 • Theater...
...20 21 22 23 24 25 26 27 28 29 30 31 32 33 34 35 NOTICE OF POSSIBLE ADVERSE EFFECTS ON TV PICTURE TUBE Avoid displaying stationary images on page 4. Introduction Connecting your TV Using the Remote Control Theater Wide 1 • Theater Wide 1 enlarges the... change the Theater Wide 1, 2, 3 using the menu system. See item 33 on your TV Using the TV's Features Appendix Index 30 A B C D E F G Wide-screen picture on page 32. Fixed (non-moving) images (such as the "letter box" format, with subtitles on a conventional TV screen Theater Wide 1 Theater Wide 2 • Theater...

Owners Manual
Page 31
... TV is turned on or the TV/VIDEO button is the result of misuse. Note: To view the hidden areas, see "Scrolling the Theater Wide picture" on page 32. A B C D E F G Poster frame signal with subtitles. Conventional signal Theater Wide 1 Theater Wide 2 Select Theater Wide 2 to view...poster frame signal with subtitles A B C D E F G Theater Wide 3 Note: A 720p signal source can become permanently engrained in the picture tube. Introduction Connecting your TV Using the Remote Control Receiving a 1080i signal source Natural Select Natural size to view a conventional 1080i source in ...
... TV is turned on or the TV/VIDEO button is the result of misuse. Note: To view the hidden areas, see "Scrolling the Theater Wide picture" on page 32. A B C D E F G Poster frame signal with subtitles. Conventional signal Theater Wide 1 Theater Wide 2 Select Theater Wide 2 to view...poster frame signal with subtitles A B C D E F G Theater Wide 3 Note: A 720p signal source can become permanently engrained in the picture tube. Introduction Connecting your TV Using the Remote Control Receiving a 1080i signal source Natural Select Natural size to view a conventional 1080i source in ...

Owners Manual
Page 32
... +30 to -20 Wide 3 : +30 to select the Theater Wide 2 or 3 mode. 2. Setting up your TV Using the Remote Control Scrolling the Theater Wide picture (Theater Wide 2 and 3 only) 1. Press y or z to display the Scroll Adjustment mode. SCROL L AD JUSTMENT : TO ADJUST -20 NOTICE OF POSSIBLE ADVERSE... on your TV screen for extended periods of time. Press PIC SIZE to -20 SCROL L AD JUSTMENT : TO ADJUST +35 • To lower the picture, press z. Press MENU, and then press x or • until THEATER menu appears. 3. SCROL L AD JUSTMENT 0 : TO ADJUST 5. Introduction Connecting your...
... +30 to -20 Wide 3 : +30 to select the Theater Wide 2 or 3 mode. 2. Setting up your TV Using the Remote Control Scrolling the Theater Wide picture (Theater Wide 2 and 3 only) 1. Press y or z to display the Scroll Adjustment mode. SCROL L AD JUSTMENT : TO ADJUST -20 NOTICE OF POSSIBLE ADVERSE... on your TV screen for extended periods of time. Press PIC SIZE to -20 SCROL L AD JUSTMENT : TO ADJUST +35 • To lower the picture, press z. Press MENU, and then press x or • until THEATER menu appears. 3. SCROL L AD JUSTMENT 0 : TO ADJUST 5. Introduction Connecting your...

Owners Manual
Page 33
... program from the AUDIO CTV CABLE OUT jacks (see "Connecting your TV" on page 51). NOTICE OF POSSIBLE ADVERSE EFFECTS ON TV PICTURE TUBE Avoid displaying stationary images on page 4. This type of damage is NOT COVERED BY YOUR WARRANTY because it is on page 36).... come from an external source in the POP window: 1. Introduction Connecting your TV Using the Remote Control Using the POP double-window feature The POP (picture-out-picture) feature splits the screen into a double window that exceeds your set rating limits, the program will display in purple. 1 2 3 4 5 6 7 8 9 ...
... program from the AUDIO CTV CABLE OUT jacks (see "Connecting your TV" on page 51). NOTICE OF POSSIBLE ADVERSE EFFECTS ON TV PICTURE TUBE Avoid displaying stationary images on page 4. This type of damage is NOT COVERED BY YOUR WARRANTY because it is on page 36).... come from an external source in the POP window: 1. Introduction Connecting your TV Using the Remote Control Using the POP double-window feature The POP (picture-out-picture) feature splits the screen into a double window that exceeds your set rating limits, the program will display in purple. 1 2 3 4 5 6 7 8 9 ...

