Owner's Manual - English
Page 11
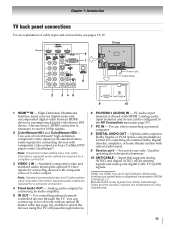
...174;. Standard (composite) video and standard audio inputs plus optional S-video inputs for connecting devices with component video output, such as a Toshiba DVD player with HDMI 1 analog audio input terminal, and its use can connect up to receive 1080p signals. 2 ColorStream HD1 and ...Dolby Digital decoder, amplifier, or home theater system with composite video or S-video output. Optical audio output in the AV Connection menu (- Chapter 1: Introduction TV back panel connections For an explanation of cable types and connections, see item 6. Analog audio outputs for updating the ...
...174;. Standard (composite) video and standard audio inputs plus optional S-video inputs for connecting devices with component video output, such as a Toshiba DVD player with HDMI 1 analog audio input terminal, and its use can connect up to receive 1080p signals. 2 ColorStream HD1 and ...Dolby Digital decoder, amplifier, or home theater system with composite video or S-video output. Optical audio output in the AV Connection menu (- Chapter 1: Introduction TV back panel connections For an explanation of cable types and connections, see item 6. Analog audio outputs for updating the ...

Owner's Manual - English
Page 18
...174; Digital decoder or other digital audio system LINE IN LR Optical Audio IN TV upper back panel To control the audio: 1 Turn on the TV and the digital audio device. 2 Press Y on page 53). AV Connection PC/HDMI 1 Audio HDMI 1 Audio HDMI Settings Digital Audio Output PC ... Laboratories. You will need : •standard audio cables Analog audio amplifier LINE IN LR TV upper back panel SETUP Menu Language ANT/CABLE In Auto Tuning Manual Tuning TV Settings Manual Setting AV Connection PC Settings English Antenna 4 Press B or b to select Digital Audio Output, and then press...
...174; Digital decoder or other digital audio system LINE IN LR Optical Audio IN TV upper back panel To control the audio: 1 Turn on the TV and the digital audio device. 2 Press Y on page 53). AV Connection PC/HDMI 1 Audio HDMI 1 Audio HDMI Settings Digital Audio Output PC ... Laboratories. You will need : •standard audio cables Analog audio amplifier LINE IN LR TV upper back panel SETUP Menu Language ANT/CABLE In Auto Tuning Manual Tuning TV Settings Manual Setting AV Connection PC Settings English Antenna 4 Press B or b to select Digital Audio Output, and then press...
Owner's Manual - English
Page 34
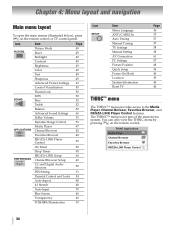
... and Locks 54 Auto Aspect 48 4:3 Stretch 48 Auto Input 39 Blue Screen 40 Transparency 40 TOSHIBA Illumination 39 Icon SETUP Item Menu Language ANT/CABLE In Auto Tuning Manual Tuning TV Settings Manual Setting AV Connection PC Settings Picture Position Quick Setup Power-On Mode Location System Information Reset... TV Page 36 37 37 37 38 38 61 57 48 36 40 39 40 40 THINC™...
... and Locks 54 Auto Aspect 48 4:3 Stretch 48 Auto Input 39 Blue Screen 40 Transparency 40 TOSHIBA Illumination 39 Icon SETUP Item Menu Language ANT/CABLE In Auto Tuning Manual Tuning TV Settings Manual Setting AV Connection PC Settings Picture Position Quick Setup Power-On Mode Location System Information Reset... TV Page 36 37 37 37 38 38 61 57 48 36 40 39 40 40 THINC™...

Owner's Manual - English
Page 36
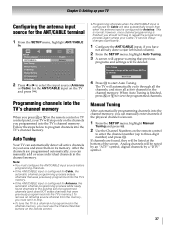
...Location To use the demo, please select [On]. left-hand column). SETUP Menu Language ANT/CABLE In Auto Tuning Manual Tuning TV Settings Manual Setting AV Connection PC Settings English Antenna 36 HFoormneoramnadlphroemsseTus.e, press C or c to select appear on the Yes and press T. 4 Other procedures... are same as Initial Setup (- Auto Demo To use the TV for displaying in step 3, the Auto Demo setting window will appear...
...Location To use the demo, please select [On]. left-hand column). SETUP Menu Language ANT/CABLE In Auto Tuning Manual Tuning TV Settings Manual Setting AV Connection PC Settings English Antenna 36 HFoormneoramnadlphroemsseTus.e, press C or c to select appear on the Yes and press T. 4 Other procedures... are same as Initial Setup (- Auto Demo To use the TV for displaying in step 3, the Auto Demo setting window will appear...
Owner's Manual - English
Page 37
... remote control. • Programming channels when the ANT/CABLE input is normal; After the channels are programmed automatically, you programmed into the TV's channel memory. however, once channel programming is configured for the ANT/CABLE terminal 1 From the SETUP menu, highlight ANT/CABLE In. ...ANT/CABLE input, if you have to a channel not programmed in the cphreasnsn SETUP Menu Language ANT/CABLE In Auto Tuning Manual Tuning TV Settings Manual Setting AV Connection PC Settings English Antenna 2 Press C or c to select the input source (Antenna or Cable) and press O for no ...
... remote control. • Programming channels when the ANT/CABLE input is normal; After the channels are programmed automatically, you programmed into the TV's channel memory. however, once channel programming is configured for the ANT/CABLE terminal 1 From the SETUP menu, highlight ANT/CABLE In. ...ANT/CABLE input, if you have to a channel not programmed in the cphreasnsn SETUP Menu Language ANT/CABLE In Auto Tuning Manual Tuning TV Settings Manual Setting AV Connection PC Settings English Antenna 2 Press C or c to select the input source (Antenna or Cable) and press O for no ...
Owner's Manual - English
Page 53
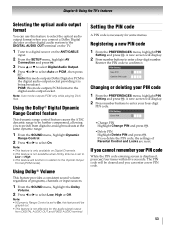
... Delete PIN and press T. Note: • This feature is only available on the ANT/CABLE input. 2 From the SETUP Connection and pmreesnsuT , h.ighlight AV 3 Press B or b to select Digital Audio Output. 4 O Pre.ss C or c to select Auto or PCM , then press Auto: this mode... Parental Control and Locks are reset. Note: • If Dynamic Range Control is not effective for some menus. Chapter 6: Using the TV's features Selecting the optical audio output format You can enter a new PIN code. 53 CAEnSewmesncrue,ehnigwhillilgdhitspPlIaNy. 2 Press number buttons to confirm ...
... Delete PIN and press T. Note: • This feature is only available on the ANT/CABLE input. 2 From the SETUP Connection and pmreesnsuT , h.ighlight AV 3 Press B or b to select Digital Audio Output. 4 O Pre.ss C or c to select Auto or PCM , then press Auto: this mode... Parental Control and Locks are reset. Note: • If Dynamic Range Control is not effective for some menus. Chapter 6: Using the TV's features Selecting the optical audio output format You can enter a new PIN code. 53 CAEnSewmesncrue,ehnigwhillilgdhitspPlIaNy. 2 Press number buttons to confirm ...

Owner's Manual - English
Page 57
... The adjustment range is affected by interference, readjust the Clock Phase and Sampling Clock. 1 Select PC input mode (- Chapter 6: Using the TV's features Using the PC settings feature Setting the PC Audio You can use the PC Settings feature to make an appropriate adjustments. If the ... within ±32 from your PC when connecting using the PC IN terminal and an analog RGB cable. 1 From the SETUP Connection and pmreesnsuT , h.ighlight AV 2 Press B or b to select PC/HDMI 1 Audio. 3 Press C or c to reduce noise and minimize periodic vertical stripes on page 41). 2 ...
... The adjustment range is affected by interference, readjust the Clock Phase and Sampling Clock. 1 Select PC input mode (- Chapter 6: Using the TV's features Using the PC settings feature Setting the PC Audio You can use the PC Settings feature to make an appropriate adjustments. If the ... within ±32 from your PC when connecting using the PC IN terminal and an analog RGB cable. 1 From the SETUP Connection and pmreesnsuT , h.ighlight AV 2 Press B or b to select PC/HDMI 1 Audio. 3 Press C or c to reduce noise and minimize periodic vertical stripes on page 41). 2 ...

Owner's Manual - English
Page 61
... with this mode. 1 Select the appropriate HDMI input mode (HDMI 1, HDMI 2, HDMI 3, or HDMI 4). 2 From the SETUP Connection and pmreesnsuT , h.ighlight AV 3 Press B or b to select HDMI Settings. 4 Press B or b to highlight the item you will be output. 61 Note: If your HDMI connection ...Finally press C or c to 235. Conventional HDMI/DVI cables may not work properly with your TV is output in the range from 16 to select Auto, Digital or Analog. (Auto is the recommended mode.) AV Connection PC/HDMI 1 Audio HDMI 1 Audio HDMI Settings Digital Audio Output HDMI 1 Auto Auto...
... with this mode. 1 Select the appropriate HDMI input mode (HDMI 1, HDMI 2, HDMI 3, or HDMI 4). 2 From the SETUP Connection and pmreesnsuT , h.ighlight AV 3 Press B or b to select HDMI Settings. 4 Press B or b to highlight the item you will be output. 61 Note: If your HDMI connection ...Finally press C or c to 235. Conventional HDMI/DVI cables may not work properly with your TV is output in the range from 16 to select Auto, Digital or Analog. (Auto is the recommended mode.) AV Connection PC/HDMI 1 Audio HDMI 1 Audio HDMI Settings Digital Audio Output HDMI 1 Auto Auto...


