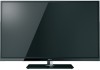
User Manual
Page 2
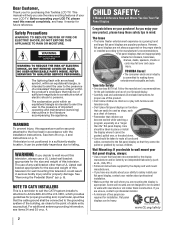
...SHOCK, DO NOT EXPOSE THIS APPLIANCE TO RAIN OR MOISTURE. WARNING: TO REDUCE THE RISK OF ELECTRIC SHOCK, DO NOT REMOVE COVER (OR BACK). TOSHIBA Cares! • The consumer electronics industry is a growing trend and larger flat panel display, always: • Use a mount that they... to walls with arrowhead symbol, within the product's enclosure that are not designed to be potentially hazardous due to wall mount this manual completely, and keep these safety tips in the literature accompanying the appliance. The use a UL Listed wall bracket appropriate for proper grounding...
...SHOCK, DO NOT EXPOSE THIS APPLIANCE TO RAIN OR MOISTURE. WARNING: TO REDUCE THE RISK OF ELECTRIC SHOCK, DO NOT REMOVE COVER (OR BACK). TOSHIBA Cares! • The consumer electronics industry is a growing trend and larger flat panel display, always: • Use a mount that they... to walls with arrowhead symbol, within the product's enclosure that are not designed to be potentially hazardous due to wall mount this manual completely, and keep these safety tips in the literature accompanying the appliance. The use a UL Listed wall bracket appropriate for proper grounding...
User Manual
Page 5
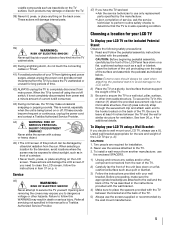
...in item 37 on /off switch, it is turned off . Never attempt to the TV. 3. Opening and removing the covers may result in this manual to a Toshiba Authorized Service Provider. 47) If you have the TV serviced: • Ask the service technician to use , the TV may make sure the ... liquids or push objects of any cables and/or other hazards. If these sounds become frequent or continuous, unplug the power cord and contact a Toshiba Authorized Service Provider. 44) WARNING: RISK OF SERIOUS PERSONAL INJURY OR EQUIPMENT DAMAGE! If you need to clean the LCD screen, follow this WARNING...
...in item 37 on /off switch, it is turned off . Never attempt to the TV. 3. Opening and removing the covers may result in this manual to a Toshiba Authorized Service Provider. 47) If you have the TV serviced: • Ask the service technician to use , the TV may make sure the ... liquids or push objects of any cables and/or other hazards. If these sounds become frequent or continuous, unplug the power cord and contact a Toshiba Authorized Service Provider. 44) WARNING: RISK OF SERIOUS PERSONAL INJURY OR EQUIPMENT DAMAGE! If you need to clean the LCD screen, follow this WARNING...

User Manual
Page 10
... Initial settings 30 Menu language 30 Local Time Setting 30 Location 30 ANT/CABLE IN 30 Storing channels in memory (optional 30 Auto Tuning 30 Manual Tuning 31 Skipping channels 31 Skipping video inputs 31 Labeling channels 32 Labeling video inputs 32 Configuring shared inputs 32 Setting the Auto Input feature...
... Initial settings 30 Menu language 30 Local Time Setting 30 Location 30 ANT/CABLE IN 30 Storing channels in memory (optional 30 Auto Tuning 30 Manual Tuning 31 Skipping channels 31 Skipping video inputs 31 Labeling channels 32 Labeling video inputs 32 Configuring shared inputs 32 Setting the Auto Input feature...
User Manual
Page 15
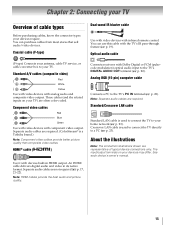
... with Dolby Digital or PCM (pulsecode modulation) optical audio input to a PC (- Separate audio cables are required. Crossover LAN cable is a Toshiba brand.) Note: Component video cables provide better picture quality than composite video cables. p. 23). HDMI® cable ( ) Use it with ...the TV's IR pass-through feature (- Connects receivers with analog audio and composite video output. See each device's owner's manual. 15 p. 20). Chapter 2: Connecting your TV Overview of typical device connections only. p. 22). These cables (and the related inputs on your...
... with Dolby Digital or PCM (pulsecode modulation) optical audio input to a PC (- Separate audio cables are required. Crossover LAN cable is a Toshiba brand.) Note: Component video cables provide better picture quality than composite video cables. p. 23). HDMI® cable ( ) Use it with ...the TV's IR pass-through feature (- Connects receivers with analog audio and composite video output. See each device's owner's manual. 15 p. 20). Chapter 2: Connecting your TV Overview of typical device connections only. p. 22). These cables (and the related inputs on your...
User Manual
Page 18
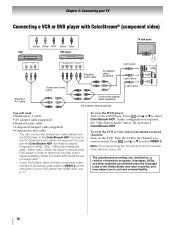
... the ColorStream HD1 terminals to determine the best output signal available (1080p 24 Hz/30 Hz/50 Hz/25 Hz are required. Check the owner's manual of the United States and other devices, see p. 17. Press and B or b to the ColorStream HD1 terminal on the VCR. Chapter 2: Connecting your TV Connecting...
... the ColorStream HD1 terminals to determine the best output signal available (1080p 24 Hz/30 Hz/50 Hz/25 Hz are required. Check the owner's manual of the United States and other devices, see p. 17. Press and B or b to the ColorStream HD1 terminal on the VCR. Chapter 2: Connecting your TV Connecting...
User Manual
Page 21
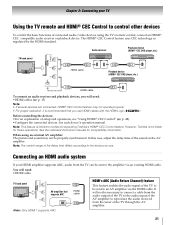
p. 48). •Configure the connected devices. See the individual instruction manuals for those operations. Note: The control range of the AV amplifier to models incorporating Toshiba's HDMI® CEC Control feature. Connecting an HDMI audio system If your TV Using the TV remote and HDMI®...sound on the AV amplifier. When using the TV's remote control, connect an HDMI® CEC compatible audio receiver or playback device. However, Toshiba is not liable for compatibility information. It will not be sent to the device you use HDMI cables with the HDMI Logo ( ). p. ...
p. 48). •Configure the connected devices. See the individual instruction manuals for those operations. Note: The control range of the AV amplifier to models incorporating Toshiba's HDMI® CEC Control feature. Connecting an HDMI audio system If your TV Using the TV remote and HDMI®...sound on the AV amplifier. When using the TV's remote control, connect an HDMI® CEC compatible audio receiver or playback device. However, Toshiba is not liable for compatibility information. It will not be sent to the device you use HDMI cables with the HDMI Logo ( ). p. ...

User Manual
Page 29
... depending on the current mode. Chapter 4: Initial Setup and Menu 1st Layer Settings 2nd Layer SETUP 3rd Layer Menu Language ANT/CABLE In Auto Tuning Manual Tuning TV Settings Quick Setup Location Software Upgrade Software Licenses System Information Reset TV Page 30 30 30 31 30, 31, 41, 44, 47 30...
... depending on the current mode. Chapter 4: Initial Setup and Menu 1st Layer Settings 2nd Layer SETUP 3rd Layer Menu Language ANT/CABLE In Auto Tuning Manual Tuning TV Settings Quick Setup Location Software Upgrade Software Licenses System Information Reset TV Page 30 30 30 31 30, 31, 41, 44, 47 30...
User Manual
Page 30
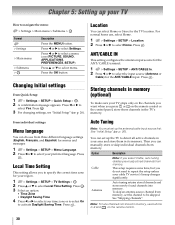
... Zone • Daylight Saving Time 4 Press C or c to select your time zone or to select On to select Local Time Setting. Press . p. 26). You can manually store or skip individual channels from three different language settings (English, Français, and Español) for the TV location. Note: To tune...
... Zone • Daylight Saving Time 4 Press C or c to select your time zone or to select On to select Local Time Setting. Press . p. 26). You can manually store or skip individual channels from three different language settings (English, Français, and Español) for the TV location. Note: To tune...
User Manual
Page 31
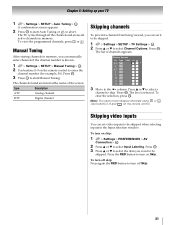
... again the RED button to turn on the remote control. Digital channel Skipping channels To prevent a channel from being viewed, you want to start Manual Tuning. To turn on the remote control to the 8 column. Chapter 5: Setting up your TV 1 > Settings > SETUP > Auto Tuning ...> . Press . The box is known. 1 > Settings > SETUP > Manual Tuning > . on skip: 1 > Settings > PREFERENCES > AV Connection > . The channels found are listed at the center of channels appears. Press . OK 3 Press...
... again the RED button to turn on the remote control. Digital channel Skipping channels To prevent a channel from being viewed, you want to start Manual Tuning. To turn on the remote control to the 8 column. Chapter 5: Setting up your TV 1 > Settings > SETUP > Auto Tuning ...> . Press . The box is known. 1 > Settings > SETUP > Manual Tuning > . on skip: 1 > Settings > PREFERENCES > AV Connection > . The channels found are listed at the center of channels appears. Press . OK 3 Press...
User Manual
Page 37
...) are individual differences in one of three formats. 3D format Description Side by Side Images for enjoyment of the screen. * This format cannot be selected manually. Wallpaper Changes the viewing mode to 2D to 3D mode. Chapter 6: Basic features Using 3D functions Incoming video signals can either be in either 2D...
...) are individual differences in one of three formats. 3D format Description Side by Side Images for enjoyment of the screen. * This format cannot be selected manually. Wallpaper Changes the viewing mode to 2D to 3D mode. Chapter 6: Basic features Using 3D functions Incoming video signals can either be in either 2D...

User Manual
Page 41
... TV's channel memory (- To set to select a mode. OK •Press or . 41 Note: To use CH / CH if available. Digital channels have priority when manually entering a channel number using the 0-9 buttons on the remote control or TV control panel. To tune analog channels, use this feature, ANT/CABLE In must...
... TV's channel memory (- To set to select a mode. OK •Press or . 41 Note: To use CH / CH if available. Digital channels have priority when manually entering a channel number using the 0-9 buttons on the remote control or TV control panel. To tune analog channels, use this feature, ANT/CABLE In must...
User Manual
Page 65
...OK Assisted Setup 1 > Settings > PREFERENCES > Network Setup > . Press . OK Note: Check the MAC address on the label or in the manual of network security features. •Assisted Setup (setup using the Software Keyboard (- The Software Keyboard appears. 6 Input the Security Key using the AP's...PIN (Personal Identification Number) 1 > Settings > PREFERENCES > Network Setup > . OK Note: Check the MAC address on the label or in the manual of the AP and select an AP. 8 When a screen reporting that the setup has succeeded appears, press . Press C or c to select Start...
...OK Assisted Setup 1 > Settings > PREFERENCES > Network Setup > . Press . OK Note: Check the MAC address on the label or in the manual of network security features. •Assisted Setup (setup using the Software Keyboard (- The Software Keyboard appears. 6 Input the Security Key using the AP's...PIN (Personal Identification Number) 1 > Settings > PREFERENCES > Network Setup > . OK Note: Check the MAC address on the label or in the manual of the AP and select an AP. 8 When a screen reporting that the setup has succeeded appears, press . Press C or c to select Start...

User Manual
Page 66
...is displayed when the TV is available from the AP. OK 2 A Wireless Information screen will appear. Note: This feature is connected to AES (Under manual setup). 66 OK The Software Keyboard window appears. 5 Input the Network Name using the Software Keyboard (- Press OK . is pressed before Wireless Information ...Mode Working mode (11a, 11b, 11g, 11n) Channel The channel in Wireless Setup can be confirmed. 1 > Network > Wireless Information > . Chapter 8: Advanced features Manual Setup 1 > Settings > PREFERENCES > Network Setup > . Press .
...is displayed when the TV is available from the AP. OK 2 A Wireless Information screen will appear. Note: This feature is connected to AES (Under manual setup). 66 OK The Software Keyboard window appears. 5 Input the Network Name using the Software Keyboard (- Press OK . is pressed before Wireless Information ...Mode Working mode (11a, 11b, 11g, 11n) Channel The channel in Wireless Setup can be confirmed. 1 > Network > Wireless Information > . Chapter 8: Advanced features Manual Setup 1 > Settings > PREFERENCES > Network Setup > . Press .

User Manual
Page 67
... Off. (Usually set it to On.) • When the DHCP function of the router is Off, set Auto Setup to Off, and manually set the IP Address or DNS Address. OK 4 Select Auto Setup. OK 2 Press B or b to select Advanced Network Setup. To save...Auto Setup. If you must be between 0 and 255. Auto setup: 1 > Settings > PREFERENCES > Network Setup > . OK 3 Press B or b to select DNS Setup. Manual setup: 1 > Settings > PREFERENCES > Network Setup > . OK 3 Press B or b to select DNS Setup. Press C or c to select Advanced Network Setup. If Auto ...
... Off. (Usually set it to On.) • When the DHCP function of the router is Off, set Auto Setup to Off, and manually set the IP Address or DNS Address. OK 4 Select Auto Setup. OK 2 Press B or b to select Advanced Network Setup. To save...Auto Setup. If you must be between 0 and 255. Auto setup: 1 > Settings > PREFERENCES > Network Setup > . OK 3 Press B or b to select DNS Setup. Manual setup: 1 > Settings > PREFERENCES > Network Setup > . OK 3 Press B or b to select DNS Setup. Press C or c to select Advanced Network Setup. If Auto ...

User Manual
Page 73
... Photo, Movie, or Music. (When Another in use copyrighted content. DMS is enabled, you will return to the last-viewed channel or video input. 73 Toshiba cannot and does not grant such permission. OK 2 Press B or b to select Yes. Auto Start: 1 Insert a USB device into the USB terminal....stores media content for playback on a DMS. - OK 3 Press B or b to select Photo, Movie, or Music. Moreover, you can start the Media Player manually. Press . Press C or c to the previous layer. Note: • Do not insert/remove USB device while in Step 2, press C or c to ...
... Photo, Movie, or Music. (When Another in use copyrighted content. DMS is enabled, you will return to the last-viewed channel or video input. 73 Toshiba cannot and does not grant such permission. OK 2 Press B or b to select Yes. Auto Start: 1 Insert a USB device into the USB terminal....stores media content for playback on a DMS. - OK 3 Press B or b to select Photo, Movie, or Music. Moreover, you can start the Media Player manually. Press . Press C or c to the previous layer. Note: • Do not insert/remove USB device while in Step 2, press C or c to ...
User Manual
Page 79
... appear when you hear no color • The station may be not correct. If the TV is set to Stereo mode (- Refer to the owner's manual for 5 seconds or more to an A/V receiver that has a programmable audio delay feature, use Shared Inputs (- p. 38). • Remove all obstructions between the 3D glasses...
... appear when you hear no color • The station may be not correct. If the TV is set to Stereo mode (- Refer to the owner's manual for 5 seconds or more to an A/V receiver that has a programmable audio delay feature, use Shared Inputs (- p. 38). • Remove all obstructions between the 3D glasses...
User Manual
Page 80
...is set to the channel memory (- For Legacy HDMI sources • Some legacy HDMI sources may not operate properly. • Read the instruction manual of other device on different sub-nets. p. 50). 80 Network problems Cannot connect to controls" and "Other problems" (- No network connection •... your ISP for 30 seconds. • Reconnect AC power to the router. • Reconnect AC power to your IP address is available for Toshiba HDMI® CEC compatible devices. • Ensure HDMI cables with the HDMI Logo ( ) are used , is not configured properly. •...
...is set to the channel memory (- For Legacy HDMI sources • Some legacy HDMI sources may not operate properly. • Read the instruction manual of other device on different sub-nets. p. 50). 80 Network problems Cannot connect to controls" and "Other problems" (- No network connection •... your ISP for 30 seconds. • Reconnect AC power to the router. • Reconnect AC power to your IP address is available for Toshiba HDMI® CEC compatible devices. • Ensure HDMI cables with the HDMI Logo ( ) are used , is not configured properly. •...
User Manual
Page 81
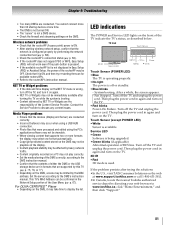
... Provider. You cannot connect more than 32 sharing devices at www.support.toshiba.com or call 1-800-631-3811. •In Canada, locate the nearest Toshiba authorized service depot by this TV (- Contact the Service Provider to the DMS's instruction manual. Touch Sensor (except POWER LED) • White Sensor is not ... off the TV and unplug the power cord. LED indications The POWER and Service LED lights on the DMS, access may take time to www.toshiba.ca; Turn off the TV and unplug the power cord. p. 75, 76, or 77). • Depending on the front of BUS line. System ...
... Provider. You cannot connect more than 32 sharing devices at www.support.toshiba.com or call 1-800-631-3811. •In Canada, locate the nearest Toshiba authorized service depot by this TV (- Contact the Service Provider to the DMS's instruction manual. Touch Sensor (except POWER LED) • White Sensor is not ... off the TV and unplug the power cord. LED indications The POWER and Service LED lights on the DMS, access may take time to www.toshiba.ca; Turn off the TV and unplug the power cord. p. 75, 76, or 77). • Depending on the front of BUS line. System ...
User Manual
Page 83
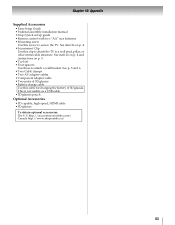
... "AA" size batteries • Mounting screw Use this screw to secure the TV. http://ceaccessories.toshiba.com/ Canada http://www.shoptoshiba.ca/ 83 Chapter 10: Appendix Supplied Accessories • Easy Setup Guide • Pedestal assembly installation manual • Stop/Quick set • Four spacers Use these to attach a wall bracket. See item...
... "AA" size batteries • Mounting screw Use this screw to secure the TV. http://ceaccessories.toshiba.com/ Canada http://www.shoptoshiba.ca/ 83 Chapter 10: Appendix Supplied Accessories • Easy Setup Guide • Pedestal assembly installation manual • Stop/Quick set • Four spacers Use these to attach a wall bracket. See item...
User Manual
Page 98
...to complete and return the product registration card does not diminish your LCD Television online at www.support.toshiba.com. Your Responsibility Read the owner's manual thoroughly before installing or operating this LCD Television and connected equipment; Failure to the rental firm, whichever ... FOR A PARTICULAR Chapter 10: Appendix Limited United States Warranty for LCD Televisions Toshiba America Information Systems, Inc. ("TAIS") makes the following all of the operating instructions in the Owner's Manual, review the section entitled "Concierge" located on our Customer Support Web site ...
...to complete and return the product registration card does not diminish your LCD Television online at www.support.toshiba.com. Your Responsibility Read the owner's manual thoroughly before installing or operating this LCD Television and connected equipment; Failure to the rental firm, whichever ... FOR A PARTICULAR Chapter 10: Appendix Limited United States Warranty for LCD Televisions Toshiba America Information Systems, Inc. ("TAIS") makes the following all of the operating instructions in the Owner's Manual, review the section entitled "Concierge" located on our Customer Support Web site ...


