User Manual
Page 9
...the HDMI input 16 Connecting a VCR or DVD player with ColorStream® (component video 17 Connecting a digital audio system 18 Using the TV remote and HDMI® CEC Control to control other devices 19 Connecting an HDMI audio system 19 Connecting a PC 20 Connecting to a home network... 21 Chapter 3: Using the remote control 22 Controlling other devices 22 Installing batteries 22 Learning about the Remote Control 23 Chapter 4: Initial Setup and Menu 24 Initial Setup 24 Navigating the menu system 25 Main menu...
...the HDMI input 16 Connecting a VCR or DVD player with ColorStream® (component video 17 Connecting a digital audio system 18 Using the TV remote and HDMI® CEC Control to control other devices 19 Connecting an HDMI audio system 19 Connecting a PC 20 Connecting to a home network... 21 Chapter 3: Using the remote control 22 Controlling other devices 22 Installing batteries 22 Learning about the Remote Control 23 Chapter 4: Initial Setup and Menu 24 Initial Setup 24 Navigating the menu system 25 Main menu...
User Manual
Page 10
...Acceptable signal formats for PC IN and HDMI terminals 75 PC IN signal formats 75 HDMI signal formats 76 Remote control functional key chart 77 Operating other devices 79 Programming the remote to operate other devices . . . 79 Device code setup 79 Searching for a device code 80 ...Locking the volume keys 80 Clearing the remote's programming 80 Resetting to the factory default 80 Operating the TV with combination buttons 81 Remote control codes 82 Limited United States Warranty for LCD Televisions 88 Limited Canadian Warranty for Toshiba Brand Flat Panel Televisions 89 Index 92 ...
...Acceptable signal formats for PC IN and HDMI terminals 75 PC IN signal formats 75 HDMI signal formats 76 Remote control functional key chart 77 Operating other devices 79 Programming the remote to operate other devices . . . 79 Device code setup 79 Searching for a device code 80 ...Locking the volume keys 80 Clearing the remote's programming 80 Resetting to the factory default 80 Operating the TV with combination buttons 81 Remote control codes 82 Limited United States Warranty for LCD Televisions 88 Limited Canadian Warranty for Toshiba Brand Flat Panel Televisions 89 Index 92 ...
User Manual
Page 11
... TV, learn the functions of the TV's connections and controls (- p. 14-21). 5 See "Chapter 3: Using the remote control" (- p. 22) for an overview of the buttons on the remote control, installing the batteries, and preparing to "Chapter 9: Troubleshooting" (- p. 70). 11 See "Chapter 10: Appendix", ... about your TV (- p. 16). •HDMI capabilities ARC (Audio Return Channel) enables the audio signal of external devices from the TV remote via an HDMI cable. Chapter 1: Introduction Features •Integrated digital tuning (8VSB ATSC and QAM) eliminates the need for details on using ...
... TV, learn the functions of the TV's connections and controls (- p. 14-21). 5 See "Chapter 3: Using the remote control" (- p. 22) for an overview of the buttons on the remote control, installing the batteries, and preparing to "Chapter 9: Troubleshooting" (- p. 70). 11 See "Chapter 10: Appendix", ... about your TV (- p. 16). •HDMI capabilities ARC (Audio Return Channel) enables the audio signal of external devices from the TV remote via an HDMI cable. Chapter 1: Introduction Features •Integrated digital tuning (8VSB ATSC and QAM) eliminates the need for details on using ...
User Manual
Page 12
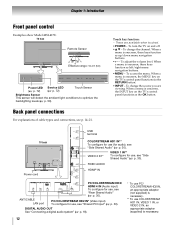
... touched. • POWER - When a menu is onscreen, these keys function as the OK button. Chapter 1: Introduction Front panel control Examples show Model 42SL417U. TV front Remote Sensor Effective range: 16.4 ft (5m) Power LED Service LED (- p. 72) Touch Sensor Brightness Sensor This sensor will detect the ambient light conditions to optimize...
... touched. • POWER - When a menu is onscreen, these keys function as the OK button. Chapter 1: Introduction Front panel control Examples show Model 42SL417U. TV front Remote Sensor Effective range: 16.4 ft (5m) Power LED Service LED (- p. 72) Touch Sensor Brightness Sensor This sensor will detect the ambient light conditions to optimize...
User Manual
Page 16
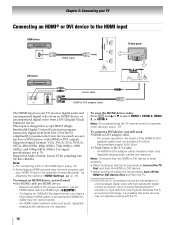
...). Supported signal formats: VGA, SVGA, XGA, WXGA, SXGA, 480i (60Hz), 480p (60Hz), 720p (60Hz), 1080i (60Hz), and 1080p (24Hz/60Hz). Note: For programming the TV remote control to operate other devices, see p. 76. This input is being standardized for reception of high-definition video signals. Chapter 2: Connecting your TV Connecting an...
...). Supported signal formats: VGA, SVGA, XGA, WXGA, SXGA, 480i (60Hz), 480p (60Hz), 720p (60Hz), 1080i (60Hz), and 1080p (24Hz/60Hz). Note: For programming the TV remote control to operate other devices, see p. 76. This input is being standardized for reception of high-definition video signals. Chapter 2: Connecting your TV Connecting an...
User Manual
Page 17
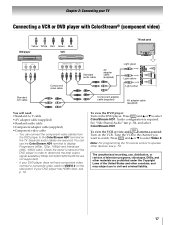
... other materials are not supported). - The unauthorized recording, use the ColorStream HD1 terminal to watch. p. 30), and select ColorStream HD1. Note: For programming the TV remote control to operate other countries, and may subject you want to display Progressive (480p, 720p, 1080p) and Interlaced (480i, 1080i) video. Separate audio cables are...
... other materials are not supported). - The unauthorized recording, use the ColorStream HD1 terminal to watch. p. 30), and select ColorStream HD1. Note: For programming the TV remote control to operate other countries, and may subject you want to display Progressive (480p, 720p, 1080p) and Interlaced (480i, 1080i) video. Separate audio cables are...
User Manual
Page 19
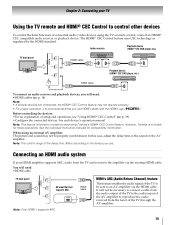
... an audio receiver and playback devices, you will not be sent to an AV amplifier via the existing HDMI cable. However, Toshiba is limited to models incorporating Toshiba's HDMI® CEC Control feature. You will need : •HDMI cables (- Chapter 2: Connecting your HDMI amplifier supports ARC...will need : •HDMI cable TV back panel AV amplifier that you use HDMI cables with the HDMI Logo ( ). When using the TV's remote control, connect an HDMI® CEC compatible audio receiver or playback device. p. 14) Note: • If several devices are connected, the HDMI...
... an audio receiver and playback devices, you will not be sent to an AV amplifier via the existing HDMI cable. However, Toshiba is limited to models incorporating Toshiba's HDMI® CEC Control feature. You will need : •HDMI cables (- Chapter 2: Connecting your HDMI amplifier supports ARC...will need : •HDMI cable TV back panel AV amplifier that you use HDMI cables with the HDMI Logo ( ). When using the TV's remote control, connect an HDMI® CEC compatible audio receiver or playback device. p. 14) Note: • If several devices are connected, the HDMI...
User Manual
Page 22
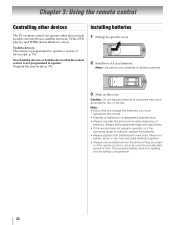
... is not programmed to operate a variety of devices (- p. 79). Note: • Every time you change the batteries, you must reprogram the remote. • Dispose of batteries in a box). Toshiba devices: The remote is reduced, replace the batteries. • Always replace both batteries with new ones. Always follow applicable laws and regulations. • If...
... is not programmed to operate a variety of devices (- p. 79). Note: • Every time you change the batteries, you must reprogram the remote. • Dispose of batteries in a box). Toshiba devices: The remote is reduced, replace the batteries. • Always replace both batteries with new ones. Always follow applicable laws and regulations. • If...
User Manual
Page 23
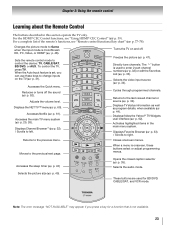
...picture (- p. 34). p. 62). Returns to the previous/next page. Moves to the previous menu. p. 35). Chapter 3: Using the remote control Learning about the Remote Control The buttons described in the main menu system. Changes the picture mode to Game when the input mode is not available. 23...Returns to control the device: TV, CABLE/SAT, BD/DVD, or AUX. For a complete list of the remote's functions, see "Using HDMI® CEC Control" (- Sets the remote control mode to the last viewed channel or source (- Accesses the Quick menu. Accesses the sleep timer (- Selects ...
...picture (- p. 34). p. 62). Returns to the previous/next page. Moves to the previous menu. p. 35). Chapter 3: Using the remote control Learning about the Remote Control The buttons described in the main menu system. Changes the picture mode to Game when the input mode is not available. 23...Returns to control the device: TV, CABLE/SAT, BD/DVD, or AUX. For a complete list of the remote's functions, see "Using HDMI® CEC Control" (- Sets the remote control mode to the last viewed channel or source (- Accesses the Quick menu. Accesses the sleep timer (- Selects ...
User Manual
Page 25
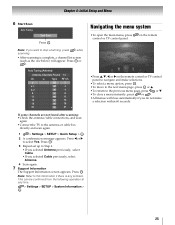
... screen (such as the one below) will close a menu instantly, press or . •All menus will appear. on the remote Wallpaper Timer Settings Network Media Player •Press B, b, C, or c on the remote control or TV control panel to select Yes. OK •To move to the next menu page, press OK or...
... screen (such as the one below) will close a menu instantly, press or . •All menus will appear. on the remote Wallpaper Timer Settings Network Media Player •Press B, b, C, or c on the remote control or TV control panel to select Yes. OK •To move to the next menu page, press OK or...

User Manual
Page 26
Chapter 4: Initial Setup and Menu Main menu layout To open the main menus (illustrated below), press on the remote control or TV control panel. 1st Layer 2nd Layer 3rd Layer Page Network Media Player Wallpaper Timer Settings NET TV Network Setup Wireless Information Photo ...
Chapter 4: Initial Setup and Menu Main menu layout To open the main menus (illustrated below), press on the remote control or TV control panel. 1st Layer 2nd Layer 3rd Layer Page Network Media Player Wallpaper Timer Settings NET TV Network Setup Wireless Information Photo ...
User Manual
Page 28
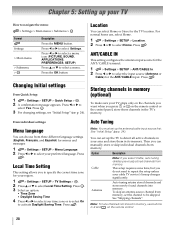
... channels in memory (optional) To make sure your TV stops only on the channels you want when you press CH or CH on the remote control. 28 Press . This setup requires some time, but you to select Yes. Antenna Auto tuning retains stored channels and stores newly found... Home. 1 > Settings > SETUP > Location. 2 Press C or c to select Home. For normal home use buttons 0-9 and - You can choose from memory. on the remote control or the control panel, store those channels in the TV's memory. Press C or c to repeat the setup unless your cable TV service's lineup changes...
... channels in memory (optional) To make sure your TV stops only on the channels you want when you press CH or CH on the remote control. 28 Press . This setup requires some time, but you to select Yes. Antenna Auto tuning retains stored channels and stores newly found... Home. 1 > Settings > SETUP > Location. 2 Press C or c to select Home. For normal home use buttons 0-9 and - You can choose from memory. on the remote control or the control panel, store those channels in the TV's memory. Press C or c to repeat the setup unless your cable TV service's lineup changes...
User Manual
Page 29
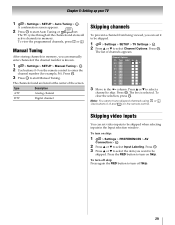
...Settings > SETUP > TV Settings > . Press . The channels found are listed at the center of channels appears. Press OK . To clear the selection, press . on the remote control to be skipped. Chapter 5: Setting up your TV 1 > Settings > SETUP > Auto Tuning > . To view the programmed channels, press CH or . CH Manual Tuning... CH or . OK 3 Press B or b to select the item you can set video inputs to turn on Skip. OK 2 Use buttons 0-9 on the remote control. OK The list of the screen. Type Label 5-1 DTV 6 ATV 6-1 DTV 8 ATV 9 ATV 10 ATV 11 ATV 12 ATV 3 Move to select...
...Settings > SETUP > TV Settings > . Press . The channels found are listed at the center of channels appears. Press OK . To clear the selection, press . on the remote control to be skipped. Chapter 5: Setting up your TV 1 > Settings > SETUP > Auto Tuning > . To view the programmed channels, press CH or . CH Manual Tuning... CH or . OK 3 Press B or b to select the item you can set video inputs to turn on Skip. OK 2 Use buttons 0-9 on the remote control. OK The list of the screen. Type Label 5-1 DTV 6 ATV 6-1 DTV 8 ATV 9 ATV 10 ATV 11 ATV 12 ATV 3 Move to select...

User Manual
Page 31
Chapter 5: Setting up your TV Setting the Auto Input feature You can change TV inputs using the MODE SELECT buttons on the remote control: TV, CABLE/SAT, BD/ DVD, AUX. To turn off Auto Input: Select Off in Step 2. Auto Input settings options for other modes. To set . 4 ...
Chapter 5: Setting up your TV Setting the Auto Input feature You can change TV inputs using the MODE SELECT buttons on the remote control: TV, CABLE/SAT, BD/ DVD, AUX. To turn off Auto Input: Select Off in Step 2. Auto Input settings options for other modes. To set . 4 ...

User Manual
Page 32
...39). 5 Select On or Off. 6 To return to Off (- Digital channels have priority when manually entering a channel number using the 0-9 buttons on the remote control. (For example, to highlight Channel Tuning Mode. Press . To set to factory defaults, highlight Reset and press . OK 2 Press b or B ...to channels as you store channels in to a specific channel (programmed or unprogrammed) Channel Analog Digital Description Use the 0-9 buttons on the remote. Press the dash ( - ) button. Features: •Navigate the contents of all of the last 32 channels or inputs viewed. ...
...39). 5 Select On or Off. 6 To return to Off (- Digital channels have priority when manually entering a channel number using the 0-9 buttons on the remote control. (For example, to highlight Channel Tuning Mode. Press . To set to factory defaults, highlight Reset and press . OK 2 Press b or B ...to channels as you store channels in to a specific channel (programmed or unprogrammed) Channel Analog Digital Description Use the 0-9 buttons on the remote. Press the dash ( - ) button. Features: •Navigate the contents of all of the last 32 channels or inputs viewed. ...

User Manual
Page 33
... the Channel Browser™. The Favorites Browser list appears. 2 Select a channel or input by default. for at least 5 seconds using the numeric buttons on the remote control. •Channels that is integrated into the Channel Browser™. The Channel Browser™ stores these channels: •Channels that are tuned for 3 seconds...
... the Channel Browser™. The Favorites Browser list appears. 2 Select a channel or input by default. for at least 5 seconds using the numeric buttons on the remote control. •Channels that is integrated into the Channel Browser™. The Channel Browser™ stores these channels: •Channels that are tuned for 3 seconds...
User Manual
Page 34
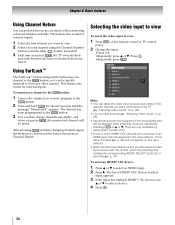
...CH RTN , the memorized channel will be quickly returned to the CH RTN button. 3 You can select a video input source with the remote control by repeatedly pressing INPUT or B or b. Using SurfLock™ The SurfLock™ feature temporarily memorizes one or more HDMI® CEC... you have connected to select a device. 4 Press . Press . OK 34 This feature also works for that were tuned. "Skipping video inputs" on the remote control or TV control panel. 2 Change the input: • Press 0-8. • Repeatedly press B or b. Chapter 6: Basic features Using Channel Return You ...
...CH RTN , the memorized channel will be quickly returned to the CH RTN button. 3 You can select a video input source with the remote control by repeatedly pressing INPUT or B or b. Using SurfLock™ The SurfLock™ feature temporarily memorizes one or more HDMI® CEC... you have connected to select a device. 4 Press . Press . OK 34 This feature also works for that were tuned. "Skipping video inputs" on the remote control or TV control panel. 2 Change the input: • Press 0-8. • Repeatedly press B or b. Chapter 6: Basic features Using Channel Return You ...
User Manual
Page 38
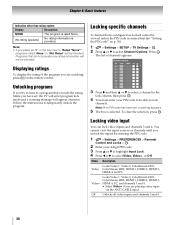
... Q on p. 36). 1 > Settings > SETUP > TV Settings > . Programs that is selected. Follow the instructions to select Video, Video+, or Off. "Setting the PIN code" on the remote control. Off Unlocks all video inputs and channels 3 and 4. 38 Unlocking programs If you try to tune to a program that exceeds the rating limits you...
... Q on p. 36). 1 > Settings > SETUP > TV Settings > . Programs that is selected. Follow the instructions to select Video, Video+, or Off. "Setting the PIN code" on the remote control. Off Unlocks all video inputs and channels 3 and 4. 38 Unlocking programs If you try to tune to a program that exceeds the rating limits you...
User Manual
Page 39
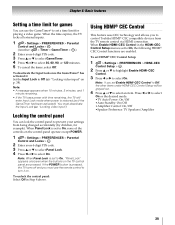
... onscreen when the buttons on the control panel operate except POWER. 1 > Settings > PREFERENCES > Parental Control and Locks > . Note: If you to control Toshiba HDMI® CEC compatible devices from being changed accidentally (by children, for playing a video game. Locking the control panel You can use the... remote control to turn it : Set the Input Lock to select On or the desired mode. • TV Auto Power: On/Off •...
... onscreen when the buttons on the control panel operate except POWER. 1 > Settings > PREFERENCES > Parental Control and Locks > . Note: If you to control Toshiba HDMI® CEC compatible devices from being changed accidentally (by children, for playing a video game. Locking the control panel You can use the... remote control to turn it : Set the Input Lock to select On or the desired mode. • TV Auto Power: On/Off •...
User Manual
Page 40
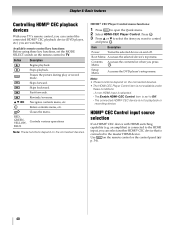
... Menu . The Enable HDMI-CEC Control item is selected. - an amplifier) is connected to the master HDMI device. Available remote control key functions: Before using these conditions: - Skips forward. Fast-forwards. OK Item Description Power Turns the selected device on the.... - Note: • These functions depend on the connected devices. Chapter 6: Basic features Controlling HDMI® CEC playback devices With your TV's remote control, you can select another HDMI® CEC device that is connected to the HDMI input, you want to control and press . A non-...
... Menu . The Enable HDMI-CEC Control item is selected. - an amplifier) is connected to the master HDMI device. Available remote control key functions: Before using these conditions: - Skips forward. Fast-forwards. OK Item Description Power Turns the selected device on the.... - Note: • These functions depend on the connected devices. Chapter 6: Basic features Controlling HDMI® CEC playback devices With your TV's remote control, you can select another HDMI® CEC device that is connected to the HDMI input, you want to control and press . A non-...


