

Owners Manual
Page 2
...and maintenance instructions follow this product may result in the triangle tells you wish to cause an electric shock. Stationary patterns generated by a picture-in direct sunlight or near a heater. CAUTION The plug has one prong wider than the other stands may be flat and steady. ...Then remove the source of time. DO NOT TRY TO SERVICE THIS PRODUCT YOURSELF. In such a case, simply wait a while (with Toshiba stands listed on the picture tube. This damage is not protected by your dealer. • If the room temperature suddenly rises, condensation may occur on the lenses...
...and maintenance instructions follow this product may result in the triangle tells you wish to cause an electric shock. Stationary patterns generated by a picture-in direct sunlight or near a heater. CAUTION The plug has one prong wider than the other stands may be flat and steady. ...Then remove the source of time. DO NOT TRY TO SERVICE THIS PRODUCT YOURSELF. In such a case, simply wait a while (with Toshiba stands listed on the picture tube. This damage is not protected by your dealer. • If the room temperature suddenly rises, condensation may occur on the lenses...

Owners Manual
Page 3
Introduction 4 Welcome to Toshiba 4 Exploring your new TV 4 Connecting your TV 5 Connecting a VCR 5 Connecting a cable converter box 6 Connecting a... channels 29 Locking video inputs 30 Changing the PIN code 30 Adjusting the picture 31 Selecting the picture mode 31 Adjusting the picture quality 31 Saving new preference 32 Using the flesh tone feature 32 Using ...the noise reduction feature 32 Selecting the color temperature 33 Resetting your picture adjustments 33 Watching video input 34 Selecting the video label 34 Using the closed caption feature ...
Introduction 4 Welcome to Toshiba 4 Exploring your new TV 4 Connecting your TV 5 Connecting a VCR 5 Connecting a cable converter box 6 Connecting a... channels 29 Locking video inputs 30 Changing the PIN code 30 Adjusting the picture 31 Selecting the picture mode 31 Adjusting the picture quality 31 Saving new preference 32 Using the flesh tone feature 32 Using ...the noise reduction feature 32 Selecting the color temperature 33 Resetting your picture adjustments 33 Watching video input 34 Selecting the video label 34 Using the closed caption feature ...

Owners Manual
Page 5
...use "F" connectors. • Audio and video cables are color coded in the same manner as the cables. • S-video cables provide better picture performance. Connecting a VCR This connection allows you to watch local channels and video programs, play or record on the VCR while watching TV, ...finished connecting all of the TV, you will need: • one coaxial cable • one pair of three and provide the best picture performance. Coaxial cables use the S-video connections and remove the video cable. Introduction Connecting your TV Using the Remote Control Connecting your TV...
...use "F" connectors. • Audio and video cables are color coded in the same manner as the cables. • S-video cables provide better picture performance. Connecting a VCR This connection allows you to watch local channels and video programs, play or record on the VCR while watching TV, ...finished connecting all of the TV, you will need: • one coaxial cable • one pair of three and provide the best picture performance. Coaxial cables use the S-video connections and remove the video cable. Introduction Connecting your TV Using the Remote Control Connecting your TV...

Owners Manual
Page 7
Your TV is capable of copyright laws. If you use a video cable instead of the S-video cable, but the picture quality will need: • one coaxial cable • three pairs of audio cables (one single and two pairs of cables for a mono VCR) &#... will decrease. Connecting your TV Connecting a DVD/satellite receiver and a VCR This connection allows you to a ColorStream compatible DVD, such as a Toshiba DVD, can greatly enhance picture quality and performance. Introduction Connecting your TV Using the Remote Control Setting up your TV to watch DVD/satellite, video and TV programs...
Your TV is capable of copyright laws. If you use a video cable instead of the S-video cable, but the picture quality will need: • one coaxial cable • three pairs of audio cables (one single and two pairs of cables for a mono VCR) &#... will decrease. Connecting your TV Connecting a DVD/satellite receiver and a VCR This connection allows you to a ColorStream compatible DVD, such as a Toshiba DVD, can greatly enhance picture quality and performance. Introduction Connecting your TV Using the Remote Control Setting up your TV to watch DVD/satellite, video and TV programs...

Owners Manual
Page 8
...: Do not connect one VCR to the output and input jacks on page 41.) VIDEO AUDIO L R IN ** Video OUT jack does not output the PIP picture. You will need: • one coaxial cable • two pairs of copyright laws. CH 3 CH 4 OUT 8 VCR2 Appendix Index You will also be able... INPUT IN DVD IN OUT The unauthorized recording of television programs, video tapes and other materials may infringe upon the provisions of Main or PIP picture being displayed on the screen. (See "Selecting the Audio OUT sound" on the TV at the same time. Do not connect the video cable...
...: Do not connect one VCR to the output and input jacks on page 41.) VIDEO AUDIO L R IN ** Video OUT jack does not output the PIP picture. You will need: • one coaxial cable • two pairs of copyright laws. CH 3 CH 4 OUT 8 VCR2 Appendix Index You will also be able... INPUT IN DVD IN OUT The unauthorized recording of television programs, video tapes and other materials may infringe upon the provisions of Main or PIP picture being displayed on the screen. (See "Selecting the Audio OUT sound" on the TV at the same time. Do not connect the video cable...
Owners Manual
Page 15
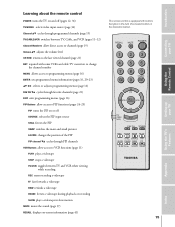
... 24-25) PIP turns the PIP on or off SOURCE selects the PIP input source STILL freezes the PIP SWAP switches the main and small pictures LOCATE changes the position of the PIP PIP channel zy cycles through PIP channels VCR Buttons allow access to VCR functions (page 11) PLAY plays...
... 24-25) PIP turns the PIP on or off SOURCE selects the PIP input source STILL freezes the PIP SWAP switches the main and small pictures LOCATE changes the position of the PIP PIP channel zy cycles through PIP channels VCR Buttons allow access to VCR functions (page 11) PLAY plays...

Owners Manual
Page 19
... select channel 125, press 100-2-5. Press x or • to select ADD or ERASE, whichever function you can add or erase specific channels. The picture will be on your screen are projected onto the screen where they converge to the next programmed channel: Press Channel y or z on the TV or...blue. Convergence may drift over time or if you must select the channel to add or erase. Changing channels To change to form a full-color picture. Introduction Connecting your TV Using the TV's Features Appendix Index 19 Press MENU, then press x or • until the SET UP menu appears....
... select channel 125, press 100-2-5. Press x or • to select ADD or ERASE, whichever function you can add or erase specific channels. The picture will be on your screen are projected onto the screen where they converge to the next programmed channel: Press Channel y or z on the TV or...blue. Convergence may drift over time or if you must select the channel to add or erase. Changing channels To change to form a full-color picture. Introduction Connecting your TV Using the TV's Features Appendix Index 19 Press MENU, then press x or • until the SET UP menu appears....

Owners Manual
Page 20
... 32 33 34 35 9. Press ENTER to highlight RED or BLUE, depending on which color needs adjusting. Press MENU, then press x or • until the PICTURE menu appears. 2. Press x or • to display the center CONVERGENCE menu. 1 2 3 4 5 6 7 8 9 10 11 12 13 14 15 16 17 18 19 20 21 22 23...
... 32 33 34 35 9. Press ENTER to highlight RED or BLUE, depending on which color needs adjusting. Press MENU, then press x or • until the PICTURE menu appears. 2. Press x or • to display the center CONVERGENCE menu. 1 2 3 4 5 6 7 8 9 10 11 12 13 14 15 16 17 18 19 20 21 22 23...

Owners Manual
Page 24
...PAUSE REW FF PIP CH LOCATE SWAP SOURCE PIP PIP CH zy PIP 24 BLOCKED Note: • PIP cannot be displayed as a small picture. To display a picture from an external source, such as a VCR. Turn on the TV and select the program you set, the TV will appear. Press ...window. 4. Turn on the TV and select the program you have connected the external source equipment properly. Press PIP a second time to display a small picture. Using the TV's Features Appendix Index 24 Introduction Connecting your TV Using the Remote Control Setting up your TV" on page 5. 2. To display a ...
...PAUSE REW FF PIP CH LOCATE SWAP SOURCE PIP PIP CH zy PIP 24 BLOCKED Note: • PIP cannot be displayed as a small picture. To display a picture from an external source, such as a VCR. Turn on the TV and select the program you set, the TV will appear. Press ...window. 4. Turn on the TV and select the program you have connected the external source equipment properly. Press PIP a second time to display a small picture. Using the TV's Features Appendix Index 24 Introduction Connecting your TV Using the Remote Control Setting up your TV" on page 5. 2. To display a ...

Owners Manual
Page 25
... STILL while you are using the PIP feature to the moving picture, press STILL again. Changing the position of the small picture will become a still picture. The display position of the small picture Press LOCATE repeatedly while you are watching a small picture. RECALL MUTE POWER 123 456 78 9 CH RTN 100 0 ...FF PIP CH LOCATE SWAP STILL SWAP LOCATE Still Setting up your TV Using the Remote Control Switching the main and small pictures Press SWAP while you press the SWAP button. Introduction Connecting your TV Using the TV's Features Appendix Index 25 The main and ...
... STILL while you are using the PIP feature to the moving picture, press STILL again. Changing the position of the small picture will become a still picture. The display position of the small picture Press LOCATE repeatedly while you are watching a small picture. RECALL MUTE POWER 123 456 78 9 CH RTN 100 0 ...FF PIP CH LOCATE SWAP STILL SWAP LOCATE Still Setting up your TV Using the Remote Control Switching the main and small pictures Press SWAP while you press the SWAP button. Introduction Connecting your TV Using the TV's Features Appendix Index 25 The main and ...

Owners Manual
Page 28
... 13 14 15 16 17 18 19 20 21 22 23 24 25 26 27 28 29 30 31 32 33 34 35 Note: The picture-in-picture is not locked even if ON is selected. Press • to lock "X" or press x to select item. If you can lock are as follows...
... 13 14 15 16 17 18 19 20 21 22 23 24 25 26 27 28 29 30 31 32 33 34 35 Note: The picture-in-picture is not locked even if ON is selected. Press • to lock "X" or press x to select item. If you can lock are as follows...

Owners Manual
Page 29
... 35 To select each item: Press z or y . All locking is disabled until the TV is correct, the lock mode will be released and the normal picture will not be locked.) 4. If a wrong PIN code is turned on again. From the LOCKS menu, select CH LOCK. 2. Press the Channel Number buttons to...
... 35 To select each item: Press z or y . All locking is disabled until the TV is correct, the lock mode will be released and the normal picture will not be locked.) 4. If a wrong PIN code is turned on again. From the LOCKS menu, select CH LOCK. 2. Press the Channel Number buttons to...

Owners Manual
Page 31
...the Save New Preference feature in the TV's memory by using the Save New Preference feature (see page 32). You can adjust the picture quality to adjust is changed without saving your TV Introduction Press z or y to highlight the mode you can select your personal preference... 33 34 35 Selection contrast brightness color tint sharpness x Pressing • lower higher darker paler lighter deeper reddish greenish softer sharper The PICTURE items you have adjusted can be saved in your TV's memory so you want to your personal preferences, including the contrast, brightness, ...
...the Save New Preference feature in the TV's memory by using the Save New Preference feature (see page 32). You can adjust the picture quality to adjust is changed without saving your TV Introduction Press z or y to highlight the mode you can select your personal preference... 33 34 35 Selection contrast brightness color tint sharpness x Pressing • lower higher darker paler lighter deeper reddish greenish softer sharper The PICTURE items you have adjusted can be saved in your TV's memory so you want to your personal preferences, including the contrast, brightness, ...

Owners Manual
Page 32
... reduction feature This feature allows you to obtain natural flesh tones by selecting the PREFERENCE mode in the picture preference mode. Using the flesh tone feature This feature allows you have adjusted in the picture mode feature. Press y or z to highlight ON. 1 2 3 4 5 6 7 8 9 10 11 12 13 14 ... MODE 10 8 PREFERENCE 9 10 11 11 12 FLESH TONE ON / OFF 12 13 NO I T FAV CH TV/VIDEO MENU yzx • To save the PICTURE items (contrast, brightness, color, tint, and sharpness) you to reduce visible interference in step 3 above . 32 RECALL MUTE POWER 123 456 78 9 CH RTN 100...
... reduction feature This feature allows you to obtain natural flesh tones by selecting the PREFERENCE mode in the picture preference mode. Using the flesh tone feature This feature allows you have adjusted in the picture mode feature. Press y or z to highlight ON. 1 2 3 4 5 6 7 8 9 10 11 12 13 14 ... MODE 10 8 PREFERENCE 9 10 11 11 12 FLESH TONE ON / OFF 12 13 NO I T FAV CH TV/VIDEO MENU yzx • To save the PICTURE items (contrast, brightness, color, tint, and sharpness) you to reduce visible interference in step 3 above . 32 RECALL MUTE POWER 123 456 78 9 CH RTN 100...

Owners Manual
Page 33
... 22 23 24 25 26 27 28 29 30 31 32 33 34 35 The RESET function adjusts the picture functions to highlight the mode you want. 1 2 3 4 5 6 7 8 9 10 11 12...15 16 17 18 19 20 21 22 23 24 25 26 27 28 29 30 31 32 33 34 35 Resetting your picture adjustments 1. center (50) color center (50) tint center (0) sharpness ......... Press x or •. 1 2 3 ...and warm. Press MENU, then press x or • until the PICTURE menu appears. 2. Press y or z to highlight COLOR TEMPERATURE. 3. Mode cool medium warm Picture Quality blueish neutral reddish To select the color temperature: 1. Press x ...
... 22 23 24 25 26 27 28 29 30 31 32 33 34 35 The RESET function adjusts the picture functions to highlight the mode you want. 1 2 3 4 5 6 7 8 9 10 11 12...15 16 17 18 19 20 21 22 23 24 25 26 27 28 29 30 31 32 33 34 35 Resetting your picture adjustments 1. center (50) color center (50) tint center (0) sharpness ......... Press x or •. 1 2 3 ...and warm. Press MENU, then press x or • until the PICTURE menu appears. 2. Press y or z to highlight COLOR TEMPERATURE. 3. Mode cool medium warm Picture Quality blueish neutral reddish To select the color temperature: 1. Press x ...

Owners Manual
Page 37
... deactivate this occurs, turn off , the screen will hear the station's second audio program (if available) from the speakers while viewing the original programming picture (see the picture but not hear sound. Press y or z to see notes at right). If you have the SAP mode on and the station the TV is...
... deactivate this occurs, turn off , the screen will hear the station's second audio program (if available) from the speakers while viewing the original programming picture (see the picture but not hear sound. Press y or z to see notes at right). If you have the SAP mode on and the station the TV is...

Owners Manual
Page 41
... 14 15 16 17 18 19 20 21 22 23 24 25 26 27 28 29 30 31 32 33 34 35 • MAIN: Main picture sound. • PIP: Selected PIP sound. Press MENU, then press x or • until the AUDIO menu appears. 2. Press y or z to display the following on -screen... and solid (gray). Press x or • to highlight AUDIO OUT. 3. Selecting the background of the menu display You can change the background of the main picture through the built-in TV mode) • Channel number or VIDEO mode selected • Time (if set) • Channel label (if set) • Stereo or...
... 14 15 16 17 18 19 20 21 22 23 24 25 26 27 28 29 30 31 32 33 34 35 • MAIN: Main picture sound. • PIP: Selected PIP sound. Press MENU, then press x or • until the AUDIO menu appears. 2. Press y or z to display the following on -screen... and solid (gray). Press x or • to highlight AUDIO OUT. 3. Selecting the background of the menu display You can change the background of the main picture through the built-in TV mode) • Channel number or VIDEO mode selected • Time (if set) • Channel label (if set) • Stereo or...

Owners Manual
Page 44
...to select a certain channel • The channel may have broadcast difficulties. Unable to the signal source type (that the SPEAKERS function in the PICTURE menu. Poor picture, sound OK • Check the antenna connections. • The station may be poor. Try another channel. • Check that is properly... set . Poor sound, picture OK • The station may be locked out with the CH LOCK feature or erased with the ADD/ERASE feature. Problem TV will not...
...to select a certain channel • The channel may have broadcast difficulties. Unable to the signal source type (that the SPEAKERS function in the PICTURE menu. Poor picture, sound OK • Check the antenna connections. • The station may be poor. Try another channel. • Check that is properly... set . Poor sound, picture OK • The station may be locked out with the CH LOCK feature or erased with the ADD/ERASE feature. Problem TV will not...

Owners Manual
Page 45
...Inc. ("TACP") and Toshiba Hawaii Inc. ("THI") make the following conditions; (1) You must retain your bill of sale or provide other rights which have a limited ninety (90) day warranty for a period of one way to enable TACP/THI to provide you with a new or refurbished picture tube, without charge to...or parts which action must be liable for rental units begins with a copy of bill of sale to TOSHIBA OF CANADA to you find a defective product or part to find that if a defective picture tube is one (1) year after you ." The time within ten days after following all parts, labor...
...Inc. ("TACP") and Toshiba Hawaii Inc. ("THI") make the following conditions; (1) You must retain your bill of sale or provide other rights which have a limited ninety (90) day warranty for a period of one way to enable TACP/THI to provide you with a new or refurbished picture tube, without charge to...or parts which action must be liable for rental units begins with a copy of bill of sale to TOSHIBA OF CANADA to you find a defective product or part to find that if a defective picture tube is one (1) year after you ." The time within ten days after following all parts, labor...

Owners Manual
Page 46
... selection 17 Last mode memory 42 Locks menu 26 Menu system 16 MTS feature 37 MUTE button 37 P Picture adjustments COLOR TEMPERATURE 33 FLESH TONE 32 NOISE REDUCTION 32 Picture mode 31 Picture quality 31 Picture in Picture (PIP) LOCATE button 25 PIP button 24 PIP CH y z buttons 24 SOURCE button 24 STILL button 25...
... selection 17 Last mode memory 42 Locks menu 26 Menu system 16 MTS feature 37 MUTE button 37 P Picture adjustments COLOR TEMPERATURE 33 FLESH TONE 32 NOISE REDUCTION 32 Picture mode 31 Picture quality 31 Picture in Picture (PIP) LOCATE button 25 PIP button 24 PIP CH y z buttons 24 SOURCE button 24 STILL button 25...

