Owner's Manual - English
Page 7
...to Toshiba 9 Features of your new TV 9 Overview of steps for installing, setting up, and using your new TV 10 TV front and side panel controls and connections 11 TV back panel connections 12 Chapter 2: Connecting your TV ...Installation menu layout 41 THINC™ menu 41 Navigating the menu system 42 Chapter 5: Setting up your TV 43 Setting the Demo Mode 43 Selecting the menu language 43 Configuring ...Setting the Auto Input feature 46 Labeling channels 47 Setting the HDMI™ audio mode 48 Viewing the digital signal meter 49 Viewing the system status 49 Selecting the Power-On...
...to Toshiba 9 Features of your new TV 9 Overview of steps for installing, setting up, and using your new TV 10 TV front and side panel controls and connections 11 TV back panel connections 12 Chapter 2: Connecting your TV ...Installation menu layout 41 THINC™ menu 41 Navigating the menu system 42 Chapter 5: Setting up your TV 43 Setting the Demo Mode 43 Selecting the menu language 43 Configuring ...Setting the Auto Input feature 46 Labeling channels 47 Setting the HDMI™ audio mode 48 Viewing the digital signal meter 49 Viewing the system status 49 Selecting the Power-On...
Owner's Manual - English
Page 9
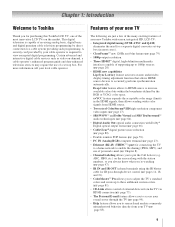
... guide and data-enhanced television services may require the use of a set -top box (in the HDMI signals, then allows sending wider color signals from HDMI source. • Two sets of external devices from your new Toshiba widescreen, integrated HD, LCD TV: • Integrated digital tuning (8VSB ATSC and QAM) eliminates the need for a separate digital converter...
... guide and data-enhanced television services may require the use of a set -top box (in the HDMI signals, then allows sending wider color signals from HDMI source. • Two sets of external devices from your new Toshiba widescreen, integrated HD, LCD TV: • Integrated digital tuning (8VSB ATSC and QAM) eliminates the need for a separate digital converter...
Owner's Manual - English
Page 13
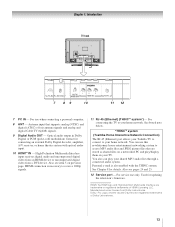
...™ system (Toshiba Home Interactive Network Connection) The RJ-45 (Ethernet) port allows your Toshiba TV to connect to your TV. Manufactured under license from a DVI device. HDMI connection is also enabled with optical audio input. 10 HDMI™ IN -... For use only. Personal e-mail is necessary to access MP3 audio files and JPEG picture files that supports analog (NTSC) and digital (ATSC) off-air antenna signals...
...™ system (Toshiba Home Interactive Network Connection) The RJ-45 (Ethernet) port allows your Toshiba TV to connect to your TV. Manufactured under license from a DVI device. HDMI connection is also enabled with optical audio input. 10 HDMI™ IN -... For use only. Personal e-mail is necessary to access MP3 audio files and JPEG picture files that supports analog (NTSC) and digital (ATSC) off-air antenna signals...
Owner's Manual - English
Page 17
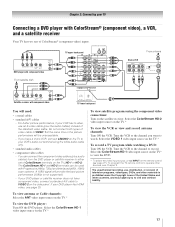
... used with Progressive (480p, 720p) and Interlaced (480i, 1080i) scan systems. A 1080i signal will need: • coaxial cables • standard A/V cables - If your DVD player has HDMI video, see Chapter 3. Select the ColorStream HD-2 video input source on the TV (HD-1 or HD-2). You can be unacceptable. - Select the VIDEO 1 video input source...
... used with Progressive (480p, 720p) and Interlaced (480i, 1080i) scan systems. A 1080i signal will need: • coaxial cables • standard A/V cables - If your DVD player has HDMI video, see Chapter 3. Select the ColorStream HD-2 video input source on the TV (HD-1 or HD-2). You can be unacceptable. - Select the VIDEO 1 video input source...

Owner's Manual - English
Page 20
... new standard adoption. This input is recommended that some devices may not work properly with HDMI or DVI output). To program the TV remote control to -DVI adapter cable transfers video only. For detailed signal specifications, see Chapter 3. Conventional HDMI/DVI cable may not operate properly with high-bandwidth digital content protection, which is...
... new standard adoption. This input is recommended that some devices may not work properly with HDMI or DVI output). To program the TV remote control to -DVI adapter cable transfers video only. For detailed signal specifications, see Chapter 3. Conventional HDMI/DVI cable may not operate properly with high-bandwidth digital content protection, which is...

Owner's Manual - English
Page 22
...• Some audio systems may not output some digital audio sources because of both the TV and the amplifier must be compatible with Dolby Digital bitstream signals. Audio Setup PC Audio HDMI 1 Audio MTS Language Speakers Optical Output Format Dolby Digital Dynamic Range Control Reset No Auto... control the audio: 1 Turn on the TV and the digital audio device. 2 Press Y on your TV Connecting a digital audio system The TV's DIGITAL AUDIO OUT terminal outputs a Dolby®* Digital or 2-channel down-mixed PCM (pulse-code modulation) signal for use external speakers with an external analog...
...• Some audio systems may not output some digital audio sources because of both the TV and the amplifier must be compatible with Dolby Digital bitstream signals. Audio Setup PC Audio HDMI 1 Audio MTS Language Speakers Optical Output Format Dolby Digital Dynamic Range Control Reset No Auto... control the audio: 1 Turn on the TV and the digital audio device. 2 Press Y on your TV Connecting a digital audio system The TV's DIGITAL AUDIO OUT terminal outputs a Dolby®* Digital or 2-channel down-mixed PCM (pulse-code modulation) signal for use external speakers with an external analog...
Owner's Manual - English
Page 23
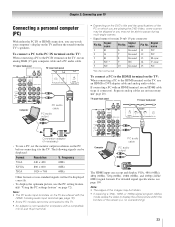
To connect a PC to the PC IN terminal on the TV: When connecting a PC to the PC IN terminal on the TV, use an HDMI-to the HDMI terminal on the TV, use an analog RGB (15-pin) computer cable and a PC audio cable. Signal name 1 R 6 Ground 11 NC 2 G 7 Ground 12 NC 3 B 8 Ground 13 H-sync 4 NC * 9 NC...
To connect a PC to the PC IN terminal on the TV: When connecting a PC to the PC IN terminal on the TV, use an HDMI-to the HDMI terminal on the TV, use an analog RGB (15-pin) computer cable and a PC audio cable. Signal name 1 R 6 Ground 11 NC 2 G 7 Ground 12 NC 3 B 8 Ground 13 H-sync 4 NC * 9 NC...
Owner's Manual - English
Page 44
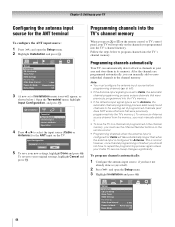
...channel programming process adds newly found channels to the existing set of Installation menu icons will stop only on the TV. at left ). • If the Antenna input signal type is set of programmed channels (and does NOT erase channels that were previously programmed into the... and press T. This is finished, you must configure the antenna input source before programming channels (- Setup Installation CE-Link Setup Sleep Timer HDMI Settings PC Settings Slide Show Interval 2 Sec Power-On Mode Power-Saving Demo Mode Off 44 Chapter 5: Setting up your area and store...
...channel programming process adds newly found channels to the existing set of Installation menu icons will stop only on the TV. at left ). • If the Antenna input signal type is set of programmed channels (and does NOT erase channels that were previously programmed into the... and press T. This is finished, you must configure the antenna input source before programming channels (- Setup Installation CE-Link Setup Sleep Timer HDMI Settings PC Settings Slide Show Interval 2 Sec Power-On Mode Power-Saving Demo Mode Off 44 Chapter 5: Setting up your area and store...
Owner's Manual - English
Page 51
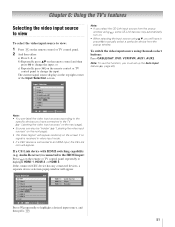
... Video 1 2 Video 2 3 ColorStream HD1 4 ColorStream HD2 5 HDMI 1 CE-Link 6 HDMI 2 7 HDMI 3 8 PC ANT 0 - 8 / INPUT to Select Navigate Note: • You can also be "hidden" (- "Labeling the video input sources" on the next page). • "No Video Signal" will have connected to highlight a desired input source, and then ...press O. or b) Repeatedly press Bb on the screen if no signal is connected to the HDMI input: Press + on the remote control or TV control panel to highlight HDMI 1, HDMI 2. Note: • If you must set up the Auto Input feature (- Note: To...
... Video 1 2 Video 2 3 ColorStream HD1 4 ColorStream HD2 5 HDMI 1 CE-Link 6 HDMI 2 7 HDMI 3 8 PC ANT 0 - 8 / INPUT to Select Navigate Note: • You can also be "hidden" (- "Labeling the video input sources" on the next page). • "No Video Signal" will have connected to highlight a desired input source, and then ...press O. or b) Repeatedly press Bb on the screen if no signal is connected to the HDMI input: Press + on the remote control or TV control panel to highlight HDMI 1, HDMI 2. Note: • If you must set up the Auto Input feature (- Note: To...
Owner's Manual - English
Page 57
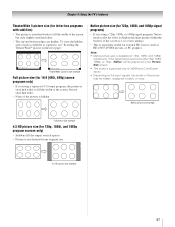
... useful for external HD sources such as subtitles or captions), see "Scrolling the TheaterWide® picture on the input signals, the border of the screen (i.e. Chapter 6: Using the TV's features TheaterWide 3 picture size (for letter box programs with subtitles) • The picture is stretched wider to ...out in black, or noisy. To view the hidden areas (such as HD-DVD, DVHS movies, or PC graphics. Native picture size (for HDMI and ColorStream inputs. • Depending on the next page." Native picture size example Full picture size example 4:3 HD picture size (for 720p, ...
... useful for external HD sources such as subtitles or captions), see "Scrolling the TheaterWide® picture on the input signals, the border of the screen (i.e. Chapter 6: Using the TV's features TheaterWide 3 picture size (for letter box programs with subtitles) • The picture is stretched wider to ...out in black, or noisy. To view the hidden areas (such as HD-DVD, DVHS movies, or PC graphics. Native picture size (for HDMI and ColorStream inputs. • Depending on the next page." Native picture size example Full picture size example 4:3 HD picture size (for 720p, ...

Owner's Manual - English
Page 58
... 4 Press b to highlight the Picture Scroll field. 5 Press C or c to scroll the picture up and down as needed, from the HDMI input. Chapter 6: Using the TV's features Scrolling the TheaterWide® picture (TheaterWide 2 and 3 only) You can set under "Selecting the picture size" on the auto aspect ...you cannot scroll in step 3 above. 58 To turn on page 56. To revert to On, the TV will automatically select the picture size when one of Automatic aspect size (automatically signal source selected when Auto Aspect is set the scroll settings: 1 Press Y and open the Video menu. ...
... 4 Press b to highlight the Picture Scroll field. 5 Press C or c to scroll the picture up and down as needed, from the HDMI input. Chapter 6: Using the TV's features Scrolling the TheaterWide® picture (TheaterWide 2 and 3 only) You can set under "Selecting the picture size" on the auto aspect ...you cannot scroll in step 3 above. 58 To turn on page 56. To revert to On, the TV will automatically select the picture size when one of Automatic aspect size (automatically signal source selected when Auto Aspect is set the scroll settings: 1 Press Y and open the Video menu. ...
Owner's Manual - English
Page 59
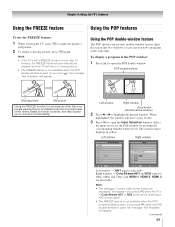
... Selection 0 ANT 1 Video 1 2 Video 2 3 ColorStream HD1 4 ColorStream HD2 5 HDMI 1 CE-Link 6 HDMI 2 7 HDMI 3 8 PC 0 - 8 / INPUT to Select ANT Navigate Input Selection ColorStream HD1 0 ANT 1 Video 1 2 Video 2 3 ColorStream HD1 4 ColorStream HD2 (Hidden) 5 HDMI 1 CE-Link 6 HDMI 2 7 HDMI 3 8 PC 0 - 8 / INPUT to open , the message "Not Available" ...) double-window feature splits the screen into two windows so you press P when the TV is in ColorStream HD1 or HD2 mode and is receiving a 480i format signal. • The FREEZE feature is not available when the POP double-window is selectable....
... Selection 0 ANT 1 Video 1 2 Video 2 3 ColorStream HD1 4 ColorStream HD2 5 HDMI 1 CE-Link 6 HDMI 2 7 HDMI 3 8 PC 0 - 8 / INPUT to Select ANT Navigate Input Selection ColorStream HD1 0 ANT 1 Video 1 2 Video 2 3 ColorStream HD1 4 ColorStream HD2 (Hidden) 5 HDMI 1 CE-Link 6 HDMI 2 7 HDMI 3 8 PC 0 - 8 / INPUT to open , the message "Not Available" ...) double-window feature splits the screen into two windows so you press P when the TV is in ColorStream HD1 or HD2 mode and is receiving a 480i format signal. • The FREEZE feature is not available when the POP double-window is selectable....

Owner's Manual - English
Page 66
...digital audio system to the Optical Audio Out terminal on the TV (see "Connecting a digital audio system" on your TV (- Chapter 6: Using the TV's features Turning off the built-in speakers You can use ...dynamic range control feature causes the ATSC dynamic range to be grayed out for NTSC signals, Video, ColorStream, and PC inputs. • The Dolby Digital Dynamic Range Control will function...Reset Done 4 To save the new settings, highlight Done and press T. Audio Setup PC Audio HDMI 1 Audio MTS Language Speakers Optical Output Format Dolby Digital Dynamic Range Control No Auto Stereo English...
...digital audio system to the Optical Audio Out terminal on the TV (see "Connecting a digital audio system" on your TV (- Chapter 6: Using the TV's features Turning off the built-in speakers You can use ...dynamic range control feature causes the ATSC dynamic range to be grayed out for NTSC signals, Video, ColorStream, and PC inputs. • The Dolby Digital Dynamic Range Control will function...Reset Done 4 To save the new settings, highlight Done and press T. Audio Setup PC Audio HDMI 1 Audio MTS Language Speakers Optical Output Format Dolby Digital Dynamic Range Control No Auto Stereo English...
Owner's Manual - English
Page 72
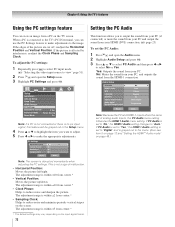
... a PC is not connected or there is connected to make adjustments to the image. page 23) To set to "No," the HDMI 1 Audio setting changes to "Auto." When a PC is no pc input signal, this feature will be grayed out in the menu. (Also see item 5 on page 12 and "Setting the... HDMI™ Audio mode" on the TV screen. The adjustment range is set the PC Audio: 1 Press Y and open the Setup menu. 3 Highlight PC...
... a PC is not connected or there is connected to make adjustments to the image. page 23) To set to "No," the HDMI 1 Audio setting changes to "Auto." When a PC is no pc input signal, this feature will be grayed out in the menu. (Also see item 5 on page 12 and "Setting the... HDMI™ Audio mode" on the TV screen. The adjustment range is set the PC Audio: 1 Press Y and open the Setup menu. 3 Highlight PC...
Owner's Manual - English
Page 75
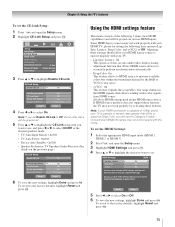
... TURN OFF OR UNPLUG THE TV UNTIL COMPLETED MESSAGE IS DISPLAYED!! Some HDMI legacy sources may not work properly by the RGB or YCbCr color space. • xvYCC: On This feature expands the acceptable color range (limits) in the HDMI signals, then allows sending wider color signals from HDMI source. If HDMI source products does not support...
... TURN OFF OR UNPLUG THE TV UNTIL COMPLETED MESSAGE IS DISPLAYED!! Some HDMI legacy sources may not work properly by the RGB or YCbCr color space. • xvYCC: On This feature expands the acceptable color range (limits) in the HDMI signals, then allows sending wider color signals from HDMI source. If HDMI source products does not support...
Owner's Manual - English
Page 76
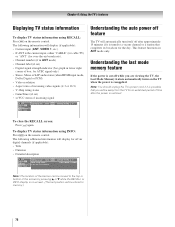
...the auto power off feature The TV will display (if applicable): • Current input (ANT, VIDEO 1, etc.) • If ANT is the current input, either "CABLE" (for cable TV) or "ANT" (for ATSC signal only) • Stereo, Mono or SAP audio status (when HDMI input mode, Dolby Digital or ...PCM) • Video resolution • Aspect ratio of incoming video signals (4:3 or 16:9) • V-Chip rating status • GameTimer ...
...the auto power off feature The TV will display (if applicable): • Current input (ANT, VIDEO 1, etc.) • If ANT is the current input, either "CABLE" (for cable TV) or "ANT" (for ATSC signal only) • Stereo, Mono or SAP audio status (when HDMI input mode, Dolby Digital or ...PCM) • Video resolution • Aspect ratio of incoming video signals (4:3 or 16:9) • V-Chip rating status • GameTimer ...
Owner's Manual - English
Page 79
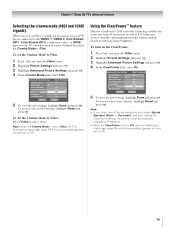
... can be available (grayed out and set to Video, the Film Stabilization feature (- Chapter 7: Using the TV's advanced features Selecting the cinema mode (480i and 1080i signals) When you select one of the factory-set picture modes (Sports, Standard, Movie, or Document) and then... anti-blur technology doubles the frame rate from a DVD player connected to the VIDEO 1, VIDEO 2, ColorStream HD-1, ColorStream HD-2 (component video), or HDMI inputs on the ClearFrame: 1 Press Y and open the Video menu. 2 Highlight Picture Settings and press T. 3 Highlight Advanced Picture Settings and press ...
... can be available (grayed out and set to Video, the Film Stabilization feature (- Chapter 7: Using the TV's advanced features Selecting the cinema mode (480i and 1080i signals) When you select one of the factory-set picture modes (Sports, Standard, Movie, or Document) and then... anti-blur technology doubles the frame rate from a DVD player connected to the VIDEO 1, VIDEO 2, ColorStream HD-1, ColorStream HD-2 (component video), or HDMI inputs on the ClearFrame: 1 Press Y and open the Video menu. 2 Highlight Picture Settings and press T. 3 Highlight Advanced Picture Settings and press ...
Owner's Manual - English
Page 80
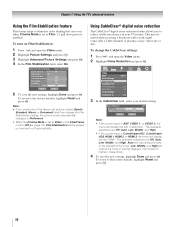
...Low, Middle, and High. • If the current input is ColorStream HD1, ColorStream HD2, HDMI 1, HDMI 2, or HDMI 3, the menu will reduce the noise in your desired setting. To turn on Film Stabilization: ...ANT, VIDEO 1, or VIDEO 2, the menu will be useful when receiving a broadcast with a weak signal (especially a Cable channel) or playing a noisy video tape or disc. To change the Film Stabilization... To save the new settings, highlight Done and press T. Chapter 7: Using the TV's advanced features Using the Film Stabilization feature This feature helps to eliminate video shaking ...
...Low, Middle, and High. • If the current input is ColorStream HD1, ColorStream HD2, HDMI 1, HDMI 2, or HDMI 3, the menu will reduce the noise in your desired setting. To turn on Film Stabilization: ...ANT, VIDEO 1, or VIDEO 2, the menu will be useful when receiving a broadcast with a weak signal (especially a Cable channel) or playing a noisy video tape or disc. To change the Film Stabilization... To save the new settings, highlight Done and press T. Chapter 7: Using the TV's advanced features Using the Film Stabilization feature This feature helps to eliminate video shaking ...

Owner's Manual - English
Page 83
... Using the Game Mode feature You can change the video input by xvYCC. Note: To use the Game Mode feature for 480i and 1080i input signals. page 51). • When the Game Mode is set to On, the following features (- Highlight OK, and then press T. 3 Press O. To turn on when any... Picture Settings Noise Reduction ColorMaster Pro xvYCC Selection Game Mode Theater Settings TheaterLock Sports On Off Off On Off To turn the TV off Game Mode: Select Off in the HDMI Settings menu is set to select On. pages 79 and 80) are not available (grayed out). -Cinema Mode: grayed out and...
... Using the Game Mode feature You can change the video input by xvYCC. Note: To use the Game Mode feature for 480i and 1080i input signals. page 51). • When the Game Mode is set to On, the following features (- Highlight OK, and then press T. 3 Press O. To turn on when any... Picture Settings Noise Reduction ColorMaster Pro xvYCC Selection Game Mode Theater Settings TheaterLock Sports On Off Off On Off To turn the TV off Game Mode: Select Off in the HDMI Settings menu is set to select On. pages 79 and 80) are not available (grayed out). -Cinema Mode: grayed out and...

Owner's Manual - English
Page 104
...watching an analog channel (off the TV, press and hold the POWER button on the TV, no picture will blink until the TV enters standby mode, (plugged in the TV picture (- Noisy picture • If you are using a ColorStream or HDMI video connection instead. • ...turn on the remote control or TV and select a valid video input source (- You may have broadcast difficulties. Cannot view external signals or channel 3 or 4 • If you cannot view signals from external devices connected to VIDEO 1, VIDEO 2, ColorStream®, HDMI 1, HDMI 2, HDMI 3, PC, or from standby...
...watching an analog channel (off the TV, press and hold the POWER button on the TV, no picture will blink until the TV enters standby mode, (plugged in the TV picture (- Noisy picture • If you are using a ColorStream or HDMI video connection instead. • ...turn on the remote control or TV and select a valid video input source (- You may have broadcast difficulties. Cannot view external signals or channel 3 or 4 • If you cannot view signals from external devices connected to VIDEO 1, VIDEO 2, ColorStream®, HDMI 1, HDMI 2, HDMI 3, PC, or from standby...


