
Owner's Manual - English
Page 2
... weight of your purchase! Before operating your new LCD TV. WARNING RISK OF ELECTRIC SHOCK DO NOT OPEN. WARNING: TO REDUCE THE RISK OF ELECTRIC SHOCK, DO NOT REMOVE COVER (OR BACK). REFER SERVICING TO QUALIFIED SERVICE PERSONNEL. NEC, which provides guidelines for wall mounting this television. As you have more than a UL Listed wall bracket appropriate for the size and weight of this television, always use...
... weight of your purchase! Before operating your new LCD TV. WARNING RISK OF ELECTRIC SHOCK DO NOT OPEN. WARNING: TO REDUCE THE RISK OF ELECTRIC SHOCK, DO NOT REMOVE COVER (OR BACK). REFER SERVICING TO QUALIFIED SERVICE PERSONNEL. NEC, which provides guidelines for wall mounting this television. As you have more than a UL Listed wall bracket appropriate for the size and weight of this television, always use...
Owner's Manual - English
Page 4
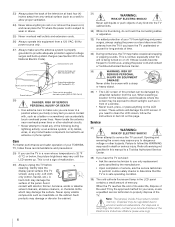
... antenna near overhead power lines or other hazards. or b) cables, wires, or any of the following during lightning activity: a) an antenna system; Gently wipe the display panel surface (the TV screen) using a dry, soft cloth only (cotton, flannel, etc.). If you leave the TV unattended or unused for your TOSHIBA TV, follow these sounds become frequent or continuous, unplug the power cord and contact a Toshiba Authorized Service...
... antenna near overhead power lines or other hazards. or b) cables, wires, or any of the following during lightning activity: a) an antenna system; Gently wipe the display panel surface (the TV screen) using a dry, soft cloth only (cotton, flannel, etc.). If you leave the TV unattended or unused for your TOSHIBA TV, follow these sounds become frequent or continuous, unplug the power cord and contact a Toshiba Authorized Service...
Owner's Manual - English
Page 7
... Using the volume lock feature (8000 32 Operational feature reset (8900 32 Multi-brand remote control device codes 33 Chapter 4: Menu layout and navigation 40 Main menu layout 40 Setup/Installation menu layout 41 THINC™ menu 41 Navigating the menu system 42 Chapter 5: Setting up your TV 43 Setting the Demo Mode 43 Selecting the menu language 43 Configuring the antenna input source for the ANT terminal 44 Programming channels into the TV's channel memory . . . . 44 Programming channels automatically 44 Manually...
... Using the volume lock feature (8000 32 Operational feature reset (8900 32 Multi-brand remote control device codes 33 Chapter 4: Menu layout and navigation 40 Main menu layout 40 Setup/Installation menu layout 41 THINC™ menu 41 Navigating the menu system 42 Chapter 5: Setting up your TV 43 Setting the Demo Mode 43 Selecting the menu language 43 Configuring the antenna input source for the ANT terminal 44 Programming channels into the TV's channel memory . . . . 44 Programming channels automatically 44 Manually...
Owner's Manual - English
Page 9
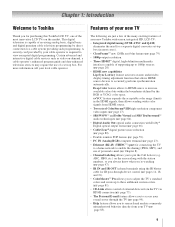
... LCD TVs on -demand, a cable operator's enhanced program guide and data-enhanced television services may require the use of a set -top box (in the HDMI signals, then allows sending wider color signals from the TV via HDMI connection (- page 80). • Double-window POP feature (- page 23). • Ethernet (RJ-45) (THINC™) port for connecting the TV to a home network to view encrypted digital programming. ABC, HBO, etc.) on the screen along with Dolby® Digital optical output format...
... LCD TVs on -demand, a cable operator's enhanced program guide and data-enhanced television services may require the use of a set -top box (in the HDMI signals, then allows sending wider color signals from the TV via HDMI connection (- page 80). • Double-window POP feature (- page 23). • Ethernet (RJ-45) (THINC™) port for connecting the TV to a home network to view encrypted digital programming. ABC, HBO, etc.) on the screen along with Dolby® Digital optical output format...
Owner's Manual - English
Page 10
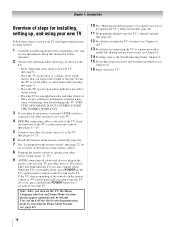
... THE TOSHIBA WARRANTY. 3 Do not plug in standby mode, press POWER on the TV control panel or remote control to your TV and begin using your new TV Follow these steps to set up your TV. 4 BEFORE connecting cables or devices to operate your other device(s) (- The yellow LED will damage the TV. page 26). 7 See "Learning about your LCD TV" (- pages 31-39). 9 AFTER connecting all cables and devices to turn on the TV, the Menu Language...
... THE TOSHIBA WARRANTY. 3 Do not plug in standby mode, press POWER on the TV control panel or remote control to your TV and begin using your new TV Follow these steps to set up your TV. 4 BEFORE connecting cables or devices to operate your other device(s) (- The yellow LED will damage the TV. page 26). 7 See "Learning about your LCD TV" (- pages 31-39). 9 AFTER connecting all cables and devices to turn on the TV, the Menu Language...
Owner's Manual - English
Page 12
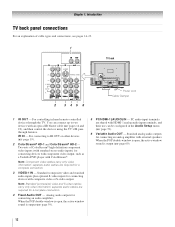
... sets of cable types and connections, see pages 14-23. 1 TV back 2 3 45 6 Power cord Cable Clamper 1 IR OUT - Note: Component video cables carry only video information; Note: Standard (composite) video and S-video cables carry only video information; page 60). 12 IR IN - Standard (composite) video and standard audio inputs plus optional S-video inputs for connecting devices with component video output, such as a Toshiba DVD player with composite video or S-video output. separate audio cables are shared with HDMI-1 analog audio input terminals, and their use can connect up...
... sets of cable types and connections, see pages 14-23. 1 TV back 2 3 45 6 Power cord Cable Clamper 1 IR OUT - Note: Component video cables carry only video information; Note: Standard (composite) video and S-video cables carry only video information; page 60). 12 IR IN - Standard (composite) video and standard audio inputs plus optional S-video inputs for connecting devices with component video output, such as a Toshiba DVD player with composite video or S-video output. separate audio cables are shared with HDMI-1 analog audio input terminals, and their use can connect up...
Owner's Manual - English
Page 13
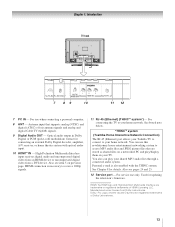
... access MP3 audio files and JPEG picture files that supports analog (NTSC) and digital (ATSC) off-air antenna signals and analog and digital Cable TV (QAM) signals. 9 Digital Audio OUT - Used for details. Also see pages 24 and 25. 12 Service port - Chapter 1: Introduction TV back 7 89 10 11 12 7 PC IN - Manufactured under license from a DVI device. Optical audio output in Dolby Digital or PCM (pulse-code modulation) format for connecting an external Dolby Digital decoder, amplifier, A/V receiver...
... access MP3 audio files and JPEG picture files that supports analog (NTSC) and digital (ATSC) off-air antenna signals and analog and digital Cable TV (QAM) signals. 9 Digital Audio OUT - Used for details. Also see pages 24 and 25. 12 Service port - Chapter 1: Introduction TV back 7 89 10 11 12 7 PC IN - Manufactured under license from a DVI device. Optical audio output in Dolby Digital or PCM (pulse-code modulation) format for connecting an external Dolby Digital decoder, amplifier, A/V receiver...
Owner's Manual - English
Page 14
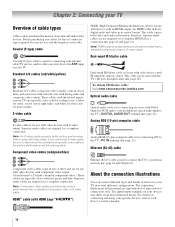
... the TV's DIGITAL AUDIO OUT terminal (- Component video cables (red/green/blue) Component video cables come in sets of three, and are representative of each device's owner's manual. 14 An HDMI cable delivers digital audio and video in its native format. This cable carries both video and audio information; page 20 and page 23). Ethernet (RJ-45) cable Ethernet (RJ-45) cable is Toshiba's brand of component video.) These cables are for connecting your antenna, cable TV service, and/or cable converter box to the ANT input...
... the TV's DIGITAL AUDIO OUT terminal (- Component video cables (red/green/blue) Component video cables come in sets of three, and are representative of each device's owner's manual. 14 An HDMI cable delivers digital audio and video in its native format. This cable carries both video and audio information; page 20 and page 23). Ethernet (RJ-45) cable Ethernet (RJ-45) cable is Toshiba's brand of component video.) These cables are for connecting your antenna, cable TV service, and/or cable converter box to the ANT input...
Owner's Manual - English
Page 16
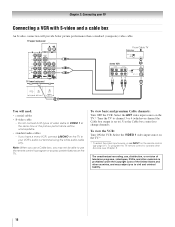
... Use the Cable box controls to operate other countries, and may not be unacceptable. • standard audio cables - To view the VCR: Turn ON the VCR. To program the TV remote control to change channels. If you may subject you to ). Select the VIDEO 1 video input source on the TV.* * To select the video input source, press INPUT on the TV to TV You will provide better picture performance than a standard (composite) video cable. page 27). TV upper back panel From Cable TV Cable box...
... Use the Cable box controls to operate other countries, and may not be unacceptable. • standard audio cables - To view the VCR: Turn ON the VCR. To program the TV remote control to change channels. If you may subject you to ). Select the VIDEO 1 video input source on the TV.* * To select the video input source, press INPUT on the TV to TV You will provide better picture performance than a standard (composite) video cable. page 27). TV upper back panel From Cable TV Cable box...
Owner's Manual - English
Page 23
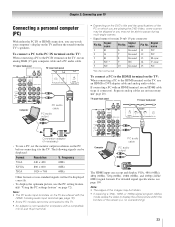
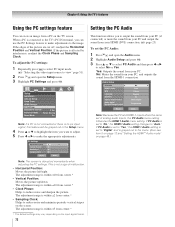
... with the HDMI-1 analog audio input terminals (- To connect a PC to the PC IN terminal on the TV: When connecting a PC to the PC IN terminal on the TV and hear the sound from the TV's speakers. page 72). • Some PC models cannot be displayed correctly. • To display the optimum picture, use a PC, set the monitor output resolution on the PC before connecting it to display the entire picture within the...
... with the HDMI-1 analog audio input terminals (- To connect a PC to the PC IN terminal on the TV: When connecting a PC to the PC IN terminal on the TV and hear the sound from the TV's speakers. page 72). • Some PC models cannot be displayed correctly. • To display the optimum picture, use a PC, set the monitor output resolution on the PC before connecting it to display the entire picture within the...
Owner's Manual - English
Page 40
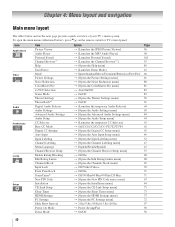
... Video Audio Preferences Locks Setup Item Picture Viewer Audio Player Personal E-mail Channel Browser™ Help Start Demo Mode Picture Settings Noise Reduction ColorMaster Pro xvYCC Selection Game Mode Theater Settings TheaterLock™ Digital Audio Selector Audio Settings Advanced Audio Settings Audio Setup CC Selector Base CC Mode Digital CC Settings Auto Input Input Labeling Channel Labeling Menu Language Channel Browser Setup Enable Rating Blocking Edit Rating Limits Channels Block Input Lock Front Panel Lock GameTimer® New PIN Code Installation CE-Link Setup Sleep Timer HDMI...
... Video Audio Preferences Locks Setup Item Picture Viewer Audio Player Personal E-mail Channel Browser™ Help Start Demo Mode Picture Settings Noise Reduction ColorMaster Pro xvYCC Selection Game Mode Theater Settings TheaterLock™ Digital Audio Selector Audio Settings Advanced Audio Settings Audio Setup CC Selector Base CC Mode Digital CC Settings Auto Input Input Labeling Channel Labeling Menu Language Channel Browser Setup Enable Rating Blocking Edit Rating Limits Channels Block Input Lock Front Panel Lock GameTimer® New PIN Code Installation CE-Link Setup Sleep Timer HDMI...
Owner's Manual - English
Page 44
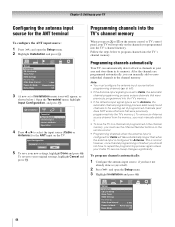
... open the Setup menu. 2 Highlight Installation and press T. To revert to repeat the programming process again unless your Cable TV service lineup changes significantly. Note: • You must use the Channel Number buttons on the remote control. • Programming channels when the antenna input is configured for Cable will stop only on the TV. Setup Installation CE-Link Setup Sleep Timer HDMI Settings PC Settings Slide Show Interval 2 Sec Power-On Mode Power-Saving Demo Mode Off 44 Programming channels automatically Your TV can manually add or...
... open the Setup menu. 2 Highlight Installation and press T. To revert to repeat the programming process again unless your Cable TV service lineup changes significantly. Note: • You must use the Channel Number buttons on the remote control. • Programming channels when the antenna input is configured for Cable will stop only on the TV. Setup Installation CE-Link Setup Sleep Timer HDMI Settings PC Settings Slide Show Interval 2 Sec Power-On Mode Power-Saving Demo Mode Off 44 Programming channels automatically Your TV can manually add or...
Owner's Manual - English
Page 48
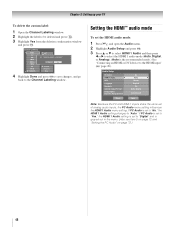
.... Audio Setup PC Audio HDMI 1 Audio MTS Language Speakers Optical Output Format Dolby Digital Dynamic Range Control Reset No Auto Stereo English On Dolby Digital Compressed Done Note: Because the PC and HDMI-1 inputs share the same set the HDMI audio mode: 1 Press Y and open the Audio menu. 2 Highlight Audio Setup and press T. 3 Press B or b to select HDMI 1 Audio and then press C or c to select the HDMI 1 audio mode (Auto, Digital, or Analog). (Auto is the recommended mode.) See "Connecting an HDMI or DVI device to "Auto." Channel...
.... Audio Setup PC Audio HDMI 1 Audio MTS Language Speakers Optical Output Format Dolby Digital Dynamic Range Control Reset No Auto Stereo English On Dolby Digital Compressed Done Note: Because the PC and HDMI-1 inputs share the same set the HDMI audio mode: 1 Press Y and open the Audio menu. 2 Highlight Audio Setup and press T. 3 Press B or b to select HDMI 1 Audio and then press C or c to select the HDMI 1 audio mode (Auto, Digital, or Analog). (Auto is the recommended mode.) See "Connecting an HDMI or DVI device to "Auto." Channel...
Owner's Manual - English
Page 72
..., and outputs the sound from center.* • Vertical Position: Moves the picture up/down. page 23) To set to "No," the HDMI 1 Audio setting changes to select PC input mode (- Audio Setup PC Audio HDMI 1 Audio MTS Language Speakers Optical Output Format Dolby Digital Dynamic Range Control No Auto Stereo English On Dolby Digital Compressed Reset Done Note: Because the PC and HDMI-1 inputs share the same set to view" page 51). 2 Press Y and open the Audio menu. 2 Highlight Audio Setup and...
..., and outputs the sound from center.* • Vertical Position: Moves the picture up/down. page 23) To set to "No," the HDMI 1 Audio setting changes to select PC input mode (- Audio Setup PC Audio HDMI 1 Audio MTS Language Speakers Optical Output Format Dolby Digital Dynamic Range Control No Auto Stereo English On Dolby Digital Compressed Reset Done Note: Because the PC and HDMI-1 inputs share the same set to view" page 51). 2 Press Y and open the Audio menu. 2 Highlight Audio Setup and...

Owner's Manual - English
Page 104
... time (- Poor color or no device is plugged in , the yellow LED will appear (page 59). LED indications while in reboot from channels 3 or 4, make sure L on the remote control is connected to an A/V receiver that contain a digital display, in this Troubleshooting section or the recommended solution has not worked, use this feature to help to an external A/V device (e.g., DVD player, video game system, set-top box, etc.) try the control panel buttons. Poor composite or S-video picture...
... time (- Poor color or no device is plugged in , the yellow LED will appear (page 59). LED indications while in reboot from channels 3 or 4, make sure L on the remote control is connected to an A/V receiver that contain a digital display, in this Troubleshooting section or the recommended solution has not worked, use this feature to help to an external A/V device (e.g., DVD player, video game system, set-top box, etc.) try the control panel buttons. Poor composite or S-video picture...
Owner's Manual - English
Page 107
... have POP3 e-mail service enabled with webbrowser-based (HTTP based) e-mail services. • Your network settings may be incorrect. Contact your operating system user guide or consult an IT professional. • Too many sharing devices are connected. Chapter 9: Troubleshooting Home server setup problems The PC ("Home Server") name is not displayed • The Ethernet cables are not connected properly or at one time. See "Setting up file sharing...
... have POP3 e-mail service enabled with webbrowser-based (HTTP based) e-mail services. • Your network settings may be incorrect. Contact your operating system user guide or consult an IT professional. • Too many sharing devices are connected. Chapter 9: Troubleshooting Home server setup problems The PC ("Home Server") name is not displayed • The Ethernet cables are not connected properly or at one time. See "Setting up file sharing...
Owner's Manual - English
Page 111
... PERIOD, TACP WILL, AT TACP'S OPTION, REPAIR OR REPLACE A DEFECTIVE PART WITH A NEW OR REFURBISHED PART WITHOUT CHARGE TO YOU FOR PARTS OR LABOR. Rental Units The warranty for LCD Television rental units begins on Parts and Labor TACP warrants this warranty. or Puerto Rico. (4) Labor service charges for set installation, setup, adjustment of customer controls, and installation or repair of antenna systems are not covered by fires, misuse...
... PERIOD, TACP WILL, AT TACP'S OPTION, REPAIR OR REPLACE A DEFECTIVE PART WITH A NEW OR REFURBISHED PART WITHOUT CHARGE TO YOU FOR PARTS OR LABOR. Rental Units The warranty for LCD Television rental units begins on Parts and Labor TACP warrants this warranty. or Puerto Rico. (4) Labor service charges for set installation, setup, adjustment of customer controls, and installation or repair of antenna systems are not covered by fires, misuse...
Owner's Manual - English
Page 112
... material defects in materials or workmanship as set installation, setup, adjustment of customer controls, and installation or repair of antenna systems are not covered by these warranties. c. d. g. Service of a Television on Toshiba-branded accessory items (such accessory items may be performed in your responsibility. (5) Warranties extend only to : a. Depending on -site when warranty service is (i) purchased as follows: all parts are warranted against material defects in...
... material defects in materials or workmanship as set installation, setup, adjustment of customer controls, and installation or repair of antenna systems are not covered by these warranties. c. d. g. Service of a Television on Toshiba-branded accessory items (such accessory items may be performed in your responsibility. (5) Warranties extend only to : a. Depending on -site when warranty service is (i) purchased as follows: all parts are warranted against material defects in...
Owner's Manual - English
Page 113
... THE USE OF THE TELEVISION IN ANY CRITICAL APPLICATIONS. Arbitration and Dispute Resolution To the extent not precluded by final and binding arbitration (to change, modify or extend the terms of these warranties in respect of TCL. AND NOT TCL, ITS AFFILIATES, ADRs OR ASPs - How to Obtain Warranty Services If, after following all of the operating instructions in...
... THE USE OF THE TELEVISION IN ANY CRITICAL APPLICATIONS. Arbitration and Dispute Resolution To the extent not precluded by final and binding arbitration (to change, modify or extend the terms of these warranties in respect of TCL. AND NOT TCL, ITS AFFILIATES, ADRs OR ASPs - How to Obtain Warranty Services If, after following all of the operating instructions in...

Owner's Manual - English
Page 115
... N Network address, setup 88 O Optical audio cable 14 Optical audio output format 66 P PC Audio 72 PC connection 23 PC settings 72 Personal E-mail feature 102 Personal E-mail setup 99 Picture adjustment 60 Picture mode 60 Picture quality 61 Picture scroll 58 Picture size selection 56 Picture Viewer 95, 96 POP button 59 POP3 Password 101 POWER button 11, 27 Power-On Mode 50 R RECALL button 76 Remote control Battery installation 26 Effective range 26 Learning about the buttons .......27 Operational feature 32 Volume lock feature 32 Reset Factory Defaults...
... N Network address, setup 88 O Optical audio cable 14 Optical audio output format 66 P PC Audio 72 PC connection 23 PC settings 72 Personal E-mail feature 102 Personal E-mail setup 99 Picture adjustment 60 Picture mode 60 Picture quality 61 Picture scroll 58 Picture size selection 56 Picture Viewer 95, 96 POP button 59 POP3 Password 101 POWER button 11, 27 Power-On Mode 50 R RECALL button 76 Remote control Battery installation 26 Effective range 26 Learning about the buttons .......27 Operational feature 32 Volume lock feature 32 Reset Factory Defaults...


