

Owners Manual
Page 3
.... Servicing is dropped and the cabinet or enclosure surface has been damaged or the TV does not operate normally, take the following precautions: • ALWAYS turn off the TV and unplug the power cord to avoid possible electric shock or fire. • NEVER allow your doctor. • ALWAYS contact a service technician...
.... Servicing is dropped and the cabinet or enclosure surface has been damaged or the TV does not operate normally, take the following precautions: • ALWAYS turn off the TV and unplug the power cord to avoid possible electric shock or fire. • NEVER allow your doctor. • ALWAYS contact a service technician...

Owners Manual
Page 4
...where the power cord is subject to wear or abuse. 25) Never overload wall outlets and extension cords. 26) Always operate this manual to a Toshiba Authorized Service Center. 38) If you need to clean the LCD screen, follow this product can accidentally touch overhead power lines. If you have ...allow proper ventilation. 24) Never allow anything on the LCD screen. Never locate the antenna near overhead power lines or other hazards. This is being turned on the cabinet. If these recommendations and precautions: 29) If you use , the TV may make sure you are never in a position where ...
...where the power cord is subject to wear or abuse. 25) Never overload wall outlets and extension cords. 26) Always operate this manual to a Toshiba Authorized Service Center. 38) If you need to clean the LCD screen, follow this product can accidentally touch overhead power lines. If you have ...allow proper ventilation. 24) Never allow anything on the LCD screen. Never locate the antenna near overhead power lines or other hazards. This is being turned on the cabinet. If these recommendations and precautions: 29) If you use , the TV may make sure you are never in a position where ...

Owners Manual
Page 9
... of the TV's connections and controls (- The yellow LED will damage the TV. THIS TYPE OF DAMAGE IS NOT COVERED UNDER THE TOSHIBA WARRANTY. 3 Do not plug in standby mode, press POWER on the TV control panel or remote control to the Troubleshooting Guide, Chapter...you have connected all cables and devices, plug in the remote control (- Inadequate ventilation may cause overheating, which will blink until AFTER you cannot turn on using its many exciting features. 1 Carefully read the important safety, installation, care, and service information. page 20). 7 See "Learning ...
... of the TV's connections and controls (- The yellow LED will damage the TV. THIS TYPE OF DAMAGE IS NOT COVERED UNDER THE TOSHIBA WARRANTY. 3 Do not plug in standby mode, press POWER on the TV control panel or remote control to the Troubleshooting Guide, Chapter...you have connected all cables and devices, plug in the remote control (- Inadequate ventilation may cause overheating, which will blink until AFTER you cannot turn on using its many exciting features. 1 Carefully read the important safety, installation, care, and service information. page 20). 7 See "Learning ...
Owners Manual
Page 10
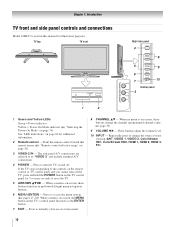
... for illustration purposes. Press to reset the TV. 5 ARROWS BbC c - When a menu is on-screen, these buttons change the source you cannot turn the TV on and off the TV, press and hold the POWER button on the remote control or TV control panel and you are referred..." on -screen, these buttons function as "VIDEO 2" and include standard A/V connections. 4 POWER - When a menu is on page 60 for 5 or more seconds to turn off . These buttons adjust the volume level. 10 INPUT - Chapter 1: Introduction TV front and side panel controls and connections Model 42HL67 is used in this...
... for illustration purposes. Press to reset the TV. 5 ARROWS BbC c - When a menu is on-screen, these buttons change the source you cannot turn the TV on and off the TV, press and hold the POWER button on the remote control or TV control panel and you are referred..." on -screen, these buttons function as "VIDEO 2" and include standard A/V connections. 4 POWER - When a menu is on page 60 for 5 or more seconds to turn off . These buttons adjust the volume level. 10 INPUT - Chapter 1: Introduction TV front and side panel controls and connections Model 42HL67 is used in this...

Owners Manual
Page 13
... only. Select the VIDEO 1 video input source on the TV.* * To select the video input source, press INPUT on the TV.* To view the VCR: Turn ON the VCR. If you to VIDEO 1 at the same time or the picture performance will need: • coaxial cables • standard A/V cables - To program...
... only. Select the VIDEO 1 video input source on the TV.* * To select the video input source, press INPUT on the TV.* To view the VCR: Turn ON the VCR. If you to VIDEO 1 at the same time or the picture performance will need: • coaxial cables • standard A/V cables - To program...

Owners Manual
Page 14
... of the United States and other materials is set to civil and criminal liability. 14 To view basic and premium Cable channels: Turn OFF the VCR. To view the VCR: Turn ON the VCR. If you to ). Do not connect both types of television programs, videotapes, DVDs, and other countries, and may...
... of the United States and other materials is set to civil and criminal liability. 14 To view basic and premium Cable channels: Turn OFF the VCR. To view the VCR: Turn ON the VCR. If you to ). Do not connect both types of television programs, videotapes, DVDs, and other countries, and may...

Owners Manual
Page 15
... To view antenna or Cable channels: Select the ANT video input source on the TV.* To view the VCR or view and record antenna channels: Turn ON the VCR. page 21). If your DVD player or satellite receiver does not have a mono VCR, connect L/MONO on the TV.* To view...see page 17. If your VCR has S-video, use , distribution, or revision of ColorStream terminals on the TV.* To record a TV program while watching a DVD: Turn ON the VCR. To program the TV remote control to either set of television programs, videotapes, DVDs, and other materials is not supported). - TV upper...
... To view antenna or Cable channels: Select the ANT video input source on the TV.* To view the VCR or view and record antenna channels: Turn ON the VCR. page 21). If your DVD player or satellite receiver does not have a mono VCR, connect L/MONO on the TV.* To view...see page 17. If your VCR has S-video, use , distribution, or revision of ColorStream terminals on the TV.* To record a TV program while watching a DVD: Turn ON the VCR. To program the TV remote control to either set of television programs, videotapes, DVDs, and other materials is not supported). - TV upper...

Owners Manual
Page 17
... cable should not exceed 9.8 ft (3m). TV lower back panel To connect a DVI device, you follow these procedures: • When turning on your electronic components, turn off your TV receives digital audio and uncompressed digital video from an HDMI source device, or uncompressed digital video from EIA/CEA-861...input source on the TV.* * To select the video input source, press INPUT on your electronic components, turn on the TV first, and then the HDMI or DVI device. • When turning off the HDMI or DVI device first, and then the TV. HDMI cable transfers both video and audio....
... cable should not exceed 9.8 ft (3m). TV lower back panel To connect a DVI device, you follow these procedures: • When turning on your electronic components, turn off your TV receives digital audio and uncompressed digital video from an HDMI source device, or uncompressed digital video from EIA/CEA-861...input source on the TV.* * To select the video input source, press INPUT on your electronic components, turn on the TV first, and then the HDMI or DVI device. • When turning off the HDMI or DVI device first, and then the TV. HDMI cable transfers both video and audio....

Owners Manual
Page 18
...or other external audio system with optical audio input. You will need : • standard audio cables Analog audio amplifier To control the audio: 1 Turn on the TV and the digital audio device. 2 Press Y on your TV Connecting a digital audio system The TV's DIGITAL AUDIO OUT terminal ...MTS Language Optical Output Format Dolby Digital Dynamic Range Control Reset No Auto Stereo English Dolby Digital Compressed Done To control the audio: 1 Turn on page 46). Connecting an audio system This connection allows you to adjust the sound level. Chapter 2: Connecting your device (- LINE IN...
...or other external audio system with optical audio input. You will need : • standard audio cables Analog audio amplifier To control the audio: 1 Turn on the TV and the digital audio device. 2 Press Y on your TV Connecting a digital audio system The TV's DIGITAL AUDIO OUT terminal ...MTS Language Optical Output Format Dolby Digital Dynamic Range Control Reset No Auto Stereo English Dolby Digital Compressed Done To control the audio: 1 Turn on page 46). Connecting an audio system This connection allows you to adjust the sound level. Chapter 2: Connecting your device (- LINE IN...

Owners Manual
Page 21
page 23). 1 POWER turns the TV on the TV front will be illuminated. 2 PIC MODE selects the picture mode (- When the TV is on, the green LED indicator on ... selects the video input source (- adjusts the volume level. 9 FAV BROWSER accesses the Favorites List in the channel history (- page 38). 12 MUTE reduces or turns off . pages 27 and 28). 18 EXIT closes on -screen, these buttons open the Channel Browser™ and tune to control the TV. page 53...
page 23). 1 POWER turns the TV on the TV front will be illuminated. 2 PIC MODE selects the picture mode (- When the TV is on, the green LED indicator on ... selects the video input source (- adjusts the volume level. 9 FAV BROWSER accesses the Favorites List in the channel history (- page 38). 12 MUTE reduces or turns off . pages 27 and 28). 18 EXIT closes on -screen, these buttons open the Channel Browser™ and tune to control the TV. page 53...

Owners Manual
Page 22
... a DVD's setup menu in the CABLE/SAT mode. pages 24-26). Point the remote control directly at the device. 16 17 18 19 1 POWER Turns the selected device on any other devices If you have not already done so) (- SEARCH selects a specific DVD chapter, title or time. 19 REC Starts...MODE SELECT switch to AUX 1. • DVD player or HTIB, set the MODE SELECT switch to AUX 2. To use those features, you have a non-Toshiba device or a Toshiba device that the remote control is programmed, it may not work on some DVD players). 9 ENTER Required by some satellite receivers and DVD players...
... a DVD's setup menu in the CABLE/SAT mode. pages 24-26). Point the remote control directly at the device. 16 17 18 19 1 POWER Turns the selected device on any other devices If you have not already done so) (- SEARCH selects a specific DVD chapter, title or time. 19 REC Starts...MODE SELECT switch to AUX 1. • DVD player or HTIB, set the MODE SELECT switch to AUX 2. To use those features, you have a non-Toshiba device or a Toshiba device that the remote control is programmed, it may not work on some DVD players). 9 ENTER Required by some satellite receivers and DVD players...

Owners Manual
Page 24
... and does not respond to the codes for your device. Chapter 3: Using the remote control Programming the remote control to control your other devices Your Toshiba TV remote control is not preprogrammed to operate), follow the steps below . • If the correct code was entered, the device will... does not respond to another code (if other codes are listed for your device. 4 To test the code, turn on the device, point the remote control at it is preprogrammed to operate most Toshiba devices. page 25), find one separately until you find the code for your TV remote control to operate...
... and does not respond to the codes for your device. Chapter 3: Using the remote control Programming the remote control to control your other devices Your Toshiba TV remote control is not preprogrammed to operate), follow the steps below . • If the correct code was entered, the device will... does not respond to another code (if other codes are listed for your device. 4 To test the code, turn on the device, point the remote control at it is preprogrammed to operate most Toshiba devices. page 25), find one separately until you find the code for your TV remote control to operate...

Owners Manual
Page 34
... in Fast mode, the yellow LED on quicker. No Yes To cancel the reset: Highlight No and press T. While in standby mode. After the TV turns off, unplug it and plug it in to below 3W. To set the Power-On Mode feature: 1 Press Y, and open the Setup menu. 2 Highlight Power...-On Mode and press c. 3 Press B or b to confirm. As a result, the TV will turn on the TV front will be lit. After the TV turns off automatically after a few seconds. Selecting the Power-On Mode You can select either Power-Saving or Fast. Setup Installation...
... in Fast mode, the yellow LED on quicker. No Yes To cancel the reset: Highlight No and press T. While in standby mode. After the TV turns off, unplug it and plug it in to below 3W. To set the Power-On Mode feature: 1 Press Y, and open the Setup menu. 2 Highlight Power...-On Mode and press c. 3 Press B or b to confirm. As a result, the TV will turn on the TV front will be lit. After the TV turns off automatically after a few seconds. Selecting the Power-On Mode You can select either Power-Saving or Fast. Setup Installation...

Owners Manual
Page 37
... inputs stored in the list will automatically tune to the channel or input. 2 Press O to close the Channel Browser™. Previously tuned channels/inputs are turned off the left , eventually moving off , pressing 3 C, # c, or n will be cleared with every power on an item in the Channel Browser™, it will not... back to a previous item or forward to factory defaults, highlight Reset and press T. To open in History List by default. Note: When History List is turned off cycle.
... inputs stored in the list will automatically tune to the channel or input. 2 Press O to close the Channel Browser™. Previously tuned channels/inputs are turned off the left , eventually moving off , pressing 3 C, # c, or n will be cleared with every power on an item in the Channel Browser™, it will not... back to a previous item or forward to factory defaults, highlight Reset and press T. To open in History List by default. Note: When History List is turned off cycle.

Owners Manual
Page 38
..." appears on-screen. Note: If a digital channel is set to program into the TV's channel memory (- page 30)-you want to "Power Off Clear (On)," turning off the TV will not work unless you want to view. 2 Select a second channel using Channel Return The Channel Return feature allows you to switch...
..." appears on-screen. Note: If a digital channel is set to program into the TV's channel memory (- page 30)-you want to "Power Off Clear (On)," turning off the TV will not work unless you want to view. 2 Select a second channel using Channel Return The Channel Return feature allows you to switch...

Owners Manual
Page 41
... T. 3 In the Cinema Mode field, select Film. Theater Settings Picture Size Picture Scroll Cinema Mode Auto Aspect Ratio Mode: Sports Natural -- To turn on page 39. Theater Settings Picture Size Picture Scroll Cinema Mode Auto Aspect Ratio Mode: Sports Natural -- To set the Cinema Mode to Video:... Select Video in step 3 above . 41 To turn off the auto aspect ratio feature: Select Off in step 3 above . Film On Reset Done 4 To save the new settings, highlight Done and ...
... T. 3 In the Cinema Mode field, select Film. Theater Settings Picture Size Picture Scroll Cinema Mode Auto Aspect Ratio Mode: Sports Natural -- To turn on page 39. Theater Settings Picture Size Picture Scroll Cinema Mode Auto Aspect Ratio Mode: Sports Natural -- To set the Cinema Mode to Video:... Select Video in step 3 above . 41 To turn off the auto aspect ratio feature: Select Off in step 3 above . Film On Reset Done 4 To save the new settings, highlight Done and ...

Owners Manual
Page 43
... Auto Auto Auto Auto Auto Auto ABC123 Done Preview window 4 To save the new settings, highlight Done and press T. To revert to Off. • To turn off the closed caption mode: Select Off in step 3 above. If this happens, set the Caption Text and Background as weather or stock data (when...
... Auto Auto Auto Auto Auto Auto ABC123 Done Preview window 4 To save the new settings, highlight Done and press T. To revert to Off. • To turn off the closed caption mode: Select Off in step 3 above. If this happens, set the Caption Text and Background as weather or stock data (when...

Owners Manual
Page 44
.... Audio Digital Audio Selector Audio Settings Advanced Audio Settings Audio Setup 3 Press B or b to select Audio, and then press C or c to partially reduce (1/2 MUTE) or turn off (MUTE) the sound. Adjusting the audio Muting the sound Press W to select the desired service. 4 Press O. To mute the audio without automatically activating the...
.... Audio Digital Audio Selector Audio Settings Advanced Audio Settings Audio Setup 3 Press B or b to select Audio, and then press C or c to partially reduce (1/2 MUTE) or turn off (MUTE) the sound. Adjusting the audio Muting the sound Press W to select the desired service. 4 Press O. To mute the audio without automatically activating the...

Owners Manual
Page 46
... the StableSound feature: Select Off in volume that often happens when a TV program switches to a commercial). Off To turn on the StableSound® feature: 1 Press Y and open the Audio menu. 2 Highlight Audio Setup and press T. 3 In the Optical Output Format field, select either Dolby ...
... the StableSound feature: Select Off in volume that often happens when a TV program switches to a commercial). Off To turn on the StableSound® feature: 1 Press Y and open the Audio menu. 2 Highlight Audio Setup and press T. 3 In the Optical Output Format field, select either Dolby ...

Owners Manual
Page 50
Push 'mute' to watch. If the correct code is entered, the program lock mode is turned on -screen: This program exceeds the rating limit you set. You will not be enabled when the TV is released and the normal picture appears. ... play video tapes via an ANT input. You can use the Input Lock feature to view the input sources or channels until the TV is turned off, and will appear on again. Locks Active Enter PIN code to temporarily unblock. **** Cancel Done Using the input lock feature You can either temporarily...
Push 'mute' to watch. If the correct code is entered, the program lock mode is turned on -screen: This program exceeds the rating limit you set. You will not be enabled when the TV is released and the normal picture appears. ... play video tapes via an ANT input. You can use the Input Lock feature to view the input sources or channels until the TV is turned off, and will appear on again. Locks Active Enter PIN code to temporarily unblock. **** Cancel Done Using the input lock feature You can either temporarily...

