
Owners Manual
Page 7
... key chart 24 Programming the remote control to control your other devices 25 Remote control codes 26 Chapter 4: Menu layout and navigation 28 Main menu layout 28 Setup/Installation menu layout 29 Navigating the menu system 29 Chapter 5: Setting up your TV 30 Selecting the menu language 30 TOSHIBA Logo LED 30 Configuring...
... key chart 24 Programming the remote control to control your other devices 25 Remote control codes 26 Chapter 4: Menu layout and navigation 28 Main menu layout 28 Setup/Installation menu layout 29 Navigating the menu system 29 Chapter 5: Setting up your TV 30 Selecting the menu language 30 TOSHIBA Logo LED 30 Configuring...
Owners Manual
Page 8
Chapter 1: Introduction Features of your new TV The following are just a few of the many exciting features of your new Toshiba widescreen, integrated HD, LCD TV: • Integrated digital tuning (8VSB ATSC and QAM) eliminates the need for a separate digital converter set-top box (in most ... (Analog RGB) computer terminal ( page 20). • Channel Labeling allows you to accurately perform synchronization automatically. • Two sets of external devices from the TV remote via HDMI connection ( page 50). 8
Chapter 1: Introduction Features of your new TV The following are just a few of the many exciting features of your new Toshiba widescreen, integrated HD, LCD TV: • Integrated digital tuning (8VSB ATSC and QAM) eliminates the need for a separate digital converter set-top box (in most ... (Analog RGB) computer terminal ( page 20). • Channel Labeling allows you to accurately perform synchronization automatically. • Two sets of external devices from the TV remote via HDMI connection ( page 50). 8
Owners Manual
Page 9
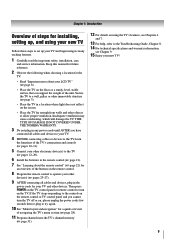
...2 Observe the following when choosing a location for your TV and other electronic device(s) to the TV ( pages 12-20). 6 Install the batteries in the remote control ( page 21). 7 See "Learning about your other devices. Inadequate ventilation may cause overheating, which will damage the TV. Then press POWER on the ... pages 10-11). 5 Connect your LCD TV" ( page 6). • Place the TV on the TV. THIS TYPE OF DAMAGE IS NOT COVERED UNDER THE TOSHIBA WARRANTY. 3 Do not plug in any power cords until AFTER you cannot turn on the floor or a sturdy, level, stable surface that can support the...
...2 Observe the following when choosing a location for your TV and other electronic device(s) to the TV ( pages 12-20). 6 Install the batteries in the remote control ( page 21). 7 See "Learning about your other devices. Inadequate ventilation may cause overheating, which will damage the TV. Then press POWER on the ... pages 10-11). 5 Connect your LCD TV" ( page 6). • Place the TV on the TV. THIS TYPE OF DAMAGE IS NOT COVERED UNDER THE TOSHIBA WARRANTY. 3 Do not plug in any power cords until AFTER you cannot turn on the floor or a sturdy, level, stable surface that can support the...
Owners Manual
Page 10
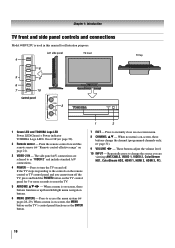
... control panel for illustration purposes. 1 Green LED and TOSHIBA Logo LED Power LED(Green) = Power indicator TOSHIBA Logo LED= On or Off ( page 30). 2 Remote sensor - If the TV stops responding to the controls on the remote control or TV control panel and you cannot turn off... are viewing (ANT/CABLE, VIDEO 1, VIDEO 2, ColorStream HD1, ColorStream HD2, HDMI 1, HDMI 2, HDMI 3, PC). 10 When a menu is used in this remote sensor ( "Remote control effective range" on page 21). 3 VIDEO-2 IN - Press to as "VIDEO 2" and include standard A/V connections. 4 POWER - Press to access the ...
... control panel for illustration purposes. 1 Green LED and TOSHIBA Logo LED Power LED(Green) = Power indicator TOSHIBA Logo LED= On or Off ( page 30). 2 Remote sensor - If the TV stops responding to the controls on the remote control or TV control panel and you cannot turn off... are viewing (ANT/CABLE, VIDEO 1, VIDEO 2, ColorStream HD1, ColorStream HD2, HDMI 1, HDMI 2, HDMI 3, PC). 10 When a menu is used in this remote sensor ( "Remote control effective range" on page 21). 3 VIDEO-2 IN - Press to as "VIDEO 2" and include standard A/V connections. 4 POWER - Press to access the ...
Owners Manual
Page 13
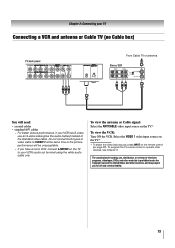
Do not connect both types of the standard video cable. To program the TV remote control to VIDEO 1 at the same time or the picture performance will need: • coaxial cables • standard A/V cables − For better picture performance, if ...'s audio out terminal using the white audio cable only. To view the antenna or Cable signal: Select the ANT/CABLE video input source on the remote control ( page 22). Chapter 2: Connecting your TV Connecting a VCR and antenna or Cable TV (no Cable box) From Cable TV or antenna You will be...
Do not connect both types of the standard video cable. To program the TV remote control to VIDEO 1 at the same time or the picture performance will need: • coaxial cables • standard A/V cables − For better picture performance, if ...'s audio out terminal using the white audio cable only. To view the antenna or Cable signal: Select the ANT/CABLE video input source on the remote control ( page 22). Chapter 2: Connecting your TV Connecting a VCR and antenna or Cable TV (no Cable box) From Cable TV or antenna You will be...

Owners Manual
Page 14
.... Note: When you use a Cable box, you may subject you have a mono VCR, connect L/MONO on the TV to ). To program the TV remote control to operate other materials is set to your TV Connecting a VCR with S-video and a cable box An S-video connection will need: • coaxial cables...video input source, press INPUT on the TV. Use the Cable box controls to program or access certain features on the remote control ( page 22). The unauthorized recording, use the remote control to change channels. Chapter 2: Connecting your VCR's audio out terminal using the white audio cable only. To view...
.... Note: When you use a Cable box, you may subject you have a mono VCR, connect L/MONO on the TV to ). To program the TV remote control to operate other materials is set to your TV Connecting a VCR with S-video and a cable box An S-video connection will need: • coaxial cables...video input source, press INPUT on the TV. Use the Cable box controls to program or access certain features on the remote control ( page 22). The unauthorized recording, use the remote control to change channels. Chapter 2: Connecting your VCR's audio out terminal using the white audio cable only. To view...
Owners Manual
Page 15
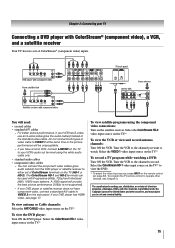
To program the TV remote control to either set of video cable to VIDEO 1 at the same time or the picture performance will be used with ColorStream® (component video), a ...-2). If your VCR has S-video, use , distribution, or revision of the United States and other countries, and may subject you want to VIDEO 2 on the remote control ( page 22). Chapter 2: Connecting your TV Connecting a DVD player with Progressive (480p, 720p) and Interlaced (480i, 1080i) scan systems. A 1080i signal will provide the...
To program the TV remote control to either set of video cable to VIDEO 1 at the same time or the picture performance will be used with ColorStream® (component video), a ...-2). If your VCR has S-video, use , distribution, or revision of the United States and other countries, and may subject you want to VIDEO 2 on the remote control ( page 22). Chapter 2: Connecting your TV Connecting a DVD player with Progressive (480p, 720p) and Interlaced (480i, 1080i) scan systems. A 1080i signal will provide the...

Owners Manual
Page 16
To program the TV remote control to VIDEO 1 on the TV back instead of the VIDEO 2 on the remote control ( page 22). Camcorder VIDEO AUDIO OUT L R VIDEO 2 inputs on TV side panel To view the camcorder video: Select the VIDEO 2 video input source on the TV.* * To select the video input source, press INPUT on the TV side panel. Chapter 2: Connecting your TV Connecting a camcorder You will need: • standard A/V cables − For better picture performance, if your camcorder has S-video, connect an S-video cable (plus the audio cables) to operate other devices, see Chapter 3. 16
To program the TV remote control to VIDEO 1 on the TV back instead of the VIDEO 2 on the remote control ( page 22). Camcorder VIDEO AUDIO OUT L R VIDEO 2 inputs on TV side panel To view the camcorder video: Select the VIDEO 2 video input source on the TV.* * To select the video input source, press INPUT on the TV side panel. Chapter 2: Connecting your TV Connecting a camcorder You will need: • standard A/V cables − For better picture performance, if your camcorder has S-video, connect an S-video cable (plus the audio cables) to operate other devices, see Chapter 3. 16

Owners Manual
Page 17
... Chapter 3. 17 Separate analog audio cables are not required (see illustration). − See "Setting the HDMI™ audio mode" ( page 33). To program the TV remote control to the HDMI input, see page 58. Conventional HDMI/DVI cable may not operate properly with the HDMI Logo ( ). − To display an 1080i... HDMI device video: Select the HDMI 1, HDMI 2 or HDMI 3 video input source on the TV.* * To select the video input source, press INPUT on the remote control ( page 22).
... Chapter 3. 17 Separate analog audio cables are not required (see illustration). − See "Setting the HDMI™ audio mode" ( page 33). To program the TV remote control to the HDMI input, see page 58. Conventional HDMI/DVI cable may not operate properly with the HDMI Logo ( ). − To display an 1080i... HDMI device video: Select the HDMI 1, HDMI 2 or HDMI 3 video input source on the TV.* * To select the video input source, press INPUT on the remote control ( page 22).
Owners Manual
Page 18
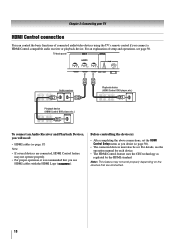
... Control Setup menu as regulated by the HDMI standard. For details, see page 50. For an explanation of connected audio/video devices using the TV's remote control if you use HDMI cables with the HDMI Logo ( ). Before controlling the device(s): • After completing the above connections, set . Chapter 2: Connecting your TV...
... Control Setup menu as regulated by the HDMI standard. For details, see page 50. For an explanation of connected audio/video devices using the TV's remote control if you use HDMI cables with the HDMI Logo ( ). Before controlling the device(s): • After completing the above connections, set . Chapter 2: Connecting your TV...
Owners Manual
Page 19
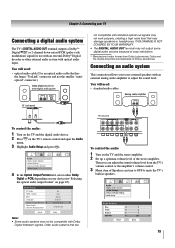
... signals. You will need : • standard audio cables To control the audio: 1 Turn on the TV and the digital audio device. 2 Press on the TV's remote control and open the Audio menu. 3 Highlight Audio Setup and press .
... signals. You will need : • standard audio cables To control the audio: 1 Turn on the TV and the digital audio device. 2 Press on the TV's remote control and open the Audio menu. 3 Highlight Audio Setup and press .

Owners Manual
Page 21
..., replace batteries with new ones. • When necessary to match the + and - If you have a non-Toshiba device or a Toshiba device that the remote control is no obstruction between the remote control and the TV. Caution: Batteries must not be used batteries in mind. Chapter 3: Using the...(5m) Squeeze tab and lift cover. 2 Install two "AAA" size batteries, making sure to replace batteries in the remote control, always replace both batteries with the environment in combination. 21 If you have a Toshiba device: Your TV remote control is not to be exposed to operate most...
..., replace batteries with new ones. • When necessary to match the + and - If you have a non-Toshiba device or a Toshiba device that the remote control is no obstruction between the remote control and the TV. Caution: Batteries must not be used batteries in mind. Chapter 3: Using the...(5m) Squeeze tab and lift cover. 2 Install two "AAA" size batteries, making sure to replace batteries in the remote control, always replace both batteries with the environment in combination. 21 If you have a Toshiba device: Your TV remote control is not to be exposed to operate most...

Owners Manual
Page 22
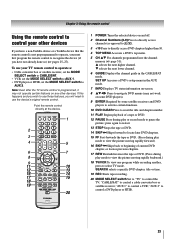
...'s functions, see "Arrow buttons.") 15 Arrow buttons (STWX) When a menu is not available. 22 Chapter 3: Using the remote control Learning about the remote control The buttons used to tune digital channels ( page 38) or to edit the Favorites List ( page 37). 6 INPUT selects the video... (0-9, -/100) directly tune channels. adjusts the volume level. 9 FAV BROWSER accesses the Favorites List in the channel history ( page 37). (Also see the remote control functional key chart ( page 24). 1 POWER turns the TV on -screen menus. 19 MODE SELECT switch switches between TV, CABLE/SAT, AUX 1, and...
...'s functions, see "Arrow buttons.") 15 Arrow buttons (STWX) When a menu is not available. 22 Chapter 3: Using the remote control Learning about the remote control The buttons used to tune digital channels ( page 38) or to edit the Favorites List ( page 37). 6 INPUT selects the video... (0-9, -/100) directly tune channels. adjusts the volume level. 9 FAV BROWSER accesses the Favorites List in the channel history ( page 37). (Also see the remote control functional key chart ( page 24). 1 POWER turns the TV on -screen menus. 19 MODE SELECT switch switches between TV, CABLE/SAT, AUX 1, and...
Owners Manual
Page 23
... to recognize the device (if you will need to use those features, you have a non-Toshiba device or a Toshiba device that the remote control is programmed, it may not work on some DVD players). 9 ENTER Required by some satellite receivers and DVD players to activate certain ...another, press to select TV mode. SET UP Accesses a DVD's setup menu in the CABLE/SAT mode. Chapter 3: Using the remote control Using the remote control to control your TV remote control to operate a: • Cable converter box or satellite receiver, set the MODE SELECT switch to CABLE/SAT. • VCR,...
... to recognize the device (if you will need to use those features, you have a non-Toshiba device or a Toshiba device that the remote control is programmed, it may not work on some DVD players). 9 ENTER Required by some satellite receivers and DVD players to activate certain ...another, press to select TV mode. SET UP Accesses a DVD's setup menu in the CABLE/SAT mode. Chapter 3: Using the remote control Using the remote control to control your TV remote control to operate a: • Cable converter box or satellite receiver, set the MODE SELECT switch to CABLE/SAT. • VCR,...
Owners Manual
Page 24
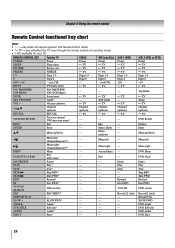
... functional key chart Note key does not send a signal in that remote control mode. • " TV" = key will affect the TV, even though the remote control is in another mode. • * Not available for your TV. REMOTE CONTROL KEY Toshiba TV CABLE SAT (satellite) POWER Power Power Power SLEEP Sleep timer TV TV PIC...
... functional key chart Note key does not send a signal in that remote control mode. • " TV" = key will affect the TV, even though the remote control is in another mode. • * Not available for your TV. REMOTE CONTROL KEY Toshiba TV CABLE SAT (satellite) POWER Power Power Power SLEEP Sleep timer TV TV PIC...
Owners Manual
Page 25
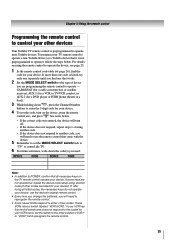
... device code setup using another code. • If the device does not respond to another code (if other devices Your Toshiba TV remote control is preprogrammed to operate most Toshiba devices. If your VCR has this kind of device you find the code for your device). If more than one code ..., try each one that it , and press . If, after trying all necessary keys on the TV remote control operate your device. To program your TV remote control to operate a non-Toshiba device (or a Toshiba device that works. 2 Set the MODE SELECT switch to the type of switch and does not respond to...
... device code setup using another code. • If the device does not respond to another code (if other devices Your Toshiba TV remote control is preprogrammed to operate most Toshiba devices. If your VCR has this kind of device you find the code for your device). If more than one code ..., try each one that it , and press . If, after trying all necessary keys on the TV remote control operate your device. To program your TV remote control to operate a non-Toshiba device (or a Toshiba device that works. 2 Set the MODE SELECT switch to the type of switch and does not respond to...
Owners Manual
Page 26
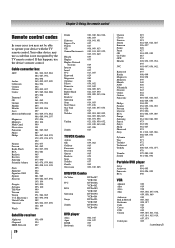
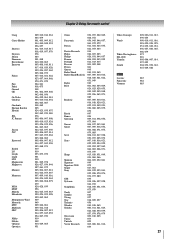
.... S. Your other device may not be able to operate your device with the TV remote control. Cable converter box ABC Archer Cableview Century Citizen Contec Diamond GE Gemini Hamlin Hitachi Jasco Motorola/GI/Jerrold Magnavox Memorex Multi Canal Novavision Panasonic ... Magnavox Memorex Mintek NAD Nakamichi Norcent Onkyo Oritron Panasonic Philips Pioneer Proscan Qwestar RCA Sampo Samsung Sansui Sanyo Sharp Sherwood Sony Sylvania Teac Technics Techwood Toshiba Yamaha Zenith 019 020 021 022, 023, 024, 025 026, 027 028 027 001, 029, 030 087 031 005, 032, 033, 034, 035 003, 007...
.... S. Your other device may not be able to operate your device with the TV remote control. Cable converter box ABC Archer Cableview Century Citizen Contec Diamond GE Gemini Hamlin Hitachi Jasco Motorola/GI/Jerrold Magnavox Memorex Multi Canal Novavision Panasonic ... Magnavox Memorex Mintek NAD Nakamichi Norcent Onkyo Oritron Panasonic Philips Pioneer Proscan Qwestar RCA Sampo Samsung Sansui Sanyo Sharp Sherwood Sony Sylvania Teac Technics Techwood Toshiba Yamaha Zenith 019 020 021 022, 023, 024, 025 026, 027 028 027 001, 029, 030 087 031 005, 032, 033, 034, 035 003, 007...
Owners Manual
Page 27
... 018 005, 006, 007, 012, 014, 037, 043, 053, 054, 067, 070 010 009 010, 049, 065 031 Chapter 3: Using the remote control Orion Panasonic Pentax Pentex Research Philco Philips Pioneer Portland Proscan Proton Quasar Radio Shack Radio Shack/Realistic Radix RCA Realistic Ricoh Runco Samsung Sansui... Sanyo Scott Sears Sharp Shintom Signature Signature 2000 Singer Sony STS Sylvania Symphonic Tandy Tashiko Tatung Teac Technics Teknika Toshiba Totevision Unitec Unitech Vector Research 054, 057, 062, 065, 068, 072 036, 045, 046, 057, 061, 072, 079 012, 024, 025...
... 018 005, 006, 007, 012, 014, 037, 043, 053, 054, 067, 070 010 009 010, 049, 065 031 Chapter 3: Using the remote control Orion Panasonic Pentax Pentex Research Philco Philips Pioneer Portland Proscan Proton Quasar Radio Shack Radio Shack/Realistic Radix RCA Realistic Ricoh Runco Samsung Sansui... Sanyo Scott Sears Sharp Shintom Signature Signature 2000 Singer Sony STS Sylvania Symphonic Tandy Tashiko Tatung Teac Technics Teknika Toshiba Totevision Unitec Unitech Vector Research 054, 057, 062, 065, 068, 072 036, 045, 046, 057, 061, 072, 079 012, 024, 025...
Owners Manual
Page 28
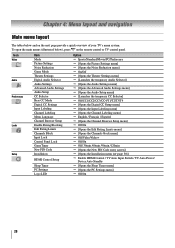
To open the main menus (illustrated below and on the remote control or TV control panel. Icon Video Audio Preferences Locks Setup Item Mode Picture Settings Noise Reduction Game Mode Theater Settings Digital Audio Selector Audio ...
To open the main menus (illustrated below and on the remote control or TV control panel. Icon Video Audio Preferences Locks Setup Item Mode Picture Settings Noise Reduction Game Mode Theater Settings Digital Audio Selector Audio ...
Owners Manual
Page 29
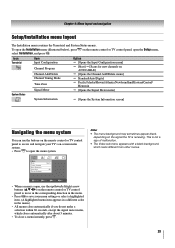
... closes automatically after about 5 minutes. • To close a menu instantly, press . 29 This is open, use the buttons on the remote control or TV control panel to access and navigate your menu settings or select a highlighted item. (A highlighted menu item appears in a different color...to open the Setup menu, select Installation, and press . Note: • The menu background may sometimes appear black, depending on the remote control or TV control panel, open the menu system. Chapter 4: Menu layout and navigation Setup/Installation menu layout The Installation menu contains the...
... closes automatically after about 5 minutes. • To close a menu instantly, press . 29 This is open, use the buttons on the remote control or TV control panel to access and navigate your menu settings or select a highlighted item. (A highlighted menu item appears in a different color...to open the Setup menu, select Installation, and press . Note: • The menu background may sometimes appear black, depending on the remote control or TV control panel, open the menu system. Chapter 4: Menu layout and navigation Setup/Installation menu layout The Installation menu contains the...


