Owners Manual
Page 6
If this TV. ENERGY STAR® qualified TV. Note: Interactive video games that may cause undesired ...may not cause harmful interference, and (2) this TV is : Toshiba America Consumer Products, L.L.C. 82 Totowa Rd. These limits are not an indication of malfunction; Changing Picture Settings may appear on a circuit different from a ...Products that interference will disappear in a short period of time. 2) The LCD panel contained in a residential installation. Important notes about your LCD TV The following measures: • Reorient or relocate the receiving antenna. •...
If this TV. ENERGY STAR® qualified TV. Note: Interactive video games that may cause undesired ...may not cause harmful interference, and (2) this TV is : Toshiba America Consumer Products, L.L.C. 82 Totowa Rd. These limits are not an indication of malfunction; Changing Picture Settings may appear on a circuit different from a ...Products that interference will disappear in a short period of time. 2) The LCD panel contained in a residential installation. Important notes about your LCD TV The following measures: • Reorient or relocate the receiving antenna. •...
Owners Manual
Page 7
...TV 8 Overview of steps for installing, setting up, and using your new TV 8 TV front and side panel controls and connections 10 TV back panel connections 11 Chapter 2: Connecting your TV...TV (no Cable box 13 Connecting a VCR with S-video and a cable box 14 Connecting a DVD player with ColorStream® (component video...Setting up your TV 30 Selecting the menu language 30 TOSHIBA... Settings...settings feature 49 Setting the PC Audio 50 Setting the sleep timer 50 Using HDMI Control 50 Displaying TV...TV's advanced features 52 Using the advanced picture settings...advanced audio settings features ...
...TV 8 Overview of steps for installing, setting up, and using your new TV 8 TV front and side panel controls and connections 10 TV back panel connections 11 Chapter 2: Connecting your TV...TV (no Cable box 13 Connecting a VCR with S-video and a cable box 14 Connecting a DVD player with ColorStream® (component video...Setting up your TV 30 Selecting the menu language 30 TOSHIBA... Settings...settings feature 49 Setting the PC Audio 50 Setting the sleep timer 50 Using HDMI Control 50 Displaying TV...TV's advanced features 52 Using the advanced picture settings...advanced audio settings features ...
Owners Manual
Page 8
... are just a few of the many exciting features of your new Toshiba widescreen, integrated HD, LCD TV: • Integrated digital tuning (8VSB ATSC and QAM) eliminates the need for a separate digital converter set-top box (in most cases). • 1080p output resolution. •... • HDMI new capability Lip-Sync Latency activates an audio/video display timing adjustment function that allows HDMI source devices to accurately perform synchronization automatically. • Two sets of ColorStream® HD high-resolution component video inputs ( page 15). • QSound® audio technologies ...
... are just a few of the many exciting features of your new Toshiba widescreen, integrated HD, LCD TV: • Integrated digital tuning (8VSB ATSC and QAM) eliminates the need for a separate digital converter set-top box (in most cases). • 1080p output resolution. •... • HDMI new capability Lip-Sync Latency activates an audio/video display timing adjustment function that allows HDMI source devices to accurately perform synchronization automatically. • Two sets of ColorStream® HD high-resolution component video inputs ( page 15). • QSound® audio technologies ...
Owners Manual
Page 11
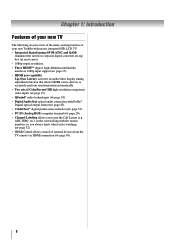
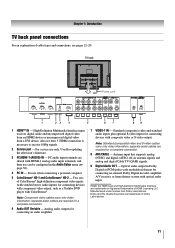
Two sets of cable types and connections, see item 3. HDMI, the HDMI logo and High-Definition Multimedia Interface are trademarks or registered trademarks of Dolby Laboratories. 11 ... double-D symbol are required for a complete connection. 6 Audio OUT Variable - Chapter 1: Introduction TV back panel connections For an explanation of ColorStream® high-definition component video inputs (with standard stereo audio inputs) for connecting devices with component video output, such as a Toshiba DVD player with HDMI-1 analog audio input terminals, and their use can...
Two sets of cable types and connections, see item 3. HDMI, the HDMI logo and High-Definition Multimedia Interface are trademarks or registered trademarks of Dolby Laboratories. 11 ... double-D symbol are required for a complete connection. 6 Audio OUT Variable - Chapter 1: Introduction TV back panel connections For an explanation of ColorStream® high-definition component video inputs (with standard stereo audio inputs) for connecting devices with component video output, such as a Toshiba DVD player with HDMI-1 analog audio input terminals, and their use can...
Owners Manual
Page 12
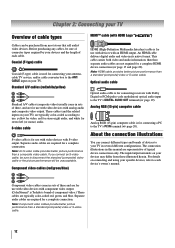
... cable is for connecting receivers with an HDMI output. The connection illustrations in sets of three and are typically color-coded red, green, and blue. Coaxial (F-type) cable Coaxial (F-type) cable is Toshiba's brand of each device's owner's manual. Note: HDMI cable provides better ...connection ( page 17 and page 20). Component video cables come in sets of devices to your TV) are representative of cable types HDMI™ cable (with component video output. (ColorStream® is used for connecting your antenna, cable TV service, and/or cable converter box to disconnect ...
... cable is for connecting receivers with an HDMI output. The connection illustrations in sets of three and are typically color-coded red, green, and blue. Coaxial (F-type) cable Coaxial (F-type) cable is Toshiba's brand of each device's owner's manual. Note: HDMI cable provides better ...connection ( page 17 and page 20). Component video cables come in sets of devices to your TV) are representative of cable types HDMI™ cable (with component video output. (ColorStream® is used for connecting your antenna, cable TV service, and/or cable converter box to disconnect ...

Owners Manual
Page 14
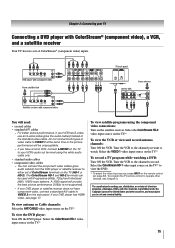
... connect both types of television programs, videotapes, DVDs, and other materials is set to). Select the VIDEO 1 video input source on the TV.* * To select the video input source, press INPUT on the TV.* Tune the TV to VIDEO 1 at the same time or the picture performance will provide better picture performance...box, you may subject you have a mono VCR, connect L/MONO on the TV to your TV Connecting a VCR with S-video and a cable box An S-video connection will be able to use , distribution, or revision of video cable to channel 3 or 4 (whichever channel the Cable box output is ...
... connect both types of television programs, videotapes, DVDs, and other materials is set to). Select the VIDEO 1 video input source on the TV.* * To select the video input source, press INPUT on the TV.* Tune the TV to VIDEO 1 at the same time or the picture performance will provide better picture performance...box, you may subject you have a mono VCR, connect L/MONO on the TV to your TV Connecting a VCR with S-video and a cable box An S-video connection will be able to use , distribution, or revision of video cable to channel 3 or 4 (whichever channel the Cable box output is ...
Owners Manual
Page 15
...the VCR. Select the ColorStream HD-1 video input source on the side panel. To program the TV remote control to watch. You will be used with ColorStream® (component video), a VCR, and a satellite receiver Your TV has two sets of the standard video cable. Tune the VCR to the ...channel you want to operate other countries, and may subject you have component video, connect a standard A/V cable to view the DVD...
...the VCR. Select the ColorStream HD-1 video input source on the side panel. To program the TV remote control to watch. You will be used with ColorStream® (component video), a VCR, and a satellite receiver Your TV has two sets of the standard video cable. Tune the VCR to the ...channel you want to operate other countries, and may subject you have component video, connect a standard A/V cable to view the DVD...

Owners Manual
Page 17
... components, turn off your TV receives digital audio and uncompressed digital video from an HDMI source device, or uncompressed digital video from EIA/CEA-861-D-compliant[1] consumer electronic devices (such as a set-top box or DVD player with the TV. To view the HDMI device video: Select the HDMI 1,... HDMI 2 or HDMI 3 video input source on the TV.* * To select the video input source, press ...
... components, turn off your TV receives digital audio and uncompressed digital video from an HDMI source device, or uncompressed digital video from EIA/CEA-861-D-compliant[1] consumer electronic devices (such as a set-top box or DVD player with the TV. To view the HDMI device video: Select the HDMI 1,... HDMI 2 or HDMI 3 video input source on the TV.* * To select the video input source, press ...
Owners Manual
Page 18
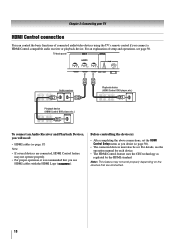
... on the devices that you desire ( page 50). • The connected devices must also be set the HDMI Control Setup menu as regulated by the HDMI standard. For details, see page 50. TV back panel VIDEO AUDIO L R IN OUT L R Audio receiver HDMI IN HDMI OUT Playback device (HDMI Control ... The HDMI Control feature uses the CEC technology as you use HDMI cables with the HDMI Logo ( ). For an explanation of connected audio/video devices using the TV's remote control if you will need: • HDMI cables ( page 17) Note: • If several devices are connected. 18
... on the devices that you desire ( page 50). • The connected devices must also be set the HDMI Control Setup menu as regulated by the HDMI standard. For details, see page 50. TV back panel VIDEO AUDIO L R IN OUT L R Audio receiver HDMI IN HDMI OUT Playback device (HDMI Control ... The HDMI Control feature uses the CEC technology as you use HDMI cables with the HDMI Logo ( ). For an explanation of connected audio/video devices using the TV's remote control if you will need: • HDMI cables ( page 17) Note: • If several devices are connected. 18
Owners Manual
Page 20
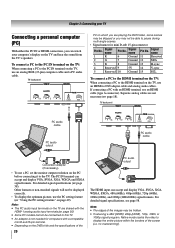
...58. Signal name Pin No. Separate analog cables are playing the DVD-Video, some scenes may be skipped or you may be displayed correctly. • To display the optimum picture, use a PC, set the monitor output resolution on the TV are shared with a compatible mini D-sub15-pin terminal. • ...). PC audio cable PC audio output PC audio cable Conversion adapter (if necessary) • To use the PC setting feature ( "Using the PC settings feature" on the TV and hear the sound from the TV's speakers. The PC IN terminal can accept and display VGA, SVGA, XGA, WXGA, SXGA, 480i (60Hz), ...
...58. Signal name Pin No. Separate analog cables are playing the DVD-Video, some scenes may be skipped or you may be displayed correctly. • To display the optimum picture, use a PC, set the monitor output resolution on the TV are shared with a compatible mini D-sub15-pin terminal. • ...). PC audio cable PC audio output PC audio cable Conversion adapter (if necessary) • To use the PC setting feature ( "Using the PC settings feature" on the TV and hear the sound from the TV's speakers. The PC IN terminal can accept and display VGA, SVGA, XGA, WXGA, SXGA, 480i (60Hz), ...

Owners Manual
Page 22
.... 9 FAV BROWSER accesses the Favorites List in the Channel Brower™ ( page 36). 10 RECALL displays TV status information ( page 51). 11 CH RTN returns to edit the Favorites List ( page 37). 6 INPUT selects the video input source ( page 35). 7 CH ST cycles through the picture sizes: Natural, TheaterWide 1/2/3, Full, 4:3 HD,...38) or to the last viewed channel or source ( page 39). 12 MUTE reduces or turns off . Set to "TV" to the previous/next channel in the main menu system. 17 MENU accesses the main TV menu system ( pages 28 and 29). 18 EXIT closes on and off the sound ( page 44). 13...
.... 9 FAV BROWSER accesses the Favorites List in the Channel Brower™ ( page 36). 10 RECALL displays TV status information ( page 51). 11 CH RTN returns to edit the Favorites List ( page 37). 6 INPUT selects the video input source ( page 35). 7 CH ST cycles through the picture sizes: Natural, TheaterWide 1/2/3, Full, 4:3 HD,...38) or to the last viewed channel or source ( page 39). 12 MUTE reduces or turns off . Set to "TV" to the previous/next channel in the main menu system. 17 MENU accesses the main TV menu system ( pages 28 and 29). 18 EXIT closes on and off the sound ( page 44). 13...
Owners Manual
Page 24
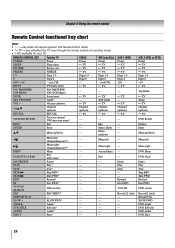
...FWD* --- --- FF Fast FWD* --- --- TV/VCR/ SEARCH DVD search* --- --- ANGLE Angle* --- --- MUTE Sound mute TV TV SET UP/GUIDE Guide* --- Volume up/down TV TV CHST Channel up/down Channel up/down Channel up/down TV --- ----- --- --- --- --- --- Menu left... CONTROL KEY Toshiba TV CABLE SAT (satellite) POWER Power Power Power SLEEP Sleep timer TV TV PIC SIZE Picture size TV TV FREEZE FREEZE TV TV 1-9 Digit 1-9 Digit 1-9 Digit 1-9 0 Digit 0 Digit 0 Digit 0 100/-/+10 - (sub CH) --- - (sub CH) INPUT TV/Video select TV TV FAV BROWSER/...
...FWD* --- --- FF Fast FWD* --- --- TV/VCR/ SEARCH DVD search* --- --- ANGLE Angle* --- --- MUTE Sound mute TV TV SET UP/GUIDE Guide* --- Volume up/down TV TV CHST Channel up/down Channel up/down Channel up/down TV --- ----- --- --- --- --- --- Menu left... CONTROL KEY Toshiba TV CABLE SAT (satellite) POWER Power Power Power SLEEP Sleep timer TV TV PIC SIZE Picture size TV TV FREEZE FREEZE TV TV 1-9 Digit 1-9 Digit 1-9 Digit 1-9 0 Digit 0 Digit 0 Digit 0 100/-/+10 - (sub CH) --- - (sub CH) INPUT TV/Video select TV TV FAV BROWSER/...
Owners Manual
Page 28
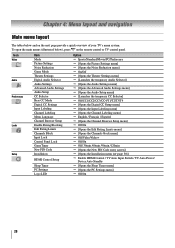
...ol p [Opens the Channel Browser Setup menu] p Off/On p [Opens the Edit Rating Limits menu] p [Opens the Channels block menu] p Off/Video/Video+ p Off/On p Off/ 30min /60min /90min /120min p [Opens the New PIN Code entry screen] p [Opens the Installation menu ( page 30)] p Enable HDMI ...Control / TV Auto Input Switch / TV Auto Power/ Device Auto Standby p [Opens the Sleep Timer menu] p [Opens the PC Settings menu] p Off/On 28 Chapter 4: Menu layout and navigation Main menu layout The tables below ), press...
...ol p [Opens the Channel Browser Setup menu] p Off/On p [Opens the Edit Rating Limits menu] p [Opens the Channels block menu] p Off/Video/Video+ p Off/On p Off/ 30min /60min /90min /120min p [Opens the New PIN Code entry screen] p [Opens the Installation menu ( page 30)] p Enable HDMI ...Control / TV Auto Input Switch / TV Auto Power/ Device Auto Standby p [Opens the Sleep Timer menu] p [Opens the PC Settings menu] p Off/On 28 Chapter 4: Menu layout and navigation Main menu layout The tables below ), press...
Owners Manual
Page 29
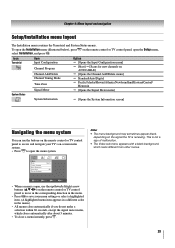
... arrow buttons (STWX) on the remote control or TV control panel to move in the corresponding direction in the menu. • Press to save your TV's on the remote control or TV control panel, open the menu system. Video Mode Picture Settings Noise Reduction Game Mode Theater Settings Sports Off Navigate ENTER Select CH RTN Back...
... arrow buttons (STWX) on the remote control or TV control panel to move in the corresponding direction in the menu. • Press to save your TV's on the remote control or TV control panel, open the menu system. Video Mode Picture Settings Noise Reduction Game Mode Theater Settings Sports Off Navigate ENTER Select CH RTN Back...
Owners Manual
Page 32
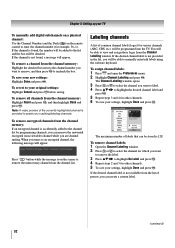
... press . To remove encrypted channels from the channel memory: Highlight Reset and press , and then highlight Done and press . Chapter 5: Setting up your TV To manually add digital subchannels on a physical channel: Use the Channel Numbers and the Dash ( ) on the screen to remove the unnecessary...logos from the list of labels that can create a custom label. (continued) 32 Note: A video preview of common channel labels (logos) for other channels. 6 To save your original settings: Highlight Cancel and press before saving. Digital Channel Is Encrypted - When you will appear. You ...
... press . To remove encrypted channels from the channel memory: Highlight Reset and press , and then highlight Done and press . Chapter 5: Setting up your TV To manually add digital subchannels on a physical channel: Use the Channel Numbers and the Dash ( ) on the screen to remove the unnecessary...logos from the list of labels that can create a custom label. (continued) 32 Note: A video preview of common channel labels (logos) for other channels. 6 To save your original settings: Highlight Cancel and press before saving. Digital Channel Is Encrypted - When you will appear. You ...
Owners Manual
Page 35
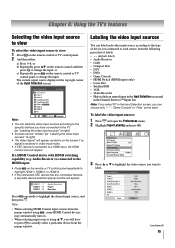
...Audio Receiver) is connected to a HDMI input, the HDMI Control icon will appear randomly on the remote control or TV control panel to change the input; To label the video input sources: 1 Press and open the Preferences menu. 2 Highlight Input Labeling and press . The current signal source...CC Selector Off Base CC Mode Off CC1 Digital CC Settings CC2 Input Labeling CC3 Channel Labeling CC4 Menu Language English T1 Channel Browser Setup T2 . 3 Press S or T to highlight the video source you can label each video input source according to highlight the desired input source, ...
...Audio Receiver) is connected to a HDMI input, the HDMI Control icon will appear randomly on the remote control or TV control panel to change the input; To label the video input sources: 1 Press and open the Preferences menu. 2 Highlight Input Labeling and press . The current signal source...CC Selector Off Base CC Mode Off CC1 Digital CC Settings CC2 Input Labeling CC3 Channel Labeling CC4 Menu Language English T1 Channel Browser Setup T2 . 3 Press S or T to highlight the video source you can label each video input source according to highlight the desired input source, ...
Owners Manual
Page 36
... surf and tune your channels and inputs. The channel/input will be skipped over when you connected a VCR to VIDEO 1, Cable TV to VIDEO 2, a video recorder to ColorStream HD1, a DTV settop box to HDMI 1, a satellite/DSS set-top box to HDMI 2, and a DVD player to HDMI 3. If a particular input is not used, you can select...
... surf and tune your channels and inputs. The channel/input will be skipped over when you connected a VCR to VIDEO 1, Cable TV to VIDEO 2, a video recorder to ColorStream HD1, a DTV settop box to HDMI 1, a satellite/DSS set-top box to HDMI 2, and a DVD player to HDMI 3. If a particular input is not used, you can select...
Owners Manual
Page 41
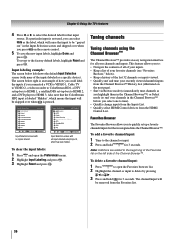
...1080p, or VGA (60Hz) signal from a DVD player connected to the VIDEO 1, VIDEO 2, ColorStream HD-1, ColorStream HD-2 (component video), or HDMI inputs on the TV, smoother motion can set the scroll settings: 1 Press and open the Video menu. 2 Highlight Theater Settings and press . 3 In the Cinema Mode field, select Film. 4 To...for any other button). Chapter 6: Using the TV's features Scrolling the TheaterWide® picture (TheaterWide 2 and 3 only) You can be obtained by setting the Cinema Mode to Film. To revert to PC input. To turn on page 40. Note: When receiving a signal at 480i...
...1080p, or VGA (60Hz) signal from a DVD player connected to the VIDEO 1, VIDEO 2, ColorStream HD-1, ColorStream HD-2 (component video), or HDMI inputs on the TV, smoother motion can set the scroll settings: 1 Press and open the Video menu. 2 Highlight Theater Settings and press . 3 In the Cinema Mode field, select Film. 4 To...for any other button). Chapter 6: Using the TV's features Scrolling the TheaterWide® picture (TheaterWide 2 and 3 only) You can be obtained by setting the Cinema Mode to Film. To revert to PC input. To turn on page 40. Note: When receiving a signal at 480i...
Owners Manual
Page 42
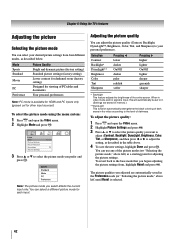
... picture quality: 1 Press and open the Video menu. 2 Highlight Mode and press . You can use any of PC tables and documents Your personal preferences Note: PC mode is available for HDMI and PC inputs only (grayed out for adjusting the picture settings. Chapter 6: Using the TV's features Adjusting the picture Selecting the picture...
... picture quality: 1 Press and open the Video menu. 2 Highlight Mode and press . You can use any of PC tables and documents Your personal preferences Note: PC mode is available for HDMI and PC inputs only (grayed out for adjusting the picture settings. Chapter 6: Using the TV's features Adjusting the picture Selecting the picture...
Owners Manual
Page 43
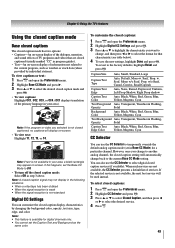
... mode has two options: • Captions-An on-screen display of the dialogue, narration, and sound effects of TV programs and videos that characteristic (see table below). 4 To save the new settings, highlight Done and press . WORLD WEATHER Temps F C LONDON 51 11 MOSCOW 57 14 PARIS 53 12 ROME ...view captions: Highlight CC1, CC2, CC3, or CC4. (CC1 displays translation of information not related to the current Base CC Mode setting. Note: If the program or video you want to change back to the current program, such as the same color. To view captions or text: 1 Press and ...
... mode has two options: • Captions-An on-screen display of the dialogue, narration, and sound effects of TV programs and videos that characteristic (see table below). 4 To save the new settings, highlight Done and press . WORLD WEATHER Temps F C LONDON 51 11 MOSCOW 57 14 PARIS 53 12 ROME ...view captions: Highlight CC1, CC2, CC3, or CC4. (CC1 displays translation of information not related to the current Base CC Mode setting. Note: If the program or video you want to change back to the current program, such as the same color. To view captions or text: 1 Press and ...


