Owners Manual
Page 1
...Definition LCD Television HIGH-DEFINITION TELEVISION 40RV52R 40RV525R 46RV525R For an overview of your TV. Record these numbers whenever you communicate with your new TV, see page 9. Model number: Serial number: VX3A00041800 Note: To display a High Definition picture, the TV must be receiving ..., please contact your TV antenna installer, cable provider, or satellite provider. © 2008 TOSHIBA CORPORATION All Rights Reserved Owner's Record The model number and serial number are on the back of steps for setting up your Toshiba dealer about this TV. Refer to these ...
...Definition LCD Television HIGH-DEFINITION TELEVISION 40RV52R 40RV525R 46RV525R For an overview of your TV. Record these numbers whenever you communicate with your new TV, see page 9. Model number: Serial number: VX3A00041800 Note: To display a High Definition picture, the TV must be receiving ..., please contact your TV antenna installer, cable provider, or satellite provider. © 2008 TOSHIBA CORPORATION All Rights Reserved Owner's Record The model number and serial number are on the back of steps for setting up your Toshiba dealer about this TV. Refer to these ...
Owners Manual
Page 6
... logo and High-Definition Multimedia Interface are trademarks of QSound Labs, Inc. • Manufactured under your warranty. To ensure your LCD TV The following measures: • Reorient or relocate the receiving antenna. • Increase the separation between the equipment and the receiver...Statement (Part 15): The Toshiba 40RV52U, 40RV525U, and 46RV525U Televisions comply with the instructions, may cause harmful interference to radio communications. However, there is encouraged to try to correct the interference by the U.S. Changing Picture Settings may increase energy consumption, ...
... logo and High-Definition Multimedia Interface are trademarks of QSound Labs, Inc. • Manufactured under your warranty. To ensure your LCD TV The following measures: • Reorient or relocate the receiving antenna. • Increase the separation between the equipment and the receiver...Statement (Part 15): The Toshiba 40RV52U, 40RV525U, and 46RV525U Televisions comply with the instructions, may cause harmful interference to radio communications. However, there is encouraged to try to correct the interference by the U.S. Changing Picture Settings may increase energy consumption, ...
Owners Manual
Page 7
... auto power off feature 51 Understanding the last mode memory feature 51 Chapter 7: Using the TV's advanced features 52 Using the advanced picture settings features 52 Using dynamic contrast 52 Using the static gamma feature 52 Selecting the color temperature 52...settings features 54 Using the QSound® sound feature 54 Chapter 8: Troubleshooting 55 General troubleshooting 55 Chapter 9: Appendix 57 Specifications 57 Acceptable signal formats for PC IN and HDMI terminals 58 Limited United States Warranty for LCD Televisions 26" and Larger 59 Limited Canadian Warranty for Toshiba...
... auto power off feature 51 Understanding the last mode memory feature 51 Chapter 7: Using the TV's advanced features 52 Using the advanced picture settings features 52 Using dynamic contrast 52 Using the static gamma feature 52 Selecting the color temperature 52...settings features 54 Using the QSound® sound feature 54 Chapter 8: Troubleshooting 55 General troubleshooting 55 Chapter 9: Appendix 57 Specifications 57 Acceptable signal formats for PC IN and HDMI terminals 58 Limited United States Warranty for LCD Televisions 26" and Larger 59 Limited Canadian Warranty for Toshiba...
Owners Manual
Page 8
ABC, HBO, etc.) on the screen along with Dolby® Digital optical output format ( page 45). • CableClear® digital picture noise reduction ( page 53). • PC IN (Analog RGB) computer terminal ( page 20). • Channel Labeling allows you 're watching ( page 32... following are just a few of the many exciting features of your new Toshiba widescreen, integrated HD, LCD TV: • Integrated digital tuning (8VSB ATSC and QAM) eliminates the need for a separate digital converter set-top box (in most cases). • 1080p output resolution. • Three HDMI™ digital, high-...
ABC, HBO, etc.) on the screen along with Dolby® Digital optical output format ( page 45). • CableClear® digital picture noise reduction ( page 53). • PC IN (Analog RGB) computer terminal ( page 20). • Channel Labeling allows you 're watching ( page 32... following are just a few of the many exciting features of your new Toshiba widescreen, integrated HD, LCD TV: • Integrated digital tuning (8VSB ATSC and QAM) eliminates the need for a separate digital converter set-top box (in most cases). • 1080p output resolution. • Three HDMI™ digital, high-...
Owners Manual
Page 12
...cables (and the related inputs on your devices may differ from most stores that sell audio/ video devices. Component video cables come in sets of three, and are for stereo left (or mono) audio. If you connect an S-video cable, be sure to disconnect the standard... cable S-video cable is Toshiba's brand of component video.) These cables are not required for connecting receivers with Dolby Digital or PCM (pulse-code modulation) optical audio input to the TV's DIGITAL AUDIO OUT terminal ( page 19). Note: An S-video cable provides better picture performance than a standard (...
...cables (and the related inputs on your devices may differ from most stores that sell audio/ video devices. Component video cables come in sets of three, and are for stereo left (or mono) audio. If you connect an S-video cable, be sure to disconnect the standard... cable S-video cable is Toshiba's brand of component video.) These cables are not required for connecting receivers with Dolby Digital or PCM (pulse-code modulation) optical audio input to the TV's DIGITAL AUDIO OUT terminal ( page 19). Note: An S-video cable provides better picture performance than a standard (...

Owners Manual
Page 14
...the video input source, press INPUT on the remote control ( page 22). To program the TV remote control to operate other materials is set to). To view the VCR: Turn ON the VCR. Chapter 2: Connecting your TV Connecting a VCR with S-video and a cable box An S-video connection will be able ...to use , distribution, or revision of video cable to VIDEO 1 at the same time or the picture performance will provide ...
...the video input source, press INPUT on the remote control ( page 22). To program the TV remote control to operate other materials is set to). To view the VCR: Turn ON the VCR. Chapter 2: Connecting your TV Connecting a VCR with S-video and a cable box An S-video connection will be able ...to use , distribution, or revision of video cable to VIDEO 1 at the same time or the picture performance will provide ...
Owners Manual
Page 15
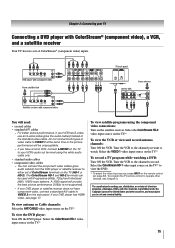
...does not have component video, connect a standard A/V cable to either set of ColorStream terminals on the TV (HD-1 or HD-2). Select the ColorStream HD-1 video input source on the TV* to VIDEO 1 at the same time or the picture performance will be used with ColorStream® (component video), a VCR,... and a satellite receiver Your TV has two sets of ColorStream® (component video) inputs. Do not connect ...
...does not have component video, connect a standard A/V cable to either set of ColorStream terminals on the TV (HD-1 or HD-2). Select the ColorStream HD-1 video input source on the TV* to VIDEO 1 at the same time or the picture performance will be used with ColorStream® (component video), a VCR,... and a satellite receiver Your TV has two sets of ColorStream® (component video) inputs. Do not connect ...
Owners Manual
Page 20
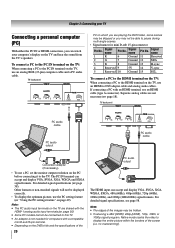
...may be skipped or you can watch your computer's display on the TV, use an analog RGB (15-pin) computer cable and a PC audio cable. If connecting a PC with an HDMI terminal, use the PC setting feature ( "Using the PC settings feature" on page 49). Separate analog cables are shared with a ...the video to display the entire picture within the borders of the screen (i.e. For detailed signal specifications ( page 58). To connect a PC to the PC IN terminal on the TV: When connecting a PC to the PC IN terminal on the TV and hear the sound from the TV's speakers. Signal name Pin No...
...may be skipped or you can watch your computer's display on the TV, use an analog RGB (15-pin) computer cable and a PC audio cable. If connecting a PC with an HDMI terminal, use the PC setting feature ( "Using the PC settings feature" on page 49). Separate analog cables are shared with a ...the video to display the entire picture within the borders of the screen (i.e. For detailed signal specifications ( page 58). To connect a PC to the PC IN terminal on the TV: When connecting a PC to the PC IN terminal on the TV and hear the sound from the TV's speakers. Signal name Pin No...

Owners Manual
Page 22
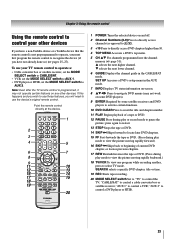
... here. Press again to edit the Favorites List ( page 37). 6 INPUT selects the video input source ( page 35). 7 CH ST cycles through the picture sizes: Natural, TheaterWide 1/2/3, Full, 4:3 HD, Native and Dot by Dot ( page 39). 5 Channel Numbers (0-9, -/100) directly tune channels. Chapter 3:... in the channel history ( page 37). (Also see the remote control functional key chart ( page 24). 1 POWER turns the TV on the TV front will be illuminated. 2 FREEZE freezes the picture. Set to "TV" to the previous/next channel in the Channel Brower™ ( page 36). 10 RECALL displays...
... here. Press again to edit the Favorites List ( page 37). 6 INPUT selects the video input source ( page 35). 7 CH ST cycles through the picture sizes: Natural, TheaterWide 1/2/3, Full, 4:3 HD, Native and Dot by Dot ( page 39). 5 Channel Numbers (0-9, -/100) directly tune channels. Chapter 3:... in the channel history ( page 37). (Also see the remote control functional key chart ( page 24). 1 POWER turns the TV on the TV front will be illuminated. 2 FREEZE freezes the picture. Set to "TV" to the previous/next channel in the Channel Brower™ ( page 36). 10 RECALL displays...
Owners Manual
Page 23
...or HTIB, set the MODE SELECT switch to control the TV; "CABLE/SAT" to recognize the device (if you must first program the remote control to control a cable converter box or satellite receiver; Note: Even after the TV remote control is not preprogrammed to operate, you have a non-Toshiba device or a Toshiba device that... of current DVD chapter, or locates previous chapters. 17 REW Rewinds/reverses the tape or DVD. (Press during play mode to view the picture moving rapidly forward.) 16 SKIP Skips back to beginning of a tape or DVD. 12 PAUSE Press during play or record mode to select...
...or HTIB, set the MODE SELECT switch to control the TV; "CABLE/SAT" to recognize the device (if you must first program the remote control to control a cable converter box or satellite receiver; Note: Even after the TV remote control is not preprogrammed to operate, you have a non-Toshiba device or a Toshiba device that... of current DVD chapter, or locates previous chapters. 17 REW Rewinds/reverses the tape or DVD. (Press during play mode to view the picture moving rapidly forward.) 16 SKIP Skips back to beginning of a tape or DVD. 12 PAUSE Press during play or record mode to select...
Owners Manual
Page 24
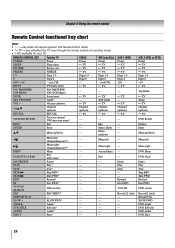
...FWD DVD Angle DVD Sub title DVD Audio DVD Eject 24 SLOW + SLOW FWD* --- --- TV/VCR/ SEARCH DVD search* --- --- AUDIO Audio* --- --- MUTE Sound mute TV TV SET UP/GUIDE Guide* --- Info ENTER Enter --- PLAY Play* --- --- REW Rewind* --- ---...TV. REMOTE CONTROL KEY Toshiba TV CABLE SAT (satellite) POWER Power Power Power SLEEP Sleep timer TV TV PIC SIZE Picture size TV TV FREEZE FREEZE TV TV 1-9 Digit 1-9 Digit 1-9 Digit 1-9 0 Digit 0 Digit 0 Digit 0 100/-/+10 - (sub CH) --- - (sub CH) INPUT TV/Video select TV TV...
...FWD DVD Angle DVD Sub title DVD Audio DVD Eject 24 SLOW + SLOW FWD* --- --- TV/VCR/ SEARCH DVD search* --- --- AUDIO Audio* --- --- MUTE Sound mute TV TV SET UP/GUIDE Guide* --- Info ENTER Enter --- PLAY Play* --- --- REW Rewind* --- ---...TV. REMOTE CONTROL KEY Toshiba TV CABLE SAT (satellite) POWER Power Power Power SLEEP Sleep timer TV TV PIC SIZE Picture size TV TV FREEZE FREEZE TV TV 1-9 Digit 1-9 Digit 1-9 Digit 1-9 0 Digit 0 Digit 0 Digit 0 100/-/+10 - (sub CH) --- - (sub CH) INPUT TV/Video select TV TV...
Owners Manual
Page 28
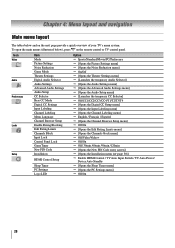
Icon Video Audio Preferences Locks Setup Item Mode Picture Settings Noise Reduction Game Mode Theater Settings Digital Audio Selector Audio Settings Advanced Audio Settings Audio Setup CC Selector Base CC Mode Digital CC Settings Input Labeling Channel Labeling Menu Language Channel Browser Setup Enable Rating Blocking ...entry screen] p [Opens the Installation menu ( page 30)] p Enable HDMI Control / TV Auto Input Switch / TV Auto Power/ Device Auto Standby p [Opens the Sleep Timer menu] p [Opens the PC Settings menu] p Off/On 28 To open the main menus (illustrated below and on the remote...
Icon Video Audio Preferences Locks Setup Item Mode Picture Settings Noise Reduction Game Mode Theater Settings Digital Audio Selector Audio Settings Advanced Audio Settings Audio Setup CC Selector Base CC Mode Digital CC Settings Input Labeling Channel Labeling Menu Language Channel Browser Setup Enable Rating Blocking ...entry screen] p [Opens the Installation menu ( page 30)] p Enable HDMI Control / TV Auto Input Switch / TV Auto Power/ Device Auto Standby p [Opens the Sleep Timer menu] p [Opens the PC Settings menu] p Off/On 28 To open the main menus (illustrated below and on the remote...
Owners Manual
Page 29
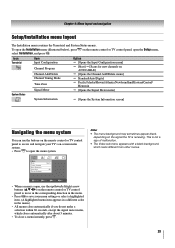
Note: • The menu background may sometimes appear black, depending on the signal the TV is open, use the buttons on the remote control or TV control panel, open the menu system. Video Mode Picture Settings Noise Reduction Game Mode Theater Settings Sports Off Navigate ENTER Select CH RTN Back EXIT Exit • When a menu is...
Note: • The menu background may sometimes appear black, depending on the signal the TV is open, use the buttons on the remote control or TV control panel, open the menu system. Video Mode Picture Settings Noise Reduction Game Mode Theater Settings Sports Off Navigate ENTER Select CH RTN Back EXIT Exit • When a menu is...

Owners Manual
Page 39
... the remote control. 2 While the Picture Size screen is open , you can return to that are currently watching. Note: If you select one of the picture sizes may not be "grayed out" in the Theater Settings menu. 2 Press W or X to select the desired picture size setting. 3 Highlight Done and press . ...To memorize a channel to the button: 1 Tune the TV to the channel you want to view. 2 Select...
... the remote control. 2 While the Picture Size screen is open , you can return to that are currently watching. Note: If you select one of the picture sizes may not be "grayed out" in the Theater Settings menu. 2 Press W or X to select the desired picture size setting. 3 Highlight Done and press . ...To memorize a channel to the button: 1 Tune the TV to the channel you want to view. 2 Select...
Owners Manual
Page 41
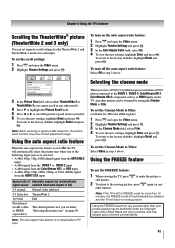
... again (or any purpose other button). Note: When receiving a signal at 480i resolution, the picture scroll function may be prohibited under "Selecting the picture size" on page 40. Note: If the TV is received: • A 480i, 480p, 720p, 1080i digital signal from the ANT/CABLE input &#...) 1 Press and open the Video menu. 2 Highlight Theater Settings and press . To revert to the moving picture. Using the FREEZE feature To use the FREEZE feature: 1 When viewing the TV, press to make the picture a still picture. 2 To return to the factory defaults, highlight Reset and press...
... again (or any purpose other button). Note: When receiving a signal at 480i resolution, the picture scroll function may be prohibited under "Selecting the picture size" on page 40. Note: If the TV is received: • A 480i, 480p, 720p, 1080i digital signal from the ANT/CABLE input &#...) 1 Press and open the Video menu. 2 Highlight Theater Settings and press . To revert to the moving picture. Using the FREEZE feature To use the FREEZE feature: 1 When viewing the TV, press to make the picture a still picture. 2 To return to the factory defaults, highlight Reset and press...
Owners Manual
Page 42
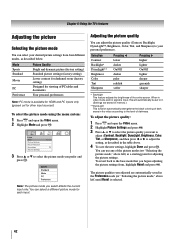
... input only. Chapter 6: Using the TV's features Adjusting the picture Selecting the picture mode You can select a different picture mode for each input. You can select your personal preferences. Video Mode Picture Settings Noise Reduction Game Mode Theater Settings Sports Off 3 Press S or T to your desired picture settings from , highlight Reset and press . The picture qualities you want to adjust...
... input only. Chapter 6: Using the TV's features Adjusting the picture Selecting the picture mode You can select a different picture mode for each input. You can select your personal preferences. Video Mode Picture Settings Noise Reduction Game Mode Theater Settings Sports Off 3 Press S or T to your desired picture settings from , highlight Reset and press . The picture qualities you want to adjust...

Owners Manual
Page 48
...again. A list of video input locking you set , the TV will enter program lock mode and the following message will be enabled when the TV is released and the normal picture appears. Unlocking programs temporarily If you try to tune the TV to select the level of the channels available...previous page and then highlight Done and press . Chapter 6: Using the TV's features Blocking channels With the Channels Block feature, you play video tapes via an ANT/CABLE input. All locking is disabled until you set . You will be displayed along with the call letters for other ...
...again. A list of video input locking you set , the TV will enter program lock mode and the following message will be enabled when the TV is released and the normal picture appears. Unlocking programs temporarily If you try to tune the TV to select the level of the channels available...previous page and then highlight Done and press . Chapter 6: Using the TV's features Blocking channels With the Channels Block feature, you play video tapes via an ANT/CABLE input. All locking is disabled until you set . You will be displayed along with the call letters for other ...
Owners Manual
Page 49
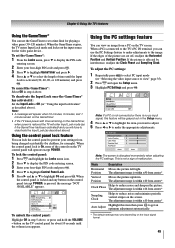
... image. When the GameTimer expires, the TV enters Input Lock mode and locks out the input source for about 10 seconds until the Input Lock is not a sign of the picture are cut off, readjust the Horizontal Position and Vertical Position. To set a time limit for example). Using the... center.* Clock Phase Helps to reduce noise and sharpen the picture. Using the PC settings feature You can lock the control panel to prevent your settings from center.* Sampling Clock Helps to reduce noise and minimize periodic vertical stripes on the TV screen. When a PC is within ±10 from a...
... image. When the GameTimer expires, the TV enters Input Lock mode and locks out the input source for about 10 seconds until the Input Lock is not a sign of the picture are cut off, readjust the Horizontal Position and Vertical Position. To set a time limit for example). Using the... center.* Clock Phase Helps to reduce noise and sharpen the picture. Using the PC settings feature You can lock the control panel to prevent your settings from center.* Sampling Clock Helps to reduce noise and minimize periodic vertical stripes on the TV screen. When a PC is within ±10 from a...
Owners Manual
Page 52
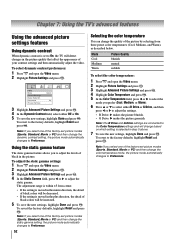
... Done and press . Chapter 7: Using the TV's advanced features Using the advanced picture settings features Using dynamic contrast When dynamic contrast is set to On, the TV will change based on which setting is moved in the picture. Video Mode Picture Settings Noise Reduction Game Mode Theater Settings Sports Off 3 Highlight Advanced Picture Settings and press . 4 In the Dynamic Contrast field, select...
... Done and press . Chapter 7: Using the TV's advanced features Using the advanced picture settings features Using dynamic contrast When dynamic contrast is set to On, the TV will change based on which setting is moved in the picture. Video Mode Picture Settings Noise Reduction Game Mode Theater Settings Sports Off 3 Highlight Advanced Picture Settings and press . 4 In the Dynamic Contrast field, select...

Owners Manual
Page 53
... 2, ColorStream HD1, ColorStream HD2, HDMI 1, HDMI 2, or HDMI 3. This feature is disabled ("grayed out"). Using the Game Mode feature You can change the CableClear settings: 1 Press and open the Video menu. 2 Press S or T to highlight the Game Mode and then press X. 3 Press S or T to reduce visible ... on Game Mode: 1 Press and open the Video menu, highlight Noise Reduction and press . 2 In the CableClear field, select your TV picture. This may be turned on the Using MPEG noise reduction The MPEG noise reduction feature allows you to reduce visible interference in your desired...
... 2, ColorStream HD1, ColorStream HD2, HDMI 1, HDMI 2, or HDMI 3. This feature is disabled ("grayed out"). Using the Game Mode feature You can change the CableClear settings: 1 Press and open the Video menu. 2 Press S or T to highlight the Game Mode and then press X. 3 Press S or T to reduce visible ... on Game Mode: 1 Press and open the Video menu, highlight Noise Reduction and press . 2 In the CableClear field, select your TV picture. This may be turned on the Using MPEG noise reduction The MPEG noise reduction feature allows you to reduce visible interference in your desired...


