
Printable Spec Sheet
Page 1
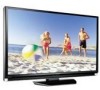
...that formerly fit our 37" screen size. • High 10-Bit LCD Panel - Toshiba's new 10-bit LCD provides 64 times more colors than a standard 8-bit panel, offering smoother transitions between the TV and compatible source devices, • SoundStrip 2™ Speaker System for ... • ColorBurst™ Wide Color Gamut CCFL - This significantly improves both color purity and color saturation. 40RF35OU PRELIMINARY • Beautifully-designed 40" Screen Size (measured diagonally) Super Narrow Bezel Design (under 1" wide) fits into spaces that are more vibrant, more natural, and more...
...that formerly fit our 37" screen size. • High 10-Bit LCD Panel - Toshiba's new 10-bit LCD provides 64 times more colors than a standard 8-bit panel, offering smoother transitions between the TV and compatible source devices, • SoundStrip 2™ Speaker System for ... • ColorBurst™ Wide Color Gamut CCFL - This significantly improves both color purity and color saturation. 40RF35OU PRELIMINARY • Beautifully-designed 40" Screen Size (measured diagonally) Super Narrow Bezel Design (under 1" wide) fits into spaces that are more vibrant, more natural, and more...

Owner's Manual - English
Page 2
...be of sufficient magnitude to constitute a risk of electric shock to Article 820-40 of the U.S. Eads St. The exclamation point within an equilateral triangle is a growing trend, and larger TVs are like most consumers, you have more than a UL Listed wall bracket appropriate...is the Sponsor, Producer and Manager of the International CES® Toshiba Cares! a Sometimes TVs are not always supported on top of your new LCD TV. Many homes, in fact, have a TV in accordance with furniture and TVs. however, they are improperly secured or inappropriately situated on page 3....
...be of sufficient magnitude to constitute a risk of electric shock to Article 820-40 of the U.S. Eads St. The exclamation point within an equilateral triangle is a growing trend, and larger TVs are like most consumers, you have more than a UL Listed wall bracket appropriate...is the Sponsor, Producer and Manager of the International CES® Toshiba Cares! a Sometimes TVs are not always supported on top of your new LCD TV. Many homes, in fact, have a TV in accordance with furniture and TVs. however, they are improperly secured or inappropriately situated on page 3....
Owner's Manual - English
Page 7
... 3 Chapter 1: Introduction 9 Welcome to Toshiba 9 Features of your new TV 9 Overview of steps for installing, setting up, and using your new TV 10 TV front and side panel controls and connections 11 TV back panel connections 12 Chapter 2: Connecting your TV 13 Overview of cable types 13 About ... the antenna input source for the ANT terminal 39 Programming channels into the TV's channel memory . . . . 40 Programming channels automatically 40 Manually adding and deleting channels in the channel memory 40 Setting the Auto Input feature 41 Labeling channels 42 Setting the HDMI™...
... 3 Chapter 1: Introduction 9 Welcome to Toshiba 9 Features of your new TV 9 Overview of steps for installing, setting up, and using your new TV 10 TV front and side panel controls and connections 11 TV back panel connections 12 Chapter 2: Connecting your TV 13 Overview of cable types 13 About ... the antenna input source for the ANT terminal 39 Programming channels into the TV's channel memory . . . . 40 Programming channels automatically 40 Manually adding and deleting channels in the channel memory 40 Setting the Auto Input feature 41 Labeling channels 42 Setting the HDMI™...

Owner's Manual - English
Page 10
...other devices. The yellow LED will damage the TV. page 40). 12 For details on using its many exciting features. 1 Carefully read the important safety, installation, care, and service information. Secure the TV to allow proper ventilation. page 6). • Place the TV on , press and hold the POWER button for... OF DAMAGE IS NOT COVERED UNDER THE TOSHIBA WARRANTY. 3 Do not plug in the power cords for your TV. 4 BEFORE connecting cables or devices to operate your LCD TV" (- page 24) for an overview of the buttons on the remote control or TV control panel and you have connected all...
...other devices. The yellow LED will damage the TV. page 40). 12 For details on using its many exciting features. 1 Carefully read the important safety, installation, care, and service information. Secure the TV to allow proper ventilation. page 6). • Place the TV on , press and hold the POWER button for... OF DAMAGE IS NOT COVERED UNDER THE TOSHIBA WARRANTY. 3 Do not plug in the power cords for your TV. 4 BEFORE connecting cables or devices to operate your LCD TV" (- page 24) for an overview of the buttons on the remote control or TV control panel and you have connected all...

Owner's Manual - English
Page 11
... A/V connections are viewing (ANT, VIDEO 1, VIDEO 2, ColorStream HD1, ColorStream HD2, HDMI 1, HDMI 2, HDMI 3, PC) (- Chapter 1: Introduction TV front and side panel controls and connections TV front 1 Right side panel 5 9 6 10 7 8 11 Control panel 4 2 3 1 Illumination - Press to as the ENTER button. ... control effective range" on the TV control panel for additional information. 2 Green and Yellow LEDs Green = See "LED indications" on the TV's control panel functions as "VIDEO 2" and include standard A/V connections. 5 POWER - page 40). 10 VOLUME C c - Power...
... A/V connections are viewing (ANT, VIDEO 1, VIDEO 2, ColorStream HD1, ColorStream HD2, HDMI 1, HDMI 2, HDMI 3, PC) (- Chapter 1: Introduction TV front and side panel controls and connections TV front 1 Right side panel 5 9 6 10 7 8 11 Control panel 4 2 3 1 Illumination - Press to as the ENTER button. ... control effective range" on the TV control panel for additional information. 2 Green and Yellow LEDs Green = See "LED indications" on the TV's control panel functions as "VIDEO 2" and include standard A/V connections. 5 POWER - page 40). 10 VOLUME C c - Power...

Owner's Manual - English
Page 24
...in the main menu system. 9 THINC accesses the THINC menu (- page 54). 21 FREEZE freezes the picture. page 66). 2 POWER turns the TV on the TV (- page 40). 14 EXIT closes on -screen (- page 57.) By using this button, it is being recorded. 20 PIC MODE selects the picture mode (- ...Press again to the previous/next channel in the channel history (- page 37). 10 3 C / # c While watching TV, these buttons select or adjust programming menus. (...
...in the main menu system. 9 THINC accesses the THINC menu (- page 54). 21 FREEZE freezes the picture. page 66). 2 POWER turns the TV on the TV (- page 40). 14 EXIT closes on -screen (- page 57.) By using this button, it is being recorded. 20 PIC MODE selects the picture mode (- ...Press again to the previous/next channel in the channel history (- page 37). 10 3 C / # c While watching TV, these buttons select or adjust programming menus. (...

Owner's Manual - English
Page 37
.... To open the Installation menu (illustrated below), press Y on the remote control or TV control panel, open the Installation sub-menu. You can only view the THINC menu by...Channel Add/Delete menu] S Standard/Auto/Digital S [Opens the Signal Meter menu] Page 39 40 40 49 44 S [Opens the System Information screen] 44 THINC™ menu The THINC* menu ... channels on the remote control. THINC Applications CE-Link Player Control Channel Browser Favorites Browser * Toshiba Home Interactive Network Connection. 37 Chapter 4: Menu layout and navigation Setup/Installation menu layout The ...
.... To open the Installation menu (illustrated below), press Y on the remote control or TV control panel, open the Installation sub-menu. You can only view the THINC menu by...Channel Add/Delete menu] S Standard/Auto/Digital S [Opens the Signal Meter menu] Page 39 40 40 49 44 S [Opens the System Information screen] 44 THINC™ menu The THINC* menu ... channels on the remote control. THINC Applications CE-Link Player Control Channel Browser Favorites Browser * Toshiba Home Interactive Network Connection. 37 Chapter 4: Menu layout and navigation Setup/Installation menu layout The ...

Owner's Manual - English
Page 40
... on-screen display and press T). Installation Terrestrial Input Configuration Channel Program Channel Add/Delete Channel Tuning Mode Signal Meter Standard 40 After the channels are programmed automatically, you should not have not already done so (- Note: • You must...message "Scanning channels, please wait" appears (as shown below to a channel not programmed in the channel memory After automatically programming channels into the TV's channel memory. This is configured for Antenna. page 39). 2 Press Y and open the Setup menu. 2 Highlight Installation and press T....
... on-screen display and press T). Installation Terrestrial Input Configuration Channel Program Channel Add/Delete Channel Tuning Mode Signal Meter Standard 40 After the channels are programmed automatically, you should not have not already done so (- Note: • You must...message "Scanning channels, please wait" appears (as shown below to a channel not programmed in the channel memory After automatically programming channels into the TV's channel memory. This is configured for Antenna. page 39). 2 Press Y and open the Setup menu. 2 Highlight Installation and press T....

Owner's Manual - English
Page 50
... 125. • If the Channel Tuning Mode is set to Digital, the TV will have to tune the RF channel using SurfLock™ The SurfLock™ feature temporarily "memorizes" one time only. page 40)-you will tune to digital channel 125-1. (It is not possible to the ...dash (=) button if selecting a digital channel). 3 Press R on the remote control or TV control panel. The channel has been programmed to the R button. 3 You can return to program into the TV's channel memory (- page 40). page 40) or the Channel Add/ Delete function (- Also, the History List will be cleared, but...
... 125. • If the Channel Tuning Mode is set to Digital, the TV will have to tune the RF channel using SurfLock™ The SurfLock™ feature temporarily "memorizes" one time only. page 40)-you will tune to digital channel 125-1. (It is not possible to the ...dash (=) button if selecting a digital channel). 3 Press R on the remote control or TV control panel. The channel has been programmed to the R button. 3 You can return to program into the TV's channel memory (- page 40). page 40) or the Channel Add/ Delete function (- Also, the History List will be cleared, but...

Owner's Manual - English
Page 76
...-Link device. The PIN code you have been erased from the channel list (- page 60). • The V-Chip feature is available for Toshiba CE-Link compatible devices. • Make sure the HDMI cables with the HDMI Logo ( ) are still unable to the correct device mode ...on another device, use the Reset Factory Defaults procedure (- Chapter 8: Troubleshooting • Your TV remote control may not operate properly. • Read the instruction manual furnished with the device (- page 40). b) when the signal reception is not closedcaptioned, no captions will be blocked by the...
...-Link device. The PIN code you have been erased from the channel list (- page 60). • The V-Chip feature is available for Toshiba CE-Link compatible devices. • Make sure the HDMI cables with the HDMI Logo ( ) are still unable to the correct device mode ...on another device, use the Reset Factory Defaults procedure (- Chapter 8: Troubleshooting • Your TV remote control may not operate properly. • Read the instruction manual furnished with the device (- page 40). b) when the signal reception is not closedcaptioned, no captions will be blocked by the...
Owner's Manual - English
Page 79
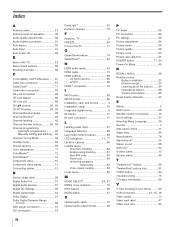
...56.476kHz 60.023kHz 47.396kHz 47.776kHz 60.289kHz 47.712kHz 63.981kHz Pixel Clock Frequency 25.175MHz 31.500MHz 31.500MHz 40.000MHz 50.000MHz 49.500MHz 65.000MHz 75.000MHz 78.750MHz 68.250MHz 79.500MHz 102.250MHz 85.500MHz 108.000MHz HDMI ....000kHz 33.716/33.750kHz 26.973/27.000kHz 67.433/67.500kHz Pixel Clock Frequency 25.175MHz 31.500MHz 31.500MHz 40.000MHz 50.000MHz 49.500MHz 65.000MHz 75.000MHz 78.750MHz 68.250MHz 79.500MHz 102.250MHz 85.500MHz 108.000MHz 27.... signal formats Note: Depending on the connected PC, the following status may occur; But this is not a malfunction of your TV.
...56.476kHz 60.023kHz 47.396kHz 47.776kHz 60.289kHz 47.712kHz 63.981kHz Pixel Clock Frequency 25.175MHz 31.500MHz 31.500MHz 40.000MHz 50.000MHz 49.500MHz 65.000MHz 75.000MHz 78.750MHz 68.250MHz 79.500MHz 102.250MHz 85.500MHz 108.000MHz HDMI ....000kHz 33.716/33.750kHz 26.973/27.000kHz 67.433/67.500kHz Pixel Clock Frequency 25.175MHz 31.500MHz 31.500MHz 40.000MHz 50.000MHz 49.500MHz 65.000MHz 75.000MHz 78.750MHz 68.250MHz 79.500MHz 102.250MHz 85.500MHz 108.000MHz 27.... signal formats Note: Depending on the connected PC, the following status may occur; But this is not a malfunction of your TV.
Owner's Manual - English
Page 84
... 50 S-video cable 13 System status 44 T TheaterLock™ feature 55 TheaterWide® picture size 51 THINC button 24 Troubleshooting 75 TV status information 69 V V-Chip blocking (Locks menu) .........60 VCR connection 14, 15, 16 Video cables 13 Video input label 47... Browser Setup 48 Channel Browser 48 Channel labeling 42 Channel Number buttons .......... 24, 50 Channel programming Automatic programming 40 Manually adding and deleting... 40 Channel Tuning Mode 49 Cinema mode 54 Closed captions 56 Color temperature 71 ColorMaster 72 ColorStream 16 Component video 16...
... 50 S-video cable 13 System status 44 T TheaterLock™ feature 55 TheaterWide® picture size 51 THINC button 24 Troubleshooting 75 TV status information 69 V V-Chip blocking (Locks menu) .........60 VCR connection 14, 15, 16 Video cables 13 Video input label 47... Browser Setup 48 Channel Browser 48 Channel labeling 42 Channel Number buttons .......... 24, 50 Channel programming Automatic programming 40 Manually adding and deleting... 40 Channel Tuning Mode 49 Cinema mode 54 Closed captions 56 Color temperature 71 ColorMaster 72 ColorStream 16 Component video 16...


