
User's Guide for L1350U and L2300U Series TV's
Page 2
... Article 820-40 of the U.S. NEC, which provides guidelines for the size and weight of this television, always use a mounting bracket that has been Listed by an independent laboratory (such as practical. NO USER-SERVICEABLE PARTS INSIDE. See "To Display your LED TV on the included Pedestal Stand:" on page 5 . For additional antenna grounding information, see 33) on page 5 and 34) on page 5 . WARNING...
... Article 820-40 of the U.S. NEC, which provides guidelines for the size and weight of this television, always use a mounting bracket that has been Listed by an independent laboratory (such as practical. NO USER-SERVICEABLE PARTS INSIDE. See "To Display your LED TV on the included Pedestal Stand:" on page 5 . For additional antenna grounding information, see 33) on page 5 and 34) on page 5 . WARNING...
User's Guide for L1350U and L2300U Series TV's
Page 4
...operate normally, or has been dropped. Never place the TV on or pinched, particularly at all times. • Keep the product away from being walked on an unstable cart, stand, or table. A polarized plug has two blades with the plastic bag. Installation, Care, and Service Installation Follow these instructions. 3) Heed all warnings. 4) Follow all instructions. 5) Do not use this product at plugs..., stoves, or other . The LCD panel inside a wall or similar enclosed area. 22) Never modify this equipment under the rules of plug to the TV. When a cart is located in fire.
...operate normally, or has been dropped. Never place the TV on or pinched, particularly at all times. • Keep the product away from being walked on an unstable cart, stand, or table. A polarized plug has two blades with the plastic bag. Installation, Care, and Service Installation Follow these instructions. 3) Heed all warnings. 4) Follow all instructions. 5) Do not use this product at plugs..., stoves, or other . The LCD panel inside a wall or similar enclosed area. 22) Never modify this equipment under the rules of plug to the TV. When a cart is located in fire.
User's Guide for L1350U and L2300U Series TV's
Page 6
... objects of the LCD Panel face down on page 5 . CAUTION: Before beginning pedestal assembly, carefully lay the front of any cables and/or other hazards. When selecting a location for the television, avoid locations where the screen may expose you leave the TV unattended or unused for long periods of the VESA Mounting Pattern show in this product can support the weight of a window...
... objects of the LCD Panel face down on page 5 . CAUTION: Before beginning pedestal assembly, carefully lay the front of any cables and/or other hazards. When selecting a location for the television, avoid locations where the screen may expose you leave the TV unattended or unused for long periods of the VESA Mounting Pattern show in this product can support the weight of a window...

User's Guide for L1350U and L2300U Series TV's
Page 8
... power to the equipment, the user is no guarantee that to [Home] mode settings, select [Standard] picture mode. [Standard] mode is not permanent and will not occur in a particular installation. marks. This is a structural property of LCD technology, is not a sign of this equipment. 8 FCC Declaration of Conformity Compliance Statement (Part 15): Toshiba 23L1350U, 29L1350U, 32L1350U, 39L1350U, 50L1350U, 23L2300U, 32L2300U, 39L2300U, 50L2300U Television models...
... power to the equipment, the user is no guarantee that to [Home] mode settings, select [Standard] picture mode. [Standard] mode is not permanent and will not occur in a particular installation. marks. This is a structural property of LCD technology, is not a sign of this equipment. 8 FCC Declaration of Conformity Compliance Statement (Part 15): Toshiba 23L1350U, 29L1350U, 32L1350U, 39L1350U, 50L1350U, 23L2300U, 32L2300U, 39L2300U, 50L2300U Television models...

User's Guide for L1350U and L2300U Series TV's
Page 11
... the remote control 38 Chapter 4: Menu Layout and Navigation 41 Main menu layout 41 Navigating the menu system 43 Chapter 5: Setting up your TV 44 Initial Setup 44 Installation setup selection 45 Storing channels in memory (optional 46 Auto Tuning 46 Manual Tuning 48 Setting channel skip 48 Setting the AV input mode 49 Setting the HDMITM audio mode 50 Setting the time zone 51 Viewing the system status 51 Resetting Factory Defaults 51 Chapter 6: Setting up...
... the remote control 38 Chapter 4: Menu Layout and Navigation 41 Main menu layout 41 Navigating the menu system 43 Chapter 5: Setting up your TV 44 Initial Setup 44 Installation setup selection 45 Storing channels in memory (optional 46 Auto Tuning 46 Manual Tuning 48 Setting channel skip 48 Setting the AV input mode 49 Setting the HDMITM audio mode 50 Setting the time zone 51 Viewing the system status 51 Resetting Factory Defaults 51 Chapter 6: Setting up...
User's Guide for L1350U and L2300U Series TV's
Page 12
12 Contents Labeling the video input sources 54 Tuning channels using the Channel Browser............55 Favorites browser 56 Elements of the Channel Browser 57 Adding and clearing channels and inputs in the History List 59 Tuning to the next programmed channel............59 Tuning to a specific channel (programmed or unprogrammed 59 Switching between two channels using Channel Return 60 Switching between two channels using SurfLock 60 Selecting the picture size 61 Full 62 TheaterWide 1 62 TheaterWide...
12 Contents Labeling the video input sources 54 Tuning channels using the Channel Browser............55 Favorites browser 56 Elements of the Channel Browser 57 Adding and clearing channels and inputs in the History List 59 Tuning to the next programmed channel............59 Tuning to a specific channel (programmed or unprogrammed 59 Switching between two channels using Channel Return 60 Switching between two channels using SurfLock 60 Selecting the picture size 61 Full 62 TheaterWide 1 62 TheaterWide...
User's Guide for L1350U and L2300U Series TV's
Page 15
... Media Player problems 108 If the problem persists after trying the solutions....108 Appendix A: Specifications 109 Television system 109 Channel coverage 109 Power source 110 Power maximum current 110 Power consumption 110 Audio power 110 Speaker type 111 Video/audio terminals 111 Video/audio input 111 ColorStream® (component video) HD input.....111 HDMITM input 111 Digital audio output 112 PC input 112 Dimensions 112 Mass (weight 112 Operating conditions 113 Supplied accessories 113 Acceptable signal formats for PC IN, HDMITM.........113 PC IN signal formats...
... Media Player problems 108 If the problem persists after trying the solutions....108 Appendix A: Specifications 109 Television system 109 Channel coverage 109 Power source 110 Power maximum current 110 Power consumption 110 Audio power 110 Speaker type 111 Video/audio terminals 111 Video/audio input 111 ColorStream® (component video) HD input.....111 HDMITM input 111 Digital audio output 112 PC input 112 Dimensions 112 Mass (weight 112 Operating conditions 113 Supplied accessories 113 Acceptable signal formats for PC IN, HDMITM.........113 PC IN signal formats...
User's Guide for L1350U and L2300U Series TV's
Page 17
...; / DVD player, satellite receiver with ColorStream® or VCR" on page 25 v Digital Audio Out-Optical audio connection with 1080p input support. See "Connecting a digital audio system" on page 30 v DNR-Digital picture Noise Reduction, see "DNR" on page 101 v ClearScanTM (for 32L2300U, 39/50L1350U and 39/50L2300U) -Provides picture clarity for a separate digital converter set-top box (in most cases). v 1366 x 768 output resolution (29L1350U, 32L1350U, 32L2300U) v 1920 x 1080 output resolution (23L1350U, 39L1350U...
...; / DVD player, satellite receiver with ColorStream® or VCR" on page 25 v Digital Audio Out-Optical audio connection with 1080p input support. See "Connecting a digital audio system" on page 30 v DNR-Digital picture Noise Reduction, see "DNR" on page 101 v ClearScanTM (for 32L2300U, 39/50L1350U and 39/50L2300U) -Provides picture clarity for a separate digital converter set-top box (in most cases). v 1366 x 768 output resolution (29L1350U, 32L1350U, 32L2300U) v 1920 x 1080 output resolution (23L1350U, 39L1350U...
User's Guide for L1350U and L2300U Series TV's
Page 18
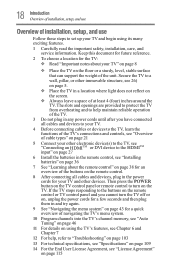
... of cable types" on page 21 5 Connect your TV and begin using the TV's features, see Chapter 6 and Chapter 7 12 For help maintain reliable operation of the TV. 3 Do not plug in any power cords until after you cannot turn on the TV. Keep this document for future reference. 2 To choose a location for the TV: v Read "Important notes about the remote control" on...
... of cable types" on page 21 5 Connect your TV and begin using the TV's features, see Chapter 6 and Chapter 7 12 For help maintain reliable operation of the TV. 3 Do not plug in any power cords until after you cannot turn on the TV. Keep this document for future reference. 2 To choose a location for the TV: v Read "Important notes about the remote control" on...
User's Guide for L1350U and L2300U Series TV's
Page 19
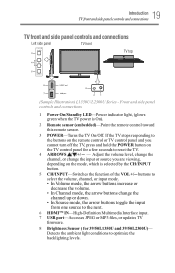
... input. 7 USB port-Accesses JPEG or MP3 files, or updates TV firmware. 8 Brightness Sensor ( for a few seconds to reset the TV. 4 ARROWS Adjust the volume level, change the channel, or change the input or source you are viewing, depending on the mode, which is On). 2 Remote sensor (embedded)-Point the remote control toward this remote sensor. 3 POWER-Turns the TV On/Off. Detects the ambient light conditions to the buttons on the remote control or TV control panel and you cannot turn...
... input. 7 USB port-Accesses JPEG or MP3 files, or updates TV firmware. 8 Brightness Sensor ( for a few seconds to reset the TV. 4 ARROWS Adjust the volume level, change the channel, or change the input or source you are viewing, depending on the mode, which is On). 2 Remote sensor (embedded)-Point the remote control toward this remote sensor. 3 POWER-Turns the TV On/Off. Detects the ambient light conditions to the buttons on the remote control or TV control panel and you cannot turn...
User's Guide for L1350U and L2300U Series TV's
Page 20
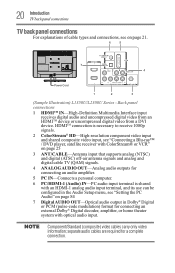
... an HDMI-1 analog audio input terminal, and its use can be configured in the Audio Setup menu, see on page 84 7 Digital AUDIO OUT-Optical audio output in Dolby® Digital or PCM (pulse-code modulation) format for a complete connection. HDMITM connection is necessary to receive 1080p signals. 2 ColorStream® HD-High-resolution component video input and shared composite video input, see "Connecting a Blu-ray™ / DVD player, satellite receiver with ColorStream® or VCR" on page 25 3 ANT/CABLE-Antenna input that supports analog...
... an HDMI-1 analog audio input terminal, and its use can be configured in the Audio Setup menu, see on page 84 7 Digital AUDIO OUT-Optical audio output in Dolby® Digital or PCM (pulse-code modulation) format for a complete connection. HDMITM connection is necessary to receive 1080p signals. 2 ColorStream® HD-High-resolution component video input and shared composite video input, see "Connecting a Blu-ray™ / DVD player, satellite receiver with ColorStream® or VCR" on page 25 3 ANT/CABLE-Antenna input that supports analog...
User's Guide for L1350U and L2300U Series TV's
Page 24
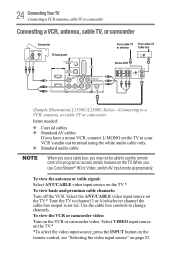
... or Video, switch AV input mode appropriately. To view the VCR or camcorder video: Turn on the TV.* Tune the TV to channel 3 or 4 (whichever channel the cable box output is set to). Select the ANT/CABLE video input source on the VCR or camcorder video. Use the cable box controls to change channels. When you use the remote control to program or access certain features on the TV to your VCR's audio out terminal using the white audio cable only. 24 ConnectingYourTV Connecting a VCR, antenna, cable...
... or Video, switch AV input mode appropriately. To view the VCR or camcorder video: Turn on the TV.* Tune the TV to channel 3 or 4 (whichever channel the cable box output is set to). Select the ANT/CABLE video input source on the VCR or camcorder video. Use the cable box controls to change channels. When you use the remote control to program or access certain features on the TV to your VCR's audio out terminal using the white audio cable only. 24 ConnectingYourTV Connecting a VCR, antenna, cable...
User's Guide for L1350U and L2300U Series TV's
Page 25
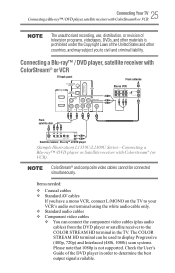
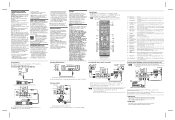
... can connect the component video cables (plus audio cables) from ANT OUT to determine the best output signal available. Connecting a Blu-ray™ / DVD player, satellite receiver with ColorStream® or VCR TV back panel From antenna Stereo VCR VIDEO AUDIO L R IN CH 3 CH 4 OUT L R IN from the DVD player or satellite receiver to the COLOR STREAM HD terminal in order to TV From satellite dish Y PB PR AUDIO OUT L Satellite COMPONENT VIDEO S-VIDEO VIDEO R IN...
... can connect the component video cables (plus audio cables) from ANT OUT to determine the best output signal available. Connecting a Blu-ray™ / DVD player, satellite receiver with ColorStream® or VCR TV back panel From antenna Stereo VCR VIDEO AUDIO L R IN CH 3 CH 4 OUT L R IN from the DVD player or satellite receiver to the COLOR STREAM HD terminal in order to TV From satellite dish Y PB PR AUDIO OUT L Satellite COMPONENT VIDEO S-VIDEO VIDEO R IN...
User's Guide for L1350U and L2300U Series TV's
Page 39
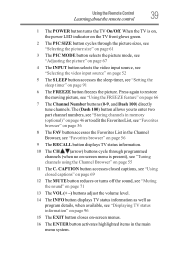
... moving picture, see "Displaying TV status information" on page 96 15 The EXIT button closes on page 66 7 The Channel Number buttons (0-9, and Dash 100) directly tune channels. Using the Remote Control Learning about the remote control 39 1 The POWER button turns the TV On/Off. When the TV is on, the power LED indicator on the TV front glows green. 2 The PIC SIZE button cycles through programmed channels (when no on-screen menu is...
... moving picture, see "Displaying TV status information" on page 96 15 The EXIT button closes on page 66 7 The Channel Number buttons (0-9, and Dash 100) directly tune channels. Using the Remote Control Learning about the remote control 39 1 The POWER button turns the TV On/Off. When the TV is on, the power LED indicator on the TV front glows green. 2 The PIC SIZE button cycles through programmed channels (when no on-screen menu is...
User's Guide for L1350U and L2300U Series TV's
Page 44
... / (arrow) buttons to select Time Zone.Then set your TV Initial Setup When you can exit out of the Setup Menu. The Store / Home Mode settings window appears. 3 For normal home use, press the / (arrow) buttons to select Start Scan and continue with the Auto Tuning. You must select a Language, either Home/Store mode, and select ANT/CABLE before you first turn on or reset the...
... / (arrow) buttons to select Time Zone.Then set your TV Initial Setup When you can exit out of the Setup Menu. The Store / Home Mode settings window appears. 3 For normal home use, press the / (arrow) buttons to select Start Scan and continue with the Auto Tuning. You must select a Language, either Home/Store mode, and select ANT/CABLE before you first turn on or reset the...
User's Guide for L1350U and L2300U Series TV's
Page 59
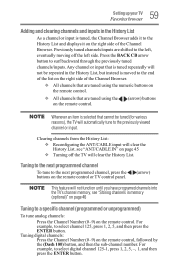
... History List and displays it on the right side of the Channel Browser. Tuning digital channels: Press the Channel Number (0-9) on the remote control or TV control panel. Previously tuned channels/inputs are tuned using the / (arrow) buttons on the remote control. see "Storing channels in memory (optional)" on page 46 Tuning to a specific channel (programmed or unprogrammed) To tune analog channels: Press the Channel Number (0-9) on the remote control. Press the BACK CB arrow button to select digital channel...
... History List and displays it on the right side of the Channel Browser. Tuning digital channels: Press the Channel Number (0-9) on the remote control or TV control panel. Previously tuned channels/inputs are tuned using the / (arrow) buttons on the remote control. see "Storing channels in memory (optional)" on page 46 Tuning to a specific channel (programmed or unprogrammed) To tune analog channels: Press the Channel Number (0-9) on the remote control. Press the BACK CB arrow button to select digital channel...
User's Guide for L1350U and L2300U Series TV's
Page 103
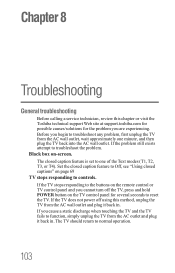
.... If the TV does not power off the TV, press and hold POWER button on the remote control or TV control panel and you cannot turn off using this chapter or visit the Toshiba technical support Web site at support.toshiba.com for possible causes/solutions for several seconds to reset the TV. Chapter 8 Troubleshooting General troubleshooting Before calling a service technician, review this method, unplug the TV from...
.... If the TV does not power off the TV, press and hold POWER button on the remote control or TV control panel and you cannot turn off using this chapter or visit the Toshiba technical support Web site at support.toshiba.com for possible causes/solutions for several seconds to reset the TV. Chapter 8 Troubleshooting General troubleshooting Before calling a service technician, review this method, unplug the TV from...
User's Guide for L1350U and L2300U Series TV's
Page 104
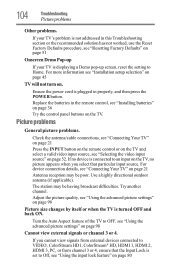
..., HDMI 1, HDMI 2, HDMI 3, PC, or from channel 3 or 4, ensure that particular input source. Try another channel. Adjust the picture quality, see "Using the advanced picture settings" on page 98 Cannot view external signals or channel 3 or 4. see "Using the advanced picture settings" on page 98 Picture size changes by itself or when the TV is turned OFF and back ON. Ensure the power cord is plugged in this Troubleshooting section or the recommended solution has not worked, use the Reset Factory Defaults...
..., HDMI 1, HDMI 2, HDMI 3, PC, or from channel 3 or 4, ensure that particular input source. Try another channel. Adjust the picture quality, see "Using the advanced picture settings" on page 98 Cannot view external signals or channel 3 or 4. see "Using the advanced picture settings" on page 98 Picture size changes by itself or when the TV is turned OFF and back ON. Ensure the power cord is plugged in this Troubleshooting section or the recommended solution has not worked, use the Reset Factory Defaults...
Resource Guide for L1350U Series TV's
Page 1
... wall mount your LED TV, always use a wall bracket Listed by an independent laboratory (such as UL, CSA, ETL) that is appropriate for the size and weight of the TV: 1) CAUTION: Two people are required for installation. 2) Unplug and remove any cables and/or other component connectors from the rear of the TV. 3) Remove the screws of the VESA Mounting Pattern shown in the table below. Model name Serial number Register your Toshiba Television at support.toshiba...
... wall mount your LED TV, always use a wall bracket Listed by an independent laboratory (such as UL, CSA, ETL) that is appropriate for the size and weight of the TV: 1) CAUTION: Two people are required for installation. 2) Unplug and remove any cables and/or other component connectors from the rear of the TV. 3) Remove the screws of the VESA Mounting Pattern shown in the table below. Model name Serial number Register your Toshiba Television at support.toshiba...
Resource Guide for L1350U Series TV's
Page 2
... does not operate properly (does not light, remains constantly lit, etc.). Directly tunes channels. Displays TV status information. Cycles through the picture sizes, see the"Connecting a Blu-ray™ / DVD player, satellite receiver with respect to TV Item: Description: 1 POWER button 2 PIC SIZE button 3 PIC MODE button 4 INPUT button 5 SLEEP button 6 FREEZE button 7 Channel Number buttons (0-9) 8 FAV button 9 RECALL button 10 CH ( / ) buttons 11 C. Accesses closed captions" section in the User's Guide. Reduces or turns off the sound, see the "Using closed captions, see...
... does not operate properly (does not light, remains constantly lit, etc.). Directly tunes channels. Displays TV status information. Cycles through the picture sizes, see the"Connecting a Blu-ray™ / DVD player, satellite receiver with respect to TV Item: Description: 1 POWER button 2 PIC SIZE button 3 PIC MODE button 4 INPUT button 5 SLEEP button 6 FREEZE button 7 Channel Number buttons (0-9) 8 FAV button 9 RECALL button 10 CH ( / ) buttons 11 C. Accesses closed captions" section in the User's Guide. Reduces or turns off the sound, see the "Using closed captions, see...


