User Manual
Page 4
...abuse. 30) Never overload wall outlets and extension cords. 31) Always operate this product, never place or store the TV in a position where your TOSHIBA TV, follow these recommendations and precautions: 34) If you use a sturdy strap from power and a minute amount of current is not a sign ...• in a room whose temperature is tight, secure, and parallel to an antenna or phone system. Gently wipe the display panel surface (the TV screen) using the on/off switch, it is properly grounded to a wall stud, pillar, or other electrical circuits. • Never attempt to install any...
...abuse. 30) Never overload wall outlets and extension cords. 31) Always operate this product, never place or store the TV in a position where your TOSHIBA TV, follow these recommendations and precautions: 34) If you use a sturdy strap from power and a minute amount of current is not a sign ...• in a room whose temperature is tight, secure, and parallel to an antenna or phone system. Gently wipe the display panel surface (the TV screen) using the on/off switch, it is properly grounded to a wall stud, pillar, or other electrical circuits. • Never attempt to install any...
User Manual
Page 5
... immovable structure. ( item 25, page 4). Before proceeding, make occasional snapping or popping sounds. These actions will damage the LCD screen. Leave the bottom of the unit protruding over the edge of the surface and assemble the pedestal as in mm) (continued) 5 ... VESA Mounting Pattern show in this product contain mercury. If these sounds become frequent or continuous, unplug the power cord and contact a Toshiba Authorized Service Center. 41) DANGER: RISK OF SERIOUS PERSONAL INJURY OR DEATH! Service 43) WARNING: RISK OF ELECTRIC SHOCK! Note: ...
... immovable structure. ( item 25, page 4). Before proceeding, make occasional snapping or popping sounds. These actions will damage the LCD screen. Leave the bottom of the unit protruding over the edge of the surface and assemble the pedestal as in mm) (continued) 5 ... VESA Mounting Pattern show in this product contain mercury. If these sounds become frequent or continuous, unplug the power cord and contact a Toshiba Authorized Service Center. 41) DANGER: RISK OF SERIOUS PERSONAL INJURY OR DEATH! Service 43) WARNING: RISK OF ELECTRIC SHOCK! Note: ...
User Manual
Page 7
... High-Definition Multimedia Interface are trademarks or registered trademarks of HDMI Licensing LLC in a residential installation. however, there may appear on the screen if a fixed, nonmoving image is encouraged to try to correct the interference by one or more of the following symptoms are technical limitations...and applying power to the equipment, the user is displayed for help. FCC Declaration of Conformity Compliance Statement (Part 15): The Toshiba 32E200U, 32E20U, 37E200U, 37E20U, 40E200U, and 40E20U Televisions comply with the limits for compliance to Part 15 of the FCC rules.
... High-Definition Multimedia Interface are trademarks or registered trademarks of HDMI Licensing LLC in a residential installation. however, there may appear on the screen if a fixed, nonmoving image is encouraged to try to correct the interference by one or more of the following symptoms are technical limitations...and applying power to the equipment, the user is displayed for help. FCC Declaration of Conformity Compliance Statement (Part 15): The Toshiba 32E200U, 32E20U, 37E200U, 37E20U, 40E200U, and 40E20U Televisions comply with the limits for compliance to Part 15 of the FCC rules.
User Manual
Page 9
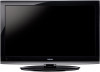
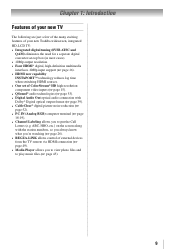
ABC, HBO, etc.) on the screen along with Dolby® Digital optical output format ( page 39). • CableClear® digital picture noise reduction ( page 52). • PC IN (Analog ... to put the Call Letters (e.g. Chapter 1: Introduction Features of your new TV The following are just a few of the many exciting features of your new Toshiba widescreen, integrated HD, LCD TV: • Integrated digital tuning (8VSB ATSC and QAM) eliminates the need for a separate digital converter set-top box (in most...
ABC, HBO, etc.) on the screen along with Dolby® Digital optical output format ( page 39). • CableClear® digital picture noise reduction ( page 52). • PC IN (Analog ... to put the Call Letters (e.g. Chapter 1: Introduction Features of your new TV The following are just a few of the many exciting features of your new Toshiba widescreen, integrated HD, LCD TV: • Integrated digital tuning (8VSB ATSC and QAM) eliminates the need for a separate digital converter set-top box (in most...
User Manual
Page 10
... read the important safety, installation, care, and service information. THIS TYPE OF DAMAGE IS NOT COVERED UNDER THE TOSHIBA WARRANTY. 3 Do not plug in a location where light does not reflect on the screen. • Place the TV far enough from walls and other electronic device(s) to turn the TV off or on...
... read the important safety, installation, care, and service information. THIS TYPE OF DAMAGE IS NOT COVERED UNDER THE TOSHIBA WARRANTY. 3 Do not plug in a location where light does not reflect on the screen. • Place the TV far enough from walls and other electronic device(s) to turn the TV off or on...
User Manual
Page 11
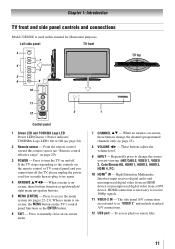
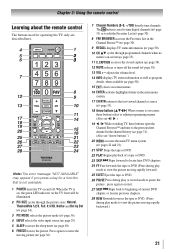
... LED Power LED(Green) = Power indicator TOSHIBA Logo LED= On or Off ( page 24). 2無 Remote sensor - Repeatedly press to try again. 4無 ARROWS pqtu - Press to instantly close an on-screen menu. 1 7無 CHANNEL pq - Press to turn off . High-Definition Multimedia Interface.../CABLE, VIDEO 1, VIDEO 2, ColorStream HD, HDMI 1, HDMI 2, HDMI 3, HDMI 4, PC). 10無 HDMI® IN - HDMI connection is on-screen, these buttons function as "VIDEO 2" and include standard A/V connections. 12無 USB port - If the TV stops responding to as up/down/left/ right...
... LED Power LED(Green) = Power indicator TOSHIBA Logo LED= On or Off ( page 24). 2無 Remote sensor - Repeatedly press to try again. 4無 ARROWS pqtu - Press to instantly close an on-screen menu. 1 7無 CHANNEL pq - Press to turn off . High-Definition Multimedia Interface.../CABLE, VIDEO 1, VIDEO 2, ColorStream HD, HDMI 1, HDMI 2, HDMI 3, HDMI 4, PC). 10無 HDMI® IN - HDMI connection is on-screen, these buttons function as "VIDEO 2" and include standard A/V connections. 12無 USB port - If the TV stops responding to as up/down/left/ right...
User Manual
Page 19
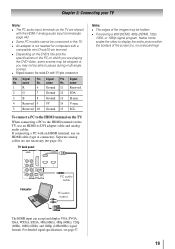
... (24Hz/60Hz) signal formats. If connecting a PC with a compatible mini D-sub15-pin terminal. •• Depending on the DVD's title and the specifications of the screen (i.e. Chapter 2: Connecting your TV Note: •• The PC audio input terminals on the TV are shared with the HDMI-1 analog audio input terminals (...
... (24Hz/60Hz) signal formats. If connecting a PC with a compatible mini D-sub15-pin terminal. •• Depending on the DVD's title and the specifications of the screen (i.e. Chapter 2: Connecting your TV Note: •• The PC audio input terminals on the TV are shared with the HDMI-1 analog audio input terminals (...
User Manual
Page 21
... level. 14無 INFO displays TV status information as well as program details, when available ( page 50). 15無 EXIT closes on-screen menus. 16無 ENTER activates highlighted items in the main menu system. 17無 CH RTN returns to the last viewed channel or source (&#...61483; page 33). 18無 Arrow buttons (pqtu) When a menu is not available. 1無 POWER turns the TV on -screen, these buttons select or adjust programming menus. (Also see "Arrow buttons.") 20無 MENU accesses the main TV menu system ( pages 22 and 23...
... level. 14無 INFO displays TV status information as well as program details, when available ( page 50). 15無 EXIT closes on-screen menus. 16無 ENTER activates highlighted items in the main menu system. 17無 CH RTN returns to the last viewed channel or source (&#...61483; page 33). 18無 Arrow buttons (pqtu) When a menu is not available. 1無 POWER turns the TV on -screen, these buttons select or adjust programming menus. (Also see "Arrow buttons.") 20無 MENU accesses the main TV menu system ( pages 22 and 23...
User Manual
Page 22
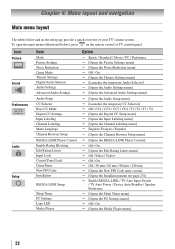
... menu] Off / Video / Video+ Off / On Off / 30 min / 60 min / 90 min / 120 min [Opens the New PIN Code entry screen] [Opens the Installation menu ( page 23)] Enable REGZA-LINK / TV Auto Input Switch / TV Auto Power / Device Auto Standby / Speaker Preference ...
... menu] Off / Video / Video+ Off / On Off / 30 min / 60 min / 90 min / 120 min [Opens the New PIN Code entry screen] [Opens the Installation menu ( page 23)] Enable REGZA-LINK / TV Auto Input Switch / TV Auto Power / Device Auto Standby / Speaker Preference ...
User Manual
Page 23
... / Digital Eastern / Newfoundland / Atlantic / Hawaii / Alaska / Pacific / Mountain / Central [Opens the Signal Meter menu] System Status System Information [Opens the System Information screen] Navigating the menu system You can use the up/down/left/right arrow buttons (pqtu) on the remote control or TV control panel to move...
... / Digital Eastern / Newfoundland / Atlantic / Hawaii / Alaska / Pacific / Mountain / Central [Opens the Signal Meter menu] System Status System Information [Opens the System Information screen] Navigating the menu system You can use the up/down/left/right arrow buttons (pqtu) on the remote control or TV control panel to move...
User Manual
Page 24
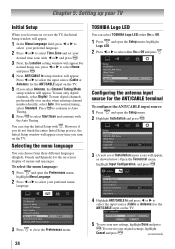
...Highlight ANT/CABLE In and press t or u to select the input source (Cable or Antenna) for the ANT/CABLE input on -screen display of menus and messages. You can select TOSHIBA Logo LED either On or Off. 1無 Press and open the Preferences menu, highlight Menu Language. 2無 Press t or u...5無 If you select Antenna, the Channel Tuning Mode setup window will appear. Press t or u to select either On or Off and press . TOSHIBA Logo LED You can stop the Initial Setup with the Auto Tuning. Press to continue to Auto Tuning. 6無 Press to your preferred menu language.
...Highlight ANT/CABLE In and press t or u to select the input source (Cable or Antenna) for the ANT/CABLE input on -screen display of menus and messages. You can select TOSHIBA Logo LED either On or Off. 1無 Press and open the Preferences menu, highlight Menu Language. 2無 Press t or u...5無 If you select Antenna, the Channel Tuning Mode setup window will appear. Press t or u to select either On or Off and press . TOSHIBA Logo LED You can stop the Initial Setup with the Auto Tuning. Press to continue to Auto Tuning. 6無 Press to your preferred menu language.
User Manual
Page 25
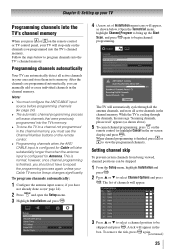
... channels, the message "Scanning channels, please wait" appears (as shown below to repeat the programming process again unless your TV will appear in the on-screen display and press ). Setting channel skip To prevent certain channels from being viewed, channel positions can automatically detect all active channels in the channel memory...
... channels, the message "Scanning channels, please wait" appears (as shown below to repeat the programming process again unless your TV will appear in the on-screen display and press ). Setting channel skip To prevent certain channels from being viewed, channel positions can automatically detect all active channels in the channel memory...

User Manual
Page 26
... the tick. The software keyboard will appear. 4無 Repeatedly press the corresponding key on the remote control to highlight the desired character on the on-screen software keyboard. 5無 The highlighted character is entered after you either press a different key, press u key, or after a two-second pause. 6無 Repeat steps 4 and...
... the tick. The software keyboard will appear. 4無 Repeatedly press the corresponding key on the remote control to highlight the desired character on the on-screen software keyboard. 5無 The highlighted character is entered after you either press a different key, press u key, or after a two-second pause. 6無 Repeat steps 4 and...
User Manual
Page 27
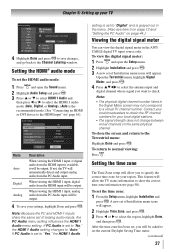
...feature will be output. 4無 To save changes, and go back to show the correct time zone information ( page 50). To close the screen and return to check. To return to a virtual TV channel number. When viewing the HDMI 1 input, digital audio from the HDMI input is set...does not change between virtual channels on page 44.) Viewing the digital signal meter You can view the digital signal meter in the Signal Meter screen may not correspond to normal viewing: Press . Contact your local broadcasters to obtain the RF channel numbers for your TV 4無 Highlight ...
...feature will be output. 4無 To save changes, and go back to show the correct time zone information ( page 50). To close the screen and return to check. To return to a virtual TV channel number. When viewing the HDMI 1 input, digital audio from the HDMI input is set...does not change between virtual channels on page 44.) Viewing the digital signal meter You can view the digital signal meter in the Signal Meter screen may not correspond to normal viewing: Press . Contact your local broadcasters to obtain the RF channel numbers for your TV 4無 Highlight ...

User Manual
Page 28
... settings and channels to select the Factory Defaults or Support Information and view the related information. Chapter 5: Setting up your PIN code. To close the screen and return to normal viewing: Press . Press t or u to complete the reset process. To cancel the reset: Select No and press in again to select...
... settings and channels to select the Factory Defaults or Support Information and view the related information. Chapter 5: Setting up your PIN code. To close the screen and return to normal viewing: Press . Press t or u to complete the reset process. To cancel the reset: Select No and press in again to select...
User Manual
Page 29
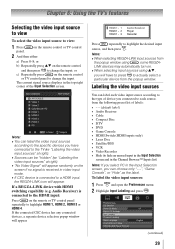
... • Laser Disc • Satellite/DSS • VCR • Video Recorder • Hide (to hide an unused input in the Input Selection screen and in the Channel Browser™ Inputs list) Note: If you select PC in video input mode. ••If CEC device is connected to... a particular device from the popup window. Note: ••When selecting REGZA-LINK input sources from the following preset list of the Input Selection screen. Chapter 6: Using the TV's features Selecting the video input source to view To select the video input source to view: 1無 Press on ...
... • Laser Disc • Satellite/DSS • VCR • Video Recorder • Hide (to hide an unused input in the Input Selection screen and in the Channel Browser™ Inputs list) Note: If you select PC in video input mode. ••If CEC device is connected to... a particular device from the popup window. Note: ••When selecting REGZA-LINK input sources from the following preset list of the Input Selection screen. Chapter 6: Using the TV's features Selecting the video input source to view To select the video input source to view: 1無 Press on ...
User Manual
Page 30
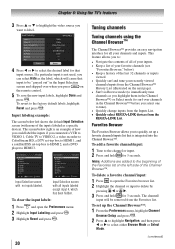
... labels, highlight Reset and press . The channel/ input will cause that is integrated into the Channel Browser™. Input labeling example: The screen below right is not used, you can select Hide as you highlight them in the Channel Browser™ before you to quickly set up... a favorite channels/inputs list that input to HDMI 3. Input Selection screen with all your recently viewed channels/inputs from the Channel Browser™ History List (illustrated on the next page). • Surf via Browse ...
... labels, highlight Reset and press . The channel/ input will cause that is integrated into the Channel Browser™. Input labeling example: The screen below right is not used, you can select Hide as you highlight them in the Channel Browser™ before you to quickly set up... a favorite channels/inputs list that input to HDMI 3. Input Selection screen with all your recently viewed channels/inputs from the Channel Browser™ History List (illustrated on the next page). • Surf via Browse ...
User Manual
Page 33
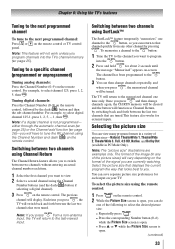
...first channel you program channels into the button. 2無 Press and hold for about 2 seconds until the message "Memorized" appears on-screen. Switching between two channels using SurfLock™ The SurfLock™ feature temporarily "memorizes" one channel to the button, so you can...example, to view. 2無 Select a second channel using the Channel Number and dash ( ) on the remote control. 2無 While the Picture Size screen is not programmed- To memorize a channel to the button: 1無 Tune the TV to the channel you can then change channels again, the CH RTN...
...first channel you program channels into the button. 2無 Press and hold for about 2 seconds until the message "Memorized" appears on-screen. Switching between two channels using SurfLock™ The SurfLock™ feature temporarily "memorizes" one channel to the button, so you can...example, to view. 2無 Select a second channel using the Channel Number and dash ( ) on the remote control. 2無 While the Picture Size screen is not programmed- To memorize a channel to the button: 1無 Tune the TV to the channel you can then change channels again, the CH RTN...
User Manual
Page 34
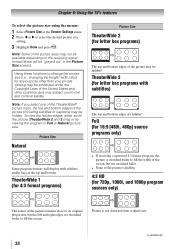
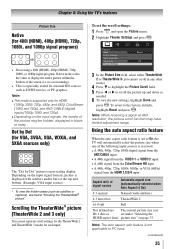
...bottom. To view the hidden edges, either scroll the picture (TheaterWide 2 and 3 only) or try viewing the program in the Picture Size screen). Note: Some of the picture sizes may subject you select one of the TheaterWide® picture sizes, the top and bottom edges of ...8226; If receiving a squeezed 4:3 format program, the picture is stretched wider to fill the width of the screen, but not stretched taller. • None of the picture remains close to fill the screen. TheaterWide 1 (for 4:3 format programs) Picture Size TheaterWide 2 (for any purpose other than your private viewing...
...bottom. To view the hidden edges, either scroll the picture (TheaterWide 2 and 3 only) or try viewing the program in the Picture Size screen). Note: Some of the picture sizes may subject you select one of the TheaterWide® picture sizes, the top and bottom edges of ...8226; If receiving a squeezed 4:3 format program, the picture is stretched wider to fill the width of the screen, but not stretched taller. • None of the picture remains close to fill the screen. TheaterWide 1 (for 4:3 format programs) Picture Size TheaterWide 2 (for any purpose other than your private viewing...
User Manual
Page 35
... 480i), ColorStream (1080i and 720p), and ANT/ CABLE (digital) inputs (1080p,1080i, and 720p). ••Depending on the input signals, the border of the screen (i.e. Note: The auto aspect ratio feature is non-scaling display. Depending on page 33. Using the auto aspect ratio feature When the auto aspect ratio...
... 480i), ColorStream (1080i and 720p), and ANT/ CABLE (digital) inputs (1080p,1080i, and 720p). ••Depending on the input signals, the border of the screen (i.e. Note: The auto aspect ratio feature is non-scaling display. Depending on page 33. Using the auto aspect ratio feature When the auto aspect ratio...


