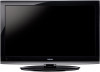
User Manual
Page 8
... system 18 Connecting a personal computer (PC 18 Chapter 3: Using the remote control 20 Installing the remote control batteries 20 Remote control effective range 20 Learning about the remote control 21 Chapter 4: Menu layout and navigation 22 Main menu layout 22 Setup.../Installation menu layout 23 Navigating the menu system 23 Chapter 5: Setting up your TV 24 Initial Setup 24 Selecting the menu language 24 TOSHIBA...
... system 18 Connecting a personal computer (PC 18 Chapter 3: Using the remote control 20 Installing the remote control batteries 20 Remote control effective range 20 Learning about the remote control 21 Chapter 4: Menu layout and navigation 22 Main menu layout 22 Setup.../Installation menu layout 23 Navigating the menu system 23 Chapter 5: Setting up your TV 24 Initial Setup 24 Selecting the menu language 24 TOSHIBA...
User Manual
Page 10
THIS TYPE OF DAMAGE IS NOT COVERED UNDER THE TOSHIBA WARRANTY. 3 Do not plug in any power cords until AFTER you cannot turn on , please unplug the power cords few seconds then re-plug to ..., see Chapter 9. 14 Enjoy your new TV! 10 Inadequate ventilation may cause overheating, which will damage the TV. Then press POWER on the TV control panel or remote control to the Troubleshooting Guide, Chapter 8. 13 For technical specifications and warranty information, see Chapters 6 and 7. 12 For help, refer to turn the TV off...
THIS TYPE OF DAMAGE IS NOT COVERED UNDER THE TOSHIBA WARRANTY. 3 Do not plug in any power cords until AFTER you cannot turn on , please unplug the power cords few seconds then re-plug to ..., see Chapter 9. 14 Enjoy your new TV! 10 Inadequate ventilation may cause overheating, which will damage the TV. Then press POWER on the TV control panel or remote control to the Troubleshooting Guide, Chapter 8. 13 For technical specifications and warranty information, see Chapters 6 and 7. 12 For help, refer to turn the TV off...
User Manual
Page 11
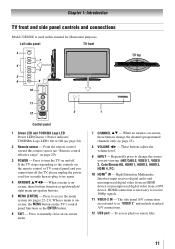
.... 9無 INPUT - Press to receive 1080p signals. 11無 VIDEO-2 IN - Point the remote control toward this manual for illustration purposes. Left side panel TV front 3 7 4 8 5 6 9 10 TV top 11 12 2 Control panel 1無 Green LED and TOSHIBA Logo LED Power LED(Green) = Power indicator TOSHIBA Logo LED= On or Off ( page 24). 2無...
.... 9無 INPUT - Press to receive 1080p signals. 11無 VIDEO-2 IN - Point the remote control toward this manual for illustration purposes. Left side panel TV front 3 7 4 8 5 6 9 10 TV top 11 12 2 Control panel 1無 Green LED and TOSHIBA Logo LED Power LED(Green) = Power indicator TOSHIBA Logo LED= On or Off ( page 24). 2無...
User Manual
Page 14
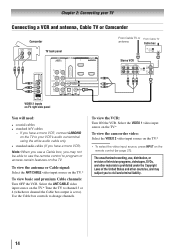
...audio cable only. • standard audio cables (If you have a mono VCR) Note: When you use the remote control to program or access certain features on the TV. Use the Cable box controls to change channels. Select the VIDEO 1 video input source on the TV.* To view the camcorder video: Select ...the VIDEO 2 video input source on the TV.* ** To select the video input source, press INPUT on the remote control ( page 21).
...audio cable only. • standard audio cables (If you have a mono VCR) Note: When you use the remote control to program or access certain features on the TV. Use the Cable box controls to change channels. Select the VIDEO 1 video input source on the TV.* To view the camcorder video: Select ...the VIDEO 2 video input source on the TV.* ** To select the video input source, press INPUT on the remote control ( page 21).
User Manual
Page 15
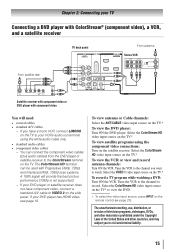
... ON the VCR. Tune the VCR to the channel you want to view the DVD. ** To select the video input source, press INPUT on the remote control ( page 21). Select the ColorStream HD video input source on the TV.* To view satellite programs using the white audio cable only. • standard...
... ON the VCR. Tune the VCR to the channel you want to view the DVD. ** To select the video input source, press INPUT on the remote control ( page 21). Select the ColorStream HD video input source on the TV.* To view satellite programs using the white audio cable only. • standard...
User Manual
Page 16
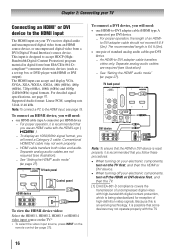
... (3m). Supported Audio format: Linear PCM, sampling rate 32/44.1/ 48 kHz Note: To connect a PC to the HDMI input The HDMI input on the remote control ( page 21). Because this is an evolving technology, it is possible that you use an HDMI cable with the HDMI Logo ( ). −−... "Setting the HDMI® audio mode" ( page 27). Conventional HDMI/DVI cable may not operate properly with HDMI or DVI output). TV back panel Control panel HDMI device To view the HDMI device video: Select the HDMI 1, HDMI 2, HDMI 3 or HDMI 4 video input source on the TV.* ** To ...
... (3m). Supported Audio format: Linear PCM, sampling rate 32/44.1/ 48 kHz Note: To connect a PC to the HDMI input The HDMI input on the remote control ( page 21). Because this is an evolving technology, it is possible that you use an HDMI cable with the HDMI Logo ( ). −−... "Setting the HDMI® audio mode" ( page 27). Conventional HDMI/DVI cable may not operate properly with HDMI or DVI output). TV back panel Control panel HDMI device To view the HDMI device video: Select the HDMI 1, HDMI 2, HDMI 3 or HDMI 4 video input source on the TV.* ** To ...
User Manual
Page 17
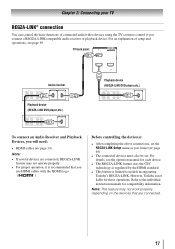
... information. For details, see page 49. For an explanation of connected audio/video devices using the TV's remote control if you desire ( page 49). • The connected devices must also be set. However, Toshiba is limited to the individual instruction manuals for those operations. Chapter 2: Connecting your TV REGZA-LINK® connection...
... information. For details, see page 49. For an explanation of connected audio/video devices using the TV's remote control if you desire ( page 49). • The connected devices must also be set. However, Toshiba is limited to the individual instruction manuals for those operations. Chapter 2: Connecting your TV REGZA-LINK® connection...
User Manual
Page 18
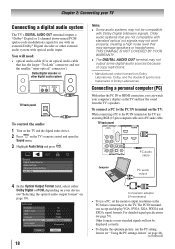
... use with an external Dolby® Digital decoder or other digital audio system TV back panel To control the audio: 1無 Turn on the TV and the digital audio device. 2無 Press on the TV's remote control and open the Sound menu. 3無 Highlight Audio Setup and press . THIS DAMAGE IS NOT COVERED...
... use with an external Dolby® Digital decoder or other digital audio system TV back panel To control the audio: 1無 Turn on the TV and the digital audio device. 2無 Press on the TV's remote control and open the Sound menu. 3無 Highlight Audio Setup and press . THIS DAMAGE IS NOT COVERED...
User Manual
Page 20
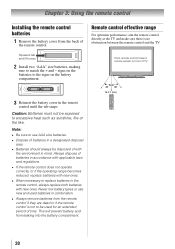
... with new ones. This will prevent battery acid from leaking into the battery compartment. 16.4 ft (5m) 20 Point remote control toward remote sensor on the battery compartment. Never mix battery types or use AAA size batteries. •• Dispose of batteries in...; Batteries should always be used batteries in the remote control until the tab snaps. Chapter 3: Using the remote control Installing the remote control batteries 1無 Remove the battery cover from the back of with the environment in the remote control, always replace both batteries with new ones. •...
... with new ones. This will prevent battery acid from leaking into the battery compartment. 16.4 ft (5m) 20 Point remote control toward remote sensor on the battery compartment. Never mix battery types or use AAA size batteries. •• Dispose of batteries in...; Batteries should always be used batteries in the remote control until the tab snaps. Chapter 3: Using the remote control Installing the remote control batteries 1無 Remove the battery cover from the back of with the environment in the remote control, always replace both batteries with new ones. •...
User Manual
Page 21
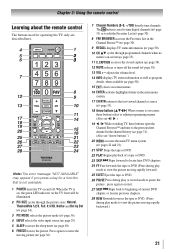
Chapter 3: Using the remote control Learning about the remote control The buttons used to tune digital channels ( page 33) or to restore the moving picture ( page 36). 7無 Channel Numbers (0-9, -/100) directly tune ...
Chapter 3: Using the remote control Learning about the remote control The buttons used to tune digital channels ( page 33) or to restore the moving picture ( page 36). 7無 Channel Numbers (0-9, -/100) directly tune ...
User Manual
Page 22
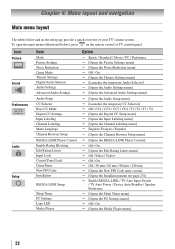
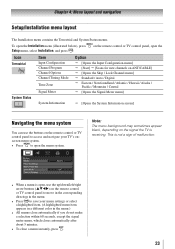
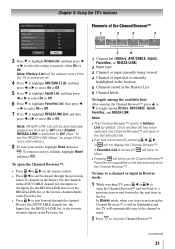
... the Channel Labeling menu] English / Français / Español [Opens the Channel Browser Setup menu] [Opens the REGZA-LINK Player Control] Off / On [Opens the Edit Rating Limits menu] Off / Video / Video+ Off / On Off / 30 min...menu] Off / On [Opens the Media Player menu] 22 To open the main menus (illustrated below and on the remote control or TV control panel. Chapter 4: Menu layout and navigation Main menu layout The tables below ), press on the next page provide a quick overview of your ...
... the Channel Labeling menu] English / Français / Español [Opens the Channel Browser Setup menu] [Opens the REGZA-LINK Player Control] Off / On [Opens the Edit Rating Limits menu] Off / Video / Video+ Off / On Off / 30 min...menu] Off / On [Opens the Media Player menu] 22 To open the main menus (illustrated below and on the remote control or TV control panel. Chapter 4: Menu layout and navigation Main menu layout The tables below ), press on the next page provide a quick overview of your ...
User Manual
Page 23
... use the up/down/left/right arrow buttons (pqtu) on the remote control or TV control panel to open the Installation menu (illustrated below), press Setup menu, select Installation, and press . on the remote control or TV control panel, open , use the buttons on the signal the TV is... The Installation menu contains the Terrestrial and System Status menus. Note: The menu background may sometimes appear black, depending on the remote control or TV control panel to access and navigate your menu settings or select a highlighted item. (A highlighted menu item appears in a different color in...
... use the up/down/left/right arrow buttons (pqtu) on the remote control or TV control panel to open the Installation menu (illustrated below), press Setup menu, select Installation, and press . on the remote control or TV control panel, open , use the buttons on the signal the TV is... The Installation menu contains the Terrestrial and System Status menus. Note: The menu background may sometimes appear black, depending on the remote control or TV control panel to access and navigate your menu settings or select a highlighted item. (A highlighted menu item appears in a different color in...
User Manual
Page 25
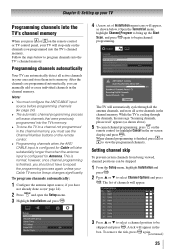
... programmed automatically, you can automatically detect all active channels in the channel memory, you must use the Channel Number buttons on the remote control. •• Programming channels when the ANT/ CABLE input is configured for Antenna. Note: •• You must configure the...individual channels in the box. This is finished, you programmed into the TV's channel memory When you press or on the remote control or TV control panel, your Cable TV service lineup changes significantly. To program channels automatically: 1無 Configure the antenna input source, if ...
... programmed automatically, you can automatically detect all active channels in the channel memory, you must use the Channel Number buttons on the remote control. •• Programming channels when the ANT/ CABLE input is configured for Antenna. Note: •• You must configure the...individual channels in the box. This is finished, you programmed into the TV's channel memory When you press or on the remote control or TV control panel, your Cable TV service lineup changes significantly. To program channels automatically: 1無 Configure the antenna input source, if ...

User Manual
Page 26
... all desired text. 7無 When finished, press . 8無 New labels will appear. 4無 Repeatedly press the corresponding key on the remote control to view and assign these logos from the deletion confirmation window and press . (continued) To assign channel labels: 1無 Press and open the...To save your settings, highlight Done and press . Assigned channel labels will be able to highlight the desired character on the on the remote control. To delete the custom label: 1無 Open the Channel Labeling window. 2無 Highlight the label to be able to manually enter/...
... all desired text. 7無 When finished, press . 8無 New labels will appear. 4無 Repeatedly press the corresponding key on the remote control to view and assign these logos from the deletion confirmation window and press . (continued) To assign channel labels: 1無 Press and open the...To save your settings, highlight Done and press . Assigned channel labels will be able to highlight the desired character on the on the remote control. To delete the custom label: 1無 Open the Channel Labeling window. 2無 Highlight the label to be able to manually enter/...
User Manual
Page 29
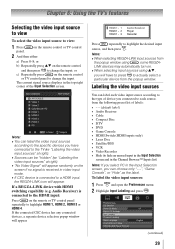
... LINK devices may automatically turn on. ••When selecting input sources using , some REGZA- or c) Repeatedly press on the remote or TV control panel repeatedly to highlight HDMI 1, HDMI 2, HDMI 3 or HDMI 4. Chapter 6: Using the TV's features Selecting the video input source...to view To select the video input source to view: 1無 Press on the remote control and then press to change the input. or b) Repeatedly press on the remote control or TV control panel. 2無 And then either: a) Press 0-8; The current signal source displays...
... LINK devices may automatically turn on. ••When selecting input sources using , some REGZA- or c) Repeatedly press on the remote or TV control panel repeatedly to highlight HDMI 1, HDMI 2, HDMI 3 or HDMI 4. Chapter 6: Using the TV's features Selecting the video input source...to view To select the video input source to view: 1無 Press on the remote control and then press to change the input. or b) Repeatedly press on the remote control or TV control panel. 2無 And then either: a) Press 0-8; The current signal source displays...
User Manual
Page 30
... screen with all of your inputs. • Keep a list of your recently viewed channels/inputs from the Channel Browser™ History List (illustrated on the remote control. 5無 To save the new input labels, highlight Done and press . The channel/ input will cause that input source. Favorites Browser The Favorites Browser allows...
... screen with all of your inputs. • Keep a list of your recently viewed channels/inputs from the Channel Browser™ History List (illustrated on the remote control. 5無 To save the new input labels, highlight Done and press . The channel/ input will cause that input source. Favorites Browser The Favorites Browser allows...
User Manual
Page 31
... 5無 Channels stored in History List by default. Note: REGZA-LINK List will be automatically grayed out and set the REGZA-LINK Setup" on the remote control. • Press to surf backward through the previously tuned 32 channels in the History list, the channels in the ANT/ CABLE channel list, the...
... 5無 Channels stored in History List by default. Note: REGZA-LINK List will be automatically grayed out and set the REGZA-LINK Setup" on the remote control. • Press to surf backward through the previously tuned 32 channels in the History list, the channels in the ANT/ CABLE channel list, the...
User Manual
Page 32
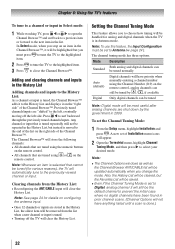
...is done.) 32 Clearing channels from the list when a new channel or input is selected that are tuned using the numeric buttons on the remote control. A new set to Digital, analog channel 3 will clear the History List. Setting the Channel Tuning Mode This feature allows you must be...using the Channel Number (0-9) on an item in the list. Also, the History List will be updated automatically when you stop on the remote control, analog channels can still be repeated in the History List, but instead is moved to surf backward through the previously tuned channels/inputs....
...is done.) 32 Clearing channels from the list when a new channel or input is selected that are tuned using the numeric buttons on the remote control. A new set to Digital, analog channel 3 will clear the History List. Setting the Channel Tuning Mode This feature allows you must be...using the Channel Number (0-9) on an item in the list. Also, the History List will be updated automatically when you stop on the remote control, analog channels can still be repeated in the History List, but instead is moved to surf backward through the previously tuned channels/inputs....
User Manual
Page 33
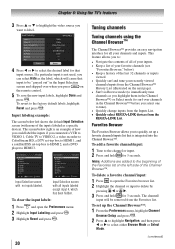
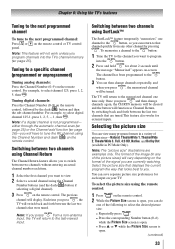
..., to you are currently watching. You can save separate picture size preferences for about 2 seconds until the message "Memorized" appears on the remote control or TV control panel. Chapter 6: Using the TV's features Tuning to the next programmed channel To tune to select digital channel 125-1, press 1, 2, 5,...Channel add function ( page 26)-you press , the TV will return to tune the RF channel using the remote control: 1無 Press on the remote control. Each time you will return to program into the TV's channel memory ( page 25). To select the ...
..., to you are currently watching. You can save separate picture size preferences for about 2 seconds until the message "Memorized" appears on the remote control or TV control panel. Chapter 6: Using the TV's features Tuning to the next programmed channel To tune to select digital channel 125-1, press 1, 2, 5,...Channel add function ( page 26)-you press , the TV will return to tune the RF channel using the remote control: 1無 Press on the remote control. Each time you will return to program into the TV's channel memory ( page 25). To select the ...
User Manual
Page 38
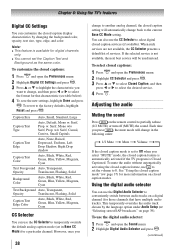
... digital audio selector You can customize the closed caption display characteristics by the language option under Audio Setup ( "Selecting stereo/SAP broadcasts" on the remote control to select the desired service. 4無 Press . To use to set the Caption Text and Background as the same color. To customize the closed captions...
... digital audio selector You can customize the closed caption display characteristics by the language option under Audio Setup ( "Selecting stereo/SAP broadcasts" on the remote control to select the desired service. 4無 Press . To use to set the Caption Text and Background as the same color. To customize the closed captions...


