
Owners Manual
Page 2
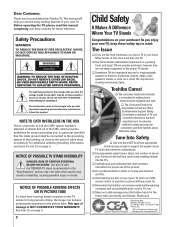
... manual will help you that the cable ground shall be strong enough to secure your TV (and other stands may reach for proper grounding and, in particular, specifies that important operating and maintenance instructions follow this Toshiba TV. NO USER-SERVICEABLE PARTS INSIDE. Tune Into Safety One size does NOT fit all! See item 32 on or play with other electronic components). Use appropriate...
... manual will help you that the cable ground shall be strong enough to secure your TV (and other stands may reach for proper grounding and, in particular, specifies that important operating and maintenance instructions follow this Toshiba TV. NO USER-SERVICEABLE PARTS INSIDE. Tune Into Safety One size does NOT fit all! See item 32 on or play with other electronic components). Use appropriate...
Owners Manual
Page 4
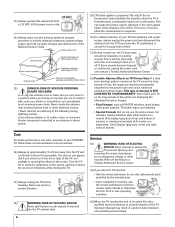
... other electrical circuits. • Never attempt to install any of the following formats or images: • Fixed Images, such as PIP/POP windows, stock tickers, video game patterns, TV station logos, and websites. • Special Formats that do not use only replacement parts specified by the manufacturer. • Upon completion of service, ask the service technician to perform routine safety checks to determine...
... other electrical circuits. • Never attempt to install any of the following formats or images: • Fixed Images, such as PIP/POP windows, stock tickers, video game patterns, TV station logos, and websites. • Special Formats that do not use only replacement parts specified by the manufacturer. • Upon completion of service, ask the service technician to perform routine safety checks to determine...
Owners Manual
Page 5
... panel lock feature 42 Changing the PIN code 42 Adjusting the picture 43 Selecting the picture mode 43 Adjusting the picture quality 43 Saving your new preferences 44 Using the flesh tone feature 44 Using CableClear™ DNR (digital noise reduction) .... 44 Selecting the scan velocity modulation (SVM 45 Selecting the color temperature 45 Resetting your picture quality adjustments 45 Selecting the video input source 46 Labeling the video input sources 46 Using the closed caption feature 47 Setting the sleep timer...
... panel lock feature 42 Changing the PIN code 42 Adjusting the picture 43 Selecting the picture mode 43 Adjusting the picture quality 43 Saving your new preferences 44 Using the flesh tone feature 44 Using CableClear™ DNR (digital noise reduction) .... 44 Selecting the scan velocity modulation (SVM 45 Selecting the color temperature 45 Resetting your picture quality adjustments 45 Selecting the video input source 46 Labeling the video input sources 46 Using the closed caption feature 47 Setting the sleep timer...
Owners Manual
Page 6
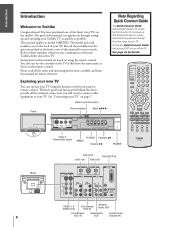
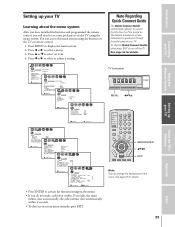
... need to connect other equipment to model 34HDX82. To stop the Quick Connect Guide, either press EXIT or turn off the TV. See page 24 for your records. This feature provides on-screen instructions to these numbers in this manual is turned on. L/MONO R S-VIDEO VIDEO AUDIO VIDEO-3 IN MENU TV/VIDEO VOLUME CHANNEL POWER Video 3 Video/audio inputs TV/VIDEO Channel yz MENU Volume x • POWER CT-90121 Setting up and operating your Toshiba TV as quickly as those on the front panel or remote control. This manual...
... need to connect other equipment to model 34HDX82. To stop the Quick Connect Guide, either press EXIT or turn off the TV. See page 24 for your records. This feature provides on-screen instructions to these numbers in this manual is turned on. L/MONO R S-VIDEO VIDEO AUDIO VIDEO-3 IN MENU TV/VIDEO VOLUME CHANNEL POWER Video 3 Video/audio inputs TV/VIDEO Channel yz MENU Volume x • POWER CT-90121 Setting up and operating your Toshiba TV as quickly as those on the front panel or remote control. This manual...
Owners Manual
Page 7
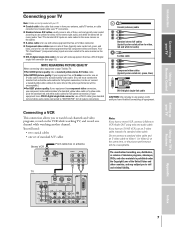
... a DVI-D digital single-link connector, use with video equipment that has component video connectors. Connecting a VCR This connection allows you to your TV. Your TV's standard A/V inputs are color-coded in sets of three, and are typically color-coded according to use component video cables instead of a standard yellow video cable. (You still must connect the standard red and white audio cables for full system connection.) If your antenna, cable TV service, or cable converter box. Your TV's ColorStream® (component video) inputs are color-coded...
... a DVI-D digital single-link connector, use with video equipment that has component video connectors. Connecting a VCR This connection allows you to your TV. Your TV's standard A/V inputs are color-coded in sets of three, and are typically color-coded according to use component video cables instead of a standard yellow video cable. (You still must connect the standard red and white audio cables for full system connection.) If your antenna, cable TV service, or cable converter box. Your TV's ColorStream® (component video) inputs are color-coded...
Owners Manual
Page 13
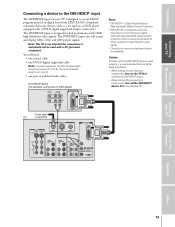
The DVI/HDCP input also will need: • one coaxial cable • one pair of standard audio cables DVI/HDCP device (for example, set -top box or DVD player equipped with a DVI-D digital single-link output connection.3 The DVI/HDCP input is 2m (6.6 ft). • one DVI-D digital single-link cable Note: For proper operation, the DVI-D cable length should not be used with 1080i high-definition video signals. The recommended length is designed for best performance with...
The DVI/HDCP input also will need: • one coaxial cable • one pair of standard audio cables DVI/HDCP device (for example, set -top box or DVD player equipped with a DVI-D digital single-link output connection.3 The DVI/HDCP input is 2m (6.6 ft). • one DVI-D digital single-link cable Note: For proper operation, the DVI-D cable length should not be used with 1080i high-definition video signals. The recommended length is designed for best performance with...
Owners Manual
Page 14
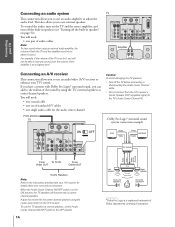
... realism of the sound by using the TV's internal speakers as center channel speakers. You will need : • one coaxial cable • one set of standard A/V cables • one pair of audio cables Note: To hear sound when using the center level control on page 52). Dolby Pro Logic* surround sound system connection example VCR Audio Video Video Audio LDP/DVD A/V receiver Setting up your TV Using the TV's Features Audio Video Audio center channel Appendix From To...
... realism of the sound by using the TV's internal speakers as center channel speakers. You will need : • one coaxial cable • one set of standard A/V cables • one pair of audio cables Note: To hear sound when using the center level control on page 52). Dolby Pro Logic* surround sound system connection example VCR Audio Video Video Audio LDP/DVD A/V receiver Setting up your TV Using the TV's Features Audio Video Audio center channel Appendix From To...
Owners Manual
Page 18
... the program mode and return to the previous code. Introduction Connecting your TV Using the Remote Control Setting up your TV Programming the remote control for that device mode and sample the functions to find the code that properly operates the target device. Invalid keys will blink one separately until the device responds to the Device code table on either of the device (CABLE/ SAT, VCR, DVD, AUDIO1, AUDIO2) lights...
... the program mode and return to the previous code. Introduction Connecting your TV Using the Remote Control Setting up your TV Programming the remote control for that device mode and sample the functions to find the code that properly operates the target device. Invalid keys will blink one separately until the device responds to the Device code table on either of the device (CABLE/ SAT, VCR, DVD, AUDIO1, AUDIO2) lights...

Owners Manual
Page 22
..., CABLE/SAT, VCR, DVD, AUDIO1, and AUDIO2. Channel Numbers (0-9, 100) allow direct access to channels (page 27) MODE cycles through programmed channels (page 27) VOL yz adjusts the volume level EXIT exits the programming menus (page 23) INPUT selects the video input source (page 46) MUTE mutes the sound (page 49) RECALL displays on-screen information (page 53) CH RTN returns to the last viewed channels (page 29) PIP CH yz selects the POP (picture...
..., CABLE/SAT, VCR, DVD, AUDIO1, and AUDIO2. Channel Numbers (0-9, 100) allow direct access to channels (page 27) MODE cycles through programmed channels (page 27) VOL yz adjusts the volume level EXIT exits the programming menus (page 23) INPUT selects the video input source (page 46) MUTE mutes the sound (page 49) RECALL displays on-screen information (page 53) CH RTN returns to the last viewed channels (page 29) PIP CH yz selects the POP (picture...
Owners Manual
Page 23
... CORRECTION QUICK CONNECT ENGL I SH 00:00 ANT 1 CABLE ADD : SELECT CUSTOM T I MER CC FAVOR I TE CH1 FAVOR I TE CH2 CH L A B E L I NG V I DEO L A B E L BACKGROUND 000 OFF : SELECT EXIT : END LOCKS V-CH I P ENABLE BLOCK I NG TV RAT I NG MPAA RAT I NG BLOCK I NG OPT I ON CH LOCK V I DEO LOCK FRONT PANEL LOCK NEW P I N ON : MOVE : SELECT TV front panel MENU TV/VIDEO VOLUME CHANNEL POWER MENU x •zy Using the Remote Control Setting...
... CORRECTION QUICK CONNECT ENGL I SH 00:00 ANT 1 CABLE ADD : SELECT CUSTOM T I MER CC FAVOR I TE CH1 FAVOR I TE CH2 CH L A B E L I NG V I DEO L A B E L BACKGROUND 000 OFF : SELECT EXIT : END LOCKS V-CH I P ENABLE BLOCK I NG TV RAT I NG MPAA RAT I NG BLOCK I NG OPT I ON CH LOCK V I DEO LOCK FRONT PANEL LOCK NEW P I N ON : MOVE : SELECT TV front panel MENU TV/VIDEO VOLUME CHANNEL POWER MENU x •zy Using the Remote Control Setting...
Owners Manual
Page 24
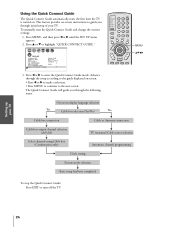
...Remote Control Using the Quick Connect Guide The Quick Connect Guide automatically starts the first time the TV is turned on -screen instructions to enter the Quick Connect Guide mode. Press x or • to guide you through initial setup of your TV. To manually start the Quick Connect Guide and change the current settings: 1. The Quick Connect Guide will guide you through the following items. MENU yzx • On-screen display language selection Yes ▼ Cable box selection (Yes/No) No ▼ Cable box connection ▼ Cable or Antenna connection ▼ Cable box...
...Remote Control Using the Quick Connect Guide The Quick Connect Guide automatically starts the first time the TV is turned on -screen instructions to enter the Quick Connect Guide mode. Press x or • to guide you through initial setup of your TV. To manually start the Quick Connect Guide and change the current settings: 1. The Quick Connect Guide will guide you through the following items. MENU yzx • On-screen display language selection Yes ▼ Cable box selection (Yes/No) No ▼ Cable box connection ▼ Cable or Antenna connection ▼ Cable box...
Owners Manual
Page 40
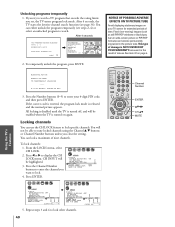
After 4 seconds, the TV starts the favorite channel search function (see steps 2-4) or select an unlocked program to lock specific channels. TV-PG L V EXCEED SET LIMITS PUSH MUTE TO ENTER PIN CABLE 9 2. This type of nine channels. Connecting your TV Using the Remote Control Setting up your TV Using the TV's Features BLOCK I NG ACTI VE ENTER P I N CODE 000 1 000 1 8 TV CABLE 8 TV CABLE 1 C L E A R A L L 1 2 3 4 5 6 7 8 9 10 11 12 13 14 15 16...
After 4 seconds, the TV starts the favorite channel search function (see steps 2-4) or select an unlocked program to lock specific channels. TV-PG L V EXCEED SET LIMITS PUSH MUTE TO ENTER PIN CABLE 9 2. This type of nine channels. Connecting your TV Using the Remote Control Setting up your TV Using the TV's Features BLOCK I NG ACTI VE ENTER P I N CODE 000 1 000 1 8 TV CABLE 8 TV CABLE 1 C L E A R A L L 1 2 3 4 5 6 7 8 9 10 11 12 13 14 15 16...

Owners Manual
Page 46
.../VIDEO VOLUME CHANNEL POWER TV/VIDEO Setting up your TV, such as desired. VCR DVD DTV SAT CBL HD : Uses the default label name : Video cassette recorder : DVD video : Digital TV set-top box : Satellite box : Cable box : DVI/HDCP device (see "Connecting your TV" on page 7.) SOURCE SELECTION 0: ANT 1 1: VIDEO 1 2: VIDEO 2 3: VIDEO 3 4: ColorStream HD1 5: ColorStream HD2 6: DVI 7: ANT 2 0-7: TO SELECT SOURCE SELECTION ANT 1 VIDEO 1 VIDEO 2 VIDEO 3 ColorStream HD1 ColorStream HD2 DVI ANT 2 TV/VIDEO: TO SELECT Pressing INPUT on the remote control Pressing TV/VIDEO on which input jacks...
.../VIDEO VOLUME CHANNEL POWER TV/VIDEO Setting up your TV, such as desired. VCR DVD DTV SAT CBL HD : Uses the default label name : Video cassette recorder : DVD video : Digital TV set-top box : Satellite box : Cable box : DVI/HDCP device (see "Connecting your TV" on page 7.) SOURCE SELECTION 0: ANT 1 1: VIDEO 1 2: VIDEO 2 3: VIDEO 3 4: ColorStream HD1 5: ColorStream HD2 6: DVI 7: ANT 2 0-7: TO SELECT SOURCE SELECTION ANT 1 VIDEO 1 VIDEO 2 VIDEO 3 ColorStream HD1 ColorStream HD2 DVI ANT 2 TV/VIDEO: TO SELECT Pressing INPUT on the remote control Pressing TV/VIDEO on which input jacks...
Owners Manual
Page 48
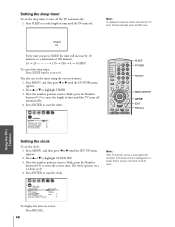
... starts to blink, press the Number buttons (0-9) to highlight TIMER. 3. Index Press y or z to enter the correct time. Press MENU, and then press x or • until the CUSTOM menu appears. 2. The clock operates on -screen menu: 1. After the number position starts to blink, press the Number buttons (0-9) to highlight CLOCK SET. 3. You also can set the timer using the on a 12-hour cycle. 4. Introduction Connecting your TV Using the TV...
... starts to blink, press the Number buttons (0-9) to highlight TIMER. 3. Index Press y or z to enter the correct time. Press MENU, and then press x or • until the CUSTOM menu appears. 2. The clock operates on -screen menu: 1. After the number position starts to blink, press the Number buttons (0-9) to highlight CLOCK SET. 3. You also can set the timer using the on a 12-hour cycle. 4. Introduction Connecting your TV Using the TV...
Owners Manual
Page 50
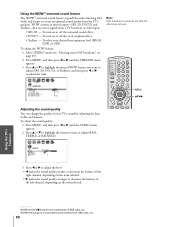
... balance in the left channel, depending on page 49). 2. To turn on or off the surround sound effect. • FOCUS - Select STEREO mode (see "Selecting stereo/SAP broadcasts" on the item selected. To adjust the sound quality: 1. Press MENU, and then press x or • until the AUDIO menu appears. 2. Press MENU, and then press x or • until the THEATER menu appears. 3. Introduction Connecting your desired bass...
... balance in the left channel, depending on page 49). 2. To turn on or off the surround sound effect. • FOCUS - Select STEREO mode (see "Selecting stereo/SAP broadcasts" on the item selected. To adjust the sound quality: 1. Press MENU, and then press x or • until the AUDIO menu appears. 2. Press MENU, and then press x or • until the THEATER menu appears. 3. Introduction Connecting your desired bass...

Owners Manual
Page 53
...: 1. To turn off the StableSound® feature: Highlight OFF in TV mode) • Channel number or video mode selected • Time (if set) • Channel label (if set) • Stereo or SAP audio status • V-CHIP rating status • Picture size STEREO SAP TV-PG L V FULL 9:25 ANT 1 ABCD CABLE 6 33 34 35 MENU yzx • RECALL 53 Index Appendix Using the TV's Features Setting up your TV Using the Remote Control Connecting your...
...: 1. To turn off the StableSound® feature: Highlight OFF in TV mode) • Channel number or video mode selected • Time (if set) • Channel label (if set) • Stereo or SAP audio status • V-CHIP rating status • Picture size STEREO SAP TV-PG L V FULL 9:25 ANT 1 ABCD CABLE 6 33 34 35 MENU yzx • RECALL 53 Index Appendix Using the TV's Features Setting up your TV Using the Remote Control Connecting your...
Owners Manual
Page 56
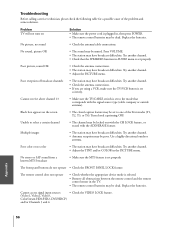
... the remote control and the remote control sensor in , then press POWER. • The remote control batteries may be dead. Cannot access signal input sources • Check the VIDEO LOCK feature. (Video1, Video2, Video3, ColorStream HD1/HD2, DVI/HDCP) and/or Channels 3 and 4. Try another channel. • Adjust the PICTURE menu. Poor reception of the problem and some solutions. Problem TV will not turn on the screen • The closed captioning OFF. Press VOLUME. •...
... the remote control and the remote control sensor in , then press POWER. • The remote control batteries may be dead. Cannot access signal input sources • Check the VIDEO LOCK feature. (Video1, Video2, Video3, ColorStream HD1/HD2, DVI/HDCP) and/or Channels 3 and 4. Try another channel. • Adjust the PICTURE menu. Poor reception of the problem and some solutions. Problem TV will not turn on the screen • The closed captioning OFF. Press VOLUME. •...
Owners Manual
Page 57
... to you . or Puerto Rico. (4) Labor service charges for set installation, setup, adjustment of customer controls, and installation or repair of any television or parts that have a limited ninety (90) day warranty for all of the operating instructions in this manual and checking the "Troubleshooting" section, you this television must be made by an Authorized TACP/THI Service Station. (3) The warranties from TACP and THI are your responsibility...
... to you . or Puerto Rico. (4) Labor service charges for set installation, setup, adjustment of customer controls, and installation or repair of any television or parts that have a limited ninety (90) day warranty for all of the operating instructions in this manual and checking the "Troubleshooting" section, you this television must be made by an Authorized TACP/THI Service Station. (3) The warranties from TACP and THI are your responsibility...
Owners Manual
Page 58
... operated in Canada. (4) Labor service charges for 27'' FST PURE® and All Larger Television Models Toshiba of Canada Limited ("TCL") makes the following all parts, labor, and picture tubes. AND USED IN CANADA ARE NOT COVERED BY THESE WARRANTIES. Depending on the type of repair required, either the service will be performed in your home or the set installation, setup, adjustment of customer controls, and installation or repair of antenna...
... operated in Canada. (4) Labor service charges for 27'' FST PURE® and All Larger Television Models Toshiba of Canada Limited ("TCL") makes the following all parts, labor, and picture tubes. AND USED IN CANADA ARE NOT COVERED BY THESE WARRANTIES. Depending on the type of repair required, either the service will be performed in your home or the set installation, setup, adjustment of customer controls, and installation or repair of antenna...

Owners Manual
Page 59
... button 36 Picture scroll 34 Picture size selection 32 R RECALL button 54 Remote control Battery installation 15 Device code table 20-21 Functional key chart 16-17 Learning about the buttons 22 Operational feature reset 19 Programming 18 Searching and sampling the code 18 Volume Lock feature 19 RESET 45, 51 S S-video cables 7 SAP sound 49 Satellite receiver connection 9 Scrolling the Theater Wide 2 or 3 picture 34 Set-top box 11 Sleep timer 48 Sound quality adjustments 50 SPEAKERS on/off 52 Specifications...
... button 36 Picture scroll 34 Picture size selection 32 R RECALL button 54 Remote control Battery installation 15 Device code table 20-21 Functional key chart 16-17 Learning about the buttons 22 Operational feature reset 19 Programming 18 Searching and sampling the code 18 Volume Lock feature 19 RESET 45, 51 S S-video cables 7 SAP sound 49 Satellite receiver connection 9 Scrolling the Theater Wide 2 or 3 picture 34 Set-top box 11 Sleep timer 48 Sound quality adjustments 50 SPEAKERS on/off 52 Specifications...


