Brochure
Page 2
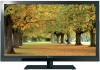
... an epileptic condition, or has a family history of HDMI®-CEC requires an HDMI®-CEC compatible display/peripheral device. System Specifications1 Toshiba 32TL515U Cabinet • Screen Size Class: 32 in. • Actual Screen Size Diagonal: 31.6 in one cable. - Panel Specifications •... • Built-in WiFi®5 • Skype® Capable • Input Labeling • Channel Browser • Sleep Timer • Illuminated Remote Control • Horizon Motion GUI Jack Pack • HDMI® Digital Inputs6: 4 w/ CEC Easily connect to 3D Conversion • 3D Resolution...
... an epileptic condition, or has a family history of HDMI®-CEC requires an HDMI®-CEC compatible display/peripheral device. System Specifications1 Toshiba 32TL515U Cabinet • Screen Size Class: 32 in. • Actual Screen Size Diagonal: 31.6 in one cable. - Panel Specifications •... • Built-in WiFi®5 • Skype® Capable • Input Labeling • Channel Browser • Sleep Timer • Illuminated Remote Control • Horizon Motion GUI Jack Pack • HDMI® Digital Inputs6: 4 w/ CEC Easily connect to 3D Conversion • 3D Resolution...

Owners Manual
Page 10
..._or DVI device to the HDMI input Connecting a VCR o1' DVD player with ColorStream (component video Connecting remote IR devices Connecting a digital audio system Using the TV remote and HDMF '_CEC Control to control other devices Connecting Connecting Connecting an HDMI audio system a PC to a... 15 15 15 16 17 _'_ 18 19 20 21 21 22 23 Chapter 3: Using the remote control 24 Controlling other devices 24 Installing batteries 24 Learning about the Remote Control 25 Chapter4: Initial Setupand Menu 26 Initial Setup 26 Navigating the menu system 27 Main menu...
..._or DVI device to the HDMI input Connecting a VCR o1' DVD player with ColorStream (component video Connecting remote IR devices Connecting a digital audio system Using the TV remote and HDMF '_CEC Control to control other devices Connecting Connecting Connecting an HDMI audio system a PC to a... 15 15 15 16 17 _'_ 18 19 20 21 21 22 23 Chapter 3: Using the remote control 24 Controlling other devices 24 Installing batteries 24 Learning about the Remote Control 25 Chapter4: Initial Setupand Menu 26 Initial Setup 26 Navigating the menu system 27 Main menu...

Owners Manual
Page 11
... and 3D . 83 PC IN signal formats 83 HDMI signal formats 84 3D signal formats 85 Remote control functional key chart 86 Operating other devices 88 Programming the remote to operate other devices . . . 88 Device code setup 88 Searching for a device code 89... rernote's programming 89 Resetting to the factory default 89 Operating the TV with combination buttons ......... 90 Remote control codes 91 Limited United States Warranty for LCD Televisions 97 Limited Canadian Warranty for Toshiba Brand Flat Panel Televisions ......... 98 Index 101 11
... and 3D . 83 PC IN signal formats 83 HDMI signal formats 84 3D signal formats 85 Remote control functional key chart 86 Operating other devices 88 Programming the remote to operate other devices . . . 88 Device code setup 88 Searching for a device code 89... rernote's programming 89 Resetting to the factory default 89 Operating the TV with combination buttons ......... 90 Remote control codes 91 Limited United States Warranty for LCD Televisions 97 Limited Canadian Warranty for Toshiba Brand Flat Panel Televisions ......... 98 Index 101 11

Owners Manual
Page 12
...dimension, and let yourself be sent to "Chapter 9: Troubleshooting" (_#r' p. 77). 11 See "Chapter 10: Appendix", for controlling infrared remote- RGB Range adjusts RGB full range signal automatically. • HDMI ® CEC Control allows control of external devices from the TV... (_#r' p. 13). 4 Connect your other electronic device(s) to the TV (_ p. 15-23). 5 See "Chapter 3: Using the remote control" (_#r' p. 24) for an overview of the buttons on the remote control, installing the batteries, and preparing to operate your LCD TV" (_ p. 8). ° Place the TV in an appropriate location...
...dimension, and let yourself be sent to "Chapter 9: Troubleshooting" (_#r' p. 77). 11 See "Chapter 10: Appendix", for controlling infrared remote- RGB Range adjusts RGB full range signal automatically. • HDMI ® CEC Control allows control of external devices from the TV... (_#r' p. 13). 4 Connect your other electronic device(s) to the TV (_ p. 15-23). 5 See "Chapter 3: Using the remote control" (_#r' p. 24) for an overview of the buttons on the remote control, installing the batteries, and preparing to operate your LCD TV" (_ p. 8). ° Place the TV in an appropriate location...

Owners Manual
Page 13
... menu. To adjust the volume level. LAN port IR IN/OUT To configure for use, see p. 15-23. Front panel control Examples show Model 32TL515U. p. 80) I Touch sensor Brightness Sensor This sensor will detect the ambient light conditions to optimize the backlighting levels (_ p. 57). When a menu... is onscreen, the INPUT key on the TV's control panel functions as left/right menu navigation buttons. • MENU - TVfront Remote Sensor Effective range: 16.4 ft (5m) Service LED (_ p. 80) Power LED (_;; To change the challneL When a menu is onscreen, the MENU key ...
... menu. To adjust the volume level. LAN port IR IN/OUT To configure for use, see p. 15-23. Front panel control Examples show Model 32TL515U. p. 80) I Touch sensor Brightness Sensor This sensor will detect the ambient light conditions to optimize the backlighting levels (_ p. 57). When a menu... is onscreen, the INPUT key on the TV's control panel functions as left/right menu navigation buttons. • MENU - TVfront Remote Sensor Effective range: 16.4 ft (5m) Service LED (_ p. 80) Power LED (_;; To change the challneL When a menu is onscreen, the MENU key ...

Owners Manual
Page 15
... and video in HDMI output. Crossover LAN cable is used to a PC (_¢ p. 23). HDMI® cable (JHJ_rrm|) Use it with infrared remote control. Standard LAN cable is a Toshiba brand.) Note: Component video cables provide better picture quality than composite video cables. The input/output terminals on your the TV directly About...
... and video in HDMI output. Crossover LAN cable is used to a PC (_¢ p. 23). HDMI® cable (JHJ_rrm|) Use it with infrared remote control. Standard LAN cable is a Toshiba brand.) Note: Component video cables provide better picture quality than composite video cables. The input/output terminals on your the TV directly About...
Owners Manual
Page 17
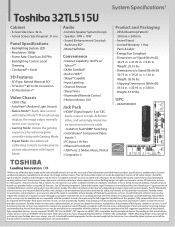
... to the adoption of the HDMI-to-DVI adapter cable must not exceed 9.8 ft (3 m). HDMI cables transfer video and audio. Note: For programming the TV remote control to accept HDCP (HighBandwidth Digital-Content Protection) program material in HDMI Settings (_,_ p. 48). For signal specifications, see p. 88. To connect an HDMI device, you...
... to the adoption of the HDMI-to-DVI adapter cable must not exceed 9.8 ft (3 m). HDMI cables transfer video and audio. Note: For programming the TV remote control to accept HDCP (HighBandwidth Digital-Content Protection) program material in HDMI Settings (_,_ p. 48). For signal specifications, see p. 88. To connect an HDMI device, you...
Owners Manual
Page 18
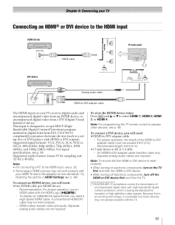
..., use the ColorStream NDt terminals to operate other devices, see p. 17. Press _ and • or • to select OolorStream HD1. Note: For programming the TV remote control to display Progressive (480p, 720p, 1080p) and Interlaced (480i, 10800 video. Audio configuration is prohibited under the Copyright Laws of the United States and...
..., use the ColorStream NDt terminals to operate other devices, see p. 17. Press _ and • or • to select OolorStream HD1. Note: For programming the TV remote control to display Progressive (480p, 720p, 1080p) and Interlaced (480i, 10800 video. Audio configuration is prohibited under the Copyright Laws of the United States and...
Owners Manual
Page 19
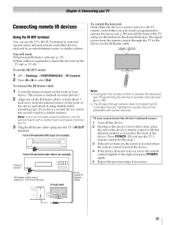
...passes from the infrared sensor on some devices.* 2 Align one of the IR blaster cable's wands about 1 inch away from the remote control through feature does not support all IRcontrolled devices. FrontofIR-controlledDVDplayer(for example) Frontof IR-controlledaudio device(forexample) sensor IR blaster cable wand... (approx.1 inch from device) TV backpanel Dualwand IR blaster cable To control the d evice(s): Point either the device's remote control or the TV remote control (that you have a second device, coil the second wand with the infrared emitter) so it behind the TV. 3...
...passes from the infrared sensor on some devices.* 2 Align one of the IR blaster cable's wands about 1 inch away from the remote control through feature does not support all IRcontrolled devices. FrontofIR-controlledDVDplayer(for example) Frontof IR-controlledaudio device(forexample) sensor IR blaster cable wand... (approx.1 inch from device) TV backpanel Dualwand IR blaster cable To control the d evice(s): Point either the device's remote control or the TV remote control (that you have a second device, coil the second wand with the infrared emitter) so it behind the TV. 3...
Owners Manual
Page 20
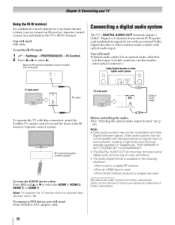
... connector.) DolbyDigitaldecodeor rother TV back panel IR cable TV back panel DIGITAL AU{)I Optical audio cable To operate the TV with this connection, point the Toshiba TV remote control toward the front of the IR receiver/repeater control system. When an HDMI input is available in the following situations: - Before controlling the... out signals may not output some ] corenetreoiv,'eRr/repeatedigritsalyasudtioemsources due to -DVI adapter cable Manufactured under license from Dolby Laboratories. Note: To program the TV remote control to a digital RF channel -
... connector.) DolbyDigitaldecodeor rother TV back panel IR cable TV back panel DIGITAL AU{)I Optical audio cable To operate the TV with this connection, point the Toshiba TV remote control toward the front of the IR receiver/repeater control system. When an HDMI input is available in the following situations: - Before controlling the... out signals may not output some ] corenetreoiv,'eRr/repeatedigritsalyasudtioemsources due to -DVI adapter cable Manufactured under license from Dolby Laboratories. Note: To program the TV remote control to a digital RF channel -
Owners Manual
Page 21
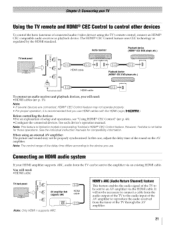
...regulated by the HDMI standard. Note: This feature is recommended that you use HDMI cables with the HDMI Logo (I-.l_rTH). Usingthe TV remote and HDMI® CECControl to the amplifier via the HDMI cable. Audio receiver Playback device (HDMI ® CECDVD player,etc.) HDMI...: • For an explanation of the delay time differs according In this case, adjust the delay to models incorporating Toshiba's HDM/® CEC Control feature. However, Toshiba is not liable for compatibility information. synchronized. Note: The control range of setup and operations, see "Using HDMI ®...
...regulated by the HDMI standard. Note: This feature is recommended that you use HDMI cables with the HDMI Logo (I-.l_rTH). Usingthe TV remote and HDMI® CECControl to the amplifier via the HDMI cable. Audio receiver Playback device (HDMI ® CECDVD player,etc.) HDMI...: • For an explanation of the delay time differs according In this case, adjust the delay to models incorporating Toshiba's HDM/® CEC Control feature. However, Toshiba is not liable for compatibility information. synchronized. Note: The control range of setup and operations, see "Using HDMI ®...

Owners Manual
Page 24
...a designated disposal area. • Always consider the environment when disposing of Non-Toshiba d evices or Toshiba d evices that the remote control is not to operate a variety of batteries. Toshiba devices: The remote is reduced, replace the batteries. • Always replace both batteries with new ones.... This prevents battery acid from the remote iftheyare dead or if the remote control is not programmed to open the cover...
...a designated disposal area. • Always consider the environment when disposing of Non-Toshiba d evices or Toshiba d evices that the remote control is not to operate a variety of batteries. Toshiba devices: The remote is reduced, replace the batteries. • Always replace both batteries with new ones.... This prevents battery acid from the remote iftheyare dead or if the remote control is not programmed to open the cover...
Owners Manual
Page 25
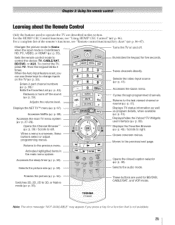
... CABLE/SAT, BD/DVD, or AUX. Displays TV status information as program details, when available (_ p. 51). __ Displays/hides the Yahoo! Sets the remote control mode to left. Enters 2-part channel numbers (_ p. 39) / Edits the Favorites List (_ p. 40). Tunes channels directly. Turns the TV on...). Displays the NET ]_/TM menu (_ p. 67). Cycles through programmed channels. as well -- For the HDMF _ CEC Control functions, see "Remote control functional key chart" (_#r' p. 86-87). Returns to operate the TV are described in this section. Returns to change inputs on and off...
... CABLE/SAT, BD/DVD, or AUX. Displays TV status information as program details, when available (_ p. 51). __ Displays/hides the Yahoo! Sets the remote control mode to left. Enters 2-part channel numbers (_ p. 39) / Edits the Favorites List (_ p. 40). Tunes channels directly. Turns the TV on...). Displays the NET ]_/TM menu (_ p. 67). Cycles through programmed channels. as well -- For the HDMF _ CEC Control functions, see "Remote control functional key chart" (_#r' p. 86-87). Returns to operate the TV are described in this section. Returns to change inputs on and off...

Owners Manual
Page 27
... menus will appear, Press @ or Navigating the menu system °To open the main menu, press 4_u on the remote control or TV control panel. ° Press A, V, "I, or • on the remote control or TV control panel to navigate and make Note: Encrypted channels cannot be confirmed from the following operation at...
... menus will appear, Press @ or Navigating the menu system °To open the main menu, press 4_u on the remote control or TV control panel. ° Press A, V, "I, or • on the remote control or TV control panel to navigate and make Note: Encrypted channels cannot be confirmed from the following operation at...
Owners Manual
Page 28
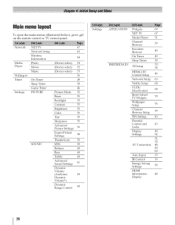
... 60 Advanced 61 Sound Settings Dynamic Volume (Audyssey 60 Dynamic Volume Main menu layout To open the main menus (illustrated below), press _,_i_u on the remote control or TV control panel.
... 60 Advanced 61 Sound Settings Dynamic Volume (Audyssey 60 Dynamic Volume Main menu layout To open the main menus (illustrated below), press _,_i_u on the remote control or TV control panel.
Owners Manual
Page 30
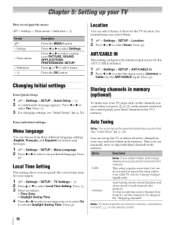
For normal home use buttons 0-9 and [_ on the remote control 3O Press (LK). 3 Select an option: • Time Zone • Daylight Saving Time 4 Press _ or • to select your cable TV service's lineup changes ... can select Home or Store for your area and store them in its memory. Press _ or • to select your TV stops only on the remote control or the control panel, store those channels in memory, use , select Home. 1 ;_.0> Settings > SETUP > Location. 2 Press _ or • to activate Daylight Saving Time. Press...
For normal home use buttons 0-9 and [_ on the remote control 3O Press (LK). 3 Select an option: • Time Zone • Daylight Saving Time 4 Press _ or • to select your cable TV service's lineup changes ... can select Home or Store for your area and store them in its memory. Press _ or • to select your TV stops only on the remote control or the control panel, store those channels in memory, use , select Home. 1 ;_.0> Settings > SETUP > Location. 2 Press _ or • to activate Daylight Saving Time. Press...
Owners Manual
Page 31
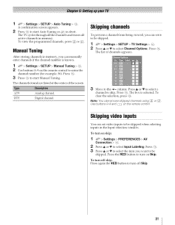
... [_ or _." . To tum off Skip. 31 Digital chalmel Skipping channels To prevent a channel from being viewed, you can set video inputs to turn on the remote control to be skipped. The box is known. 1 ;_a0> Settings > SETUP > Manual Tuning > @. 2 Use buttons 0-9 on skip: 1 44. To view... > @. 2 Press • or • to turn off skip: Press again the RED button to select Channel Options. To turn on the remote control Skipping video inputs You can manually enter channels if the channel number is selected. To clear the selection, press ,_). Press @. The TV cycles ...
... [_ or _." . To tum off Skip. 31 Digital chalmel Skipping channels To prevent a channel from being viewed, you can set video inputs to turn on the remote control to be skipped. The box is known. 1 ;_a0> Settings > SETUP > Manual Tuning > @. 2 Use buttons 0-9 on skip: 1 44. To view... > @. 2 Press • or • to turn off skip: Press again the RED button to select Channel Options. To turn on the remote control Skipping video inputs You can manually enter channels if the channel number is selected. To clear the selection, press ,_). Press @. The TV cycles ...
Owners Manual
Page 33
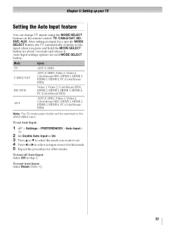
... TV automatically switches to the ANT/CABLE input. Setting the Auto Input feature You can change TV inputs using the MODE SELECT buttons on the remote control: TV, CABLE/SAT, BD/ DVD, AUX. Press _°0. 33
... TV automatically switches to the ANT/CABLE input. Setting the Auto Input feature You can change TV inputs using the MODE SELECT buttons on the remote control: TV, CABLE/SAT, BD/ DVD, AUX. Press _°0. 33
Owners Manual
Page 39
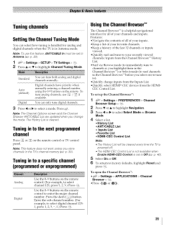
... to factory defaults, highlight Reset and press _. Digital channels have priority when manually entering a chmmel number using the 0-9 buttons on the remote control. (For example, to select channel 125, press 1, 2, 5.) Press _). The History List is a helpful navigational interface for analog... The Channel Browser _"is cleared. Tuningin to a specific channel (programmedor unprogrammed) Analog Digital Use the 0-9 buttons on the remote. Tuning in the Channel Browser _Mbefore you select one to tune to). ° Quickly change the mode. Tuning channels Setting...
... to factory defaults, highlight Reset and press _. Digital channels have priority when manually entering a chmmel number using the 0-9 buttons on the remote control. (For example, to select channel 125, press 1, 2, 5.) Press _). The History List is a helpful navigational interface for analog... The Channel Browser _"is cleared. Tuningin to a specific channel (programmedor unprogrammed) Analog Digital Use the 0-9 buttons on the remote. Tuning in the Channel Browser _Mbefore you select one to tune to). ° Quickly change the mode. Tuning channels Setting...

Owners Manual
Page 40
... to the History List: As a channel or input is tuned, the Channel Browser _M adds it to the History List and displays it on the remote control. • Channels that is integrated into the Channel Browser _'_, To add a favorite channel or input: 1 Tune to the channel or input, 2 Press and hold...
... to the History List: As a channel or input is tuned, the Channel Browser _M adds it to the History List and displays it on the remote control. • Channels that is integrated into the Channel Browser _'_, To add a favorite channel or input: 1 Tune to the channel or input, 2 Press and hold...


