Owner's Manual - English
Page 12
...TV and other devices. page 8). • Place the TV on using the TV's features, see Chapter 10. 16 Enjoy your TV. 4 BEFORE connecting cables or devices to the TV, learn the functions of the TV's connections and controls (- THIS TYPE OF DAMAGE IS NOT COVERED UNDER THE TOSHIBA... pages 13-14). 5 Connect your TV and begin using your new TV Follow these steps to reset the TV. 10 See "Menu layout and navigation...TV far enough from walls and other immovable structure (- page 23). 7 See "Learning about your other electronic device(s) to operate your LCD TV/DVD combination" (- If the TV...
...TV and other devices. page 8). • Place the TV on using the TV's features, see Chapter 10. 16 Enjoy your TV. 4 BEFORE connecting cables or devices to the TV, learn the functions of the TV's connections and controls (- THIS TYPE OF DAMAGE IS NOT COVERED UNDER THE TOSHIBA... pages 13-14). 5 Connect your TV and begin using your new TV Follow these steps to reset the TV. 10 See "Menu layout and navigation...TV far enough from walls and other immovable structure (- page 23). 7 See "Learning about your other electronic device(s) to operate your LCD TV/DVD combination" (- If the TV...

Owner's Manual - English
Page 13
...-screen, these buttons function as "VIDEO 2" and include standard A/V connections. 4 POWER - When no menu is on-screen, the MENU button on the TV control panel for additional information. 2 Remote sensor - Repeatedly press to stop a DVD video disc, or other playable disc. 12 STOP - The side panel...IN - Press to instantly close an on -screen, these buttons change the source you cannot turn the TV on page 71 for 5 or more seconds to reset the TV. 5 ARROWS BbC c - If the TV stops responding to as up/down/left/right menu navigation buttons. 6 MENU (ENTER) - Press to access...
...-screen, these buttons function as "VIDEO 2" and include standard A/V connections. 4 POWER - When no menu is on-screen, the MENU button on the TV control panel for additional information. 2 Remote sensor - Repeatedly press to stop a DVD video disc, or other playable disc. 12 STOP - The side panel...IN - Press to instantly close an on -screen, these buttons change the source you cannot turn the TV on page 71 for 5 or more seconds to reset the TV. 5 ARROWS BbC c - If the TV stops responding to as up/down/left/right menu navigation buttons. 6 MENU (ENTER) - Press to access...
Owner's Manual - English
Page 20
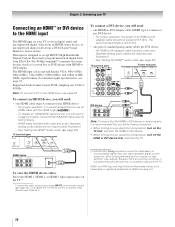
...HDMI logo and High-Definition Multimedia Interface are required (see page 72. Chapter 2: Connecting your TV Connecting an HDMI™ or DVI device to the HDMI input The HDMI input on your electronic... components, turn on the remote control (- Supported Audio format: Linear PCM, sampling rate 32/44.1/ 48 kHz Note: To connect a PC to operate other devices, see Chapter 3....specifications, see illustration). - The recommended length is recommended that the HDMI or DVI device is reset properly, it is designed to -DVI adapter cable should not exceed 9.8 ft (3m). ...
...HDMI logo and High-Definition Multimedia Interface are required (see page 72. Chapter 2: Connecting your TV Connecting an HDMI™ or DVI device to the HDMI input The HDMI input on your electronic... components, turn on the remote control (- Supported Audio format: Linear PCM, sampling rate 32/44.1/ 48 kHz Note: To connect a PC to operate other devices, see Chapter 3....specifications, see illustration). - The recommended length is recommended that the HDMI or DVI device is reset properly, it is designed to -DVI adapter cable should not exceed 9.8 ft (3m). ...
Owner's Manual - English
Page 21
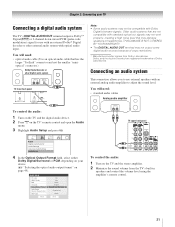
...MTS Language Optical Output Format Dolby Digital Dynamic Range Control DVD Audio Reset No Auto Stereo English Dolby Digital/Surround Compressed Stereo Done To control the audio: 1 Turn on your TV Connecting a digital audio system The TV's DIGITAL AUDIO OUT terminal outputs a Dolby®* Digital g ... Audio Settings Audio Setup 4 In the Optical Output Format field, select either Dolby Digital/Surround or PCM, depending on the TV and the stereo amplifier. 2 Minimize the sound volume from Dolby Laboratories. Older audio systems that are registered trademarks of copy restrictions...
...MTS Language Optical Output Format Dolby Digital Dynamic Range Control DVD Audio Reset No Auto Stereo English Dolby Digital/Surround Compressed Stereo Done To control the audio: 1 Turn on your TV Connecting a digital audio system The TV's DIGITAL AUDIO OUT terminal outputs a Dolby®* Digital g ... Audio Settings Audio Setup 4 In the Optical Output Format field, select either Dolby Digital/Surround or PCM, depending on the TV and the stereo amplifier. 2 Minimize the sound volume from Dolby Laboratories. Older audio systems that are registered trademarks of copy restrictions...

Owner's Manual - English
Page 25
... those features, you have a non-Toshiba device or a Toshiba device that the remote control is programmed, it may not work on some DVD players). 9 ENTER Required by some satellite receivers and DVD players to activate certain functions. 10 DVD CLEAR Press to reset the title and chapter number. 11...DVD player or HTIB. 25 pages 27-29). b selects the next lower channel. 6 GUIDE Displays the channel guide in the AUX mode. 7 INFO Displays TV status information on-screen. 8 BbC c Press to navigate DVD menus (may not operate certain features on and off. 2 Channel Numbers (0-9) Press to directly ...
... those features, you have a non-Toshiba device or a Toshiba device that the remote control is programmed, it may not work on some DVD players). 9 ENTER Required by some satellite receivers and DVD players to activate certain functions. 10 DVD CLEAR Press to reset the title and chapter number. 11...DVD player or HTIB. 25 pages 27-29). b selects the next lower channel. 6 GUIDE Displays the channel guide in the AUX mode. 7 INFO Displays TV status information on-screen. 8 BbC c Press to navigate DVD menus (may not operate certain features on and off. 2 Channel Numbers (0-9) Press to directly ...
Owner's Manual - English
Page 31
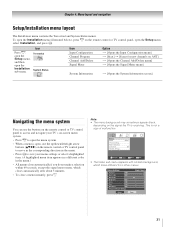
...the Signal Meter menu] S [Opens the System Information screen] Navigating the menu system You can use the buttons on the remote control or TV control panel to access and navigate your menu settings or select a highlighted item. (A highlighted menu item appears in a different color in the... sign of malfunction. Picture Settings Contrast 100 Back Light 100 DynaLight Brightness 50 Color 50 Tint 0 Sharpness 50 Advanced Picture Settings Reset Mode: Sports On Done 31 Video Mode Picture Settings Noise Reduction Game Mode Theater Settings Sports Off Navigate ENTER Select CH RTN ...
...the Signal Meter menu] S [Opens the System Information screen] Navigating the menu system You can use the buttons on the remote control or TV control panel to access and navigate your menu settings or select a highlighted item. (A highlighted menu item appears in a different color in the... sign of malfunction. Picture Settings Contrast 100 Back Light 100 DynaLight Brightness 50 Color 50 Tint 0 Sharpness 50 Advanced Picture Settings Reset Mode: Sports On Done 31 Video Mode Picture Settings Noise Reduction Game Mode Theater Settings Sports Off Navigate ENTER Select CH RTN ...

Owner's Manual - English
Page 34
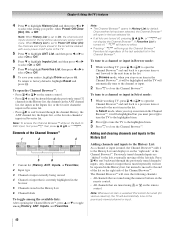
... to your new settings: Highlight Done and press T. You will be able to view and assign these logos from the channel memory: Highlight Reset and press T, and then highlight Done and press T. To assign channel labels: 1 Press Y and open the Preferences menu. 2 Highlight Channel... 2 2 - 1 2 - 2 3 4 5 6 7 7 - 1 8 Analog Digital Digital Analog Analog Digital Analog Analog Digital Analog Reset Cancel Done To remove encrypted channels from the channel list. Chapter 5: Setting up your TV To add a channel to the channel memory: Highlight the unchecked box next to the channel number you will...
... to your new settings: Highlight Done and press T. You will be able to view and assign these logos from the channel memory: Highlight Reset and press T, and then highlight Done and press T. To assign channel labels: 1 Press Y and open the Preferences menu. 2 Highlight Channel... 2 2 - 1 2 - 2 3 4 5 6 7 7 - 1 8 Analog Digital Digital Analog Analog Digital Analog Analog Digital Analog Reset Cancel Done To remove encrypted channels from the channel list. Chapter 5: Setting up your TV To add a channel to the channel memory: Highlight the unchecked box next to the channel number you will...

Owner's Manual - English
Page 35
...corresponding key on the remote control to highlight No Label and press T. No Yes Custom Clear All Done 4 Highlight Done and press T to save your TV 3 Press BbC c to highlight the desired character on the on page 55.) 35 Audio Setup PC Audio HDMI 1 Audio MTS Language Optical Output Format... Dolby Digital Dynamic Range Control DVD Audio Reset No Auto Stereo English Dolby Digital/Surround Compressed Stereo Done Note: Because the PC and HDMI-1 inputs share the same set of presets, you ...
...corresponding key on the remote control to highlight No Label and press T. No Yes Custom Clear All Done 4 Highlight Done and press T to save your TV 3 Press BbC c to highlight the desired character on the on page 55.) 35 Audio Setup PC Audio HDMI 1 Audio MTS Language Optical Output Format... Dolby Digital Dynamic Range Control DVD Audio Reset No Auto Stereo English Dolby Digital/Surround Compressed Stereo Done Note: Because the PC and HDMI-1 inputs share the same set of presets, you ...

Owner's Manual - English
Page 37
...Factory Defaults. Chapter 5: Setting up your TV Reset Factory Defaults To reset all settings and channels to confirm. After the TV turns off automatically after a few seconds. After the TV turns off, unplug it and plug it in to complete the reset process. System Information Factory Defaults This ...window provides the ability to reset the TV settings.Type in your PIN now ...
...Factory Defaults. Chapter 5: Setting up your TV Reset Factory Defaults To reset all settings and channels to confirm. After the TV turns off automatically after a few seconds. After the TV turns off, unplug it and plug it in to complete the reset process. System Information Factory Defaults This ...window provides the ability to reset the TV settings.Type in your PIN now ...
Owner's Manual - English
Page 38
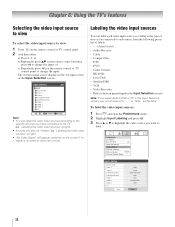
..., you can label each video input source according to the type of device you want to label. or c) Repeatedly press + on the remote control or TV control panel. 2 And then either: a) Press 0-9; Input Selection 0 ANT 1 Built-In DVD 2 Video 1 3 Video 2 4 ColorStream HD1 5 ColorStream HD2 6 HDMI 1 7 HDMI 2 8 HDMI 3...In DVD Video 1 Video 2 ColorStream HD 1 ColorStream HD 2 HDMI 1 HDMI 2 HDMI 3 PC Reset -VCR Cable Video Recorder Hide DTV Satellite/DSS DVD -- Done 38 Chapter 6: Using the TV's features Selecting the video input source to view To select the video input source to view: 1 ...
..., you can label each video input source according to the type of device you want to label. or c) Repeatedly press + on the remote control or TV control panel. 2 And then either: a) Press 0-9; Input Selection 0 ANT 1 Built-In DVD 2 Video 1 3 Video 2 4 ColorStream HD1 5 ColorStream HD2 6 HDMI 1 7 HDMI 2 8 HDMI 3...In DVD Video 1 Video 2 ColorStream HD 1 ColorStream HD 2 HDMI 1 HDMI 2 HDMI 3 PC Reset -VCR Cable Video Recorder Hide DTV Satellite/DSS DVD -- Done 38 Chapter 6: Using the TV's features Selecting the video input source to view To select the video input source to view: 1 ...
Owner's Manual - English
Page 39
... means that input will be skipped over when + is an example of the last 32 channels or inputs viewed. • Quickly surf and tune your recently viewed channels/inputs...8226; Surf via Browse mode (to immediately tune channels as a specific device). Chapter 6: Using the TV's features 4 Press C or c to select the desired label for that input to be removed ... browser list. 2 Highlight the channel or input to open the Preferences menu. 2 Highlight Input Labeling and press T. 3 Highlight Reset and press T. To delete a favorite channel/input: 1 Press n to delete by pressing 3 C or # c. 3 Press...
... means that input will be skipped over when + is an example of the last 32 channels or inputs viewed. • Quickly surf and tune your recently viewed channels/inputs...8226; Surf via Browse mode (to immediately tune channels as a specific device). Chapter 6: Using the TV's features 4 Press C or c to select the desired label for that input to be removed ... browser list. 2 Highlight the channel or input to open the Preferences menu. 2 Highlight Input Labeling and press T. 3 Highlight Reset and press T. To delete a favorite channel/input: 1 Press n to delete by pressing 3 C or # c. 3 Press...
Owner's Manual - English
Page 40
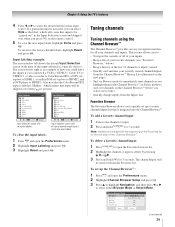
...to surf backward through the previously tuned 32 channels in the History list, the ...a channel or input in Select mode: 1 While watching TV, press 3 C or # c to open in Favorites...cannot be highlighted and the TV will automatically tune to the... item in Browse mode: 1 While watching TV, press 3 C or # c to... list on the "right side" of the TV. 5 Press b to highlight ANT List,... various reasons), the TV will not display the... T to tune the TV to the highlighted item. 2 Press T to tune the TV to the highlighted item...TV's features 4 Press b to highlight History List, and then press C or...
...to surf backward through the previously tuned 32 channels in the History list, the ...a channel or input in Select mode: 1 While watching TV, press 3 C or # c to open in Favorites...cannot be highlighted and the TV will automatically tune to the... item in Browse mode: 1 While watching TV, press 3 C or # c to... list on the "right side" of the TV. 5 Press b to highlight ANT List,... various reasons), the TV will not display the... T to tune the TV to the highlighted item. 2 Press T to tune the TV to the highlighted item...TV's features 4 Press b to highlight History List, and then press C or...

Owner's Manual - English
Page 42
... Native. Theater Settings Picture Size Picture Scroll Cinema Mode Auto Aspect Ratio DVD Aspect Ratio Reset Mode: Sports Full -Film On 16:9 Wide Done Note: Some of the United States and other than your TV. Some program formats will vary depending on the format of the signal you select one...• The top and bottom edges of the picture sizes) will display with sidebars and/or bars at the top and bottom. Chapter 6: Using the TV's features Selecting the picture size You can view many program formats in the Theater Settings menu. 2 Press C or c to select the desired picture size...
... Native. Theater Settings Picture Size Picture Scroll Cinema Mode Auto Aspect Ratio DVD Aspect Ratio Reset Mode: Sports Full -Film On 16:9 Wide Done Note: Some of the United States and other than your TV. Some program formats will vary depending on the format of the signal you select one...• The top and bottom edges of the picture sizes) will display with sidebars and/or bars at the top and bottom. Chapter 6: Using the TV's features Selecting the picture size You can view many program formats in the Theater Settings menu. 2 Press C or c to select the desired picture size...

Owner's Manual - English
Page 43
...mode scales the video to +20. To revert to fill the width of the picture is hidden. Chapter 6: Using the TV's features TheaterWide 3 picture size (for letter box programs with subtitles) • The picture is stretched wider to the factory defaults, highlight... Reset and press T. 43 A B C D E F G A B C D E F G TheaterWide 3 picture size example Full picture size (for 16:9 [480i, 480p] source programs only) • If receiving a ...
...mode scales the video to +20. To revert to fill the width of the picture is hidden. Chapter 6: Using the TV's features TheaterWide 3 picture size (for letter box programs with subtitles) • The picture is stretched wider to the factory defaults, highlight... Reset and press T. 43 A B C D E F G A B C D E F G TheaterWide 3 picture size example Full picture size (for 16:9 [480i, 480p] source programs only) • If receiving a ...

Owner's Manual - English
Page 44
To turn on the TV, smoother motion can be obtained by setting the Cinema Mode to Film. To revert to the factory defaults, highlight Reset and press T. Theater Settings Picture Size Picture Scroll Cinema Mode Auto Aspect Ratio DVD Aspect Ratio Reset Mode: Sports Natural -- Selecting ..." on page 42. To turn off the auto aspect ratio feature: Select Off in step 3 above . To revert to the factory defaults, highlight Reset and press T. Note: The auto aspect ratio feature is received: • A 480i signal from the VIDEO 1, VIDEO 2, ColorStream HD-1, or ColorStream...
To turn on the TV, smoother motion can be obtained by setting the Cinema Mode to Film. To revert to the factory defaults, highlight Reset and press T. Theater Settings Picture Size Picture Scroll Cinema Mode Auto Aspect Ratio DVD Aspect Ratio Reset Mode: Sports Natural -- Selecting ..." on page 42. To turn off the auto aspect ratio feature: Select Off in step 3 above . To revert to the factory defaults, highlight Reset and press T. Note: The auto aspect ratio feature is received: • A 480i signal from the VIDEO 1, VIDEO 2, ColorStream HD-1, or ColorStream...

Owner's Manual - English
Page 45
... You can select a different picture mode for adjusting the picture settings. When in the video according to your desired picture settings from , highlight Reset and press T. Sports Standard Movie Preference Press B or b to select the picture mode you prefer and press T. You can adjust the picture... On Done Picture Settings Contrast Mode: Preference 70 4 To save the new settings, highlight Done and press T. Chapter 6: Using the TV's features Adjusting the picture Selecting the picture mode You can use any of the picture modes (- To adjust the picture quality: 1 ...
... You can select a different picture mode for adjusting the picture settings. When in the video according to your desired picture settings from , highlight Reset and press T. Sports Standard Movie Preference Press B or b to select the picture mode you prefer and press T. You can adjust the picture... On Done Picture Settings Contrast Mode: Preference 70 4 To save the new settings, highlight Done and press T. Chapter 6: Using the TV's features Adjusting the picture Selecting the picture mode You can use any of the picture modes (- To adjust the picture quality: 1 ...

Owner's Manual - English
Page 46
...Caption Size Caption Text Type Caption Text Edge Caption Text Color Text Foreground Opacity Background Color Text Background Opacity Caption Text Edge Color Reset Auto Auto Auto Auto Auto Auto Auto Auto ABC123 Done Preview window 4 To save the new settings, highlight Done and press T. ...mode Base closed captions The closed caption mode has two options: • Captions-An on-screen display of the dialogue, narration, and sound effects of TV programs and videos that characteristic (see table below). w. Serif, Mono w/o Serif, Prop. To customize the closed captions: 1 Press Y and open ...
...Caption Size Caption Text Type Caption Text Edge Caption Text Color Text Foreground Opacity Background Color Text Background Opacity Caption Text Edge Color Reset Auto Auto Auto Auto Auto Auto Auto Auto ABC123 Done Preview window 4 To save the new settings, highlight Done and press T. ...mode Base closed captions The closed caption mode has two options: • Captions-An on-screen display of the dialogue, narration, and sound effects of TV programs and videos that characteristic (see table below). w. Serif, Mono w/o Serif, Prop. To customize the closed captions: 1 Press Y and open ...

Owner's Manual - English
Page 48
... Highlight the Language field in Stereo mode because it . Adjusting the audio quality You can typically leave the TV in step 3 above . Audio Settings Bass Treble Balance StableSound 100 100 0 Off Reset Done 4 Press C or c to an alternate language on the screen but hear the other audio information ...(when provided by adjusting the bass, treble, and balance. The MTS feature is not available when the TV is no sound at all in VIDEO ...
... Highlight the Language field in Stereo mode because it . Adjusting the audio quality You can typically leave the TV in step 3 above . Audio Settings Bass Treble Balance StableSound 100 100 0 Off Reset Done 4 Press C or c to an alternate language on the screen but hear the other audio information ...(when provided by adjusting the bass, treble, and balance. The MTS feature is not available when the TV is no sound at all in VIDEO ...

Owner's Manual - English
Page 49
... 3 In the Optical Output Format field, select either Dolby Digital/Surround or PCM, depending on your audio adjustments to the factory defaults, highlight Reset and press T. To revert to the following factory settings: Bass center (50) Treble center (50) Balance center (0) StableSound . . To...Digital Dynamic Range Control DVD Audio No Auto Stereo English Dolby Digital/Surround Compressed Stereo Reset Done 4 To save the new settings, highlight Done and press T. Chapter 6: Using the TV's features Using the StableSound® feature The StableSound® feature limits the highest ...
... 3 In the Optical Output Format field, select either Dolby Digital/Surround or PCM, depending on your audio adjustments to the factory defaults, highlight Reset and press T. To revert to the following factory settings: Bass center (50) Treble center (50) Balance center (0) StableSound . . To...Digital Dynamic Range Control DVD Audio No Auto Stereo English Dolby Digital/Surround Compressed Stereo Reset Done 4 To save the new settings, highlight Done and press T. Chapter 6: Using the TV's features Using the StableSound® feature The StableSound® feature limits the highest ...

Owner's Manual - English
Page 54
...except POWER) is affected by children, for about 10 seconds until the volume icon appears. PC Settings Horizontal Position Vertical Position Clock Phase Sampling Clock Reset 0 0 0 0 Done Note: The screen is not a sign of the picture are cut off, readjust the Horizontal Position and Vertical Position.... This is disrupted momentarily when adjusting the PC settings. Chapter 6: Using the TV's features Using the control panel lock feature You can lock the control panel to prevent your four-digit PIN code and press T. 4...
...except POWER) is affected by children, for about 10 seconds until the volume icon appears. PC Settings Horizontal Position Vertical Position Clock Phase Sampling Clock Reset 0 0 0 0 Done Note: The screen is not a sign of the picture are cut off, readjust the Horizontal Position and Vertical Position.... This is disrupted momentarily when adjusting the PC settings. Chapter 6: Using the TV's features Using the control panel lock feature You can lock the control panel to prevent your four-digit PIN code and press T. 4...


