Owner's Manual - English
Page 3
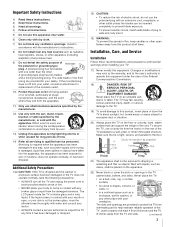
The LCD panel inside the TV contains glass and a toxic liquid. Changes or modifications may fall, causing serious personal injury, death, or serious damage to the TV. 19) To avoid damage to wide slot; Never place the TV on a bed, sofa, rug, or similar surface; • too close to dripping or ... power-supply cord or plug is dropped and the cabinet or enclosure surface has been damaged or the TV does not operate normally, take the following precautions: • ALWAYS turn off the TV and unplug the power cord to avoid possible electric shock or fire. • NEVER allow your body...
The LCD panel inside the TV contains glass and a toxic liquid. Changes or modifications may fall, causing serious personal injury, death, or serious damage to the TV. 19) To avoid damage to wide slot; Never place the TV on a bed, sofa, rug, or similar surface; • too close to dripping or ... power-supply cord or plug is dropped and the cabinet or enclosure surface has been damaged or the TV does not operate normally, take the following precautions: • ALWAYS turn off the TV and unplug the power cord to avoid possible electric shock or fire. • NEVER allow your body...
Owner's Manual - English
Page 4
... objects of any kind into the TV cabinet slots. 32) While it is being turned on the cabinet. When selecting a location for long periods of time. 34) During normal use the TV in contact with a sharp or heavy object. 36) • The LCD screen of this product can accidentally ...ladder or screwdriver) can be regulated due to environmental considerations. Refer all servicing not specified in this manual to a Toshiba Authorized Service Center. 38) If you need to clean the LCD screen, follow the instructions in front of a window. • Never touch, press, or place anything to ...
... objects of any kind into the TV cabinet slots. 32) While it is being turned on the cabinet. When selecting a location for long periods of time. 34) During normal use the TV in contact with a sharp or heavy object. 36) • The LCD screen of this product can accidentally ...ladder or screwdriver) can be regulated due to environmental considerations. Refer all servicing not specified in this manual to a Toshiba Authorized Service Center. 38) If you need to clean the LCD screen, follow the instructions in front of a window. • Never touch, press, or place anything to ...

Owner's Manual - English
Page 5
... to your eyesight. These discs are attached to the wall and the back of the TV as a quilt or blanket. Notes on a warm day. Five screws (continued) 5 To secure the TV in which the heat has just been turned on, or where cold air from an air conditioner falls directly on the included...-up lens inside the DVD player, one of the most crucial internal parts of the DVD player. Safety and Care Information for your LCD TV To Display your LCD TV on the TV. The playback sound may condense on a flat, cushioned surface such as indicated below. In the same way, moisture may skip if the...
... to your eyesight. These discs are attached to the wall and the back of the TV as a quilt or blanket. Notes on a warm day. Five screws (continued) 5 To secure the TV in which the heat has just been turned on, or where cold air from an air conditioner falls directly on the included...-up lens inside the DVD player, one of the most crucial internal parts of the DVD player. Safety and Care Information for your LCD TV To Display your LCD TV on the TV. The playback sound may condense on a flat, cushioned surface such as indicated below. In the same way, moisture may skip if the...

Owner's Manual - English
Page 6
...Structure of television programs, videotapes, DVDs, and other countries, and may subject you to the wall outlet, turn on the TV, remove the disc, and leave the TV on your DVD video disc and you use the DVD player when moisture condensation may be present. Each ...intellectual property rights. patents and other limited viewing uses only unless otherwise authorized by Macrovision, and is prohibited under the Copyright Laws of the TV is assigned a number (the "title number," "chapter number," and "track number," respectively). Using such solvents may cause warping. If...
...Structure of television programs, videotapes, DVDs, and other countries, and may subject you to the wall outlet, turn on the TV, remove the disc, and leave the TV on your DVD video disc and you use the DVD player when moisture condensation may be present. Each ...intellectual property rights. patents and other limited viewing uses only unless otherwise authorized by Macrovision, and is prohibited under the Copyright Laws of the TV is assigned a number (the "title number," "chapter number," and "track number," respectively). Using such solvents may cause warping. If...
Owner's Manual - English
Page 12
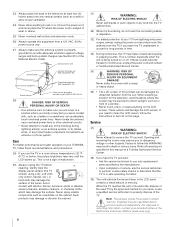
... cause overheating, which will blink until AFTER you cannot turn on the TV. THIS TYPE OF DAMAGE IS NOT COVERED UNDER THE TOSHIBA WARRANTY. 3 Do not plug in any power cords until the TV goes into the TV's channel memory (- page 23). 7 See "Learning about your LCD TV/DVD combination" (- pages 25-29). 9 AFTER connecting all cables...
... cause overheating, which will blink until AFTER you cannot turn on the TV. THIS TYPE OF DAMAGE IS NOT COVERED UNDER THE TOSHIBA WARRANTY. 3 Do not plug in any power cords until the TV goes into the TV's channel memory (- page 23). 7 See "Learning about your LCD TV/DVD combination" (- pages 25-29). 9 AFTER connecting all cables...

Owner's Manual - English
Page 13
... information. 2 Remote sensor - Press to reset the TV. 5 ARROWS BbC c - Insert a playable disc to instantly close an on and off the TV, press and hold the POWER button on -screen, these buttons change the source you cannot turn the TV on -screen menu. 8 CHANNEL Bb - Press to... play a DVD video disc, or other playable disc. 13 SKIP - Press to eject a disc. 15 DVD disc slot - page 33). 9 VOLUME C c - Repeatedly press to turn off . Press to access the ...
... information. 2 Remote sensor - Press to reset the TV. 5 ARROWS BbC c - Insert a playable disc to instantly close an on and off the TV, press and hold the POWER button on -screen, these buttons change the source you cannot turn the TV on -screen menu. 8 CHANNEL Bb - Press to... play a DVD video disc, or other playable disc. 13 SKIP - Press to eject a disc. 15 DVD disc slot - page 33). 9 VOLUME C c - Repeatedly press to turn off . Press to access the ...

Owner's Manual - English
Page 16
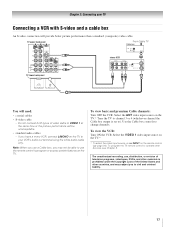
... under the Copyright Laws of the standard video cable. Select the VIDEO 1 video input source on the TV.* * To select the video input source, press INPUT on the TV.* To view the VCR: Turn ON the VCR. For better picture performance, if your VCR's audio out terminal using the white audio ...cable only. Chapter 2: Connecting your TV Connecting a VCR and antenna or Cable TV (no Cable box) TV upper back panel From Cable TV or antenna Stereo VCR ...
... under the Copyright Laws of the standard video cable. Select the VIDEO 1 video input source on the TV.* * To select the video input source, press INPUT on the TV.* To view the VCR: Turn ON the VCR. For better picture performance, if your VCR's audio out terminal using the white audio ...cable only. Chapter 2: Connecting your TV Connecting a VCR and antenna or Cable TV (no Cable box) TV upper back panel From Cable TV or antenna Stereo VCR ...
Owner's Manual - English
Page 17
...VCR VIDEO AUDIO L R IN CH 3 CH 4 OUT L R IN from ANT OUT to change channels. To view the VCR: Turn ON the VCR. page 24). Use the Cable box controls to TV You will provide better picture performance than a standard (composite) video cable. To view basic and premium Cable channels...: Turn OFF the VCR. Select the VIDEO 1 video input source on the TV.* * To select the video input source, press INPUT on the TV.* Tune the TV to ). Select the ANT video input source on the remote control (- To ...
...VCR VIDEO AUDIO L R IN CH 3 CH 4 OUT L R IN from ANT OUT to change channels. To view the VCR: Turn ON the VCR. page 24). Use the Cable box controls to TV You will provide better picture performance than a standard (composite) video cable. To view basic and premium Cable channels...: Turn OFF the VCR. Select the VIDEO 1 video input source on the TV.* * To select the video input source, press INPUT on the TV.* Tune the TV to ). Select the ANT video input source on the remote control (- To ...
Owner's Manual - English
Page 18
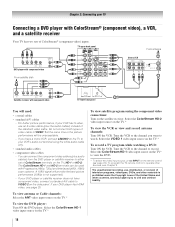
... supported). - To view antenna or Cable channels: Select the ANT video input source on the TV.* To view the VCR or view and record antenna channels: Turn ON the VCR. To program the TV remote control to civil and criminal liability. 18 The ColorStream HD-1 and HD-2 terminals can connect...video cables (plus the audio cables) instead of ColorStream terminals on the TV.* To record a TV program while watching a DVD: Turn ON the VCR. Select the ColorStream HD-2 video input source on the TV.* To view the DVD player: Turn ON the DVD player. Tune the VCR to the channel to either set...
... supported). - To view antenna or Cable channels: Select the ANT video input source on the TV.* To view the VCR or view and record antenna channels: Turn ON the VCR. To program the TV remote control to civil and criminal liability. 18 The ColorStream HD-1 and HD-2 terminals can connect...video cables (plus the audio cables) instead of ColorStream terminals on the TV.* To record a TV program while watching a DVD: Turn ON the VCR. Select the ColorStream HD-2 video input source on the TV.* To view the DVD player: Turn ON the DVD player. Tune the VCR to the channel to either set...
Owner's Manual - English
Page 20
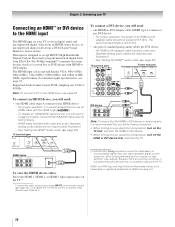
...that the HDMI or DVI device is reset properly, it is possible that you follow these procedures: • When turning on your electronic components, turn off your TV receives digital audio and uncompressed digital video from an HDMI source device, or uncompressed digital video from EIA/CEA-861-... DVI device, you will need: • one HDMI cable (type A connector) per DVI device - Supported Audio format: Linear PCM, sampling rate 32/44.1/ 48 kHz Note: To connect a PC to -DVI adapter cable transfers video only. Conventional HDMI/DVI cable may not operate properly with the ...
...that the HDMI or DVI device is reset properly, it is possible that you follow these procedures: • When turning on your electronic components, turn off your TV receives digital audio and uncompressed digital video from an HDMI source device, or uncompressed digital video from EIA/CEA-861-... DVI device, you will need: • one HDMI cable (type A connector) per DVI device - Supported Audio format: Linear PCM, sampling rate 32/44.1/ 48 kHz Note: To connect a PC to -DVI adapter cable transfers video only. Conventional HDMI/DVI cable may not operate properly with the ...
Owner's Manual - English
Page 21
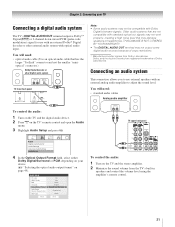
.... You will need : • standard audio cables Analog audio amplifier To control the audio: 1 Turn on the TV and the digital audio device. 2 Press Y on your TV Connecting a digital audio system The TV's DIGITAL AUDIO OUT terminal outputs a Dolby®* Digital g or 2-channel down-mixed PCM (pulse-code...Format Dolby Digital Dynamic Range Control DVD Audio Reset No Auto Stereo English Dolby Digital/Surround Compressed Stereo Done To control the audio: 1 Turn on page 49). You will need : • optical audio cable (Use an optical audio cable that has the larger "TosLink" connector...
.... You will need : • standard audio cables Analog audio amplifier To control the audio: 1 Turn on the TV and the digital audio device. 2 Press Y on your TV Connecting a digital audio system The TV's DIGITAL AUDIO OUT terminal outputs a Dolby®* Digital g or 2-channel down-mixed PCM (pulse-code...Format Dolby Digital Dynamic Range Control DVD Audio Reset No Auto Stereo English Dolby Digital/Surround Compressed Stereo Done To control the audio: 1 Turn on page 49). You will need : • optical audio cable (Use an optical audio cable that has the larger "TosLink" connector...

Owner's Manual - English
Page 24
...functions, see "Arrow buttons.") 15 Arrow buttons (BbC c) When a menu is on-screen, these buttons open the Channel Browser™ and tune to control the TV. The = button is on-screen (- page 38). 7 CH Bb cycles through the picture sizes: Natural, TheaterWide 1/2/3, Full, 4:3 HD, and Native (page ...2 modes (- page 56). 11 CH RTN returns to edit the Favorites List (- page 25). page 41). 12 MUTE reduces or turns off . Set to "TV" to the previous/next channel in the Channel Brower™ (- Chapter 3: Using the remote control Learning about the remote control The ...
...functions, see "Arrow buttons.") 15 Arrow buttons (BbC c) When a menu is on-screen, these buttons open the Channel Browser™ and tune to control the TV. The = button is on-screen (- page 38). 7 CH Bb cycles through the picture sizes: Natural, TheaterWide 1/2/3, Full, 4:3 HD, and Native (page ...2 modes (- page 56). 11 CH RTN returns to edit the Favorites List (- page 25). page 41). 12 MUTE reduces or turns off . Set to "TV" to the previous/next channel in the Channel Brower™ (- Chapter 3: Using the remote control Learning about the remote control The ...

Owner's Manual - English
Page 25
... programmed into the channel memory (- "CABLE/SAT" to control the TV; Point the remote control directly at the device. 16 17 18 19 1 POWER Turns the selected device on any other devices. Note: Even after the TV remote control is not preprogrammed to operate, you must first program the... remote control to recognize the device (if you have a non-Toshiba device or a Toshiba device that the remote control is programmed...
... programmed into the channel memory (- "CABLE/SAT" to control the TV; Point the remote control directly at the device. 16 17 18 19 1 POWER Turns the selected device on any other devices. Note: Even after the TV remote control is not preprogrammed to operate, you must first program the... remote control to recognize the device (if you have a non-Toshiba device or a Toshiba device that the remote control is programmed...

Owner's Manual - English
Page 27
...confirm that works. 2 Set the MODE SELECT switch to operate - To program your device. For details on the TV remote control operate your TV remote control to operate a non-Toshiba device (or a Toshiba device that it , and press p. If more than one that all listed codes, the necessary keys do not ..., point the remote control at it is listed, try each one separately until you find the code for your device. 4 To test the code, turn off. • If the device does not respond, repeat steps 1-4 using another code, you will need to use the device's original remote control....
...confirm that works. 2 Set the MODE SELECT switch to operate - To program your device. For details on the TV remote control operate your TV remote control to operate a non-Toshiba device (or a Toshiba device that it , and press p. If more than one that all listed codes, the necessary keys do not ..., point the remote control at it is listed, try each one separately until you find the code for your device. 4 To test the code, turn off. • If the device does not respond, repeat steps 1-4 using another code, you will need to use the device's original remote control....

Owner's Manual - English
Page 37
... 3 Open the System Status menu, highlight System Information, and press T. 4 Press C c to scroll through the menu bar to select Factory Defaults. After the TV turns off automatically after a few seconds. No Yes To cancel the reset: Highlight No and press T. 37 Chapter 5: Setting up your PIN now (or "0000"... if no PIN code has been set of Installation menu icons will turn off , unplug it and plug it in your TV Reset Factory Defaults To reset all settings and channels to their factory default values: 1 Press Y and open the Setup menu. ...
... 3 Open the System Status menu, highlight System Information, and press T. 4 Press C c to scroll through the menu bar to select Factory Defaults. After the TV turns off automatically after a few seconds. No Yes To cancel the reset: Highlight No and press T. 37 Chapter 5: Setting up your PIN now (or "0000"... if no PIN code has been set of Installation menu icons will turn off , unplug it and plug it in your TV Reset Factory Defaults To reset all settings and channels to their factory default values: 1 Press Y and open the Setup menu. ...
Owner's Manual - English
Page 40
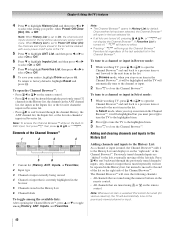
...< or , on the remote control. • Press 3 C to surf backward through the previously tuned 32 channels in the History list, the channels in the ANT channel list, the inputs in the Inputs list...8482;, press B or b to the previously viewed channel or input. 40 Previously tuned channels/inputs are turned off cycle. Note: When History List is set to select On or Off. 8 To save your... Press O to close the Channel Browser™. To tune to a channel or input in Browse mode: 1 While watching TV, press 3 C or # c to open the Channel Browser™ and surf back to a previous item or forward ...
...< or , on the remote control. • Press 3 C to surf backward through the previously tuned 32 channels in the History list, the channels in the ANT channel list, the inputs in the Inputs list...8482;, press B or b to the previously viewed channel or input. 40 Previously tuned channels/inputs are turned off cycle. Note: When History List is set to select On or Off. 8 To save your... Press O to close the Channel Browser™. To tune to a channel or input in Browse mode: 1 While watching TV, press 3 C or # c to open the Channel Browser™ and surf back to a previous item or forward ...

Owner's Manual - English
Page 41
...a non-antenna input, the TV will return to the last-viewed input. Tuning digital channels: Press the Channel Number (0-9) on configuring the antenna input. • Once 32 channels or inputs are tuned. page 33) or the channel add/ delete function (- Note: See page 32 for details on the remote ... the Channel Number (0-9) on the remote control. Note: If a digital channel is set to "Power Off Clear (On)," turning off the TV will clear the History List. The TV will return to the channel you press R from the History List: • Reconfiguring the ANT input will clear the History ...
...a non-antenna input, the TV will return to the last-viewed input. Tuning digital channels: Press the Channel Number (0-9) on configuring the antenna input. • Once 32 channels or inputs are tuned. page 33) or the channel add/ delete function (- Note: See page 32 for details on the remote ... the Channel Number (0-9) on the remote control. Note: If a digital channel is set to "Power Off Clear (On)," turning off the TV will clear the History List. The TV will return to the channel you press R from the History List: • Reconfiguring the ANT input will clear the History ...

Owner's Manual - English
Page 44
... video), or HDMI inputs on page 42. Theater Settings Picture Size Picture Scroll Cinema Mode Auto Aspect Ratio DVD Aspect Ratio Mode: Sports Natural -- To turn on the auto aspect ratio feature: 1 Press Y and open the Video menu. 2 Highlight Theater Settings and press T. 3 In the Cinema Mode field,... and press T. Film On 16:9 Wide Reset Done 4 To save the new settings, highlight Done and press T. To set to On, the TV will automatically select the picture size when one of Automatic aspect size (automatically signal source selected when Auto Aspect is On) 4:3 normal Natural (with ...
... video), or HDMI inputs on page 42. Theater Settings Picture Size Picture Scroll Cinema Mode Auto Aspect Ratio DVD Aspect Ratio Mode: Sports Natural -- To turn on the auto aspect ratio feature: 1 Press Y and open the Video menu. 2 Highlight Theater Settings and press T. 3 In the Cinema Mode field,... and press T. Film On 16:9 Wide Reset Done 4 To save the new settings, highlight Done and press T. To set to On, the TV will automatically select the picture size when one of Automatic aspect size (automatically signal source selected when Auto Aspect is On) 4:3 normal Natural (with ...

Owner's Manual - English
Page 46
...and then press C or c to select the format for digital channels only. • You cannot set the Base CC Mode to Off. • To turn off the closed caption mode: Select Off in step 3 above. 46 Note: A closed caption signal may appear on screen. To customize the closed captions: ..., Black, White, Red, Green, Blue, Yellow, Magenta, Cyan w. To revert to the factory defaults, highlight Reset and press T. Chapter 6: Using the TV's features Using the closed caption mode Base closed captions The closed caption mode has two options: • Captions-An on-screen display of the dialogue...
...and then press C or c to select the format for digital channels only. • You cannot set the Base CC Mode to Off. • To turn off the closed caption mode: Select Off in step 3 above. 46 Note: A closed caption signal may appear on screen. To customize the closed captions: ..., Black, White, Red, Green, Blue, Yellow, Magenta, Cyan w. To revert to the factory defaults, highlight Reset and press T. Chapter 6: Using the TV's features Using the closed caption mode Base closed captions The closed caption mode has two options: • Captions-An on-screen display of the dialogue...

Owner's Manual - English
Page 47
... Audio Selector Audio Settings Advanced Audio Settings Audio Setup 3 Press B or b to select Audio, and then press C or c to partially reduce (1/2 MUTE) or turn off (MUTE) the sound. However, once you select "MUTE" mode, the closed caption feature, use the CC Selector to temporarily override the default analog caption... current Base CC Mode setting. This temporarily overrides the audio track chosen by the language option under Audio Setup (- Chapter 6: Using the TV's features CC Selector You can use Z to set the volume to 0. Closed Caption Audio CC 1 None 47
... Audio Selector Audio Settings Advanced Audio Settings Audio Setup 3 Press B or b to select Audio, and then press C or c to partially reduce (1/2 MUTE) or turn off (MUTE) the sound. However, once you select "MUTE" mode, the closed caption feature, use the CC Selector to temporarily override the default analog caption... current Base CC Mode setting. This temporarily overrides the audio track chosen by the language option under Audio Setup (- Chapter 6: Using the TV's features CC Selector You can use Z to set the volume to 0. Closed Caption Audio CC 1 None 47

