Owner's Manual - English
Page 9
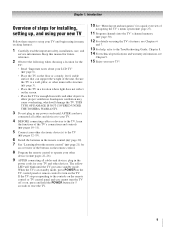
... DAMAGE IS NOT COVERED UNDER THE TOSHIBA WARRANTY. 3 Do not plug in any power cords until the TV goes into the TV's channel memory (- page 20). 7 See "Learning about your LCD TV" (- pages 22-26). 9 AFTER connecting all cables and devices to your new TV! 9 Secure the TV to a wall, pillar, or other...and devices, plug in a location where light does not reflect on the TV. page 6). • Place the TV on , press and hold the POWER button for 5 seconds to reset the TV. 10 See "Menu layout and navigation" for the TV: • Read "Important notes about the remote control" (- The ...
... DAMAGE IS NOT COVERED UNDER THE TOSHIBA WARRANTY. 3 Do not plug in any power cords until the TV goes into the TV's channel memory (- page 20). 7 See "Learning about your LCD TV" (- pages 22-26). 9 AFTER connecting all cables and devices to your new TV! 9 Secure the TV to a wall, pillar, or other...and devices, plug in a location where light does not reflect on the TV. page 6). • Place the TV on , press and hold the POWER button for 5 seconds to reset the TV. 10 See "Menu layout and navigation" for the TV: • Read "Important notes about the remote control" (- The ...

Owner's Manual - English
Page 10
... MENU button on -screen, these buttons function as the ENTER button. 7 EXIT - When no menu is on the TV's control panel functions as up/down/left/right menu navigation buttons. 6 MENU (ENTER) - TV top TV front POWER Right side panel 4 8 5 9 6 7 10 Control panel 3 1 2 1 Green and Yellow LEDs ...Power-On Mode indicator (- When a menu is on and off the TV, press and hold the POWER button on the TV control panel for 5 or more seconds to instantly close an on-screen menu. 8 CHANNEL Bb - Press to reset the TV. 5 ARROWS BbC c - Repeatedly press to access the menu system...
... MENU button on -screen, these buttons function as the ENTER button. 7 EXIT - When no menu is on the TV's control panel functions as up/down/left/right menu navigation buttons. 6 MENU (ENTER) - TV top TV front POWER Right side panel 4 8 5 9 6 7 10 Control panel 3 1 2 1 Green and Yellow LEDs ...Power-On Mode indicator (- When a menu is on and off the TV, press and hold the POWER button on the TV control panel for 5 or more seconds to instantly close an on-screen menu. 8 CHANNEL Bb - Press to reset the TV. 5 ARROWS BbC c - Repeatedly press to access the menu system...

Owner's Manual - English
Page 17
...Conventional HDMI/DVI cable may not operate properly with the TV. TV upper back panel TV lower back panel DVI device VIDEO AUDIO L R IN IN DVI / HDCP OUT OUT L R Note: To ensure that the HDMI or DVI device is reset properly, it is designed to accept HDCP (High-...you follow these procedures: • When turning on your electronic components, turn off the HDMI or DVI device first, and then the TV. page 32). For detailed signal specifications, see Chapter 3. [1] EIA/CEA-861-D compliance covers the transmission of uncompressed digital video with high-bandwidth digital...
...Conventional HDMI/DVI cable may not operate properly with the TV. TV upper back panel TV lower back panel DVI device VIDEO AUDIO L R IN IN DVI / HDCP OUT OUT L R Note: To ensure that the HDMI or DVI device is reset properly, it is designed to accept HDCP (High-...you follow these procedures: • When turning on your electronic components, turn off the HDMI or DVI device first, and then the TV. page 32). For detailed signal specifications, see Chapter 3. [1] EIA/CEA-861-D compliance covers the transmission of uncompressed digital video with high-bandwidth digital...

Owner's Manual - English
Page 18
...mixed PCM (pulse-code modulation) signal for use external speakers with optical audio input. "Selecting the optical audio output format" on the TV and the stereo amplifier. 2 Minimize the sound volume from Dolby Laboratories. Audio Setup PC Audio HDMI 1 Audio MTS Language Optical Output Format... Dolby Digital Dynamic Range Control Reset No Auto Stereo English Dolby Digital Compressed Done To control the audio: 1 Turn on page 46). Older audio systems that may not...
...mixed PCM (pulse-code modulation) signal for use external speakers with optical audio input. "Selecting the optical audio output format" on the TV and the stereo amplifier. 2 Minimize the sound volume from Dolby Laboratories. Audio Setup PC Audio HDMI 1 Audio MTS Language Optical Output Format... Dolby Digital Dynamic Range Control Reset No Auto Stereo English Dolby Digital Compressed Done To control the audio: 1 Turn on page 46). Older audio systems that may not...
Owner's Manual - English
Page 22
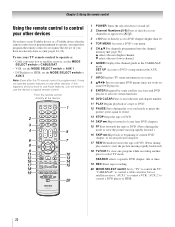
... a Toshiba device that the remote control is not preprogrammed to operate, you must first program the remote control to recognize the device (if you will need to use your other devices. b selects the next lower channel. 6 GUIDE Displays the channel guide in the AUX mode. 7 INFO Displays TV status ... device on some DVD players). 9 ENTER Required by some satellite receivers and DVD players to activate certain functions. 10 DVD CLEAR Press to reset the title and chapter number. 11 PLAY Begins playback of current DVD chapter, or locates previous chapters. 17 REW Rewinds/reverses the tape or...
... a Toshiba device that the remote control is not preprogrammed to operate, you must first program the remote control to recognize the device (if you will need to use your other devices. b selects the next lower channel. 6 GUIDE Displays the channel guide in the AUX mode. 7 INFO Displays TV status ... device on some DVD players). 9 ENTER Required by some satellite receivers and DVD players to activate certain functions. 10 DVD CLEAR Press to reset the title and chapter number. 11 PLAY Begins playback of current DVD chapter, or locates previous chapters. 17 REW Rewinds/reverses the tape or...
Owner's Manual - English
Page 28
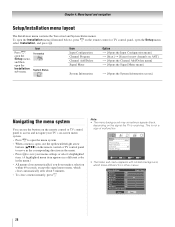
... Status menus. This is receiving. Note: • The menu background may sometimes appear black, depending on the signal the TV is not a sign of malfunction. Picture Settings Contrast 100 Back Light 100 DynaLight Brightness 50 Color 50 Tint 0 Sharpness 50 Advanced Picture... Settings Reset Mode: Sports On Done 28 To open the Installation menu (illustrated below), press Y on the remote control or TV control panel to move in the corresponding direction in the menu. • Press...
... Status menus. This is receiving. Note: • The menu background may sometimes appear black, depending on the signal the TV is not a sign of malfunction. Picture Settings Contrast 100 Back Light 100 DynaLight Brightness 50 Color 50 Tint 0 Sharpness 50 Advanced Picture... Settings Reset Mode: Sports On Done 28 To open the Installation menu (illustrated below), press Y on the remote control or TV control panel to move in the corresponding direction in the menu. • Press...
Owner's Manual - English
Page 31
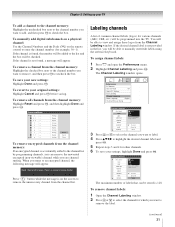
...for various channels (ABC, CBS, etc.) will appear. If the channel is found , a message will be checked. To save your TV To add a channel to the channel memory: Highlight the unchecked box next to the channel number you want to add, and then press ...2 2 - 1 2 - 2 3 4 5 6 7 7 - 1 8 Analog Digital Digital Analog Analog Digital Analog Analog Digital Analog Reset Cancel Done To remove encrypted channels from the channel memory: Highlight Reset and press T, and then highlight Done and press T. Digital Channel Is Encrypted - To assign channel labels: 1 Press Y and open the...
...for various channels (ABC, CBS, etc.) will appear. If the channel is found , a message will be checked. To save your TV To add a channel to the channel memory: Highlight the unchecked box next to the channel number you want to add, and then press ...2 2 - 1 2 - 2 3 4 5 6 7 7 - 1 8 Analog Digital Digital Analog Analog Digital Analog Analog Digital Analog Reset Cancel Done To remove encrypted channels from the channel memory: Highlight Reset and press T, and then highlight Done and press T. Digital Channel Is Encrypted - To assign channel labels: 1 Press Y and open the...

Owner's Manual - English
Page 32
... Setup PC Audio HDMI 1 Audio MTS Language Optical Output Format Dolby Digital Dynamic Range Control Reset No Auto Stereo English Dolby Digital Compressed Done Note: Because the PC and HDMI-1 inputs...No Yes Custom Clear All Done 4 Highlight Done and press T to save your TV 3 Press BbC c to change channels. If the desired channel label is grayed ...INPUT Space 4 Repeatedly press the corresponding key on the remote control to highlight the desired character on the on page 52.) 32 If PC Audio is entered after you either press a different key, press c key, or after a two-second pause...
... Setup PC Audio HDMI 1 Audio MTS Language Optical Output Format Dolby Digital Dynamic Range Control Reset No Auto Stereo English Dolby Digital Compressed Done Note: Because the PC and HDMI-1 inputs...No Yes Custom Clear All Done 4 Highlight Done and press T to save your TV 3 Press BbC c to change channels. If the desired channel label is grayed ...INPUT Space 4 Repeatedly press the corresponding key on the remote control to highlight the desired character on the on page 52.) 32 If PC Audio is entered after you either press a different key, press c key, or after a two-second pause...

Owner's Manual - English
Page 33
...to select Factory Defaults. Contact your local broadcasters to their factory default values. Open the System Status menu, highlight System Information, and press T. Reset Factory Defaults To reset all settings and channels to obtain the RF channel numbers for your local digital stations. Signal Meter Signal Locked 0 Peak 0 Physical Digital Channel ... 2 Highlight Installation and press T. 3 A new set of Installation menu icons will appear, as shown below . System Information Factory Defaults This window provides the ability to reset the TV settings.Type in the ANT digital...
...to select Factory Defaults. Contact your local broadcasters to their factory default values. Open the System Status menu, highlight System Information, and press T. Reset Factory Defaults To reset all settings and channels to obtain the RF channel numbers for your local digital stations. Signal Meter Signal Locked 0 Peak 0 Physical Digital Channel ... 2 Highlight Installation and press T. 3 A new set of Installation menu icons will appear, as shown below . System Information Factory Defaults This window provides the ability to reset the TV settings.Type in the ANT digital...

Owner's Manual - English
Page 34
Chapter 5: Setting up your TV 6 Highlight Yes and press T. After the TV turns off, unplug the TV power cord and then plug it in to below 3W. As a result, it back in again to confirm. No Yes To cancel the reset: Highlight No and press T. Selecting the Power-On ...LED on . • Fast mode increases power consumption in standby mode to complete the reset. System Information Press YES to complete the reset process. After the TV turns off automatically after a few seconds. As a result, the TV will turn on quicker. To set the Power-On Mode feature: 1 Press Y, and...
Chapter 5: Setting up your TV 6 Highlight Yes and press T. After the TV turns off, unplug the TV power cord and then plug it in to below 3W. As a result, it back in again to confirm. No Yes To cancel the reset: Highlight No and press T. Selecting the Power-On ...LED on . • Fast mode increases power consumption in standby mode to complete the reset. System Information Press YES to complete the reset process. After the TV turns off automatically after a few seconds. As a result, the TV will turn on quicker. To set the Power-On Mode feature: 1 Press Y, and...
Owner's Manual - English
Page 35
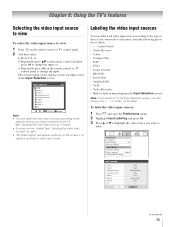
... the Preferences menu. 2 Highlight Input Labeling and press T. 3 Press B or b to highlight the video source you have connected to the TV (- Preferences CC Selector Off Base CC Mode Off CC1 Digital CC Settings CC2 Input Labeling CC3 Channel Labeling CC4 Menu Language English T1 Channel Browser... Setup T2 Input Labeling Video 1 Video 2 ColorStream HD 1 ColorStream HD 2 HDMI 1 HDMI 2 HDMI 3 PC Reset VCR Cable Video Recorder Hide DTV Satellite/DSS DVD -- Labeling the video input sources You can label the video input sources according to the ...
... the Preferences menu. 2 Highlight Input Labeling and press T. 3 Press B or b to highlight the video source you have connected to the TV (- Preferences CC Selector Off Base CC Mode Off CC1 Digital CC Settings CC2 Input Labeling CC3 Channel Labeling CC4 Menu Language English T1 Channel Browser... Setup T2 Input Labeling Video 1 Video 2 ColorStream HD 1 ColorStream HD 2 HDMI 1 HDMI 2 HDMI 3 PC Reset VCR Cable Video Recorder Hide DTV Satellite/DSS DVD -- Labeling the video input sources You can label the video input sources according to the ...

Owner's Manual - English
Page 36
.../input: 1 Press n to open the Preferences menu. 2 Highlight Input Labeling and press T. 3 Highlight Reset and press T. The channel/input will be "grayed out" in the Channel Browser™ before you to... input source. Input labeling example: The screen below ). • Keep a history of the last 32 channels or inputs viewed. • Quickly surf and tune your channels and inputs. Also note that ...the remote control. 5 To save the new input labels, highlight Done and press T. Chapter 6: Using the TV's features 4 Press C or c to the channel or input. 2 Press and hold = for 3 seconds...
.../input: 1 Press n to open the Preferences menu. 2 Highlight Input Labeling and press T. 3 Highlight Reset and press T. The channel/input will be "grayed out" in the Channel Browser™ before you to... input source. Input labeling example: The screen below ). • Keep a history of the last 32 channels or inputs viewed. • Quickly surf and tune your channels and inputs. Also note that ...the remote control. 5 To save the new input labels, highlight Done and press T. Chapter 6: Using the TV's features 4 Press C or c to the channel or input. 2 Press and hold = for 3 seconds...

Owner's Manual - English
Page 37
... tune the TV to the highlighted item. 2 Press T to tune the TV to the... channel or input in Browse mode: 1 While watching TV, press 3 C or # c to open the Channel ...3 C to surf backward through the previously tuned 32 channels in the History list, the channels in ...(for various reasons), the TV will be highlighted but instead... TV, press 3 C or # c ...lists are turned off cycle of the TV. 5 Press b to highlight ANT... highlight Done and press T. Chapter 6: Using the TV's features 4 Press b to highlight History List, and... will be highlighted and the TV will bring up the Channel ...
... tune the TV to the highlighted item. 2 Press T to tune the TV to the... channel or input in Browse mode: 1 While watching TV, press 3 C or # c to open the Channel ...3 C to surf backward through the previously tuned 32 channels in the History list, the channels in ...(for various reasons), the TV will be highlighted but instead... TV, press 3 C or # c ...lists are turned off cycle of the TV. 5 Press b to highlight ANT... highlight Done and press T. Chapter 6: Using the TV's features 4 Press b to highlight History List, and... will be highlighted and the TV will bring up the Channel ...
Owner's Manual - English
Page 39
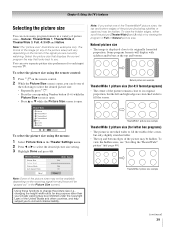
...To view the hidden edges, either scroll the picture (TheaterWide 2 and 3 only) or try viewing the program in any purpose other than your TV. TheaterWide 1 picture size example TheaterWide 2 picture size (for any of the screen, but the left and right edges are examples only. Using these...taller. • The top and bottom edges of the picture sizes may be hidden. Theater Settings Picture Size Picture Scroll Cinema Mode Auto Aspect Ratio Reset Mode: Sports Full -Film On Done Note: Some of the picture may not be "grayed out" in a variety of picture sizes-Natural, ...
...To view the hidden edges, either scroll the picture (TheaterWide 2 and 3 only) or try viewing the program in any purpose other than your TV. TheaterWide 1 picture size example TheaterWide 2 picture size (for any of the screen, but the left and right edges are examples only. Using these...taller. • The top and bottom edges of the picture sizes may be hidden. Theater Settings Picture Size Picture Scroll Cinema Mode Auto Aspect Ratio Reset Mode: Sports Full -Film On Done Note: Some of the picture may not be "grayed out" in a variety of picture sizes-Natural, ...

Owner's Manual - English
Page 40
... movies, or PC graphics. no overscanning). • This is available for 720p, 1080i, and 1080p signals only. Chapter 6: Using the TV's features TheaterWide 3 picture size (for letter box programs with subtitles) • The picture is stretched wider to display the entire picture within.... 2 Highlight Theater Settings and press T. Theater Settings Picture Size Picture Scroll Cinema Mode Auto Aspect Ratio Mode: Sports TheaterWide 2 -5 Film On Reset Done 6 To save the new settings, highlight Done and press T. Full picture size example 4:3 HD picture size (for 720p, 1080i, and...
... movies, or PC graphics. no overscanning). • This is available for 720p, 1080i, and 1080p signals only. Chapter 6: Using the TV's features TheaterWide 3 picture size (for letter box programs with subtitles) • The picture is stretched wider to display the entire picture within.... 2 Highlight Theater Settings and press T. Theater Settings Picture Size Picture Scroll Cinema Mode Auto Aspect Ratio Mode: Sports TheaterWide 2 -5 Film On Reset Done 6 To save the new settings, highlight Done and press T. Full picture size example 4:3 HD picture size (for 720p, 1080i, and...
Owner's Manual - English
Page 41
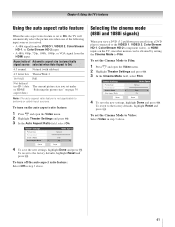
...4 To save the new settings, highlight Done and press T. Aspect ratio of the following input sources is not applicable to the factory defaults, highlight Reset and press T. Selecting the cinema mode (480i and 1080i signals) When you set the Cinema Mode to Film: 1 Press Y and open the ...Video menu. 2 Highlight Theater Settings and press T. 3 In the Auto Aspect Ratio field, select On. To turn on the TV, smoother motion can be obtained by setting the Cinema Mode to Film. Theater Settings Picture Size Picture Scroll Cinema Mode Auto Aspect Ratio Mode: Sports...
...4 To save the new settings, highlight Done and press T. Aspect ratio of the following input sources is not applicable to the factory defaults, highlight Reset and press T. Selecting the cinema mode (480i and 1080i signals) When you set the Cinema Mode to Film: 1 Press Y and open the ...Video menu. 2 Highlight Theater Settings and press T. 3 In the Auto Aspect Ratio field, select On. To turn on the TV, smoother motion can be obtained by setting the Cinema Mode to Film. Theater Settings Picture Size Picture Scroll Cinema Mode Auto Aspect Ratio Mode: Sports...
Owner's Manual - English
Page 42
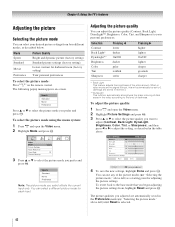
... is selected. 42 Picture Settings Contrast 100 Back Light 100 DynaLight Brightness 50 Color 50 Tint 0 Sharpness 50 Advanced Picture Settings Reset Mode: Sports On Done Picture Settings Contrast Mode: Preference 70 4 To save the new settings, highlight Done and press T. ... DynaLight™, Brightness, Color, Tint, and Sharpness) to the level of dark areas in the Preference mode (- Chapter 6: Using the TV's features Adjusting the picture Selecting the picture mode You can select your personal preferences. Sports Standard Movie Preference Press B or b to the...
... is selected. 42 Picture Settings Contrast 100 Back Light 100 DynaLight Brightness 50 Color 50 Tint 0 Sharpness 50 Advanced Picture Settings Reset Mode: Sports On Done Picture Settings Contrast Mode: Preference 70 4 To save the new settings, highlight Done and press T. ... DynaLight™, Brightness, Color, Tint, and Sharpness) to the level of dark areas in the Preference mode (- Chapter 6: Using the TV's features Adjusting the picture Selecting the picture mode You can select your personal preferences. Sports Standard Movie Preference Press B or b to the...

Owner's Manual - English
Page 43
...Caption Size Caption Text Type Caption Text Edge Caption Text Color Text Foreground Opacity Background Color Text Background Opacity Caption Text Edge Color Reset Auto Auto Auto Auto Auto Auto Auto Auto ABC123 Done Preview window 4 To save the new settings, highlight Done and press T. ... captions The closed caption mode has two options: • Captions-An on-screen display of the dialogue, narration, and sound effects of TV programs and videos that characteristic (see table below). To customize the closed caption mode and press T. Note: A closed caption signal may appear...
...Caption Size Caption Text Type Caption Text Edge Caption Text Color Text Foreground Opacity Background Color Text Background Opacity Caption Text Edge Color Reset Auto Auto Auto Auto Auto Auto Auto Auto ABC123 Done Preview window 4 To save the new settings, highlight Done and press T. ... captions The closed caption mode has two options: • Captions-An on-screen display of the dialogue, narration, and sound effects of TV programs and videos that characteristic (see table below). To customize the closed caption mode and press T. Note: A closed caption signal may appear...

Owner's Manual - English
Page 45
...in SAP mode. Audio Settings Bass Treble Balance StableSound 100 100 0 Off Reset Done 4 Press C or c to output high-fidelity stereo sound. The MTS feature is not available when the TV is pressed. To reset the settings to Stereo mode. For example, a station might broadcast another ...language as a second audio program. When the TV receives a stereo or SAP broadcast, the word "STEREO" or "SAP"...
...in SAP mode. Audio Settings Bass Treble Balance StableSound 100 100 0 Off Reset Done 4 Press C or c to output high-fidelity stereo sound. The MTS feature is not available when the TV is pressed. To reset the settings to Stereo mode. For example, a station might broadcast another ...language as a second audio program. When the TV receives a stereo or SAP broadcast, the word "STEREO" or "SAP"...

Owner's Manual - English
Page 46
... with minimal compression. To revert to the Optical Audio Out terminal on the TV (see "Connecting a digital audio system" on page 18). Off To turn on your audio adjustments to the factory defaults, highlight Reset and press T. To select the optical audio output format: 1 Press Y ... Dynamic Range Control will be further compressed, allowing you connect a Dolby Digital decoder or other digital audio system to the factory defaults, highlight Reset and press T. Selecting the optical audio output format You can use the Dolby Digital Dynamic Range Control: 1 Press Y and open the Audio...
... with minimal compression. To revert to the Optical Audio Out terminal on the TV (see "Connecting a digital audio system" on page 18). Off To turn on your audio adjustments to the factory defaults, highlight Reset and press T. To select the optical audio output format: 1 Press Y ... Dynamic Range Control will be further compressed, allowing you connect a Dolby Digital decoder or other digital audio system to the factory defaults, highlight Reset and press T. Selecting the optical audio output format You can use the Dolby Digital Dynamic Range Control: 1 Press Y and open the Audio...


