
User Manual
Page 4
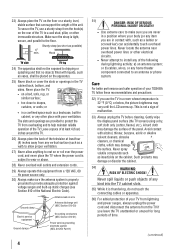
... four (4) inches away from any vertical surface (such as a wall) to allow proper ventilation. 27) Never allow anything to rest on the rear of your TOSHIBA TV, follow these recommendations and precautions: 32) If you use a sturdy strap from the hook(s) on or roll over the power cord, and never place...). or • in a confined space such as possible) 4" min. or b) cables, wires, or any other immovable structure. Gently wipe the display panel surface (the TV screen) using a dry, soft cloth only (cotton, flannel, etc.).
... four (4) inches away from any vertical surface (such as a wall) to allow proper ventilation. 27) Never allow anything to rest on the rear of your TOSHIBA TV, follow these recommendations and precautions: 32) If you use a sturdy strap from the hook(s) on or roll over the power cord, and never place...). or • in a confined space such as possible) 4" min. or b) cables, wires, or any other immovable structure. Gently wipe the display panel surface (the TV screen) using a dry, soft cloth only (cotton, flannel, etc.).
User Manual
Page 5
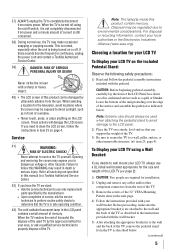
...still consumed. 38) During normal use only replacement parts specified by the approved method for the television, avoid locations where the screen may result in this manual to a Toshiba Authorized Service Center. 42) If you have the TV serviced: • Ask the service technician to use , the TV... may expose you decide to service the TV yourself. These actions will damage the LCD screen. Never strike the screen with the wall bracket. 5)...
...still consumed. 38) During normal use only replacement parts specified by the approved method for the television, avoid locations where the screen may result in this manual to a Toshiba Authorized Service Center. 42) If you have the TV serviced: • Ask the service technician to use , the TV... may expose you decide to service the TV yourself. These actions will damage the LCD screen. Never strike the screen with the wall bracket. 5)...
User Manual
Page 7
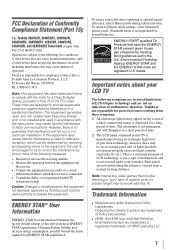
... antenna. • Increase the separation between the equipment and the receiver. • Connect the equipment into an outlet on the screen if a fixed, nonmoving image is recommended for normal home use. Ph: 1-800-631-3811 Note: This equipment has been tested... may cause harmful interference to radio communications. FCC Declaration of Conformity Compliance Statement (Part 15): The Toshiba 26AV52R, 26AV52RZ, 26AV502R, 26AV502RZ, 26AV502RY, 32AV52R, 32AV52RZ, 32AV502R, and 32AV502RZ Televisions comply with the limits for a Class B digital device, pursuant to Part 15 of the FCC...
... antenna. • Increase the separation between the equipment and the receiver. • Connect the equipment into an outlet on the screen if a fixed, nonmoving image is recommended for normal home use. Ph: 1-800-631-3811 Note: This equipment has been tested... may cause harmful interference to radio communications. FCC Declaration of Conformity Compliance Statement (Part 15): The Toshiba 26AV52R, 26AV52RZ, 26AV502R, 26AV502RZ, 26AV502RY, 32AV52R, 32AV52RZ, 32AV502R, and 32AV502RZ Televisions comply with the limits for a Class B digital device, pursuant to Part 15 of the FCC...

User Manual
Page 9
Chapter 1: Introduction Features of your new TV The following are just a few of the many exciting features of your new Toshiba widescreen, integrated HD, LCD TV: • Integrated digital tuning (8VSB ATSC and QAM) eliminates the need for a separate digital converter set-... synchronization automatically. • Two sets of external devices from the TV remote via HDMI connection ( page 50). 9 ABC, HBO, etc.) on the screen along with Dolby® Digital optical output format ( page 44). • CableClear® digital picture noise reduction ( page 54). • PC...
Chapter 1: Introduction Features of your new TV The following are just a few of the many exciting features of your new Toshiba widescreen, integrated HD, LCD TV: • Integrated digital tuning (8VSB ATSC and QAM) eliminates the need for a separate digital converter set-... synchronization automatically. • Two sets of external devices from the TV remote via HDMI connection ( page 50). 9 ABC, HBO, etc.) on the screen along with Dolby® Digital optical output format ( page 44). • CableClear® digital picture noise reduction ( page 54). • PC...
User Manual
Page 10
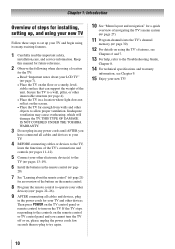
...to a wall, pillar, or other immovable structure ( page 4). • Place the TV in a location where light does not reflect on the screen. • Place the TV far enough from walls and other device(s) ( pages 22-26). 9無 AFTER connecting all cables and devices to ... many exciting features. 1無 Carefully read the important safety, installation,care, and service information. THIS TYPE OF DAMAGE IS NOT COVERED UNDER THE TOSHIBA WARRANTY. 3無 Do not plug in the remote control ( page 20). 7無 See "Learning about your other objects to operate your...
...to a wall, pillar, or other immovable structure ( page 4). • Place the TV in a location where light does not reflect on the screen. • Place the TV far enough from walls and other device(s) ( pages 22-26). 9無 AFTER connecting all cables and devices to ... many exciting features. 1無 Carefully read the important safety, installation,care, and service information. THIS TYPE OF DAMAGE IS NOT COVERED UNDER THE TOSHIBA WARRANTY. 3無 Do not plug in the remote control ( page 20). 7無 See "Learning about your other objects to operate your...
User Manual
Page 11
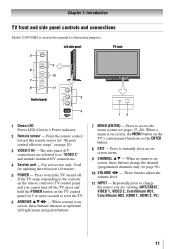
... - Press to access the menu system ( pages 27-28). Chapter 1: Introduction TV front and side panel controls and connections Model 32AV502RZ is onscreen, these buttons change the source you cannot turn off the TV, press and hold the POWER button on the TV control panel...remote sensor ( "Remote control effective range" on the TV's control panel functions as the ENTER button. 8無 EXIT - When no menu is on-screen, the MENU button on page 20). 3無 VIDEO-2 IN - When a menu is onscreen, these buttons function as "VIDEO 2" and include standard A/V...
... - Press to access the menu system ( pages 27-28). Chapter 1: Introduction TV front and side panel controls and connections Model 32AV502RZ is onscreen, these buttons change the source you cannot turn off the TV, press and hold the POWER button on the TV control panel...remote sensor ( "Remote control effective range" on the TV's control panel functions as the ENTER button. 8無 EXIT - When no menu is on-screen, the MENU button on page 20). 3無 VIDEO-2 IN - When a menu is onscreen, these buttons function as "VIDEO 2" and include standard A/V...

User Manual
Page 19
... a 480i (HDMI), 480p (HDMI), 720p, 1080i, or 1080p signal program, Native mode scales the video to the TV. Note: •• The edges of the screen (i.e. name Pin Signal No.
... a 480i (HDMI), 480p (HDMI), 720p, 1080i, or 1080p signal program, Native mode scales the video to the TV. Note: •• The edges of the screen (i.e. name Pin Signal No.

User Manual
Page 21
...; MUTE reduces or turns off . For a complete list of the remote control's functions, see "Arrow buttons.") 15無 Arrow buttons (pqtu) When a menu is on-screen, these buttons open the Channel Browser™ and tune to control the TV. 21 When the TV is on, the green LED indicator on the... channel in the main menu system. 17無 MENU accesses the main TV menu system ( pages 27 and 28). 18無 EXIT closes on-screen menus. 19無 MODE SELECT switch switches between TV, CABLE/SAT, AUX 1, and AUX 2 modes ( page 22). Press again to edit the Favorites ...
...; MUTE reduces or turns off . For a complete list of the remote control's functions, see "Arrow buttons.") 15無 Arrow buttons (pqtu) When a menu is on-screen, these buttons open the Channel Browser™ and tune to control the TV. 21 When the TV is on, the green LED indicator on the... channel in the main menu system. 17無 MENU accesses the main TV menu system ( pages 27 and 28). 18無 EXIT closes on-screen menus. 19無 MODE SELECT switch switches between TV, CABLE/SAT, AUX 1, and AUX 2 modes ( page 22). Press again to edit the Favorites ...

User Manual
Page 22
q selects the next lower channel. 6無 GUIDE Displays the channel guide in the AUX mode. 7無 INFO Displays TV status information on-screen. 8無 pqtu Press to navigate DVD menus (may not operate certain features on and off. 2無 Channel Numbers (0-9) Press to directly access ... directly at the device. 16 17 18 19 1無 POWER Turns the selected device on any other devices If you have a non-Toshiba device or a Toshiba device that the remote control is programmed, it may not work on some DVD players). 9無 ENTER Required by some satellite receivers and...
q selects the next lower channel. 6無 GUIDE Displays the channel guide in the AUX mode. 7無 INFO Displays TV status information on-screen. 8無 pqtu Press to navigate DVD menus (may not operate certain features on and off. 2無 Channel Numbers (0-9) Press to directly access ... directly at the device. 16 17 18 19 1無 POWER Turns the selected device on any other devices If you have a non-Toshiba device or a Toshiba device that the remote control is programmed, it may not work on some DVD players). 9無 ENTER Required by some satellite receivers and...
User Manual
Page 27
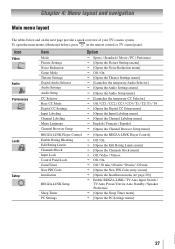
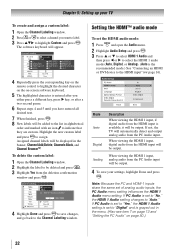
... menu] Off / Video / Video+ Off / On Off / 30 min / 60 min / 90 min / 120 min [Opens the New PIN Code entry screen] [Opens the Installation menu ( page 29)] Enable REGZA-LINK / TV Auto Input Switch / TV Auto Power/ Device Auto Standby / Speaker Preference ...
... menu] Off / Video / Video+ Off / On Off / 30 min / 60 min / 90 min / 120 min [Opens the New PIN Code entry screen] [Opens the Installation menu ( page 29)] Enable REGZA-LINK / TV Auto Input Switch / TV Auto Power/ Device Auto Standby / Speaker Preference ...
User Manual
Page 28
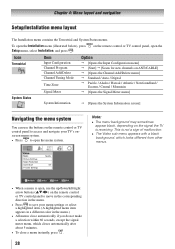
... / Digital Pacific / Alaska / Hawaii / Atlantic / Newfoundland / Eastern / Central / Mountain [Opens the Signal Meter menu] System Status System Information [Opens the System Information screen] Navigating the menu system You can use the up/down/left/right arrow buttons (pqtu) on the remote control or TV control panel to access...
... / Digital Pacific / Alaska / Hawaii / Atlantic / Newfoundland / Eastern / Central / Mountain [Opens the Signal Meter menu] System Status System Information [Opens the System Information screen] Navigating the menu system You can use the up/down/left/right arrow buttons (pqtu) on the remote control or TV control panel to access...
User Manual
Page 29
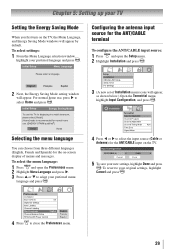
... the Terrestrial menu, highlight Input Configuration, and press . 4無 Press t or u to select your TV Setting the Energy Saving Mode When you first turn on -screen display of menus and messages. Chapter 5: Setting up your preferred menu language and press . English Français Espñol 2無 Next, the Energy...
... the Terrestrial menu, highlight Input Configuration, and press . 4無 Press t or u to select your TV Setting the Energy Saving Mode When you first turn on -screen display of menus and messages. Chapter 5: Setting up your preferred menu language and press . English Français Espñol 2無 Next, the Energy...
User Manual
Page 31
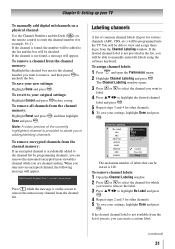
...) for other channels. 5無 To save your TV To manually add digital subchannels on a physical channel: Use the Channel Numbers and the Dash ( ) on the screen to manually enter/edit labels using the software keyboard. Labeling channels A list of the currently highlighted channel is not found , the number will be checked...
...) for other channels. 5無 To save your TV To manually add digital subchannels on a physical channel: Use the Channel Numbers and the Dash ( ) on the screen to manually enter/edit labels using the software keyboard. Labeling channels A list of the currently highlighted channel is not found , the number will be checked...
User Manual
Page 32
... Audio input. The software keyboard will appear. 4無 Repeatedly press the corresponding key on the remote control to highlight the desired character on the on-screen software keyboard. 5無 The highlighted character is entered after you either press a different key, press u key, or after a two-second pause. 6無 Repeat steps 4 and...
... Audio input. The software keyboard will appear. 4無 Repeatedly press the corresponding key on the remote control to highlight the desired character on the on-screen software keyboard. 5無 The highlighted character is entered after you either press a different key, press u key, or after a two-second pause. 6無 Repeat steps 4 and...
User Manual
Page 33
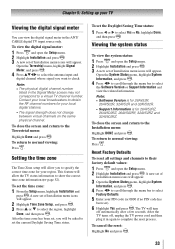
...and press . Chapter 5: Setting up your TV Viewing the digital signal meter You can view the digital signal meter in the Signal Meter screen may not correspond to a virtual TV channel number. This feature will allow you will be asked to select Factory Defaults. 5無 Enter ...complete the reset process. The TV will allow the TV status information to specify the correct time zone for 26AV52RZ, 26AV502RZ, 26AV502RY, 32AV52RZ and 32AV502RZ. To view the digital signal meter: 1無 Press and open the Setup menu. 2無 Highlight Installation and press . To return to ...
...and press . Chapter 5: Setting up your TV Viewing the digital signal meter You can view the digital signal meter in the Signal Meter screen may not correspond to a virtual TV channel number. This feature will allow you will be asked to select Factory Defaults. 5無 Enter ...complete the reset process. The TV will allow the TV status information to specify the correct time zone for 26AV52RZ, 26AV502RZ, 26AV502RY, 32AV52RZ and 32AV502RZ. To view the digital signal meter: 1無 Press and open the Setup menu. 2無 Highlight Installation and press . To return to ...

User Manual
Page 34
... on . ••When selecting input sources using , you select PC in the top right corner of the Input Selection screen. If the connected CEC device has any connected devices, a separate device selection popup window will have connected to highlight the desired input source...8226; Laser Disc • Satellite/DSS • VCR • Video Recorder • Hide (to hide an unused input in the Input Selection screen and in the Channel Browser™ Inputs list) Note: If you will appear. Chapter 6: Using the TV's features Selecting the video input source to...
... on . ••When selecting input sources using , you select PC in the top right corner of the Input Selection screen. If the connected CEC device has any connected devices, a separate device selection popup window will have connected to highlight the desired input source...8226; Laser Disc • Satellite/DSS • VCR • Video Recorder • Hide (to hide an unused input in the Input Selection screen and in the Channel Browser™ Inputs list) Note: If you will appear. Chapter 6: Using the TV's features Selecting the video input source to...
User Manual
Page 35
...). • Quickly change inputs from the Inputs List. • Quickly select REGZA-LINK devices from the Favorites list. Input Selection screen with none of the Channel Browser™. If a particular input is labeled "Hidden", which means that input source. The channel/ ...to open the Preferences menu. 2無 Highlight Input Labeling and press . 3無 Highlight Reset and press . Input labeling example: The screen below right is integrated into the Channel Browser™. To clear the input labels: 1無 Press and open the Favorites browser list. ...
...). • Quickly change inputs from the Inputs List. • Quickly select REGZA-LINK devices from the Favorites list. Input Selection screen with none of the Channel Browser™. If a particular input is labeled "Hidden", which means that input source. The channel/ ...to open the Preferences menu. 2無 Highlight Input Labeling and press . 3無 Highlight Reset and press . Input labeling example: The screen below right is integrated into the Channel Browser™. To clear the input labels: 1無 Press and open the Favorites browser list. ...
User Manual
Page 38
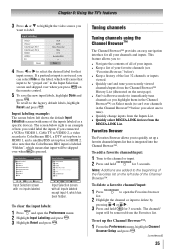
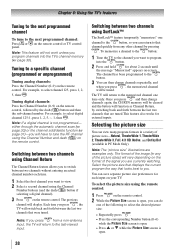
... specific channel (programmed or unprogrammed) Tuning analog channels: Press the Channel Number (0-9) on the remote control. 2無 While the Picture Size screen is not programmed- Select the picture size that displays the current program the way that were tuned. To select the picture size using the ...Channel Number and dash ( ) on -screen. Tuning to you to select the desired picture size: • Repeatedly press . • Press the corresponding Number button (0-6) while the Picture Size...
... specific channel (programmed or unprogrammed) Tuning analog channels: Press the Channel Number (0-9) on the remote control. 2無 While the Picture Size screen is not programmed- Select the picture size that displays the current program the way that were tuned. To select the picture size using the ...Channel Number and dash ( ) on -screen. Tuning to you to select the desired picture size: • Repeatedly press . • Press the corresponding Number button (0-6) while the Picture Size...

User Manual
Page 39
... may subject you to civil and criminal liability. TheaterWide 3 (for any purpose other countries, and may be "grayed out" in the Picture Size screen). Chapter 6: Using the TV's features To select the picture size using the menus: 1無 Select Picture Size in the Theater Settings menu. 2&#...28961; Press or to fill the screen. Using these functions to change the picture size (i.e., changing the height/ width ratio) for letter box programs with sidebars and/or bars at the...
... may subject you to civil and criminal liability. TheaterWide 3 (for any purpose other countries, and may be "grayed out" in the Picture Size screen). Chapter 6: Using the TV's features To select the picture size using the menus: 1無 Select Picture Size in the Theater Settings menu. 2&#...28961; Press or to fill the screen. Using these functions to change the picture size (i.e., changing the height/ width ratio) for letter box programs with sidebars and/or bars at the...
User Manual
Page 40
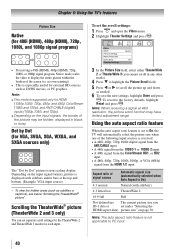
... 480i), ColorStream (1080i and 720p), and ANT/ CABLE (digital) inputs (1080p,1080i, and 720p). ••Depending on the input signals, the border of the screen (i.e. Scrolling the TheaterWide® picture (TheaterWide 2 and 3 only) You can set separate scroll settings for the TheaterWide 2 and TheaterWide 3 modes for each input. 3無 In...
... 480i), ColorStream (1080i and 720p), and ANT/ CABLE (digital) inputs (1080p,1080i, and 720p). ••Depending on the input signals, the border of the screen (i.e. Scrolling the TheaterWide® picture (TheaterWide 2 and 3 only) You can set separate scroll settings for the TheaterWide 2 and TheaterWide 3 modes for each input. 3無 In...


