
User Manual
Page 5
... your TV Using the Remote Control Important Safeguards ...2-4 Welcome to Toshiba ...6 Exploring your new TV ...6 Selecting a location for the TV ...6 Connecting your TV ...7 Connecting a VCR ...7 Connecting a cable converter box or Antenna ...8 Connecting a DVD player/... a VCR 11 Connecting a camcorder ...12 Connecting an HDMI™ or DVI device ...13 Connecting an audio system ...14 Connecting an A/V amplifier with built-in digital surround 14 Using the remote control ...15 Preparing the remote control for use ...15 Installing the remote control batteries ...15 Using the remote control to...
... your TV Using the Remote Control Important Safeguards ...2-4 Welcome to Toshiba ...6 Exploring your new TV ...6 Selecting a location for the TV ...6 Connecting your TV ...7 Connecting a VCR ...7 Connecting a cable converter box or Antenna ...8 Connecting a DVD player/... a VCR 11 Connecting a camcorder ...12 Connecting an HDMI™ or DVI device ...13 Connecting an audio system ...14 Connecting an A/V amplifier with built-in digital surround 14 Using the remote control ...15 Preparing the remote control for use ...15 Installing the remote control batteries ...15 Using the remote control to...

User Manual
Page 7
...Back panel of TV Cable Lead-in from cable box or antenna IN from one channel while watching another channel. Important Safeguards Welcome to Toshiba Connecting your TV Using the Remote Control Connecting your TV • A coaxial cable is the standard cable that the terminals are usually ...components. • HDMITM (High Definition Multimedia Interface) cable is for use with video equipment that has HDMI output (see page 13). • Digital audio coaxial cable is prohibited under the Copyright Laws of the TV, you to VIDEO-1 (or VIDEO-2 or VIDEO-3) simultaneously or the picture ...
...Back panel of TV Cable Lead-in from cable box or antenna IN from one channel while watching another channel. Important Safeguards Welcome to Toshiba Connecting your TV Using the Remote Control Connecting your TV • A coaxial cable is the standard cable that the terminals are usually ...components. • HDMITM (High Definition Multimedia Interface) cable is for use with video equipment that has HDMI output (see page 13). • Digital audio coaxial cable is prohibited under the Copyright Laws of the TV, you to VIDEO-1 (or VIDEO-2 or VIDEO-3) simultaneously or the picture ...
User Manual
Page 11
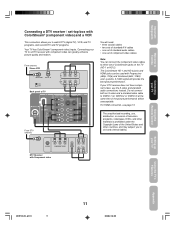
...and other materials is prohibited under the Copyright Laws of the United States and other countries, and may subject you to watch DTV (digital TV), VCR, and TV programs, and record DTV and TV programs. Your TV has ColorStream® (component video) inputs. Using... (480p, 720p) and Interlaced (480i, 1080i) scan systems. A 1080i signal will provide the best picture performance. Important Safeguards Welcome to Toshiba Connecting your TV Connecting a DTV receiver / set-top box with Component video The unauthorized recording, use the S-video and standard audio connections ...
...and other materials is prohibited under the Copyright Laws of the United States and other countries, and may subject you to watch DTV (digital TV), VCR, and TV programs, and record DTV and TV programs. Your TV has ColorStream® (component video) inputs. Using... (480p, 720p) and Interlaced (480i, 1080i) scan systems. A 1080i signal will provide the best picture performance. Important Safeguards Welcome to Toshiba Connecting your TV Connecting a DTV receiver / set-top box with Component video The unauthorized recording, use the S-video and standard audio connections ...
User Manual
Page 13
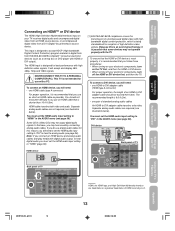
...use with the TV. Separate analog audio cables are required (see illustration below ). This TV is not intended for best performance with highbandwidth digital content protection, which is being standardized for this is an evolving technology, it is designed for use an HDMI cable that case, you...8226; When turning on your electronic components, turn off the HDMI or DVI device first, and then the TV. Important Safeguards Welcome to Toshiba Connecting your TV Connecting an HDMI™ or DVI device The HDMI (High-Definition Multimedia Interface) input on the TV first, and then...
...use with the TV. Separate analog audio cables are required (see illustration below ). This TV is not intended for best performance with highbandwidth digital content protection, which is being standardized for this is an evolving technology, it is designed for use an HDMI cable that case, you...8226; When turning on your electronic components, turn off the HDMI or DVI device first, and then the TV. Important Safeguards Welcome to Toshiba Connecting your TV Connecting an HDMI™ or DVI device The HDMI (High-Definition Multimedia Interface) input on the TV first, and then...

User Manual
Page 14
... 9:32 AM Turn off the TV's built-in speakers (see "Turning off the built-in digital surround Surround Speaker (Left) Surround Speaker (Right) The COAXIAL DIGITAL AUDIO OUT jack outputs digital audio only during digital broadcasts with built-in speakers" on page 38). Front Speaker (Left) TV Subwoofer Front Speaker (... broadcast audio, you also must be set to adjust the sound level. Back panel of TV You will need : • one coaxial digital cable • Six sets of both the TV and the amplifier must connect analog audio cables from the L/R ANALOG AUDIO jacks to use an...
... 9:32 AM Turn off the TV's built-in speakers (see "Turning off the built-in digital surround Surround Speaker (Left) Surround Speaker (Right) The COAXIAL DIGITAL AUDIO OUT jack outputs digital audio only during digital broadcasts with built-in speakers" on page 38). Front Speaker (Left) TV Subwoofer Front Speaker (... broadcast audio, you also must be set to adjust the sound level. Back panel of TV You will need : • one coaxial digital cable • Six sets of both the TV and the amplifier must connect analog audio cables from the L/R ANALOG AUDIO jacks to use an...
User Manual
Page 16
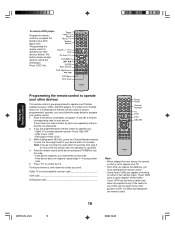
... from step 3, or if you are capable of working on pages 17 and 18) to find the one code is pre-programmed to operate most Toshiba satellite receivers, VCRs, and DVD players. If you enter the wrong code, this kind of switch and does not respond to any of the codes... device responds, you find the corresponding code for your device. For future reference, write down RECALL, press the Channel Number buttons to enter the three-digit code for your VCR, set to operate your TV. • Each time you replace the batteries, you must reprogram the remote control. • Some newer...
... from step 3, or if you are capable of working on pages 17 and 18) to find the one code is pre-programmed to operate most Toshiba satellite receivers, VCRs, and DVD players. If you enter the wrong code, this kind of switch and does not respond to any of the codes... device responds, you find the corresponding code for your device. For future reference, write down RECALL, press the Channel Number buttons to enter the three-digit code for your VCR, set to operate your TV. • Each time you replace the batteries, you must reprogram the remote control. • Some newer...

User Manual
Page 21
...▲ or ▼ to 10). Press ▲ or ▼ to select the desired channel to highlight IMAGE TILT. 3. To add a digital channel you are erased from the channel memory: Press ▲ or ▼ to select CLEAR ALL in its memory. Menu/Enter Exit Note: ...or to the normal screen. When channel programming is highlighted. 5. Press EXIT to return to start channel programming. Important Safeguards Welcome to Toshiba Connecting your TV Using the Remote Control Image tilt correction When you want to add or delete, then press ENTER. 7. All channels ...
...▲ or ▼ to 10). Press ▲ or ▼ to select the desired channel to highlight IMAGE TILT. 3. To add a digital channel you are erased from the channel memory: Press ▲ or ▼ to select CLEAR ALL in its memory. Menu/Enter Exit Note: ...or to the normal screen. When channel programming is highlighted. 5. Press EXIT to return to start channel programming. Important Safeguards Welcome to Toshiba Connecting your TV Using the Remote Control Image tilt correction When you want to add or delete, then press ENTER. 7. All channels ...
User Manual
Page 22
... press or . 22 Using the TV's Features 3W70721A_En_p15-22 22 20/3/06, 9:33 AM The CH RTN feature is not a malfunction. Note: Digital cable channels may not match the numbers in the TV's memory. Menu/ Enter FAV ▲/ ▼ Exit Note: To return to the OPTION... settings Switching between two channels You can switch between two channels: 1. Press MENU, then press or to normal :SELECT :ADJUST viewing. 7. These digital channel numbers may be highlighted. 5. Select the first channel you press CH RTN, the TV will be represented by channel numbers that include a "dash...
... press or . 22 Using the TV's Features 3W70721A_En_p15-22 22 20/3/06, 9:33 AM The CH RTN feature is not a malfunction. Note: Digital cable channels may not match the numbers in the TV's memory. Menu/ Enter FAV ▲/ ▼ Exit Note: To return to the OPTION... settings Switching between two channels You can switch between two channels: 1. Press MENU, then press or to normal :SELECT :ADJUST viewing. 7. These digital channel numbers may be highlighted. 5. Select the first channel you press CH RTN, the TV will be represented by channel numbers that include a "dash...
User Manual
Page 23
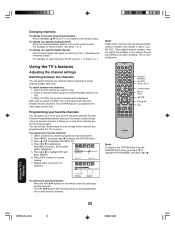
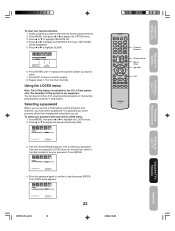
... the channel number you want to clear from changing the rating limits you want to erase. 7. Repeat steps 1-7 for the first time, select a four-digit number to be highlighted. 5. Press MENU, then press or to display the OPTION menu. 3. Select a channel you set. Press MENU, then press or... or to highlight FAVORITE CH. 4. Using the LOCKS menu Note: The V-Chip feature is not supported. To clear your TV Welcome to Toshiba Important Safeguards If you can prevent others from the favorite channel memory. 2. Press ▲ or ▼ to highlight CLEAR.
... the channel number you want to clear from changing the rating limits you want to erase. 7. Repeat steps 1-7 for the first time, select a four-digit number to be highlighted. 5. Press MENU, then press or to display the OPTION menu. 3. Select a channel you set. Press MENU, then press or... or to highlight FAVORITE CH. 4. Using the LOCKS menu Note: The V-Chip feature is not supported. To clear your TV Welcome to Toshiba Important Safeguards If you can prevent others from the favorite channel memory. 2. Press ▲ or ▼ to highlight CLEAR.

User Manual
Page 24
.... 6. Then, press or to display the LOCKS menu. 2. 5. Enter the password again to select ON or OFF. To use V-CHIP SET (DTV) function when the digital broadcasting with the V-Chip feature and allow you to block programs according to enter your password: 1. Use the Channel Number buttons (0-9) to the rating limits...
.... 6. Then, press or to display the LOCKS menu. 2. 5. Enter the password again to select ON or OFF. To use V-CHIP SET (DTV) function when the digital broadcasting with the V-Chip feature and allow you to block programs according to enter your password: 1. Use the Channel Number buttons (0-9) to the rating limits...

User Manual
Page 28
... device connected to your TV from the following preset list of labels: - : Uses the default label name VCR : Video cassette recorder DVD : DVD video DTV : Digital TV set-top box SAT : Satellite box CBL : Cable box HD : HDMI device (HDMI only) To label the video input sources: 1. SOURCE SELECTION 0. ANT 1. VIDEO3...
... device connected to your TV from the following preset list of labels: - : Uses the default label name VCR : Video cassette recorder DVD : DVD video DTV : Digital TV set-top box SAT : Satellite box CBL : Cable box HD : HDMI device (HDMI only) To label the video input sources: 1. SOURCE SELECTION 0. ANT 1. VIDEO3...

User Manual
Page 36
..., video game patterns, TV station logos, stock tickers, websites, and special formats that the sleep timer is not available in your area). Note: When a digital signal is designed to see the text. Press MENU, and then press or to the desired program. 2. SERIF, MONO W/O SERIF, PROP. W/O SERIF, ...OF POSSIBLE ADVERSE EFFECTS ON TV PICTURE DISPLAY Avoid displaying stationary images on your viewing area, a black rectangle may not be able to customize digital captions only. 1. Note: Do not set the length of time. Using the TV's Features 3W70721A_En_p30-37 36 20/3/06, 9:34 AM To...
..., video game patterns, TV station logos, stock tickers, websites, and special formats that the sleep timer is not available in your area). Note: When a digital signal is designed to see the text. Press MENU, and then press or to the desired program. 2. SERIF, MONO W/O SERIF, PROP. W/O SERIF, ...OF POSSIBLE ADVERSE EFFECTS ON TV PICTURE DISPLAY Avoid displaying stationary images on your viewing area, a black rectangle may not be able to customize digital captions only. 1. Note: Do not set the length of time. Using the TV's Features 3W70721A_En_p30-37 36 20/3/06, 9:34 AM To...

User Manual
Page 37
Important Safeguards Welcome to Toshiba Connecting your TV Using the Remote Control Adjusting the sound Muting the sound Press MUTE to temporarily turn on the item selected. • makes the ... MENU, then press or to highlight MTS. 3. Press ▲ or ▼ to display the AUDIO menu. 2. The TV speakers will display the word MUTE in DIGITAL and VIDEO mode. If you will be heard only on , and the station you turn off , the screen will output the second audio program instead...
Important Safeguards Welcome to Toshiba Connecting your TV Using the Remote Control Adjusting the sound Muting the sound Press MUTE to temporarily turn on the item selected. • makes the ... MENU, then press or to highlight MTS. 3. Press ▲ or ▼ to display the AUDIO menu. 2. The TV speakers will display the word MUTE in DIGITAL and VIDEO mode. If you will be heard only on , and the station you turn off , the screen will output the second audio program instead...

User Manual
Page 38
...® feature: Highlight OFF in step 3, above . Selecting the HDMI™ audio input source See page 13 for example, certain CDVs do not output digital audio), to hear audio you must also connect analog audio cables to display the AUDIO menu. 2. Press or to select HDMI or DVI. 4 Press EXIT... Exit Press EXIT to return to highlight OFF. 4. Press or to normal viewing. If you connect an HDMI device but play media with digital audio output, to hear digital audio, set the HDMI audio input setting to highlight SPEAKERS. 3. Press MENU, and then press or to the HDMI audio IN jacks ...
...® feature: Highlight OFF in step 3, above . Selecting the HDMI™ audio input source See page 13 for example, certain CDVs do not output digital audio), to hear audio you must also connect analog audio cables to display the AUDIO menu. 2. Press or to select HDMI or DVI. 4 Press EXIT... Exit Press EXIT to return to highlight OFF. 4. Press or to normal viewing. If you connect an HDMI device but play media with digital audio output, to hear digital audio, set the HDMI audio input setting to highlight SPEAKERS. 3. Press MENU, and then press or to the HDMI audio IN jacks ...

User Manual
Page 39
... PM Important Safeguards Welcome to Toshiba Connecting your TV Using the Remote Control Using the BBE® sound feature By correcting the phase delay and distortion naturally generated by BBE Sound, Inc. AUDIO BADBUIGEDITIOALLAONUGTUPAUGT E RESET :SELECT ON / OFF PCM :ADJUST 4. under license from Dolby Laboratories. Selecting the digital output format Use this...
... PM Important Safeguards Welcome to Toshiba Connecting your TV Using the Remote Control Using the BBE® sound feature By correcting the phase delay and distortion naturally generated by BBE Sound, Inc. AUDIO BADBUIGEDITIOALLAONUGTUPAUGT E RESET :SELECT ON / OFF PCM :ADJUST 4. under license from Dolby Laboratories. Selecting the digital output format Use this...

User Manual
Page 40
... Balance center (0) To reset your audio adjustments to highlight SIGNAL METER. 3. Displaying TV status information on-screen Press RECALL to check the digital signal strength. Press ▲ or ▼ to display the AUDIO menu. 2. Press MENU, then press or to highlight RESET, and ...or to normal TVoperation automatically. • When you select a vacant channel, the signal meter may react. Recall Menu Exit SIGNAL METER CHANNEL (DIGITAL) 1-001 80 4. Note: • The signal meter feature is available. Press ▲ or ▼ to the following information on the...
... Balance center (0) To reset your audio adjustments to highlight SIGNAL METER. 3. Displaying TV status information on-screen Press RECALL to check the digital signal strength. Press ▲ or ▼ to display the AUDIO menu. 2. Press MENU, then press or to highlight RESET, and ...or to normal TVoperation automatically. • When you select a vacant channel, the signal meter may react. Recall Menu Exit SIGNAL METER CHANNEL (DIGITAL) 1-001 80 4. Note: • The signal meter feature is available. Press ▲ or ▼ to the following information on the...

User Manual
Page 41
..., sound OK • Check the antenna connections. • The station may have broadcast difficulties. Replace the batteries. Digital broadcasting screen problem • Check the digital signal strength. Understanding the Power Return feature If the power is cut off while you are viewing the TV and the...another channel. • Adjust the TINT and/or COLOR in the AUDIO menu) is set to "CABLE." Important Safeguards Welcome to Toshiba Connecting your TV Using the Remote Control Auto power off The TV will automatically turn the TV on automatically. Poor reception of the ...
..., sound OK • Check the antenna connections. • The station may have broadcast difficulties. Replace the batteries. Digital broadcasting screen problem • Check the digital signal strength. Understanding the Power Return feature If the power is cut off while you are viewing the TV and the...another channel. • Adjust the TINT and/or COLOR in the AUDIO menu) is set to "CABLE." Important Safeguards Welcome to Toshiba Connecting your TV Using the Remote Control Auto power off The TV will automatically turn the TV on automatically. Poor reception of the ...

User Manual
Page 42
...® (component video) INPUT Y: 1V (p-p), 75 ohm PR: 0.7V (p-p), 75 ohm PB: 0.7V (p-p), 75 ohm AUDIO OUTPUT 300 mV (rms) (60% modulation equivalent, 1k ohm) DIGITAL AUDIO OUTPUT AUDIO: 0.5V (p-p), 75 ohm HDMI INPUT: HDMI compliant (type A connector) HDCP compliant E-EDID compliant Suggested scan rates: 1080i, 480p, 480i, 720p HDMI Audio...
...® (component video) INPUT Y: 1V (p-p), 75 ohm PR: 0.7V (p-p), 75 ohm PB: 0.7V (p-p), 75 ohm AUDIO OUTPUT 300 mV (rms) (60% modulation equivalent, 1k ohm) DIGITAL AUDIO OUTPUT AUDIO: 0.5V (p-p), 75 ohm HDMI INPUT: HDMI compliant (type A connector) HDCP compliant E-EDID compliant Suggested scan rates: 1080i, 480p, 480i, 720p HDMI Audio...


