
Owners Manual
Page 2
... you for proper grounding and, in the "Specifications" section only. DO NOT TRY TO SERVICE THIS PRODUCT YOURSELF. This type of damage is a reminder to call the CATV system installer's attention to support the weight of the home with the␣ TOSHIBA TV stand recommended in particular, specifies that important operating and maintenance instructions follow this product. Sometimes TVs are popular...
... you for proper grounding and, in the "Specifications" section only. DO NOT TRY TO SERVICE THIS PRODUCT YOURSELF. This type of damage is a reminder to call the CATV system installer's attention to support the weight of the home with the␣ TOSHIBA TV stand recommended in particular, specifies that important operating and maintenance instructions follow this product. Sometimes TVs are popular...
Owners Manual
Page 4
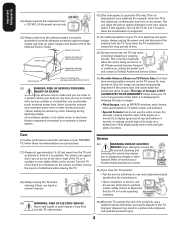
... tickers, video game patterns, TV station logos, and websites. • Special Formats that the TV is NOT COVERED BY YOUR WARRANTY. Turn the TV off to ␣ provide adequate protection against voltage surges and built-up static charges (see␣ Section 810 of␣ the National Electric Code). or b)␣ cables, wires, or any home theater component connected to install any...
... tickers, video game patterns, TV station logos, and websites. • Special Formats that the TV is NOT COVERED BY YOUR WARRANTY. Turn the TV off to ␣ provide adequate protection against voltage surges and built-up static charges (see␣ Section 810 of␣ the National Electric Code). or b)␣ cables, wires, or any home theater component connected to install any...
Owners Manual
Page 5
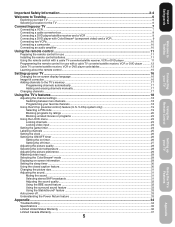
... or programs ...23 Using the LOCK menu ...23 Locking channels ...23 Locking video input ...24 Setting the game timer ...24 Labeling channels ...25 Setting the clock ...26 Setting the ON/OFF timer ...26 Setting the on timer ...26 Setting the off timer ...27 Adjusting the picture quality ...28 Selecting the color temperature ...28 Adjusting the picture preference ...29 Watching video input ...29 Selecting the ColorStream® mode ...29 Displaying on-screen information ...29 Setting the sleep timer ...30 Using the closed caption feature ...30 Changing the picture size ...31 Adjusting the sound...
... or programs ...23 Using the LOCK menu ...23 Locking channels ...23 Locking video input ...24 Setting the game timer ...24 Labeling channels ...25 Setting the clock ...26 Setting the ON/OFF timer ...26 Setting the on timer ...26 Setting the off timer ...27 Adjusting the picture quality ...28 Selecting the color temperature ...28 Adjusting the picture preference ...29 Watching video input ...29 Selecting the ColorStream® mode ...29 Displaying on-screen information ...29 Setting the sleep timer ...30 Using the closed caption feature ...30 Changing the picture size ...31 Adjusting the sound...

Owners Manual
Page 7
... be used with component video compatible components. Do not connect a standard video cable and an S-video cable to use: yellow for video and red and white for the stereo left (or mono) channel. If you look at the rear panel of the standard video cable. S-video cables can only be used with S-video compatible components. • Component video cables come in sets of three and provide the best picture performance. For better picture quality, if your VCR has Svideo, you will need: •...
... be used with component video compatible components. Do not connect a standard video cable and an S-video cable to use: yellow for video and red and white for the stereo left (or mono) channel. If you look at the rear panel of the standard video cable. S-video cables can only be used with S-video compatible components. • Component video cables come in sets of three and provide the best picture performance. For better picture quality, if your VCR has Svideo, you will need: •...
Owners Manual
Page 8
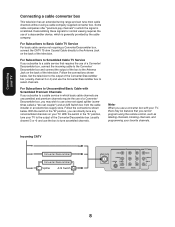
.../ Descrambler box and connect the output of the box to Scrambled Cable TV Service If you cannot program using a cable company supplied converter box. Follow the connections shown below . For Subscribers to the Antenna Jack on the back of the television. With the switch in which is scrambled. For Subscribers to Basic Cable TV Service For basic cable service not requiring a Converter/Descrambler box, connect the CATV 75 ohm Coaxial Cable directly to select channels. For...
.../ Descrambler box and connect the output of the box to Scrambled Cable TV Service If you cannot program using a cable company supplied converter box. Follow the connections shown below . For Subscribers to the Antenna Jack on the back of the television. With the switch in which is scrambled. For Subscribers to Basic Cable TV Service For basic cable service not requiring a Converter/Descrambler box, connect the CATV 75 ohm Coaxial Cable directly to select channels. For...

Owners Manual
Page 9
... SWITCH THE DEVICE'S OUTPUT TO 480i INTERLACED MODE FIRST. If you connect a high-definition settop receiver, 480p progressive scan DVD player, or other materials is capable of the S-video cable, but the picture quality will not accept or display 480p or 720p progressive scan signals or 1080i interlaced high-definition signals. The unauthorized recording, use, distribution or revision of television programs, videotapes, DVDs, and other similar device to a component video compatible DVD player...
... SWITCH THE DEVICE'S OUTPUT TO 480i INTERLACED MODE FIRST. If you connect a high-definition settop receiver, 480p progressive scan DVD player, or other materials is capable of the S-video cable, but the picture quality will not accept or display 480p or 720p progressive scan signals or 1080i interlaced high-definition signals. The unauthorized recording, use, distribution or revision of television programs, videotapes, DVDs, and other similar device to a component video compatible DVD player...

Owners Manual
Page 11
... "Programming the remote control Channel Numbers CH Enter Pic Size (TV) for a long time, remove the batteries. Connecting your TV Using the Remote Control Setting up your cable TV converter/satellite receiver (see which features are different brands. Set the TV • CBL/ TV/VCR SAT • VCR • DVD selector to recognize the brand of batteries in a designated disposal area. If you will control the cable TV Channel LM Volume LM...
... "Programming the remote control Channel Numbers CH Enter Pic Size (TV) for a long time, remove the batteries. Connecting your TV Using the Remote Control Setting up your cable TV converter/satellite receiver (see which features are different brands. Set the TV • CBL/ TV/VCR SAT • VCR • DVD selector to recognize the brand of batteries in a designated disposal area. If you will control the cable TV Channel LM Volume LM...
Owners Manual
Page 12
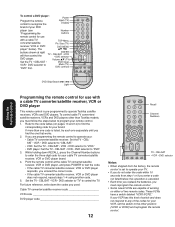
... DVD player does not respond, repeat steps 1-4 using another code. 5. These VCRs have a switch labeled "VCR1/VCR2." The TOP Menu Pic Size (TV) DVD MENU LM M buttons shown at the cable TV converter/satellite receiver, VCR or DVD player, and press POWER to operate Toshiba satellite receivers, VCRs and DVD players. Mute (TV) DVD controls Using the Remote Control M DVD Skip/Search / Light Programming the remote control for use with a cable TV converter/satellite receiver, VCR or DVD player" below to program your DVD player (see "Programming the Number buttons remote control for use...
... DVD player does not respond, repeat steps 1-4 using another code. 5. These VCRs have a switch labeled "VCR1/VCR2." The TOP Menu Pic Size (TV) DVD MENU LM M buttons shown at the cable TV converter/satellite receiver, VCR or DVD player, and press POWER to operate Toshiba satellite receivers, VCRs and DVD players. Mute (TV) DVD controls Using the Remote Control M DVD Skip/Search / Light Programming the remote control for use with a cable TV converter/satellite receiver, VCR or DVD player" below to program your DVD player (see "Programming the Number buttons remote control for use...

Owners Manual
Page 15
... Using the Remote Control Connecting your TV Welcome to DVD menu of keys. Learning about the remote control POWER turns the TV on and off Sleep programs the TV to turn off at a set time (page 30) TV/Video selects the video input source (page 29) Channel LM cycles through programmed channels (page 17) TV • CBL/SAT • VCR • DVD select TV, CABLE/SATELLITE, VCR or DVD mode (page 11) Channel Numbers allow direct access to channels (page 17) Recall TV/Video POWER Volume LM adjusts...
... Using the Remote Control Connecting your TV Welcome to DVD menu of keys. Learning about the remote control POWER turns the TV on and off Sleep programs the TV to turn off at a set time (page 30) TV/Video selects the video input source (page 29) Channel LM cycles through programmed channels (page 17) TV • CBL/SAT • VCR • DVD select TV, CABLE/SATELLITE, VCR or DVD mode (page 11) Channel Numbers allow direct access to channels (page 17) Recall TV/Video POWER Volume LM adjusts...
Owners Manual
Page 17
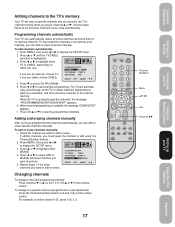
... channels automatically, you use cable, choose CABLE. To add channels automatically: 1. Press L or M to display the SETUP menu. 2. Press or to select ADD or CH PICTURE AUDIO SETUP MODE OPTION CLOSED CAPTION OFF TV / CABLE CABLE CH PROGRAM START ERASE, whichever function you want to add or erase. Changing channels To change to a specific channel (programmed or unprogrammed): Press the Channel Number buttons (0-9 and 100) on which you selected), and store all the TV or Cable channels (depending on the remote control. SELECT ADJUST...
... channels automatically, you use cable, choose CABLE. To add channels automatically: 1. Press L or M to display the SETUP menu. 2. Press or to select ADD or CH PICTURE AUDIO SETUP MODE OPTION CLOSED CAPTION OFF TV / CABLE CABLE CH PROGRAM START ERASE, whichever function you want to add or erase. Changing channels To change to a specific channel (programmed or unprogrammed): Press the Channel Number buttons (0-9 and 100) on which you selected), and store all the TV or Cable channels (depending on the remote control. SELECT ADJUST...

Owners Manual
Page 20
... 20 To change your PIN code. Press L or M to enter a new code. Use the Channel Number buttons (0-9) to highlight V-CHIP. 3. Recall Channel Numbers Menu/ Enter CH PICTURE AUDIO SETUP MODE OPTION V-CHIP ENABLE BLOCKING ON OFF SET RATING START BLOCKING OPTION START NEW PIN CODE START SELECT ADJUST 5. Press or to display the OPTION menu. 2. Press ENTER. 3. Press MENU, then press or to display the V-CHIP menu. CH PICTURE AUDIO SETUP MODE OPTION V-CHIP BLOCKING PIN CODE RESET SELECT [0-9] SET END...
... 20 To change your PIN code. Press L or M to enter a new code. Use the Channel Number buttons (0-9) to highlight V-CHIP. 3. Recall Channel Numbers Menu/ Enter CH PICTURE AUDIO SETUP MODE OPTION V-CHIP ENABLE BLOCKING ON OFF SET RATING START BLOCKING OPTION START NEW PIN CODE START SELECT ADJUST 5. Press or to display the OPTION menu. 2. Press ENTER. 3. Press MENU, then press or to display the V-CHIP menu. CH PICTURE AUDIO SETUP MODE OPTION V-CHIP BLOCKING PIN CODE RESET SELECT [0-9] SET END...
Owners Manual
Page 23
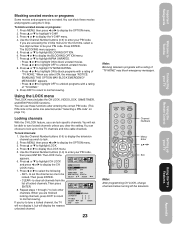
... tune locked channels unless you can choose to lock up your TV Using the Remote Control Connecting your TV Welcome to Toshiba Important Safeguards Channel Numbers Menu/ Enter Exit Note: After programming CH LOCK, change channels before turning off the television. You will display the nearest unlocked channel. 23 Note: Blocking television programs with a rating of locked channels. To lock channels: 1. The LOCK menu appears. 6. to set the channel as one selected under "Selecting a PIN code" on page 19.) Locking channels With the CH LOCK feature...
... tune locked channels unless you can choose to lock up your TV Using the Remote Control Connecting your TV Welcome to Toshiba Important Safeguards Channel Numbers Menu/ Enter Exit Note: After programming CH LOCK, change channels before turning off the television. You will display the nearest unlocked channel. 23 Note: Blocking television programs with a rating of locked channels. To lock channels: 1. The LOCK menu appears. 6. to set the channel as one selected under "Selecting a PIN code" on page 19.) Locking channels With the CH LOCK feature...

Owners Manual
Page 24
... to highlight VIDEO LOCK. 6. To unlock channels: 1. Press EXIT to return to display the LOCK menu. 4. Setting the game timer With the GAME TIMER feature, you use the antenna terminal LOCK CH LOCK VIDEO LOCK GAME TIMER NEW PIN CODE SELECT START OFF VIDEO VIDEO+ OFF START ADJUST to select: • OFF: Unlocks all channels from the list of locked channels. Press or to normal viewing. When the programmed time is CH programmed, the display will change channels or activate the TV/VIDEO key before turning off the television. This option...
... to highlight VIDEO LOCK. 6. To unlock channels: 1. Press EXIT to return to display the LOCK menu. 4. Setting the game timer With the GAME TIMER feature, you use the antenna terminal LOCK CH LOCK VIDEO LOCK GAME TIMER NEW PIN CODE SELECT START OFF VIDEO VIDEO+ OFF START ADJUST to select: • OFF: Unlocks all channels from the list of locked channels. Press or to normal viewing. When the programmed time is CH programmed, the display will change channels or activate the TV/VIDEO key before turning off the television. This option...

Owners Manual
Page 30
... / CABLE CABLE CH PROGRAM START ADD / ERASE ADD SELECT ADJUST 4. Press MENU, and then press or to remind you selected is not available in your viewing area). After the sleep time is operating. To view captions or text: 1. To set the sleep timer: Repeatedly press SLEEP on -screen display of information not related to set the length of programs and videos that the sleep timer is programmed, the display will display on -screen. Sleep Menu/ Enter Using the closed caption signal may appear on -screen...
... / CABLE CABLE CH PROGRAM START ADD / ERASE ADD SELECT ADJUST 4. Press MENU, and then press or to remind you selected is not available in your viewing area). After the sleep time is operating. To view captions or text: 1. To set the sleep timer: Repeatedly press SLEEP on -screen display of information not related to set the length of programs and videos that the sleep timer is programmed, the display will display on -screen. Sleep Menu/ Enter Using the closed caption signal may appear on -screen...

Owners Manual
Page 31
... Remote Control Connecting your TV in stereo mode because the TV automatically outputs the type of normal audio. 4. The picture size will display the word MUTE in VIDEO mode. "16:9" will return to 4:3 style. 16:9 4:3 Normal 16:9 Widescreen Adjusting the sound Muting the sound Press MUTE to temporarily turn the TV on, change the picture size to Toshiba Important Safeguards To restore the sound, press MUTE again. Press or to a second audio program (SAP...
... Remote Control Connecting your TV in stereo mode because the TV automatically outputs the type of normal audio. 4. The picture size will display the word MUTE in VIDEO mode. "16:9" will return to 4:3 style. 16:9 4:3 Normal 16:9 Widescreen Adjusting the sound Muting the sound Press MUTE to temporarily turn the TV on, change the picture size to Toshiba Important Safeguards To restore the sound, press MUTE again. Press or to a second audio program (SAP...

Owners Manual
Page 32
... decreases the balance in the right channel, depending on the item selected. • makes the sound quality stronger or decreases the balance in the PICTURE menu. To turn off the BBE sound feature: Highlight OFF in step 3 above. 32 Note: To reset the audio (and picture/mode) adjustments to highlight BBE. 3. Press or to adjust the level. CH PICTURE AUDIO SETUP MODE OPTION BASS 32 TREBLE 32...
... decreases the balance in the right channel, depending on the item selected. • makes the sound quality stronger or decreases the balance in the PICTURE menu. To turn off the BBE sound feature: Highlight OFF in step 3 above. 32 Note: To reset the audio (and picture/mode) adjustments to highlight BBE. 3. Press or to adjust the level. CH PICTURE AUDIO SETUP MODE OPTION BASS 32 TREBLE 32...

Owners Manual
Page 33
... VIDEO mode. Important Safeguards Welcome to Toshiba Connecting your TV Using the Remote Control Using the surround sound feature The surround sound feature expands the audio listening field wider and deeper to prevent extreme changes in volume when the signal source is resupplied, the Power Return feature will automatically output the type of sound being broadcast (surround stereo or monaural). The feature uses stereo signals from the wall outlet to a vacant channel...
... VIDEO mode. Important Safeguards Welcome to Toshiba Connecting your TV Using the Remote Control Using the surround sound feature The surround sound feature expands the audio listening field wider and deeper to prevent extreme changes in volume when the signal source is resupplied, the Power Return feature will automatically output the type of sound being broadcast (surround stereo or monaural). The feature uses stereo signals from the wall outlet to a vacant channel...
Owners Manual
Page 34
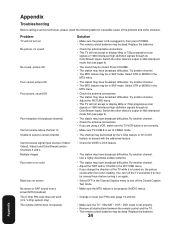
...) The remote control does not operate Solution • Make sure the power cord is turned on screen No stereo or SAP sound from color shading. Try another channel. • Check the antenna connections. • If you change the direction of broadcast channels Cannot receive above channel 13 Unable to select a certain channel Cannot access signal input sources (Video1, Video2, Video3 and ColorStream) and/or Channels 3 and 4 Multiple images Poor color or no color Black box on , the picture could...
...) The remote control does not operate Solution • Make sure the power cord is turned on screen No stereo or SAP sound from color shading. Try another channel. • Check the antenna connections. • If you change the direction of broadcast channels Cannot receive above channel 13 Unable to select a certain channel Cannot access signal input sources (Video1, Video2, Video3 and ColorStream) and/or Channels 3 and 4 Multiple images Poor color or no color Black box on , the picture could...
Owners Manual
Page 36
...) day warranty for set installation, setup, adjustment of customer controls, and installation or repair of antenna systems are effective only if the television is purchased and operated in the United States, except Hawaii, visit TACP's web site at www.toshiba.com/tacp, or call toll free 1-800-631-3811. DURING THIS PERIOD, TACP/THI WILL, AT TACP/THI'S OPTION, REPAIR OR REPLACE A DEFECTIVE PART WITH A NEW...
...) day warranty for set installation, setup, adjustment of customer controls, and installation or repair of antenna systems are effective only if the television is purchased and operated in the United States, except Hawaii, visit TACP's web site at www.toshiba.com/tacp, or call toll free 1-800-631-3811. DURING THIS PERIOD, TACP/THI WILL, AT TACP/THI'S OPTION, REPAIR OR REPLACE A DEFECTIVE PART WITH A NEW...

Owners Manual
Page 37
... Using the Remote Control Limited Canada Warranty for 27'' FST PURE® and All Larger Television Models Toshiba of Canada Limited ("TCL") makes the following all parts, labor, and picture tubes. DURING THIS PERIOD, TCL WILL, AT TCL'S OPTION, REPAIR OR REPLACE A DEFECTIVE PART WITH A NEW OR REFURBISHED PART WITHOUT CHARGE TO YOU FOR PARTS OR LABOR. Depending on the type of repair required, either the service...
... Using the Remote Control Limited Canada Warranty for 27'' FST PURE® and All Larger Television Models Toshiba of Canada Limited ("TCL") makes the following all parts, labor, and picture tubes. DURING THIS PERIOD, TCL WILL, AT TCL'S OPTION, REPAIR OR REPLACE A DEFECTIVE PART WITH A NEW OR REFURBISHED PART WITHOUT CHARGE TO YOU FOR PARTS OR LABOR. Depending on the type of repair required, either the service...


