
User Manual
Page 8
... computer (PC 19 Chapter 3: Using the remote control 20 Preparing the remote control for use 20 Installing the remote control batteries 20 Remote control effective range 20 Learning about the remote control 21 Using the remote control to control your other devices...........22 Remote Control functional key chart 23 Programming the remote control to control your other devices... Acceptable signal formats for PC IN and HDMI terminals......58 Limited United States Warranty for LCD Televisions 26" and Larger 59 Limited Canadian Warranty for Toshiba Brand Flat Panel Televisions 60
... computer (PC 19 Chapter 3: Using the remote control 20 Preparing the remote control for use 20 Installing the remote control batteries 20 Remote control effective range 20 Learning about the remote control 21 Using the remote control to control your other devices...........22 Remote Control functional key chart 23 Programming the remote control to control your other devices... Acceptable signal formats for PC IN and HDMI terminals......58 Limited United States Warranty for LCD Televisions 26" and Larger 59 Limited Canadian Warranty for Toshiba Brand Flat Panel Televisions 60

User Manual
Page 9
Chapter 1: Introduction Features of your new TV The following are just a few of the many exciting features of external devices from the TV remote via HDMI connection ( page 50). 9 ABC, HBO, etc.) on the screen along with the station numbers, so you always know what ...) computer terminal ( page 19). • Channel Labeling allows you 're watching ( page 31). • REGZA-LINK allows control of your new Toshiba widescreen, integrated HD, LCD TV: • Integrated digital tuning (8VSB ATSC and QAM) eliminates the need for a separate digital converter set-top box (in ...
Chapter 1: Introduction Features of your new TV The following are just a few of the many exciting features of external devices from the TV remote via HDMI connection ( page 50). 9 ABC, HBO, etc.) on the screen along with the station numbers, so you always know what ...) computer terminal ( page 19). • Channel Labeling allows you 're watching ( page 31). • REGZA-LINK allows control of your new Toshiba widescreen, integrated HD, LCD TV: • Integrated digital tuning (8VSB ATSC and QAM) eliminates the need for a separate digital converter set-top box (in ...
User Manual
Page 10
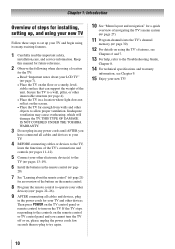
THIS TYPE OF DAMAGE IS NOT COVERED UNDER THE TOSHIBA WARRANTY. 3無 Do not plug in any power cords until AFTER you... Secure the TV to a wall, pillar, or other immovable structure ( page 4). • Place the TV in the remote control ( page 20). 7無 See "Learning about your TV and other objects to the controls on using its many ...). 11無 Program channels into the TV's channel memory ( page 30). 12無 For details on the remote control or TV control panel and you have connected all cables and devices, plug in the power cords for your LCD ...
THIS TYPE OF DAMAGE IS NOT COVERED UNDER THE TOSHIBA WARRANTY. 3無 Do not plug in any power cords until AFTER you... Secure the TV to a wall, pillar, or other immovable structure ( page 4). • Place the TV in the remote control ( page 20). 7無 See "Learning about your TV and other objects to the controls on using its many ...). 11無 Program channels into the TV's channel memory ( page 30). 12無 For details on the remote control or TV control panel and you have connected all cables and devices, plug in the power cords for your LCD ...
User Manual
Page 11
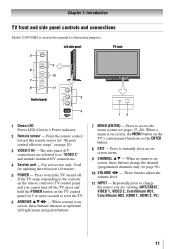
... panel functions as "VIDEO 2" and include standard A/V connections. 4無 Service port - Repeatedly press to turn off . Point the remote control toward this manual for updating the television's firmware. 5無 POWER - Press to change the channel (programmed channels only; ...navigation buttons. 7無 MENU (ENTER) - Chapter 1: Introduction TV front and side panel controls and connections Model 32AV502RZ is used in this remote sensor ( "Remote control effective range" on page 20). 3無 VIDEO-2 IN - Left side panel 5 TV front 9 6 10 7 8 11 Control...
... panel functions as "VIDEO 2" and include standard A/V connections. 4無 Service port - Repeatedly press to turn off . Point the remote control toward this manual for updating the television's firmware. 5無 POWER - Press to change the channel (programmed channels only; ...navigation buttons. 7無 MENU (ENTER) - Chapter 1: Introduction TV front and side panel controls and connections Model 32AV502RZ is used in this remote sensor ( "Remote control effective range" on page 20). 3無 VIDEO-2 IN - Left side panel 5 TV front 9 6 10 7 8 11 Control...
User Manual
Page 14
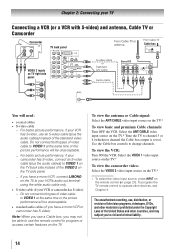
... select the video input source, press INPUT on the TV.* To view basic and premium Cable channels: Turn OFF the VCR. To program the TV remote control to operate other materials is set to). Chapter 2: Connecting your TV Connecting a VCR (or a VCR with S-video) and antenna, Cable TV or Camcorder...other devices, see Chapter 3. Use the Cable box controls to VIDEO 1 at the same time or the picture performance will be able to use the remote control to civil and criminal liability. 14 To view the VCR: Turn ON the VCR. The unauthorized recording, use an S-video cable (plus the ...
... select the video input source, press INPUT on the TV.* To view basic and premium Cable channels: Turn OFF the VCR. To program the TV remote control to operate other materials is set to). Chapter 2: Connecting your TV Connecting a VCR (or a VCR with S-video) and antenna, Cable TV or Camcorder...other devices, see Chapter 3. Use the Cable box controls to VIDEO 1 at the same time or the picture performance will be able to use the remote control to civil and criminal liability. 14 To view the VCR: Turn ON the VCR. The unauthorized recording, use an S-video cable (plus the ...
User Manual
Page 15
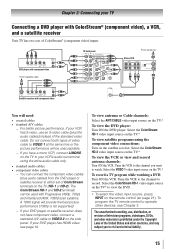
...United States and other countries, and may subject you to civil and criminal liability. 15 Select the ColorStream HD-2 video input source on the remote control ( page 21). Tune the VCR to the channel you have component video, connect a standard A/V cable to either set of ...component video) inputs. The ColorStream HD-1 and HD-2 terminals can be unacceptable. −− If you want to record. To program the TV remote control to operate other materials is not supported). −− If your DVD player or satellite receiver does not have a mono VCR, connect L/MONO...
...United States and other countries, and may subject you to civil and criminal liability. 15 Select the ColorStream HD-2 video input source on the remote control ( page 21). Tune the VCR to the channel you have component video, connect a standard A/V cable to either set of ...component video) inputs. The ColorStream HD-1 and HD-2 terminals can be unacceptable. −− If you want to record. To program the TV remote control to operate other materials is not supported). −− If your DVD player or satellite receiver does not have a mono VCR, connect L/MONO...

User Manual
Page 16
... the HDMI device video: Select the HDMI 1, or HDMI 2 video input source on the TV.* ** To select the video input source, press INPUT on the remote control ( page 21). The recommended length is 6.6 ft (2m). • one HDMI cable (type A connector) per DVI device −− For ... of an HDMI- For detailed signal specifications, see page 19. Conventional HDMI/DVI cable may not operate properly with the TV. To program the TV remote control to -DVI adapter cable should not exceed 9.8 ft (3m). Note: To connect a PC to accept HDCP (High-Bandwidth Digital-Content Protection) ...
... the HDMI device video: Select the HDMI 1, or HDMI 2 video input source on the TV.* ** To select the video input source, press INPUT on the remote control ( page 21). The recommended length is 6.6 ft (2m). • one HDMI cable (type A connector) per DVI device −− For ... of an HDMI- For detailed signal specifications, see page 19. Conventional HDMI/DVI cable may not operate properly with the TV. To program the TV remote control to -DVI adapter cable should not exceed 9.8 ft (3m). Note: To connect a PC to accept HDCP (High-Bandwidth Digital-Content Protection) ...

User Manual
Page 17
.... • This feature is limited to the individual instruction manuals for those operations. Before controlling the device(s): • After completing the above connections, set . However, Toshiba is not liable for compatibility information. For details, see pages 50. TV back panel Audio receiver Playback device (REGZA-LINK DVD player,etc.) Playback device... on the devices that you connect a REGZA-LINK compatible audio receiver or playback device. For an explanation of connected audio/video devices using the TV's remote control if you use HDMI cables with the HDMI Logo ( ).
.... • This feature is limited to the individual instruction manuals for those operations. Before controlling the device(s): • After completing the above connections, set . However, Toshiba is not liable for compatibility information. For details, see pages 50. TV back panel Audio receiver Playback device (REGZA-LINK DVD player,etc.) Playback device... on the devices that you connect a REGZA-LINK compatible audio receiver or playback device. For an explanation of connected audio/video devices using the TV's remote control if you use HDMI cables with the HDMI Logo ( ).
User Manual
Page 18
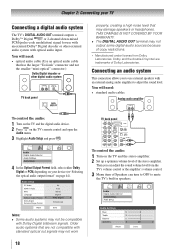
... Analog audio amplifier LINE IN LR To control the audio: 1無 Turn on the TV and the digital audio device. 2無 Press on the TV's remote control and open the Audio menu. 3無 Highlight Audio Setup and press . Older audio systems that are trademarks of the stereo amplifier. Then you to...
... Analog audio amplifier LINE IN LR To control the audio: 1無 Turn on the TV and the digital audio device. 2無 Press on the TV's remote control and open the Audio menu. 3無 Highlight Audio Setup and press . Older audio systems that are trademarks of the stereo amplifier. Then you to...

User Manual
Page 20
...Batteries should always be disposed of with the environment in the remote control, always replace both batteries with new ones. •• When necessary to match the + and - Note: •• Be sure to operate most Toshiba devices ( page 24). Squeeze tab and lift cover...even if they are different brands. Always dispose of the remote control. Installing the remote control batteries 1無 Remove the battery cover from leaking into the battery compartment. If you have a Toshiba device: Your TV remote control is not to be exposed to excessive heat such ...
...Batteries should always be disposed of with the environment in the remote control, always replace both batteries with new ones. •• When necessary to match the + and - Note: •• Be sure to operate most Toshiba devices ( page 24). Squeeze tab and lift cover...even if they are different brands. Always dispose of the remote control. Installing the remote control batteries 1無 Remove the battery cover from leaking into the battery compartment. If you have a Toshiba device: Your TV remote control is not to be exposed to excessive heat such ...

User Manual
Page 21
...HD, Native and Dot by Dot ( page 39-40). 5無 Channel Numbers (0-9, -/100) directly tune channels. For a complete list of the remote control's functions, see / .) 16無 ENTER activates highlighted items in the main menu system. 17無 MENU accesses the main TV menu system (&#...is not available. 1無 POWER turns the TV on -screen ( page 30). 8無 VOL + - Chapter 3: Using the remote control Learning about the remote control The buttons used to tune digital channels ( page 38) or to restore the moving picture ( page 41). 3無 ...
...HD, Native and Dot by Dot ( page 39-40). 5無 Channel Numbers (0-9, -/100) directly tune channels. For a complete list of the remote control's functions, see / .) 16無 ENTER activates highlighted items in the main menu system. 17無 MENU accesses the main TV menu system (&#...is not available. 1無 POWER turns the TV on -screen ( page 30). 8無 VOL + - Chapter 3: Using the remote control Learning about the remote control The buttons used to tune digital channels ( page 38) or to restore the moving picture ( page 41). 3無 ...

User Manual
Page 22
... REC Starts tape recording. 20無 MODE SELECT switch Set to "TV" to recognize the device (if you have a non-Toshiba device or a Toshiba device that the remote control is programmed, it may not work on some DVD players). 9無 ENTER Required by some satellite receivers and DVD players to ...; Channel Numbers (0-9) Press to directly access channels (as opposed to ). 3無 +10 Press to select TV mode. Note: Even after the TV remote control is not preprogrammed to operate, you will need to use your other devices. SET UP Accesses a DVD's setup menu in the CABLE/ SAT mode...
... REC Starts tape recording. 20無 MODE SELECT switch Set to "TV" to recognize the device (if you have a non-Toshiba device or a Toshiba device that the remote control is programmed, it may not work on some DVD players). 9無 ENTER Required by some satellite receivers and DVD players to ...; Channel Numbers (0-9) Press to directly access channels (as opposed to ). 3無 +10 Press to select TV mode. Note: Even after the TV remote control is not preprogrammed to operate, you will need to use your other devices. SET UP Accesses a DVD's setup menu in the CABLE/ SAT mode...

User Manual
Page 23
... up/down Channel Channel up/down up/down Channel up /down --- Info --- Menu left --- Play Play STOP Stop* --- --- REMOTE CONTROL KEY Toshiba TV CABLE SAT (satellite) AUX 1 (VCR) AUX 2 (DVD or HTIB) POWER Power Power Power Power Power SLEEP Sleep timer .../VCR/ SEARCH DVD search* --- --- Chapter 3: Using the remote control Remote Control functional key chart Note key does not send a signal in that remote control mode. •• " TV" = key will affect the TV, even though the remote control is in another mode. •• * Not available...
... up/down Channel Channel up/down up/down Channel up /down --- Info --- Menu left --- Play Play STOP Stop* --- --- REMOTE CONTROL KEY Toshiba TV CABLE SAT (satellite) AUX 1 (VCR) AUX 2 (DVD or HTIB) POWER Power Power Power Power Power SLEEP Sleep timer .../VCR/ SEARCH DVD search* --- --- Chapter 3: Using the remote control Remote Control functional key chart Note key does not send a signal in that remote control mode. •• " TV" = key will affect the TV, even though the remote control is in another mode. •• * Not available...
User Manual
Page 24
.... •• Some newer VCRs respond to the codes for your VCR brand, set the switch to the other devices Your Toshiba TV remote control is not preprogrammed to operate), follow the steps below . • If the correct code was entered, the device will turn off. &#... the device does not respond to another code (if other codes are programming the remote control to operate most Toshiba devices. If, after trying all necessary keys on using the remote control to operate a non-Toshiba device (or a Toshiba device that came with the device. 5無 Remember to set the MODE SELECT ...
.... •• Some newer VCRs respond to the codes for your VCR brand, set the switch to the other devices Your Toshiba TV remote control is not preprogrammed to operate), follow the steps below . • If the correct code was entered, the device will turn off. &#... the device does not respond to another code (if other codes are programming the remote control to operate most Toshiba devices. If, after trying all necessary keys on using the remote control to operate a non-Toshiba device (or a Toshiba device that came with the device. 5無 Remember to set the MODE SELECT ...

User Manual
Page 25
S. Your other device may not be able to operate your device with the TV remote control. Cable converter box ABC 061, 062, 063, 082, 084, 087, 092, 096, ... Norcent Onkyo Oritron Panasonic Philips Pioneer Proscan Qwestar RCA Sampo Samsung Sansui Sanyo Sharp Sherwood Sony Sylvania Teac Technics Techwood Toshiba Yamaha Zenith 006, 015 016, 017 097 018 019 020 021 022, 023, 024, 025 026, 027 ..., 092 (continued) 25 If this happens, use a code that is not recognized by the TV remote control. Chapter 3: Using the remote control Remote control codes In some cases you may use the device...
S. Your other device may not be able to operate your device with the TV remote control. Cable converter box ABC 061, 062, 063, 082, 084, 087, 092, 096, ... Norcent Onkyo Oritron Panasonic Philips Pioneer Proscan Qwestar RCA Sampo Samsung Sansui Sanyo Sharp Sherwood Sony Sylvania Teac Technics Techwood Toshiba Yamaha Zenith 006, 015 016, 017 097 018 019 020 021 022, 023, 024, 025 026, 027 ..., 092 (continued) 25 If this happens, use a code that is not recognized by the TV remote control. Chapter 3: Using the remote control Remote control codes In some cases you may use the device...
User Manual
Page 27
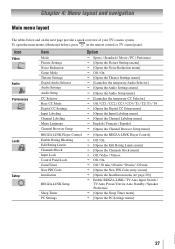
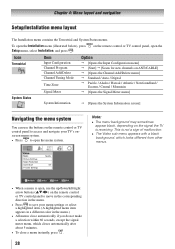
... tables below ), press on the next page provide a quick overview of your TV's menu system. To open the main menus (illustrated below and on the remote control or TV control panel. Icon Video Audio Preferences Locks Setup Item Mode Picture Settings Noise Reduction Game Mode Theater Settings Digital Audio Selector Audio...
... tables below ), press on the next page provide a quick overview of your TV's menu system. To open the main menus (illustrated below and on the remote control or TV control panel. Icon Video Audio Preferences Locks Setup Item Mode Picture Settings Noise Reduction Game Mode Theater Settings Digital Audio Selector Audio...
User Manual
Page 28
...selection within 60 seconds, except the signal meter menu, which looks different from other menus. • When a menu is receiving. on the remote control or TV control panel, open the Icon Terrestrial Item Input Configuration Channel Program Channel Add/Delete Channel Tuning Mode Time Zone Signal Meter Option... [Opens the System Information screen] Navigating the menu system You can use the up/down/left/right arrow buttons (pqtu) on the remote control or TV control panel to access and navigate your TV's onscreen menu system. • Press to save your menu settings or select a...
...selection within 60 seconds, except the signal meter menu, which looks different from other menus. • When a menu is receiving. on the remote control or TV control panel, open the Icon Terrestrial Item Input Configuration Channel Program Channel Add/Delete Channel Tuning Mode Time Zone Signal Meter Option... [Opens the System Information screen] Navigating the menu system You can use the up/down/left/right arrow buttons (pqtu) on the remote control or TV control panel to access and navigate your TV's onscreen menu system. • Press to save your menu settings or select a...

User Manual
Page 30
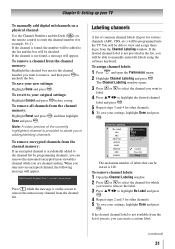
After the channels are programmed automatically, you press or on the remote control or TV control panel, your TV will stop only on the remote control (or highlight Cancel in the onscreen display and press ). When channel programming is finished, you have to repeat the ...bring up your TV Programming channels into the TV's channel memory. Note: •• You must use the Channel Number buttons on the remote control. •• Programming channels when the ANT/ CABLE input is normal; Manually adding and deleting channels in the channel memory After automatically...
After the channels are programmed automatically, you press or on the remote control or TV control panel, your TV will stop only on the remote control (or highlight Cancel in the onscreen display and press ). When channel programming is finished, you have to repeat the ...bring up your TV Programming channels into the TV's channel memory. Note: •• You must use the Channel Number buttons on the remote control. •• Programming channels when the ANT/ CABLE input is normal; Manually adding and deleting channels in the channel memory After automatically...
User Manual
Page 31
... be able to uncheck the box. Press while the message is not provided in adding/deleting channels. If the desired channel label is on the remote control to your original settings: Highlight Cancel and press before saving. To save your settings, highlight Done and press . To remove encrypted channels from the...
... be able to uncheck the box. Press while the message is not provided in adding/deleting channels. If the desired channel label is on the remote control to your original settings: Highlight Cancel and press before saving. To save your settings, highlight Done and press . To remove encrypted channels from the...
User Manual
Page 32
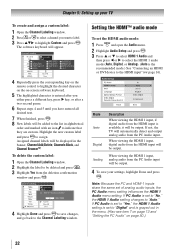
... t or u to highlight the desired character on the on page 50.) 32 The software keyboard will appear. 4無 Repeatedly press the corresponding key on the remote control to select the HDMI 1 audio mode (Auto, Digital, or Analog). (Auto is available, it will be added to the list in the banner, Channel...
... t or u to highlight the desired character on the on page 50.) 32 The software keyboard will appear. 4無 Repeatedly press the corresponding key on the remote control to select the HDMI 1 audio mode (Auto, Digital, or Analog). (Auto is available, it will be added to the list in the banner, Channel...


