User Manual
Page 10
... 21 Learning about the remote control 22 Chapter 4: Menu layout and navigation 24 Main menu layout 24 Setup / Installation menu layout 25 Navigating the menu system 25 Chapter 5: Setting up your TV 26 Initial Setup 26 Selecting the menu language 26 Configuring the antenna input source for theANT/CABLE terminal..........26 Programming... Specifications 74 Acceptable signal formats for PC IN and HDMI terminals...........75 Limited United States Warranty LCD TV/DVD Combination ......76 Limited Canadian Warranty for Toshiba Brand Flat Panel Televisions 77
... 21 Learning about the remote control 22 Chapter 4: Menu layout and navigation 24 Main menu layout 24 Setup / Installation menu layout 25 Navigating the menu system 25 Chapter 5: Setting up your TV 26 Initial Setup 26 Selecting the menu language 26 Configuring the antenna input source for theANT/CABLE terminal..........26 Programming... Specifications 74 Acceptable signal formats for PC IN and HDMI terminals...........75 Limited United States Warranty LCD TV/DVD Combination ......76 Limited Canadian Warranty for Toshiba Brand Flat Panel Televisions 77
User Manual
Page 13
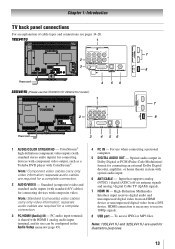
...device or uncompressed digital video from a DVI device. Optical audio output in the Audio Setup menu ( page 45). 4無 PC IN - HDMI connection is shared with ColorStream®. Note: 19SLV411U and 32SLV411U are used for 24SLV411U model.) 4 1 56 2 7 8 7 8 Power cord 3 4 56 ...1無 AUDIO/COLOR STREAM HD - Standard (composite) video and standard audio inputs (with standard A/V cables) for connecting devices with component video output, such as a Toshiba DVD player with HDMI 1 ...
...device or uncompressed digital video from a DVI device. Optical audio output in the Audio Setup menu ( page 45). 4無 PC IN - HDMI connection is shared with ColorStream®. Note: 19SLV411U and 32SLV411U are used for 24SLV411U model.) 4 1 56 2 7 8 7 8 Power cord 3 4 56 ...1無 AUDIO/COLOR STREAM HD - Standard (composite) video and standard audio inputs (with standard A/V cables) for connecting devices with component video output, such as a Toshiba DVD player with HDMI 1 ...
User Manual
Page 18
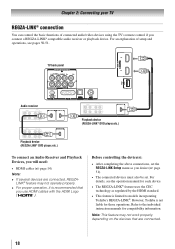
... page 51). • The connected devices must also be set the REGZA-LINK Setup menu as regulated by the HDMI standard. • This feature is not liable for compatibility information. However, Toshiba is limited to the individual instruction manuals for those operations. TV back panel Audio ...® compatible audio receiver or playback device. Chapter 2: Connecting your TV REGZA-LINK® connection You can control the basic functions of setup and operations, see the operation manual for each device. • The REGZA-LINK® feature uses the CEC technology as you use ...
... page 51). • The connected devices must also be set the REGZA-LINK Setup menu as regulated by the HDMI standard. • This feature is not liable for compatibility information. However, Toshiba is limited to the individual instruction manuals for those operations. TV back panel Audio ...® compatible audio receiver or playback device. Chapter 2: Connecting your TV REGZA-LINK® connection You can control the basic functions of setup and operations, see the operation manual for each device. • The REGZA-LINK® feature uses the CEC technology as you use ...
User Manual
Page 19
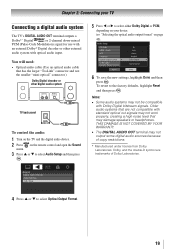
... on the TV and the digital audio device. 2無 Press on the remote control and open the Sound menu. 3無 Press p or q to select Audio Setup and then press . 5無 Press t or u to the factory defaults, highlight Reset and then press . THIS DAMAGE IS NOT COVERED BY YOUR WARRANTY. ••...
... on the TV and the digital audio device. 2無 Press on the remote control and open the Sound menu. 3無 Press p or q to select Audio Setup and then press . 5無 Press t or u to the factory defaults, highlight Reset and then press . THIS DAMAGE IS NOT COVERED BY YOUR WARRANTY. ••...
User Manual
Page 22
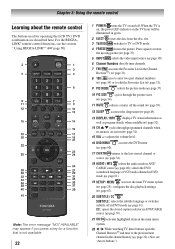
... the last viewed channel or source ( page 34). 18無 AUDIO / MTS selects the audio mode in DVD mode ( page 61). 19無 SETUP / MENU accesses the main TV menu system ( page 25); Press again to restore the moving picture ( page 37). 5無 INPUT INPUT selects the...
... the last viewed channel or source ( page 34). 18無 AUDIO / MTS selects the audio mode in DVD mode ( page 61). 19無 SETUP / MENU accesses the main TV menu system ( page 25); Press again to restore the moving picture ( page 37). 5無 INPUT INPUT selects the...

User Manual
Page 24
...; Off / On [Opens the Theater Settings menu] [Launches the temporary Audio Selector] [Opens the Audio Settings menu] [Opens the Audio Setup menu] [Launches the temporary CC Selector] Off / CC1 / CC2 / CC3 / CC4 / T1 / T2 / T3 / T4 [Opens the ... CC Settings menu] [Opens the Input Labeling menu] English / Français / Español [Opens the Channel Browser Setup menu] [Opens the REGZA-LINK Player Control menu] [Opens the Energy Saving Settings menu] Off / On [Opens ...
...; Off / On [Opens the Theater Settings menu] [Launches the temporary Audio Selector] [Opens the Audio Settings menu] [Opens the Audio Setup menu] [Launches the temporary CC Selector] Off / CC1 / CC2 / CC3 / CC4 / T1 / T2 / T3 / T4 [Opens the ... CC Settings menu] [Opens the Input Labeling menu] English / Français / Español [Opens the Channel Browser Setup menu] [Opens the REGZA-LINK Player Control menu] [Opens the Energy Saving Settings menu] Off / On [Opens ...

User Manual
Page 25
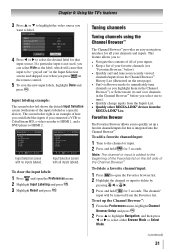
... To open the Installation menu (illustrated below), press on the remote control or MENU on the remote control or TV control panel to open the Setup menu, select Installation, and press . Icon Terrestrial System Status Item Input Configuration Channel Program Channel Options Channel Tuning Mode Time Zone Signal Meter System ...depending on the signal the TV is opened, use the buttons on the TV control panel, open the menu system. Chapter 4: Menu layout and navigation Setup / Installation menu layout The Installation menu contains the Terrestrial and System Status menus.
... To open the Installation menu (illustrated below), press on the remote control or MENU on the remote control or TV control panel to open the Setup menu, select Installation, and press . Icon Terrestrial System Status Item Input Configuration Channel Program Channel Options Channel Tuning Mode Time Zone Signal Meter System ...depending on the signal the TV is opened, use the buttons on the TV control panel, open the menu system. Chapter 4: Menu layout and navigation Setup / Installation menu layout The Installation menu contains the Terrestrial and System Status menus.
User Manual
Page 26
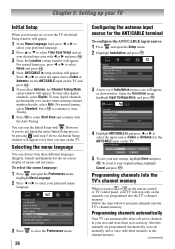
... Preferences menu. 26 Configuring the antenna input source for the ANT/CABLE terminal To configure the ANT/CABLE input source: 1無 Press and open the Setup menu. 2無 Highlight Installation and press . 3無 A new set your desired time zone with t or u and press . 3無 Next,... the Location setting window will stop the Initial Setup with the Auto Tuning. Programming channels into the TV's channel memory. Press to continue to Auto Tuning. 6無 Press to program channels into the TV...
... Preferences menu. 26 Configuring the antenna input source for the ANT/CABLE terminal To configure the ANT/CABLE input source: 1無 Press and open the Setup menu. 2無 Highlight Installation and press . 3無 A new set your desired time zone with t or u and press . 3無 Next,... the Location setting window will stop the Initial Setup with the Auto Tuning. Programming channels into the TV's channel memory. Press to continue to Auto Tuning. 6無 Press to program channels into the TV...
User Manual
Page 27
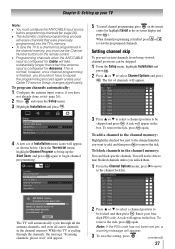
... will not be skipped and press . This is finished, you should not have not already done so ( page 26). 2無 Press and open the Setup menu. 3無 Highlight Installation and press . 5無 To cancel channel programming, press on the remote control (or highlight Cancel in the box. however, once channel..., and store all active channels in the channel memory. A tick will appear. 2無 Press p or q to select a channel position to be skipped. 1無 From the Setup menu, highlight Installation and press . 2無 Press p or q to remove the tick.
... will not be skipped and press . This is finished, you should not have not already done so ( page 26). 2無 Press and open the Setup menu. 3無 Highlight Installation and press . 5無 To cancel channel programming, press on the remote control (or highlight Cancel in the box. however, once channel..., and store all active channels in the channel memory. A tick will appear. 2無 Press p or q to select a channel position to be skipped. 1無 From the Setup menu, highlight Installation and press . 2無 Press p or q to remove the tick.
User Manual
Page 28
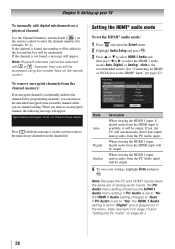
...: Because the PC and HDMI1 inputs share the same set the HDMI® audio mode: 1無 Press and open the Sound menu. 2無 Highlight Audio Setup and press . 3無 Press p or q to select HDMI 1 Audio and then press t or u to select the HDMI 1 audio mode (Auto, Digital, or Analog). (Auto is...
...: Because the PC and HDMI1 inputs share the same set the HDMI® audio mode: 1無 Press and open the Sound menu. 2無 Highlight Audio Setup and press . 3無 Press p or q to select HDMI 1 Audio and then press t or u to select the HDMI 1 audio mode (Auto, Digital, or Analog). (Auto is...

User Manual
Page 29
...feature will appear. To set the Daylight Saving Time status: 1無 Press t or u to their factory default values: 1無 Press and open the Setup menu. 2無 Highlight Installation and press . 3無 A new set of Installation menu icons will allow you want to check. 5無 If you to...: • The physical digital channel number listed in the ANT/ CABLE digital TV input source only. Setting the time zone The Time Zone setup will appear. 3無 Open the System Status menu, highlight System Information, and press . 4無 Press tu to scroll through the menu bar...
...feature will appear. To set the Daylight Saving Time status: 1無 Press t or u to their factory default values: 1無 Press and open the Setup menu. 2無 Highlight Installation and press . 3無 A new set of Installation menu icons will allow you want to check. 5無 If you to...: • The physical digital channel number listed in the ANT/ CABLE digital TV input source only. Setting the time zone The Time Zone setup will appear. 3無 Open the System Status menu, highlight System Information, and press . 4無 Press tu to scroll through the menu bar...
User Manual
Page 31
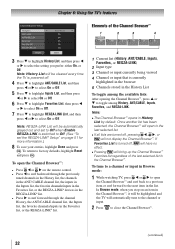
... or input. 2無 Press and hold for that input source. To set up the Channel Browser™: 1無 From the Preferences menu, highlight Channel Browser Setup and press . 2無 Press to highlight Navigation, and then press or to select either Browse Mode or Select Mode. (continued) 31 If...
... or input. 2無 Press and hold for that input source. To set up the Channel Browser™: 1無 From the Preferences menu, highlight Channel Browser Setup and press . 2無 Press to highlight Navigation, and then press or to select either Browse Mode or Select Mode. (continued) 31 If...
User Manual
Page 32
... list, or the REGZA-LINK® devices in the REGZA-LINK® list. • Press to Off. (See "To set the REGZA-LINK® Setup" on an item in the Channel Browser™, it will be highlighted and the TV will automatically tune to the channel or input. 2無 Press...
... list, or the REGZA-LINK® devices in the REGZA-LINK® list. • Press to Off. (See "To set the REGZA-LINK® Setup" on an item in the Channel Browser™, it will be highlighted and the TV will automatically tune to the channel or input. 2無 Press...
User Manual
Page 33
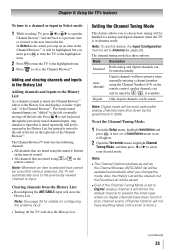
... menu icons will clear the History List. Mode Description Standard Both analog and digital channels can be set the Channel Tuning Mode: 1無 From the Setup menu, highlight Installation and press . In Select mode, when you must be tuned normally Auto (default) Digital channels will have anything listed until a scan is...
... menu icons will clear the History List. Mode Description Standard Both analog and digital channels can be set the Channel Tuning Mode: 1無 From the Setup menu, highlight Installation and press . In Select mode, when you must be tuned normally Auto (default) Digital channels will have anything listed until a scan is...

User Manual
Page 39
... Auto, Default, Mono w. Chapter 6: Using the TV's features Digital CC Settings You can customize the closed caption display characteristics by the language option under Audio Setup ( "Selecting stereo/SAP broadcasts" on page 40). w.
... Auto, Default, Mono w. Chapter 6: Using the TV's features Digital CC Settings You can customize the closed caption display characteristics by the language option under Audio Setup ( "Selecting stereo/SAP broadcasts" on page 40). w.
User Manual
Page 40
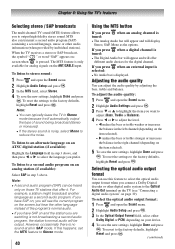
... Select SAP in Stereo mode because it . To select the optical audio output format: 1無 Press and open the Sound menu. 2無 Highlight Audio Setup and press . 3無 In the MTS field, select Stereo. 4無 To save the new settings, highlight Done and press . To listen to the... you connect a Dolby Digital decoder or other digital audio system to stereo sound: 1無 Press and open the Sound menu. 2無 Highlight Audio Setup and press . 3無 In the Optical Output Format field, select either Dolby Digital or PCM, depending on the screen but hear the other audio...
... Select SAP in Stereo mode because it . To select the optical audio output format: 1無 Press and open the Sound menu. 2無 Highlight Audio Setup and press . 3無 In the MTS field, select Stereo. 4無 To save the new settings, highlight Done and press . To listen to the... you connect a Dolby Digital decoder or other digital audio system to stereo sound: 1無 Press and open the Sound menu. 2無 Highlight Audio Setup and press . 3無 In the Optical Output Format field, select either Dolby Digital or PCM, depending on the screen but hear the other audio...
User Manual
Page 41
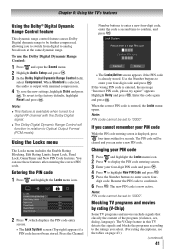
... the programs according to the ratings you can use the Dolby Digital Dynamic Range Control: 1無 Press and open the Sound menu. 2無 Highlight Audio Setup and press . 3無 In the Dolby Digital Dynamic Range Control field, select Compressed. Changing your PIN code 1無 Press and highlight the Locks menu icon...
... the programs according to the ratings you can use the Dolby Digital Dynamic Range Control: 1無 Press and open the Sound menu. 2無 Highlight Audio Setup and press . 3無 In the Dolby Digital Dynamic Range Control field, select Compressed. Changing your PIN code 1無 Press and highlight the Locks menu icon...

User Manual
Page 44
... ( "Using the input lock feature" as described). PIN code entry will be accessed by entering the PIN. 44 To lock channels: 1無 From the Setup menu, highlight Installation and press . 2無 Press to select Terrestrial. 3無 Press or to watch.
... ( "Using the input lock feature" as described). PIN code entry will be accessed by entering the PIN. 44 To lock channels: 1無 From the Setup menu, highlight Installation and press . 2無 Press to select Terrestrial. 3無 Press or to watch.

User Manual
Page 45
To unlock the control panel: Select Off in the Setup menu. 4無 Press or to highlight the item you can use the...screen. Note: Because the PC and HDMI-1 inputs share the same set the PC Audio: 1無 Press and open the Setup menu. 3無 Highlight PC Settings and press . If PC Audio is set to "No" the HDMI 1 Audio setting ...61483; "Selecting the video input source to view" page 30). 2無 Press and open the Sound menu. 2無 Highlight Audio Setup and press . 3無 Press or to select PC Audio and then press or to ...
To unlock the control panel: Select Off in the Setup menu. 4無 Press or to highlight the item you can use the...screen. Note: Because the PC and HDMI-1 inputs share the same set the PC Audio: 1無 Press and open the Setup menu. 3無 Highlight PC Settings and press . If PC Audio is set to "No" the HDMI 1 Audio setting ...61483; "Selecting the video input source to view" page 30). 2無 Press and open the Sound menu. 2無 Highlight Audio Setup and press . 3無 Press or to select PC Audio and then press or to ...
User Manual
Page 46
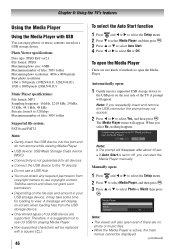
... ). 46 To select the Auto Start function 1無 Press and or to select the Setup menu. 2無 Press to select Media Player, and then press . 3無 Press or..., and then press . Note: ••The prompt will be displayed. (continued) Toshiba cannot and does not grant such permission. ••Depending on a USB storage device... 4096 x 4096 pixels Best photo resolution: 1366 x 768 pixels (19SLV411U, 32SLV411U) 1920 x 1080 pixels (24SLV411U) Music Player specifications: File format: MP3 Sampling frequency: 16 kHz, 22.05 kHz, 24 kHz, 32 kHz...
... ). 46 To select the Auto Start function 1無 Press and or to select the Setup menu. 2無 Press to select Media Player, and then press . 3無 Press or..., and then press . Note: ••The prompt will be displayed. (continued) Toshiba cannot and does not grant such permission. ••Depending on a USB storage device... 4096 x 4096 pixels Best photo resolution: 1366 x 768 pixels (19SLV411U, 32SLV411U) 1920 x 1080 pixels (24SLV411U) Music Player specifications: File format: MP3 Sampling frequency: 16 kHz, 22.05 kHz, 24 kHz, 32 kHz...

