
Owners Manual
Page 1
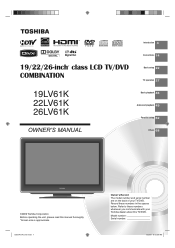
...TV/DVD. Refer to these numbers in the spaces below. Introduction 4 19/22/26-inch* class LCD TV/DVD COMBINATION Connections 14 Basic setup 22 TV operation 27 19LV61K 22LV61K 26LV61K Basic playback 46 Advanced playback 49 Function setup 62 OWNER'S MANUAL Others 68 ©2009 Toshiba... Corporation Before operating the unit, please read this TV/DVD.
...TV/DVD. Refer to these numbers in the spaces below. Introduction 4 19/22/26-inch* class LCD TV/DVD COMBINATION Connections 14 Basic setup 22 TV operation 27 19LV61K 22LV61K 26LV61K Basic playback 46 Advanced playback 49 Function setup 62 OWNER'S MANUAL Others 68 ©2009 Toshiba... Corporation Before operating the unit, please read this TV/DVD.
Owners Manual
Page 2
... OR ELECTRIC SHOCK, DO NOT EXPOSE THIS APPLIANCE TO RAIN OR MOISTURE. ENERGY STAR® qualified TV. Department of the NEC, which provides guidelines for your LCD TV" (Pg.6). TOSHIBA Cares! • The consumer electronics industry is committed to walls with steel studs or old cinder block..., Thank you enjoy your new product, please keep it cannot be pushed, pulled over and cause injury. As you for purchasing this Toshiba LCD TV or TV/DVD Combination television. However, flat panel displays are registered U.S. WARNING: If you to lead, a chemical known to the State of...
... OR ELECTRIC SHOCK, DO NOT EXPOSE THIS APPLIANCE TO RAIN OR MOISTURE. ENERGY STAR® qualified TV. Department of the NEC, which provides guidelines for your LCD TV" (Pg.6). TOSHIBA Cares! • The consumer electronics industry is committed to walls with steel studs or old cinder block..., Thank you enjoy your new product, please keep it cannot be pushed, pulled over and cause injury. As you for purchasing this Toshiba LCD TV or TV/DVD Combination television. However, flat panel displays are registered U.S. WARNING: If you to lead, a chemical known to the State of...
Owners Manual
Page 3
...digital device, pursuant to radio communications. Consult the dealer or an experienced radio/TV technician for compliance to these rules is encouraged to try to correct the interference by Toshiba could void the userʼs authority to operate this equipment does cause harmful ...between the equipment and the receiver. - Wayne, NJ 07470. FCC Declaration of Conformity Compliance Statement (Part 15): The Toshiba 19LV61K, 22LV61K, 26LV61K LCD TV/DVD Combination complies with Part 15 of the unit. NEVER STARE INTO BEAM. Disposal may not cause harmful interference, and ...
...digital device, pursuant to radio communications. Consult the dealer or an experienced radio/TV technician for compliance to these rules is encouraged to try to correct the interference by Toshiba could void the userʼs authority to operate this equipment does cause harmful ...between the equipment and the receiver. - Wayne, NJ 07470. FCC Declaration of Conformity Compliance Statement (Part 15): The Toshiba 19LV61K, 22LV61K, 26LV61K LCD TV/DVD Combination complies with Part 15 of the unit. NEVER STARE INTO BEAM. Disposal may not cause harmful interference, and ...
Owners Manual
Page 4
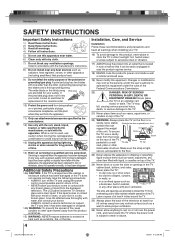
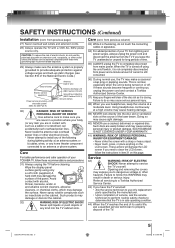
...Communications Commission. 20) DANGER: RISK OF SERIOUS PERSONAL INJURY, DEATH, OR EQUIPMENT DAMAGE! Additional Safety Precautions 14a) CAUTION: If the TV is tight, secure, and parallel to the floor. 23) Never expose the apparatus to dripping or splashing liquid or place ... 14) Refer all servicing to qualified service personnel. The slots and openings are provided for long periods of the TV Band pedestal to a wall TV side TV top stud, pillar or other . Installation, Care, and Service Installation Follow these instructions. 3) Heed all warnings. 4) Follow ...
...Communications Commission. 20) DANGER: RISK OF SERIOUS PERSONAL INJURY, DEATH, OR EQUIPMENT DAMAGE! Additional Safety Precautions 14a) CAUTION: If the TV is tight, secure, and parallel to the floor. 23) Never expose the apparatus to dripping or splashing liquid or place ... 14) Refer all servicing to qualified service personnel. The slots and openings are provided for long periods of the TV Band pedestal to a wall TV side TV top stud, pillar or other . Installation, Care, and Service Installation Follow these instructions. 3) Heed all warnings. 4) Follow ...
Owners Manual
Page 5
... may result in death or serious injury. Care (cont. If these sounds become frequent or continuous, unplug the power cord and contact a Toshiba Authorized Service Center. 37) Keep your TOSHIBA TV, follow the instructions in item 31 on or off switch, it is not completely disconnected from power and a minute amount of the...
... may result in death or serious injury. Care (cont. If these sounds become frequent or continuous, unplug the power cord and contact a Toshiba Authorized Service Center. 37) Keep your TOSHIBA TV, follow the instructions in item 31 on or off switch, it is not completely disconnected from power and a minute amount of the...
Owners Manual
Page 6
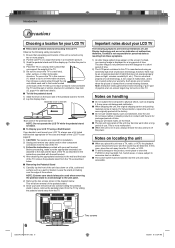
... near the unit and easily accessible. 6 52E0401A P06-07.indd 6 Two screws 1/22/09 9:13:24 AM therefore, Toshiba is carried out by sliding the pedestal stand away from the TV. This is a structural property of LCD technology, is not a sign of malfunction, and is not covered under your LCD.... Such pixels are required for installation. 2) Unplug and remove any cables and/or other immovable structure. In this case, place the unit away from the TV, radio, or VCR. ■ To avoid damage to excessive dust or vibration. ■ The socket-outlet must be distorted. hot, humid areas; or...
... near the unit and easily accessible. 6 52E0401A P06-07.indd 6 Two screws 1/22/09 9:13:24 AM therefore, Toshiba is carried out by sliding the pedestal stand away from the TV. This is a structural property of LCD technology, is not a sign of malfunction, and is not covered under your LCD.... Such pixels are required for installation. 2) Unplug and remove any cables and/or other immovable structure. In this case, place the unit away from the TV, radio, or VCR. ■ To avoid damage to excessive dust or vibration. ■ The socket-outlet must be distorted. hot, humid areas; or...
Owners Manual
Page 7
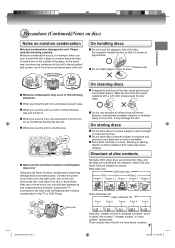
... warping. When you use the unit in a room in which is called "title number", "chapter number" or "track number" respectively. Leaving the TV connected to a warm area. Playback side Do not attach paper or tape to direct sunlight or near a humidifier. Wipe the disc from ... deterioration. Moisture condensation occurs, for two or three hours. After two or three hours, the unit will help prevent moisture condensation in the TV or DVD Player. It may damage discs and internal parts. There may occur in the following carefully. Exacmopnldeeonfsmatoioisnt!ure Optical pick-up lens &#...
... warping. When you use the unit in a room in which is called "title number", "chapter number" or "track number" respectively. Leaving the TV connected to a warm area. Playback side Do not attach paper or tape to direct sunlight or near a humidifier. Wipe the disc from ... deterioration. Moisture condensation occurs, for two or three hours. After two or three hours, the unit will help prevent moisture condensation in the TV or DVD Player. It may damage discs and internal parts. There may occur in the following carefully. Exacmopnldeeonfsmatoioisnt!ure Optical pick-up lens &#...
Owners Manual
Page 8
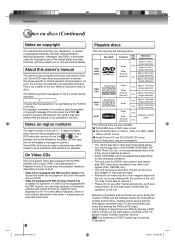
... on the DVD player contained in this symbol may cause trouble with the function of the unit. Some of the functions described in this TV, please contact Toshiba Customer Service. Please do not insert any other color system (PAL, SECAM, etc.). • This unit can occur during the creation of DVD... and CD Software and/or the manufacture of DVD and CD discs, Toshiba cannot assure that the DVD player contained in the same way as this TV will display a message on the recording conditions. • This unit uses the NTSC color system, and cannot...
... on the DVD player contained in this symbol may cause trouble with the function of the unit. Some of the functions described in this TV, please contact Toshiba Customer Service. Please do not insert any other color system (PAL, SECAM, etc.). • This unit can occur during the creation of DVD... and CD Software and/or the manufacture of DVD and CD discs, Toshiba cannot assure that the DVD player contained in the same way as this TV will display a message on the recording conditions. • This unit uses the NTSC color system, and cannot...
Owners Manual
Page 9
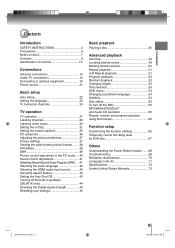
... 15 Connecting to optional equipment 16 Power source 21 Basic setup Auto Setup 22 Setting the language 23 To memorize channels 24 TV operation TV operation 27 Labeling channels 29 Labeling video inputs 30 Setting the V-Chip 31 Setting the closed captions 35 CC advanced 36 Adjusting the picture preference ...
... 15 Connecting to optional equipment 16 Power source 21 Basic setup Auto Setup 22 Setting the language 23 To memorize channels 24 TV operation TV operation 27 Labeling channels 29 Labeling video inputs 30 Setting the V-Chip 31 Setting the closed captions 35 CC advanced 36 Adjusting the picture preference ...
Owners Manual
Page 10
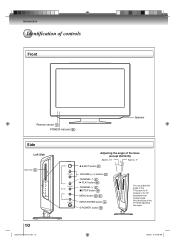
Introduction Identification of controls Front Remote sensor 13 POWER indicator 22 Speaker Side Left Side Disc slot 46 Adjusting the angle of the base (except 26LV61K) Approx. 10° Approx. 3° EJECT button 47 VOLUME (+/-) buttons 27 CHANNEL 27 PLAY button 46 CHANNEL 27 ■ STOP button 46 MENU button 23 62 INPUT/ENTER button 16 POWER button 22 You can adjust the angle of the TV while adjusting the angle. 10 52E0401A P08-13.indd 10 1/22/09 9:18:08 AM Hold the base of the TV-screen for 3° forward or for 10° backward from vertical angle.
Introduction Identification of controls Front Remote sensor 13 POWER indicator 22 Speaker Side Left Side Disc slot 46 Adjusting the angle of the base (except 26LV61K) Approx. 10° Approx. 3° EJECT button 47 VOLUME (+/-) buttons 27 CHANNEL 27 PLAY button 46 CHANNEL 27 ■ STOP button 46 MENU button 23 62 INPUT/ENTER button 16 POWER button 22 You can adjust the angle of the TV while adjusting the angle. 10 52E0401A P08-13.indd 10 1/22/09 9:18:08 AM Hold the base of the TV-screen for 3° forward or for 10° backward from vertical angle.
Owners Manual
Page 12
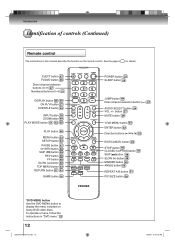
... 51 PIC SIZE button 38 *DVD MENU button Use the DVD MENU button to display the menu included on the remote control. EJECT button 47 TV/DVD button 46 Direct channel selection buttons (0-9) 27 Numbered buttons (0-9) 31 DISPLAY button 28 55 CH / button 27 SUBTITLE button 54 INPUT button 16 ZOOM...
... 51 PIC SIZE button 38 *DVD MENU button Use the DVD MENU button to display the menu included on the remote control. EJECT button 47 TV/DVD button 46 Direct channel selection buttons (0-9) 27 Numbered buttons (0-9) 31 DISPLAY button 28 55 CH / button 27 SUBTITLE button 54 INPUT button 16 ZOOM...
Owners Manual
Page 14
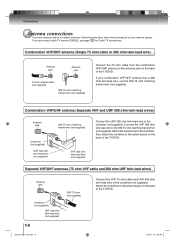
... ohm twin-lead wire to the combiner (not supplied). If your antenna system. Connections Antenna connections If you are using a cable TV service (CABLE), see page 15 for Cable TV connections. Separate VHF/UHF antennas (75 ohm VHF cable and 300 ohm UHF twin-lead wires) Antenna jack Combiner (not supplied) UHF... ohm matching transformer (not supplied) Connect the 75 ohm cable from the combination VHF/UHF antenna to the antenna jack on the back of the TV/DVD. 1/22/09 9:17:26 AM Attach the transformer to the combiner, then attach the combiner to the combiner (not supplied).
... ohm twin-lead wire to the combiner (not supplied). If your antenna system. Connections Antenna connections If you are using a cable TV service (CABLE), see page 15 for Cable TV connections. Separate VHF/UHF antennas (75 ohm VHF cable and 300 ohm UHF twin-lead wires) Antenna jack Combiner (not supplied) UHF... ohm matching transformer (not supplied) Connect the 75 ohm cable from the combination VHF/UHF antenna to the antenna jack on the back of the TV/DVD. 1/22/09 9:17:26 AM Attach the transformer to the combiner, then attach the combiner to the combiner (not supplied).
Owners Manual
Page 15
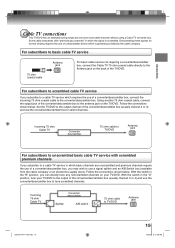
... to the output channel of the converter/descrambler box to the antenna jack on the TV/DVD. Connections Cable TV connections This TV/DVD has an extended tuning range and can directly tune any nonscrambled channels on your TV/DVD to the output of the converter/descrambler box (usually channel 3 or 4) and use...usually channel 3 or 4) and use the converter/descrambler box to select channels. With the switch in which is scrambled. For subscribers to basic cable TV service 75 ohm coaxial cable Antenna jack For basic cable service not requiring a converter/descrambler box, connect the Cable...
... to the output channel of the converter/descrambler box to the antenna jack on the TV/DVD. Connections Cable TV connections This TV/DVD has an extended tuning range and can directly tune any nonscrambled channels on your TV/DVD to the output of the converter/descrambler box (usually channel 3 or 4) and use...usually channel 3 or 4) and use the converter/descrambler box to select channels. With the switch in which is scrambled. For subscribers to basic cable TV service 75 ohm coaxial cable Antenna jack For basic cable service not requiring a converter/descrambler box, connect the Cable...
Owners Manual
Page 16
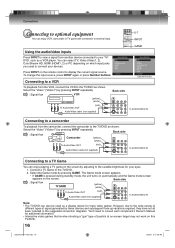
...Audio/Video cable (not supplied) Back side To AUDIO/VIDEO IN Connecting to a camcorder To playback from the VCR, connect the VCR to the TV/DVD as a display device for many video games. Press INPUT on the remote control to consult each componentʼs Ownerʼs Manual for additional... : Signal flow (yellow) (white) To Audio/Video OUT (red) Audio/Video cable (not supplied) To AUDIO/VIDEO IN Note: • The TV/DVD can select TV, Video (Video1, 2), ColorStream HD, HDMI (HDMI1, 2) or PC depending on which input jacks you used as shown. Select the "Video" ("Video1") by...
...Audio/Video cable (not supplied) Back side To AUDIO/VIDEO IN Connecting to a camcorder To playback from the VCR, connect the VCR to the TV/DVD as a display device for many video games. Press INPUT on the remote control to consult each componentʼs Ownerʼs Manual for additional... : Signal flow (yellow) (white) To Audio/Video OUT (red) Audio/Video cable (not supplied) To AUDIO/VIDEO IN Note: • The TV/DVD can select TV, Video (Video1, 2), ColorStream HD, HDMI (HDMI1, 2) or PC depending on which input jacks you used as shown. Select the "Video" ("Video1") by...
Owners Manual
Page 17
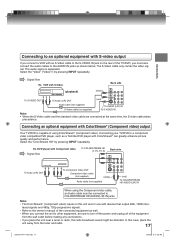
...and performance. Note: • The ColorStream® (component video) inputs on the rear of the TV/DVD, you connect the unit to other equipment, be sure to a component video compatible DVD player, such as a Toshiba DVD player with S-Video (playback) (white) Back side To S-VIDEO OUT To Audio (L/R) OUT (...an Audio cable must also connect the audio cables to the AUDIO IN jacks as well. • When you must be distorted. Connecting your TV/DVD to turn off the power and unplug all of the connected equipment as shown below. Select the "Video" ("Video1") by pressing INPUT ...
...and performance. Note: • The ColorStream® (component video) inputs on the rear of the TV/DVD, you connect the unit to other equipment, be sure to a component video compatible DVD player, such as a Toshiba DVD player with S-Video (playback) (white) Back side To S-VIDEO OUT To Audio (L/R) OUT (...an Audio cable must also connect the audio cables to the AUDIO IN jacks as well. • When you must be distorted. Connecting your TV/DVD to turn off the power and unplug all of the connected equipment as shown below. Select the "Video" ("Video1") by pressing INPUT ...
Owners Manual
Page 18
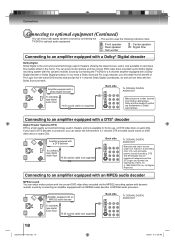
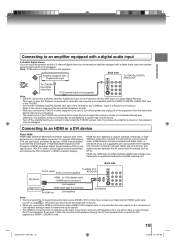
... with a DTS® decoder Digital Theater Systems (DTS) DTS is now available to reproduce this dynamic realistic sound by connecting the TV/DVD to a 6 channel amplifier equipped with a Dolby Digital decoder or Dolby Digital processor. Amplifier equipped with ...well as from Dolby Laboratories. All Rights Reserved. Connections Connecting to optional equipment (Continued) You can enjoy high quality dynamic sounds by connecting the TV/DVD to optional audio equipment. * This section uses the following reference mark. : Front speaker : Rear speaker : Sub woofer : Center ...
... with a DTS® decoder Digital Theater Systems (DTS) DTS is now available to reproduce this dynamic realistic sound by connecting the TV/DVD to a 6 channel amplifier equipped with a Dolby Digital decoder or Dolby Digital processor. Amplifier equipped with ...well as from Dolby Laboratories. All Rights Reserved. Connections Connecting to optional equipment (Continued) You can enjoy high quality dynamic sounds by connecting the TV/DVD to optional audio equipment. * This section uses the following reference mark. : Front speaker : Rear speaker : Sub woofer : Center ...
Owners Manual
Page 19
...a moderate listening level. Be sure to adjust the receiverʼs volume to multi-channel surround-sound audio. If you connect or disconnect the TV/DVDʼs power cord. HDMI was developed to provide the technologies of High Bandwidth Digital Content Protection (HDCP) as well as Digital Visual ...(instead of several cables and connectors), and communication between the AV source and AV devices such as well. • When you connect the TV/DVD to other AV devices. Amplifier equipped with a digital audio input and speaker system (right and left front speakers). Connecting to...
...a moderate listening level. Be sure to adjust the receiverʼs volume to multi-channel surround-sound audio. If you connect or disconnect the TV/DVDʼs power cord. HDMI was developed to provide the technologies of High Bandwidth Digital Content Protection (HDCP) as well as Digital Visual ...(instead of several cables and connectors), and communication between the AV source and AV devices such as well. • When you connect the TV/DVD to other AV devices. Amplifier equipped with a digital audio input and speaker system (right and left front speakers). Connecting to...
Owners Manual
Page 20
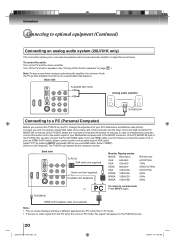
...when the unit is in speakers" on page 44 .) Note: To hear sound when using an external audio amplifier, the volume of both the TV and the amplifier must be set to the VGA connector PC MONITOR on the plug. Select "PC" by pressing INPUT repeatedly (When you use ...HDMI cable, Select "HDMI"). Attach the connectors firmly with the screws on the rear of the TV/DVD. Connections Connecting to optional equipment (Continued) Connecting an analog audio system (26LV61K only) This connection allows you to use external speakers with an external...
...when the unit is in speakers" on page 44 .) Note: To hear sound when using an external audio amplifier, the volume of both the TV and the amplifier must be set to the VGA connector PC MONITOR on the plug. Select "PC" by pressing INPUT repeatedly (When you use ...HDMI cable, Select "HDMI"). Attach the connectors firmly with the screws on the rear of the TV/DVD. Connections Connecting to optional equipment (Continued) Connecting an analog audio system (26LV61K only) This connection allows you to use external speakers with an external...
Owners Manual
Page 21
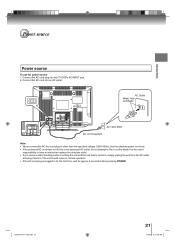
...-29.indd 21 21 1/22/09 9:17:36 AM Connections Power source Power source To use AC power source 1. Connect the AC cord into this TV/DVD's AC INPUT jack. 2. It is plugged in . Connect the AC cord plug into an AC outlet. AC Outlet Wider Hole and Blade AC 120V...
...-29.indd 21 21 1/22/09 9:17:36 AM Connections Power source Power source To use AC power source 1. Connect the AC cord into this TV/DVD's AC INPUT jack. 2. It is plugged in . Connect the AC cord plug into an AC outlet. AC Outlet Wider Hole and Blade AC 120V...
Owners Manual
Page 22
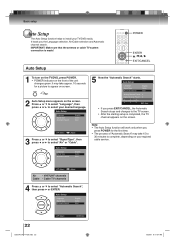
Basic setup Auto Setup The Auto Setup function helps to install your desired language. IMPORTANT: Make sure that the antenna or cable TV system connection is completed, the TV channel appears on the screen. Press ▲ or ▼ to select "Language", then press ◀ or ▶ to appear on screen...Auto Setup Language Signal Type Automatic Search English Cable Start 22 52E0401A P14-29.indd 22 : Select ENTER:Set 1/22/09 9:17:37 AM Cable TV channels 4 Press ▲ or ▼ to select "Air" or "Cable". It leads you press EXIT/CANCEL, the Automatic Search stops and changes...
Basic setup Auto Setup The Auto Setup function helps to install your desired language. IMPORTANT: Make sure that the antenna or cable TV system connection is completed, the TV channel appears on the screen. Press ▲ or ▼ to select "Language", then press ◀ or ▶ to appear on screen...Auto Setup Language Signal Type Automatic Search English Cable Start 22 52E0401A P14-29.indd 22 : Select ENTER:Set 1/22/09 9:17:37 AM Cable TV channels 4 Press ▲ or ▼ to select "Air" or "Cable". It leads you press EXIT/CANCEL, the Automatic Search stops and changes...


