
Owners Manual
Page 2
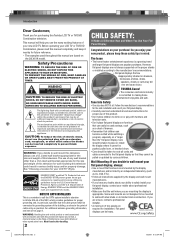
... is a growing trend and larger flat panel displays are not always supported on the 26LV61K model. However, flat panel displays are popular purchases. Some wall mounts are registered U.S. NO USER-SERVICEABLE PARTS INSIDE. See "Choosing a location for future reference. • The examples used as steps, such as close to the point of this manual are required for the size and weight of cable entry as UL, CSA, ETL). •...
... is a growing trend and larger flat panel displays are not always supported on the 26LV61K model. However, flat panel displays are popular purchases. Some wall mounts are registered U.S. NO USER-SERVICEABLE PARTS INSIDE. See "Choosing a location for future reference. • The examples used as steps, such as close to the point of this manual are required for the size and weight of cable entry as UL, CSA, ETL). •...
Owners Manual
Page 3
... connected. - Reorient or relocate the receiving antenna. - USE OF CONTROLS, ADJUSTMENTS OR THE PERFORMANCE OF PROCEDURES OTHER THAN THOSE SPECIFIED HEREIN MAY RESULT IN HAZARDOUS RADIATION EXPOSURE. CLASS 1 LASER PRODUCT Location of the required Marking The rating sheet and the safety caution are designed to Part 15 of Conformity Compliance Statement (Part 15): The Toshiba 19LV61K, 22LV61K, 26LV61K LCD TV/DVD...
... connected. - Reorient or relocate the receiving antenna. - USE OF CONTROLS, ADJUSTMENTS OR THE PERFORMANCE OF PROCEDURES OTHER THAN THOSE SPECIFIED HEREIN MAY RESULT IN HAZARDOUS RADIATION EXPOSURE. CLASS 1 LASER PRODUCT Location of the required Marking The rating sheet and the safety caution are designed to Part 15 of Conformity Compliance Statement (Part 15): The Toshiba 19LV61K, 22LV61K, 26LV61K LCD TV/DVD...
Owners Manual
Page 4
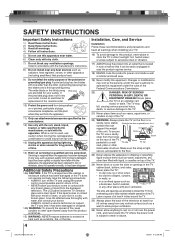
... consult an electrician for long periods of time. 14) Refer all instructions. 5) Do not use a sturdy strap from the hooks Screw on the rear of the TV. or areas subject to excessive dust or vibration. 17) ALWAYS plug the product into an outlet that is ...service personnel. Changes or modifications may fall, causing serious personal injury, death, or serious damage to help maintain reliable operation of the TV Band pedestal to a wall TV side TV top stud, pillar or other open flames away from tip-over the power cord, and never place the TV where the power cord...
... consult an electrician for long periods of time. 14) Refer all instructions. 5) Do not use a sturdy strap from the hooks Screw on the rear of the TV. or areas subject to excessive dust or vibration. 17) ALWAYS plug the product into an outlet that is ...service personnel. Changes or modifications may fall, causing serious personal injury, death, or serious damage to help maintain reliable operation of the TV Band pedestal to a wall TV side TV top stud, pillar or other open flames away from tip-over the power cord, and never place the TV where the power cord...
Owners Manual
Page 5
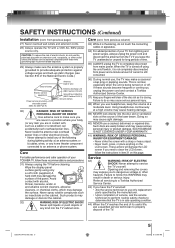
... Code.) Ground clamp Electric service equipment Power service grounding electrode system (NEC Art 250 Part H) Antenna lead-in safe operating condition. 44) When the TV reaches the end of the disc slot as insecticide on the LCD screen. Using headphones continuously at a moderate level. Avoid contact with a 120V AC, 60Hz power source only. from previous page) 27) Never overload wall outlets and extension cords...
... Code.) Ground clamp Electric service equipment Power service grounding electrode system (NEC Art 250 Part H) Antenna lead-in safe operating condition. 44) When the TV reaches the end of the disc slot as insecticide on the LCD screen. Using headphones continuously at a moderate level. Avoid contact with a 120V AC, 60Hz power source only. from previous page) 27) Never overload wall outlets and extension cords...
Owners Manual
Page 9
... 31 Setting the closed captions 35 CC advanced 36 Adjusting the picture preference 37 Picture settings 37 Viewing the wide-screen picture formats........ 38 Film Mode 39 DNR 39 Picture control adjustment in the PC mode .... 40 Sound control adjustment 41 Selecting Stereo/Second Audio Program (SAP) .... 41 Selecting the audio language 42 Selecting the HDMI audio input source .......... 42 Using the aspect feature 43 Setting the Auto Shut Off 43 Turning off the built-in speakers (26LV61K only 44 Checking the Digital-signal strength 44 Resetting your settings...
... 31 Setting the closed captions 35 CC advanced 36 Adjusting the picture preference 37 Picture settings 37 Viewing the wide-screen picture formats........ 38 Film Mode 39 DNR 39 Picture control adjustment in the PC mode .... 40 Sound control adjustment 41 Selecting Stereo/Second Audio Program (SAP) .... 41 Selecting the audio language 42 Selecting the HDMI audio input source .......... 42 Using the aspect feature 43 Setting the Auto Shut Off 43 Turning off the built-in speakers (26LV61K only 44 Checking the Digital-signal strength 44 Resetting your settings...
Owners Manual
Page 15
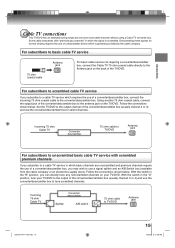
... coaxial cable to a cable TV service in which basic channels are unscrambled and premium channels require the use of the converter/descrambler box (usually channel 3 or 4) and use a signal splitter and an A/B Switch box (available from the cable company or an electronics supply store). Using another 75 ohm coaxial cable, connect the output jack of the TV/DVD. Incoming 75 ohm Cable TV Converter/ descrambler 75 ohm cable Splitter A/B switch A B to the antenna jack on...
... coaxial cable to a cable TV service in which basic channels are unscrambled and premium channels require the use of the converter/descrambler box (usually channel 3 or 4) and use a signal splitter and an A/B Switch box (available from the cable company or an electronics supply store). Using another 75 ohm coaxial cable, connect the output jack of the TV/DVD. Incoming 75 ohm Cable TV Converter/ descrambler 75 ohm cable Splitter A/B switch A B to the antenna jack on...
Owners Manual
Page 16
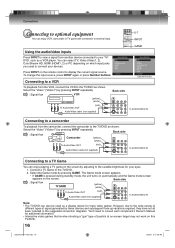
... not work on which input jacks you used as a VCR player. To change the input source, press INPUT again or press Number buttons. Select the "Video" ("Video1") by these devices and subsequent hook-up variations required, they have not all been included in the suggested connection diagrams. Youʼll need to consult each componentʼs Ownerʼs Manual for additional information. • Interactive video games that involve shooting a "gun" type of signal generated...
... not work on which input jacks you used as a VCR player. To change the input source, press INPUT again or press Number buttons. Select the "Video" ("Video1") by these devices and subsequent hook-up variations required, they have not all been included in the suggested connection diagrams. Youʼll need to consult each componentʼs Ownerʼs Manual for additional information. • Interactive video games that involve shooting a "gun" type of signal generated...
Owners Manual
Page 17
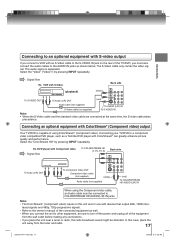
... using the Component video cable, an Audio cable must also connect the audio cables to the AUDIO IN jacks as shown below. Note: • The ColorStream® (component video) inputs on the rear of the TV/DVD, you must be distorted. The S-Video cable only carries the video signal. DVD player with Component video : Signal flow To COLORSTREAM HD (Y, Pb, Pr) IN Back side To Audio (L/R) OUT To Component Video OUT Component video cable (not supplied) (white) Audio cable (not supplied) (red) To COLORSTREAM HD AUDIO...
... using the Component video cable, an Audio cable must also connect the audio cables to the AUDIO IN jacks as shown below. Note: • The ColorStream® (component video) inputs on the rear of the TV/DVD, you must be distorted. The S-Video cable only carries the video signal. DVD player with Component video : Signal flow To COLORSTREAM HD (Y, Pb, Pr) IN Back side To Audio (L/R) OUT To Component Video OUT Component video cable (not supplied) (white) Audio cable (not supplied) (red) To COLORSTREAM HD AUDIO...
Owners Manual
Page 19
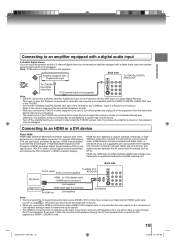
... supplied) Note: • DO NOT connect the COAXIAL DIGITAL AUDIO OUT jack of the TV/DVD to transfer the audio signals. • The HDMI-2-connection has no sound. • When you connect or disconnect the TV/DVDʼs power cord. Back side To HDMI 1/PC To DVI output Audio cord (not supplied) AUDIO IN DVI device HDMI - Be sure to adjust the receiverʼs volume to multi-channel surround-sound audio. HDCP is necessary to a DVI device with DVD players, DTV, set-top boxes...
... supplied) Note: • DO NOT connect the COAXIAL DIGITAL AUDIO OUT jack of the TV/DVD to transfer the audio signals. • The HDMI-2-connection has no sound. • When you connect or disconnect the TV/DVDʼs power cord. Back side To HDMI 1/PC To DVI output Audio cord (not supplied) AUDIO IN DVI device HDMI - Be sure to adjust the receiverʼs volume to multi-channel surround-sound audio. HDCP is necessary to a DVI device with DVD players, DTV, set-top boxes...
Owners Manual
Page 20
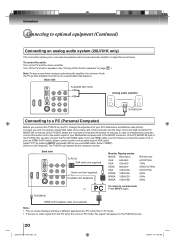
... HDMI cable. Attach the connectors firmly with an external audio amplifier to adjust the sound level. To control the audio: Turn on the plug. Switch on the TV/DVD-screen. 20 52E0401A P14-29.indd 20 1/22/09 9:17:35 AM If you use HDMI cable, you use HDMI-to-DVI cable, please connect audio cord as same way as the computer monitor Back side To PC IN VGA cable (not supplied) Audio cord (not supplied) To HDMI 1/PC AUDIO IN Monitor Display modes MODE Resolution VGA 640x480 VGA...
... HDMI cable. Attach the connectors firmly with an external audio amplifier to adjust the sound level. To control the audio: Turn on the plug. Switch on the TV/DVD-screen. 20 52E0401A P14-29.indd 20 1/22/09 9:17:35 AM If you use HDMI cable, you use HDMI-to-DVI cable, please connect audio cord as same way as the computer monitor Back side To PC IN VGA cable (not supplied) Audio cord (not supplied) To HDMI 1/PC AUDIO IN Monitor Display modes MODE Resolution VGA 640x480 VGA...

Owners Manual
Page 28
...; Audio information (Stereo, SAP or Mono) • Picture size • Resolution Press DISPLAY again to Off. ■ HEAD PHONES (except 26LV61K) Insert a stereo headphones (not supplied) with a 1/8" mini plug into the HEAD PHONE jack on the remote control. After the sleep time is available Sleep Timer Off English Mono Full 480i • Station name • Broadcast program name • Signal type • Audio language • Picture size 14 Analog Cable Sleep Timer Off When the TV/DVD receives a analog signal...
...; Audio information (Stereo, SAP or Mono) • Picture size • Resolution Press DISPLAY again to Off. ■ HEAD PHONES (except 26LV61K) Insert a stereo headphones (not supplied) with a 1/8" mini plug into the HEAD PHONE jack on the remote control. After the sleep time is available Sleep Timer Off English Mono Full 480i • Station name • Broadcast program name • Signal type • Audio language • Picture size 14 Analog Cable Sleep Timer Off When the TV/DVD receives a analog signal...
Owners Manual
Page 32
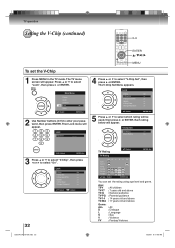
.../09 9:17:05 AM Main Menu Picture Audio Channel Lock Setup : Select ENTER:Set 2 Use Number buttons (0-9) to select "V-Chip Set", then press ▶ or ENTER. Each rating below will appear. The TV menu screen will be used, then press ▶ or ENTER. Lock Password ---- 4 Press ▲ or ▼ to enter your password, then press ENTER. Lock V-Chip On V-Chip Set >> V-Chip Set (DTV) >> Update >> V-Chip Clear >> Change Password >> : Select : Adjust 32 52E0401A P30-36.indd 32...
.../09 9:17:05 AM Main Menu Picture Audio Channel Lock Setup : Select ENTER:Set 2 Use Number buttons (0-9) to select "V-Chip Set", then press ▶ or ENTER. Each rating below will appear. The TV menu screen will be used, then press ▶ or ENTER. Lock Password ---- 4 Press ▲ or ▼ to enter your password, then press ENTER. Lock V-Chip On V-Chip Set >> V-Chip Set (DTV) >> Update >> V-Chip Clear >> Change Password >> : Select : Adjust 32 52E0401A P30-36.indd 32...

Owners Manual
Page 33
... only on programs and input sources that include a rating signal. [0-9] : Select ENTER:Set 4 Use Number buttons (0-9) to select the desired rating, then press ENTER. The protection will be reactivated. Press ▲ or ▼ to select "V-Chip Clear", then press ▶ or ENTER. • The Password screen will be temporarily overridden. If the TV/ DVD is turned off or the channel is protected. TV operation 0-9 MUTE ENTER...
... only on programs and input sources that include a rating signal. [0-9] : Select ENTER:Set 4 Use Number buttons (0-9) to select the desired rating, then press ENTER. The protection will be reactivated. Press ▲ or ▼ to select "V-Chip Clear", then press ▶ or ENTER. • The Password screen will be temporarily overridden. If the TV/ DVD is turned off or the channel is protected. TV operation 0-9 MUTE ENTER...
Owners Manual
Page 34
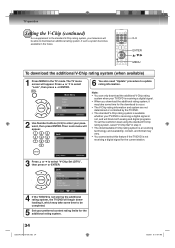
... Menu Picture Audio Channel Lock Setup : Select ENTER:Set 2 Use Number buttons (0-9) to enter your TV/DVD is receiving a digital signal or not, and will block both analog and digital programs. To set the restriction level using the standard V-Chip rating system, select "V-Chip Set" in the TV mode. Lock Password ---- 6 You also need "Update" procedure to select "Lock", then press ▶ or ENTER. TV operation Setting the V-Chip (continued) As a supplement to the standard V-Chip rating system, your television will...
... Menu Picture Audio Channel Lock Setup : Select ENTER:Set 2 Use Number buttons (0-9) to enter your TV/DVD is receiving a digital signal or not, and will block both analog and digital programs. To set the restriction level using the standard V-Chip rating system, select "V-Chip Set" in the TV mode. Lock Password ---- 6 You also need "Update" procedure to select "Lock", then press ▶ or ENTER. TV operation Setting the V-Chip (continued) As a supplement to the standard V-Chip rating system, your television will...

Owners Manual
Page 35
Setup Closed Caption Language Video Label Auto Shut Off Aspect Reset >> English >> Off On >> 4 Press ▲ or ▼ to select "Analog Caption" or "Digital Caption", then press ◀ or ▶ to select "Closed Caption", then press ▶ or ENTER. Off: Captions will appear. Important Note: If text is not available for hearing impaired viewers or it will be displayed on the screen for analog channel. Main Menu Picture Audio Channel Lock Setup : Select ENTER:Set 2 Press ▲ or ▼ to...
Setup Closed Caption Language Video Label Auto Shut Off Aspect Reset >> English >> Off On >> 4 Press ▲ or ▼ to select "Analog Caption" or "Digital Caption", then press ◀ or ▶ to select "Closed Caption", then press ▶ or ENTER. Off: Captions will appear. Important Note: If text is not available for hearing impaired viewers or it will be displayed on the screen for analog channel. Main Menu Picture Audio Channel Lock Setup : Select ENTER:Set 2 Press ▲ or ▼ to...

Owners Manual
Page 42
... Menu Picture Audio Channel Lock Setup : Select ENTER:Set 2 Press ▲ or ▼ to the normal screen. The TV menu screen will appear. Selecting the HDMI audio input source 1 Press MENU in the TV mode. TV operation Selecting the audio language/ Selecting the HDMI audio input source When two or more audio languages are included in a digital signal, you can select one of the audio language. (This function is available only for digital broadcast.) When you use PC AUDIO IN jacks with analog audio cords, select this setting. Audio...
... Menu Picture Audio Channel Lock Setup : Select ENTER:Set 2 Press ▲ or ▼ to the normal screen. The TV menu screen will appear. Selecting the HDMI audio input source 1 Press MENU in the TV mode. TV operation Selecting the audio language/ Selecting the HDMI audio input source When two or more audio languages are included in a digital signal, you can select one of the audio language. (This function is available only for digital broadcast.) When you use PC AUDIO IN jacks with analog audio cords, select this setting. Audio...

Owners Manual
Page 44
...-in speakers: Select "On" in step 2 above. Audio HDMI 1 Audio Speakers HDMI On 1 Press MENU in speakers (26LV61K only)/ Checking the Digital- Note: • Signal meter feature is changed. 3 Press EXIT/CANCEL to return to view the digital signal meter for analog channels. Press ▲ or ▼ to select "DTV Signal", then press ▶ or ENTER. Main Menu Picture Audio Channel Lock Setup : Select ENTER:Set 2 Press ▲ or ▼ to obtain the maximum signal strength. TV operation Turning off...
...-in speakers: Select "On" in step 2 above. Audio HDMI 1 Audio Speakers HDMI On 1 Press MENU in speakers (26LV61K only)/ Checking the Digital- Note: • Signal meter feature is changed. 3 Press EXIT/CANCEL to return to view the digital signal meter for analog channels. Press ▲ or ▼ to select "DTV Signal", then press ▶ or ENTER. Main Menu Picture Audio Channel Lock Setup : Select ENTER:Set 2 Press ▲ or ▼ to obtain the maximum signal strength. TV operation Turning off...
Owners Manual
Page 72
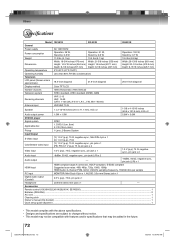
..., 1080i, 1080p HDMI Audio: 2-channel PCM, 32/44.1/48 kHz sampling frequency, 16/20/24 bits per sample PC input MONITOR: Mini-Dsub 15pin x 1, AUDIO: 3.5ø mm Stereo jack x 1 Digital audio output (Coaxial) 0.5 V (p-p), 75 Ω, pin jack x 1 Headphone ø3.5mm stereo mini jack x 1 - Accessories Remote control (19LV61K/22LV61K/26LV61K: SE-R0305)...1 Batteries (R03/AAA) ...2 AC cord ...1 Cleaning cloth ...1 Ownerʼs manual (this booklet) ...1 Quick setup guide (Spanish) ...1 • This model complies with the...
..., 1080i, 1080p HDMI Audio: 2-channel PCM, 32/44.1/48 kHz sampling frequency, 16/20/24 bits per sample PC input MONITOR: Mini-Dsub 15pin x 1, AUDIO: 3.5ø mm Stereo jack x 1 Digital audio output (Coaxial) 0.5 V (p-p), 75 Ω, pin jack x 1 Headphone ø3.5mm stereo mini jack x 1 - Accessories Remote control (19LV61K/22LV61K/26LV61K: SE-R0305)...1 Batteries (R03/AAA) ...2 AC cord ...1 Cleaning cloth ...1 Ownerʼs manual (this booklet) ...1 Quick setup guide (Spanish) ...1 • This model complies with the...
Owners Manual
Page 73
... your LCD TV/DVD Combination online at www.tacp.toshiba.com/service as soon as lightning or fluctuations in electric power), improper installation, improper maintenance, or use of antenna systems are not covered by inadequate antenna systems are effective only if the LCD TV/DVD Combination is required under the U.S. DURING THIS PERIOD, TACP WILL, AT TACPʼS OPTION, REPAIR OR REPLACE A DEFECTIVE PART...
... your LCD TV/DVD Combination online at www.tacp.toshiba.com/service as soon as lightning or fluctuations in electric power), improper installation, improper maintenance, or use of antenna systems are not covered by inadequate antenna systems are effective only if the LCD TV/DVD Combination is required under the U.S. DURING THIS PERIOD, TACP WILL, AT TACPʼS OPTION, REPAIR OR REPLACE A DEFECTIVE PART...
Owners Manual
Page 74
... time within which an action must include a copy or original bill of sale or other proof of these warranties in this manual and checking the section "Troubleshooting," you discover, or should have discovered, the defect. WITH THE EXCEPTION OF ANY WARRANTIES IMPLIED...REPAIR OR REPLACEMENT OF ANY PARTS. IN NO EVENT SHALL TACP BE LIABLE FOR CONSEQUENTIAL OR INCIDENTAL DAMAGES (INCLUDING, BUT NOT LIMITED TO, LOST PROFITS, BUSINESS INTERRUPTION, OR MODIFICATION OR ERASURE OF RECORDED DATA CAUSED BY USE, MISUSE OR INABILITY TO USE THIS LCD TV/DVD COMBINATION). THIS WARRANTY GIVES YOU SPECIFIC...
... time within which an action must include a copy or original bill of sale or other proof of these warranties in this manual and checking the section "Troubleshooting," you discover, or should have discovered, the defect. WITH THE EXCEPTION OF ANY WARRANTIES IMPLIED...REPAIR OR REPLACEMENT OF ANY PARTS. IN NO EVENT SHALL TACP BE LIABLE FOR CONSEQUENTIAL OR INCIDENTAL DAMAGES (INCLUDING, BUT NOT LIMITED TO, LOST PROFITS, BUSINESS INTERRUPTION, OR MODIFICATION OR ERASURE OF RECORDED DATA CAUSED BY USE, MISUSE OR INABILITY TO USE THIS LCD TV/DVD COMBINATION). THIS WARRANTY GIVES YOU SPECIFIC...


