
Owners Manual
Page 1
Index 14VL43U 20VL43U Appendix Using the TV's Features Setting up your TV Using the Remote Control Connecting your TV Introduction OWNER'S MANUAL LCD TV S S:ESPAÑOL F F:FRANÇAIS E E:ENGLISH
Index 14VL43U 20VL43U Appendix Using the TV's Features Setting up your TV Using the Remote Control Connecting your TV Introduction OWNER'S MANUAL LCD TV S S:ESPAÑOL F F:FRANÇAIS E E:ENGLISH
Owners Manual
Page 2
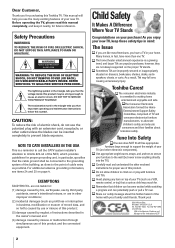
...enjoyable and safe. Tel. 703-907-7600 Fax 703-907-7690 www.CE.org CEA is committed to the point of cable entry as a VCR, remote control, or toy) that a curious child may reach for. The lightning symbol in the triangle tells you that the voltage inside this symbol. Use...Article 820-40 of the International CES® 2 For additional antenna grounding information, see items 24 and 25 on or play with your new TV. Toshiba Cares! and (4) damage caused by neglect of TV and consumer electronics furniture manufacturers, to the wall (but never screw anything directly into the TV)....
...enjoyable and safe. Tel. 703-907-7600 Fax 703-907-7690 www.CE.org CEA is committed to the point of cable entry as a VCR, remote control, or toy) that a curious child may reach for. The lightning symbol in the triangle tells you that the voltage inside this symbol. Use...Article 820-40 of the International CES® 2 For additional antenna grounding information, see items 24 and 25 on or play with your new TV. Toshiba Cares! and (4) damage caused by neglect of TV and consumer electronics furniture manufacturers, to the wall (but never screw anything directly into the TV)....
Owners Manual
Page 5
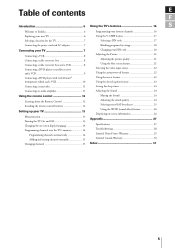
Table of contents E F Introduction 6 Using the TV's features 16 S Welcome to Toshiba 6 Exploring your new TV 6 Selecting a location for the TV 7 Connecting the power cord and AC adaptor 7 Connecting your TV 7 Connecting a VCR 8 Connecting a cable converter box ...a DVD player with ColorStream® (component video) and a VCR 10 Connecting a camcorder 11 Connecting an audio amplifier 11 Using the remote control 12 Learning about the Remote Control 12 Installing the remote control batteries 12 Setting up your TV 13 Menu function 13 Turning the TV On and Off 13 Changing the on...
Table of contents E F Introduction 6 Using the TV's features 16 S Welcome to Toshiba 6 Exploring your new TV 6 Selecting a location for the TV 7 Connecting the power cord and AC adaptor 7 Connecting your TV 7 Connecting a VCR 8 Connecting a cable converter box ...a DVD player with ColorStream® (component video) and a VCR 10 Connecting a camcorder 11 Connecting an audio amplifier 11 Using the remote control 12 Learning about the Remote Control 12 Installing the remote control batteries 12 Setting up your TV 13 Menu function 13 Turning the TV On and Off 13 Changing the on...
Owners Manual
Page 6
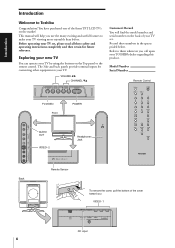
...the buttons on the back of your TV set . This manual will find the model number and serial number on the Top panel or the remote control. Before operating your TV set , please read all these numbers in the spaces prided below. The Side and back panels provide terminal ...inputs for future reference. Refer to make your TV. Exploring your new TV You can operate your TOSHIBA dealer regarding this product. VOLUME x • CHANNEL zy Customer's Record You will help you use the many exciting and useful features to them whenever...
...the buttons on the back of your TV set . This manual will find the model number and serial number on the Top panel or the remote control. Before operating your TV set , please read all these numbers in the spaces prided below. The Side and back panels provide terminal ...inputs for future reference. Refer to make your TV. Exploring your new TV You can operate your TOSHIBA dealer regarding this product. VOLUME x • CHANNEL zy Customer's Record You will help you use the many exciting and useful features to them whenever...
Owners Manual
Page 7
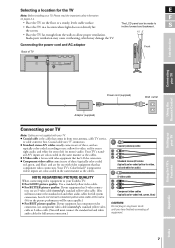
... stereo left (or mono) audio. Connecting the power cord and AC adaptor Front Back of TV Introduction Connecting your TV Using the Remote Control Setting up your TV Using the TV's Features Power cord (supplied) Wall outlet Adaptor (supplied) Connecting your equipment has component video... be made to incline forward and backward. F • Place the TV on pages 2-4. NOTE REGARDING PICTURE QUALITY When connecting video equipment to your Toshiba TV: ● For GOOD picture quality: Use a standard yellow video cable. ● For BETTER picture quality: If your TV, Please read...
... stereo left (or mono) audio. Connecting the power cord and AC adaptor Front Back of TV Introduction Connecting your TV Using the Remote Control Setting up your TV Using the TV's Features Power cord (supplied) Wall outlet Adaptor (supplied) Connecting your equipment has component video... be made to incline forward and backward. F • Place the TV on pages 2-4. NOTE REGARDING PICTURE QUALITY When connecting video equipment to your Toshiba TV: ● For GOOD picture quality: Use a standard yellow video cable. ● For BETTER picture quality: If your TV, Please read...

Owners Manual
Page 9
Using the Remote Control Setting up your TV Using the TV's Features Appendix Index 9 The illustration at left shows one S-video cable and one pair of audio cables ...
Using the Remote Control Setting up your TV Using the TV's Features Appendix Index 9 The illustration at left shows one S-video cable and one pair of audio cables ...

Owners Manual
Page 11
... TV Camcorder Introduction S-VIDEO VIDEO AUDIO OUT L R If your TV Using the TV's Features Appendix LR LINE IN 11 Index Side of TV Using the Remote Control Setting up your camcorder has an S- video connection, an S-video cable will not hear any sound. This connection also allows you to watch video...
... TV Camcorder Introduction S-VIDEO VIDEO AUDIO OUT L R If your TV Using the TV's Features Appendix LR LINE IN 11 Index Side of TV Using the Remote Control Setting up your camcorder has an S- video connection, an S-video cable will not hear any sound. This connection also allows you to watch video...

Owners Manual
Page 12
... on the on the battery compartment. 1 2 3. MENU allows access to use your TV. FAV y z cycles through programmed channels. Installing the remote control batteries To install the batteries: 1. Slide the battery cover back on and off at a set time. Note: • If you do... on -screen menus. Install two "AAA" size alkaline batteries. Caution: • Dispose of a menu option. Using the Remote Control Using the remote control Learning about the Remote Control RECALL displays screen information. VOL x • adjusts the volume level. MTS switches MTS (stereo or SAP) sound....
... on the on the battery compartment. 1 2 3. MENU allows access to use your TV. FAV y z cycles through programmed channels. Installing the remote control batteries To install the batteries: 1. Slide the battery cover back on and off at a set time. Note: • If you do... on -screen menus. Install two "AAA" size alkaline batteries. Caution: • Dispose of a menu option. Using the Remote Control Using the remote control Learning about the Remote Control RECALL displays screen information. VOL x • adjusts the volume level. MTS switches MTS (stereo or SAP) sound....
Owners Manual
Page 13
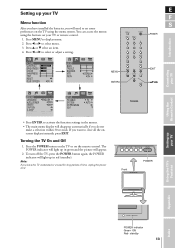
...setting. Press x or • to display menu. 2. CH SET • Press ENTER to set some preferences on the TV using the buttons on the remote control. ON Red- Press x or • to close all the onscreen displays instantly, press EXIT. Note: If you want to select menu. 3. ...or z select an item. 4. Front E F S POWER EXIT yzx • POWER Introduction Using the Remote Control Setting up in the menus. • The main menu display will light up your TV or remote control. 1. standby 13 If you leave the TV unattended or unused for long periods of time, unplug...
...setting. Press x or • to display menu. 2. CH SET • Press ENTER to set some preferences on the TV using the buttons on the remote control. ON Red- Press x or • to close all the onscreen displays instantly, press EXIT. Note: If you want to select menu. 3. ...or z select an item. 4. Front E F S POWER EXIT yzx • POWER Introduction Using the Remote Control Setting up in the menus. • The main menu display will light up your TV or remote control. 1. standby 13 If you leave the TV unattended or unused for long periods of time, unplug...
Owners Manual
Page 14
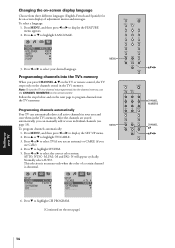
...CH PROGRAM. This selection is abnormal. Press z to highlight SYSTEM. 5. After the channels are stored automatically, you press CHANNEL y z on the TV or remote control, the TV stops only on the next page] 14 yzx • CHANNEL NUMBERS CHANNEL yz yzx • M and PAL- CH TV AUTO 12 ADD... channels (see page 15). MENU SET UP TV/CABLE SYSTEM CH PROGRAM EDIT CH POSITION ADD/ERASE FAV. Follow the steps below and on the remote control. Press MENU, and then press x or • to select the correct color system. Press x or • to display the FEATURE menu appears. 2....
...CH PROGRAM. This selection is abnormal. Press z to highlight SYSTEM. 5. After the channels are stored automatically, you press CHANNEL y z on the TV or remote control, the TV stops only on the next page] 14 yzx • CHANNEL NUMBERS CHANNEL yz yzx • M and PAL- CH TV AUTO 12 ADD... channels (see page 15). MENU SET UP TV/CABLE SYSTEM CH PROGRAM EDIT CH POSITION ADD/ERASE FAV. Follow the steps below and on the remote control. Press MENU, and then press x or • to select the correct color system. Press x or • to display the FEATURE menu appears. 2....

Owners Manual
Page 15
... 100, press +100,0,0; to view the programmed channels. See " Using the V-CHIP feature" on -screen). PG V L Excessive Rating Appendix Setting up your TV Using the Remote Control 7. Press z to normal TV viewing. Repeat steps 3-6 for example, to perform. Press x or • to display the EDIT menu. 3. Press y or z to highlight EDIT...
... 100, press +100,0,0; to view the programmed channels. See " Using the V-CHIP feature" on -screen). PG V L Excessive Rating Appendix Setting up your TV Using the Remote Control 7. Press z to normal TV viewing. Repeat steps 3-6 for example, to perform. Press x or • to display the EDIT menu. 3. Press y or z to highlight EDIT...
Owners Manual
Page 16
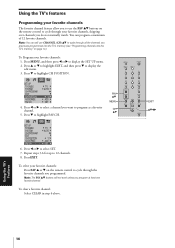
...(CH) yz to cycle through all the channels you previously programmed into the TV's memory (see "Programming channels into the TV's memory" on the remote control to cycle through your favorite channels, skipping over channels you do not normally watch. You can still use the FAV yz buttons on the... remote control to cycle through the favorite channels you programmed. CH SET 6. CH SET 4. Note: The FAV yz buttons will not work unless you want...
...(CH) yz to cycle through all the channels you previously programmed into the TV's memory (see "Programming channels into the TV's memory" on the remote control to cycle through your favorite channels, skipping over channels you do not normally watch. You can still use the FAV yz buttons on the... remote control to cycle through the favorite channels you programmed. CH SET 6. CH SET 4. Note: The FAV yz buttons will not work unless you want...
Owners Manual
Page 17
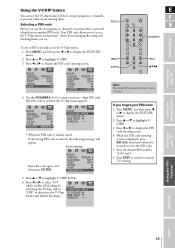
... MENU, and then press x or • to highlight V-CHIP. 3. Press y or z to display the FEATURE menu. 2. Use the NUMBERS (0-9) to enter your TV Using the Remote Control Using the V-CHIP feature You can block programs or channels, you to highlight VCHIP. 3. Press y or z to access the V-Chip menu, and prevents others...
... MENU, and then press x or • to highlight V-CHIP. 3. Press y or z to display the FEATURE menu. 2. Use the NUMBERS (0-9) to enter your TV Using the Remote Control Using the V-CHIP feature You can block programs or channels, you to highlight VCHIP. 3. Press y or z to access the V-Chip menu, and prevents others...

Owners Manual
Page 19
... adult" group will be blocked. Press y or z to highlight a particular MPAA categories, and then press x or • to be blocked. Connecting your TV Using the Remote Control 8.
... adult" group will be blocked. Press y or z to highlight a particular MPAA categories, and then press x or • to be blocked. Connecting your TV Using the Remote Control 8.

Owners Manual
Page 21
... stored in step 2. PICTURE CONTRAST BRIGHTNESS COLOR SHARPNESS TINT RESET BLUE SCREEN ON The PICTURE items you want to adjust. 3. Connecting your TV Using the Remote Control Adjusting the Picture E Adjusting the picture quality F You can adjust the picture quality to your TV Using the TV's Features Appendix Index 21 To...
... stored in step 2. PICTURE CONTRAST BRIGHTNESS COLOR SHARPNESS TINT RESET BLUE SCREEN ON The PICTURE items you want to adjust. 3. Connecting your TV Using the Remote Control Adjusting the Picture E Adjusting the picture quality F You can adjust the picture quality to your TV Using the TV's Features Appendix Index 21 To...

Owners Manual
Page 22
... and Right-and-left invert Right-and-left invert 22 Selecting the video input source You can use the VIDEO1 or VIDEO 2 buttons on the remote control to view a signal coming from other devices, such as VCRs or video disc players that completes its broadcast for the day. TV top panel...
... and Right-and-left invert Right-and-left invert 22 Selecting the video input source You can use the VIDEO1 or VIDEO 2 buttons on the remote control to view a signal coming from other devices, such as VCRs or video disc players that completes its broadcast for the day. TV top panel...

Owners Manual
Page 23
... 65 18 Current Weather Clear Cloudy Clear Cloudy Rain To turn the Closed Caption feature OFF. Setting up your area). Connecting your TV Using the Remote Control Using the closed caption feature E The closed caption feature has two options: Note: • Captions-An on -screen display of information not related to...
... 65 18 Current Weather Clear Cloudy Clear Cloudy Rain To turn the Closed Caption feature OFF. Setting up your area). Connecting your TV Using the Remote Control Using the closed caption feature E The closed caption feature has two options: Note: • Captions-An on -screen display of information not related to...

Owners Manual
Page 25
...will see the picture but hear music instead of sound being broadcast (stereo or monaural). To listen to stereo sound: • Press MTS on the remote control repeatedly until "MTS SAP" appears on the screen. Press y or z to reduce the noise. However, if you have SAP on, you ... will see the current program on the screen but not hear any sound. yzx • To listen to SAP (if available): Press MTS on the remote control until "MTS STEREO" appears on the screen. You can also transmit a second audio program (SAP) containing a second language, music, or other audio...
...will see the picture but hear music instead of sound being broadcast (stereo or monaural). To listen to stereo sound: • Press MTS on the remote control repeatedly until "MTS SAP" appears on the screen. Press y or z to reduce the noise. However, if you have SAP on, you ... will see the current program on the screen but not hear any sound. yzx • To listen to SAP (if available): Press MTS on the remote control until "MTS STEREO" appears on the screen. You can also transmit a second audio program (SAP) containing a second language, music, or other audio...

Owners Manual
Page 26
... on-screen information Press RECALL to select WOW x or • in the SOUND menu. Your audio now sounds fuller, richer and wider. Based on the remote control to display the following information on or off press WOW again. MENU WOW SOUND BASS TREBLE BALANCE MTS WOW STEREO ON You can also...
... on-screen information Press RECALL to select WOW x or • in the SOUND menu. Your audio now sounds fuller, richer and wider. Based on the remote control to display the following information on or off press WOW again. MENU WOW SOUND BASS TREBLE BALANCE MTS WOW STEREO ON You can also...
Owners Manual
Page 27
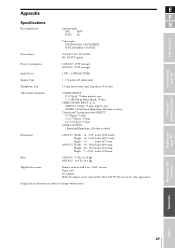
...(493 mm) 20 - 19/32 inches (523 mm) 7 - 25/32 inches (198 mm) Mass 14VL43U: 9.1 lbs. (4.15 kg) 20VL43U: 13.9 lbs. (6.3 kg) Supplied Accessories Remote Control with 2 size "AAA" batteries Power cord AC adaptor (This AC adaptor can be only used for other apparatus.) Design and specifications are... 3.58 PAL(M/N) NTSC(50/60Hz) 3.58 NTSC Power Source 110-220 V AC, 50 / 60 Hz DC 16V(TV input) Power Consumption 14VL43U: 45 W (average) 20VL43U: 60 W (average) Audio Power 2.5W + 2.5W(10% THD) Speaker Type 1 - 3/4 inches (45 mm) round Headphones jack 3.5 mm (stereo-mini type), Impedance...
...(493 mm) 20 - 19/32 inches (523 mm) 7 - 25/32 inches (198 mm) Mass 14VL43U: 9.1 lbs. (4.15 kg) 20VL43U: 13.9 lbs. (6.3 kg) Supplied Accessories Remote Control with 2 size "AAA" batteries Power cord AC adaptor (This AC adaptor can be only used for other apparatus.) Design and specifications are... 3.58 PAL(M/N) NTSC(50/60Hz) 3.58 NTSC Power Source 110-220 V AC, 50 / 60 Hz DC 16V(TV input) Power Consumption 14VL43U: 45 W (average) 20VL43U: 60 W (average) Audio Power 2.5W + 2.5W(10% THD) Speaker Type 1 - 3/4 inches (45 mm) round Headphones jack 3.5 mm (stereo-mini type), Impedance...


