

Owners Manual
Page 9
... ColorStream® (component video) and a VCR .......... 15 Connecting a camcorder 16 Connecting an HDMI™ or a DVI device to the HDMI input 17 Connecting an amplifier equipped with a Dolby® Digital decoder 18 Connecting an amplifier equipped with a DTS® decoder 18 Connecting an amplifier... adjustments 39 Using the StableSound® feature 39 Using the WOW™ surround sound feature ........ 39 Selecting the HDMI audio input source 40 Adjusting the back lighting feature 40 Displaying on-screen information 40 Auto power off 40 Understanding the Power Return feature ...
... ColorStream® (component video) and a VCR .......... 15 Connecting a camcorder 16 Connecting an HDMI™ or a DVI device to the HDMI input 17 Connecting an amplifier equipped with a Dolby® Digital decoder 18 Connecting an amplifier equipped with a DTS® decoder 18 Connecting an amplifier... adjustments 39 Using the StableSound® feature 39 Using the WOW™ surround sound feature ........ 39 Selecting the HDMI audio input source 40 Adjusting the back lighting feature 40 Displaying on-screen information 40 Auto power off 40 Understanding the Power Return feature ...

Owners Manual
Page 10
The side and back panels provide the inputs to connect other equipment to your TV/DVD by using the buttons on the top panel or the remote control. Top panel POWERMENU VOLUMCEH+AN/ -...
The side and back panels provide the inputs to connect other equipment to your TV/DVD by using the buttons on the top panel or the remote control. Top panel POWERMENU VOLUMCEH+AN/ -...

Owners Manual
Page 15
... video cable to watch DTV (digital TV), VCR, and TV programs, and record DTV and TV programs. Your TV/DVD has ColorStream® (component video) inputs. Introduction Connecting your TV/DVD Setting up your TV/DVD Connecting a DTV receiver/set-top box with ColorStream® (component video) and a VCR This connection...
... video cable to watch DTV (digital TV), VCR, and TV programs, and record DTV and TV programs. Your TV/DVD has ColorStream® (component video) inputs. Introduction Connecting your TV/DVD Setting up your TV/DVD Connecting a DTV receiver/set-top box with ColorStream® (component video) and a VCR This connection...

Owners Manual
Page 17
...video from EIA/CEA-861/861B-compliant[4] consumer electronic devices (such as possible. Because this reason, you will need to set the HDMI audio input setting to "DVI" to -DVI adapter cable should not be used with highbandwidth digital content protection, which is possible that is 6.6 ft (2m...registered trademarks of standard analog audio cables An HDMI-to "DVI" in digital form from a DVI[2] device. You must set the HDMI audio input setting to -DVI adapter cable transfers only video. Separate analog audio cables are required (see illustration below ). In that case, you use ...
...video from EIA/CEA-861/861B-compliant[4] consumer electronic devices (such as possible. Because this reason, you will need to set the HDMI audio input setting to "DVI" to -DVI adapter cable should not be used with highbandwidth digital content protection, which is possible that is 6.6 ft (2m...registered trademarks of standard analog audio cables An HDMI-to "DVI" in digital form from a DVI[2] device. You must set the HDMI audio input setting to -DVI adapter cable transfers only video. Separate analog audio cables are required (see illustration below ). In that case, you use ...
Owners Manual
Page 18
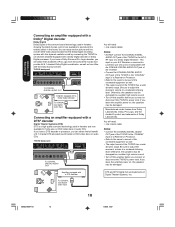
...8226; DO NOT connect the COAXIAL DIGITAL AUDIO OUT jack of Dolby Laboratories. Be sure to adjust the receiver's volume to the AC-3 RF input of the connected equipment as from Dolby Laboratories. Otherwise, the speakers may be damaged by a sudden high volume sound. • Turn off the...a moderate listening level. TV/DVD back panel To COAXIAL DIGITAL AUDIO OUT Amplifier equipped with a Dolby Digital decoder To COAXIAL type digital audio input Connecting an amplifier equipped with the Dolby Surround mark. If you connect or disconnect the TV/DVD's power cord. If you have a Dolby...
...8226; DO NOT connect the COAXIAL DIGITAL AUDIO OUT jack of Dolby Laboratories. Be sure to adjust the receiver's volume to the AC-3 RF input of the connected equipment as from Dolby Laboratories. Otherwise, the speakers may be damaged by a sudden high volume sound. • Turn off the...a moderate listening level. TV/DVD back panel To COAXIAL DIGITAL AUDIO OUT Amplifier equipped with a Dolby Digital decoder To COAXIAL type digital audio input Connecting an amplifier equipped with the Dolby Surround mark. If you connect or disconnect the TV/DVD's power cord. If you have a Dolby...

Owners Manual
Page 19
... audio decoder MPEG2 sound You can enjoy the dynamic sound of 2 channel digital stereo by connecting an amplifier equipped with a digital audio input and speaker system (right and left front speakers). Be sure to adjust the receiver's volume to a moderate listening level. TV/DVD ...'s power cord. Introduction Connecting your TV/DVD Using the TV/DVD's Features DVD Playback Connecting an amplifier equipped with a digital audio input 2 channel digital stereo You can enjoy motion picture and live concert DVD video discs encoded via the MPEG2 recording system with dynamic realistic...
... audio decoder MPEG2 sound You can enjoy the dynamic sound of 2 channel digital stereo by connecting an amplifier equipped with a digital audio input and speaker system (right and left front speakers). Be sure to adjust the receiver's volume to a moderate listening level. TV/DVD ...'s power cord. Introduction Connecting your TV/DVD Using the TV/DVD's Features DVD Playback Connecting an amplifier equipped with a digital audio input 2 channel digital stereo You can enjoy motion picture and live concert DVD video discs encoded via the MPEG2 recording system with dynamic realistic...

Owners Manual
Page 20
... electric shock, or damage. • When this unit is not a malfunction. This may fall, causing personal injury or equipment damage. Set the video input source to PC mode (see page 41.) To PC Power source Power connection To use the AC adapter becomes warm. Fix the connectors firmly with...the power using any device other than the supplied AC adapter or power cord. Connect the AC adapter plug into the TV/DVD's DC input jack. 3. Connect one VGA cable Monitor Display modes MODE Resolution VGA 640x480 SVGA 800x600 SVGA 800x600 XGA 1024x768 WXGA 1280x720 WXGA 1280x768 Refresh ...
... electric shock, or damage. • When this unit is not a malfunction. This may fall, causing personal injury or equipment damage. Set the video input source to PC mode (see page 41.) To PC Power source Power connection To use the AC adapter becomes warm. Fix the connectors firmly with...the power using any device other than the supplied AC adapter or power cord. Connect the AC adapter plug into the TV/DVD's DC input jack. 3. Connect one VGA cable Monitor Display modes MODE Resolution VGA 640x480 SVGA 800x600 SVGA 800x600 XGA 1024x768 WXGA 1280x720 WXGA 1280x768 Refresh ...
Owners Manual
Page 22
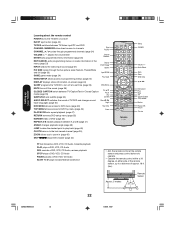
... Game PLAY MODE sets repeat playback (page 47) RETURN removes DVD setup menu (page 55) MARKER index of approx. 16 ft. (5m). Subtitle Input/ZOOM GAME game mode (page 24) MENU/SETUP allows access to programming menus (page 23) Play mode DISPLAY displays status information on either side of... the TV/DVD to turn off EJECT eject a disc (page 43) TV/DVD switches between TV/Caption/Text in the menu (page 23) INPUT selects the video input source (page 31) PIC SIZE cycles through programmed channels (page 24) VOLUME + / - adjusts the volume level ENTER sets programmed menu information ...
... Game PLAY MODE sets repeat playback (page 47) RETURN removes DVD setup menu (page 55) MARKER index of approx. 16 ft. (5m). Subtitle Input/ZOOM GAME game mode (page 24) MENU/SETUP allows access to programming menus (page 23) Play mode DISPLAY displays status information on either side of... the TV/DVD to turn off EJECT eject a disc (page 43) TV/DVD switches between TV/Caption/Text in the menu (page 23) INPUT selects the video input source (page 31) PIC SIZE cycles through programmed channels (page 24) VOLUME + / - adjusts the volume level ENTER sets programmed menu information ...

Owners Manual
Page 24
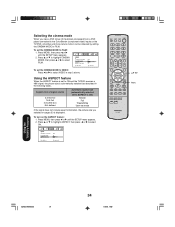
... ADD / ERASE ENGLISH 12:00AM CABLE ADD / ERASE 5. on the TV/DVD or CH M / ? Game mode After connecting a TV Game to cycling through the video input sources (page 31) in the TV/DVD's channel memory. Menu Game In addition to the unit, press GAME. SETUP LANGUAGE CLOCK SET TV / CABLE CH...
... ADD / ERASE ENGLISH 12:00AM CABLE ADD / ERASE 5. on the TV/DVD or CH M / ? Game mode After connecting a TV Game to cycling through the video input sources (page 31) in the TV/DVD's channel memory. Menu Game In addition to the unit, press GAME. SETUP LANGUAGE CLOCK SET TV / CABLE CH...

Owners Manual
Page 26
.... Use the Channel Number buttons (0-9) to enter your password: 1. See "Using the V-Chip (parental control) feature" (page 27), "Locking channels" (page 28), "Locking the video inputs" (page 28), "Setting the GameTimerTM" (page 29) or "Using the panel lock feature" (page 29). Using the TV/DVD's Features 5U90221A(E)P26-30 26 26...
.... Use the Channel Number buttons (0-9) to enter your password: 1. See "Using the V-Chip (parental control) feature" (page 27), "Locking channels" (page 28), "Locking the video inputs" (page 28), "Setting the GameTimerTM" (page 29) or "Using the panel lock feature" (page 29). Using the TV/DVD's Features 5U90221A(E)P26-30 26 26...

Owners Manual
Page 28
... to select the following: :SELECT :ADJUST • SET- Press MENU, then press or to display the LOCKS menu. 3. Locking the video inputs With the VIDEO LOCK feature, you can lock specific channels. Channel Numbers Enter Exit Menu Note: After programming CH LOCK, change channels or press the...ENTER. 7. Press EXIT to return to enter your password, then press ENTER. Locking channels With the CH LOCK feature, you can lock out the input sources (VIDEO1, VIDEO2, COLORSTREAM HD, HDMI, PC, GAME) and channels 3 and 4. You can choose to normal viewing. Use the Channel Number...
... to select the following: :SELECT :ADJUST • SET- Press MENU, then press or to display the LOCKS menu. 3. Locking the video inputs With the VIDEO LOCK feature, you can lock specific channels. Channel Numbers Enter Exit Menu Note: After programming CH LOCK, change channels or press the...ENTER. 7. Press EXIT to return to enter your password, then press ENTER. Locking channels With the CH LOCK feature, you can lock out the input sources (VIDEO1, VIDEO2, COLORSTREAM HD, HDMI, PC, GAME) and channels 3 and 4. You can choose to normal viewing. Use the Channel Number...

Owners Manual
Page 29
...work on this TV/DVD. • To deactivate the GameTimer, set the VIDEO LOCK to set up your TV/DVD To unlock the video inputs: 1. After the GameTimer is :SELECT :ADJUST reached, the TV/DVD will LOCKS appear briefly every ten minutes to remind you can automatically ...activate the VIDEO LOCK feature (VIDEO setting) to OFF (see "Locking the video inputs" page 28). Press MENU, then press or to enter your password, then press ENTER. Use the Channel Number buttons (0-9) to display the LOCKS ...
...work on this TV/DVD. • To deactivate the GameTimer, set the VIDEO LOCK to set up your TV/DVD To unlock the video inputs: 1. After the GameTimer is :SELECT :ADJUST reached, the TV/DVD will LOCKS appear briefly every ten minutes to remind you can automatically ...activate the VIDEO LOCK feature (VIDEO setting) to OFF (see "Locking the video inputs" page 28). Press MENU, then press or to enter your password, then press ENTER. Use the Channel Number buttons (0-9) to display the LOCKS ...

Owners Manual
Page 31
... VIDEO LABEL 1.VIDEO1 2.VIDEO2 3.ColorStream HD 4.HDMI - / VCR / DVD / DTV - Press ▲ or ▼ to select the desired label for that input source. 6. SOURCE SELECTION 0. buttons will need to reset the clock. Press EXIT to return to highlight VIDEO LABEL. 3. To set the hour, then press to...the power cord is not intended for connection to and should not be used to connect your devices (see "Connecting your TV/DVD" on which input jacks you will also cycle through your programmed channels (page 24), the Channel M / ? VIDEO1 2. Press ▲ or ▼ to normal...
... VIDEO LABEL 1.VIDEO1 2.VIDEO2 3.ColorStream HD 4.HDMI - / VCR / DVD / DTV - Press ▲ or ▼ to select the desired label for that input source. 6. SOURCE SELECTION 0. buttons will need to reset the clock. Press EXIT to return to highlight VIDEO LABEL. 3. To set the hour, then press to...the power cord is not intended for connection to and should not be used to connect your devices (see "Connecting your TV/DVD" on which input jacks you will also cycle through your programmed channels (page 24), the Channel M / ? VIDEO1 2. Press ▲ or ▼ to normal...
Owners Manual
Page 34
... table). To turn on the TV/DVD, smoother and more natural motion can be obtained by setting the CINEMA MODE to the ColorStream (component video) inputs on the ASPECT feature: 1. Press ▲ or ▼ to highlight ASPECT, then press or to select FILM. To set mode If the signal does not...
... table). To turn on the TV/DVD, smoother and more natural motion can be obtained by setting the CINEMA MODE to the ColorStream (component video) inputs on the ASPECT feature: 1. Press ▲ or ▼ to highlight ASPECT, then press or to select FILM. To set mode If the signal does not...

Owners Manual
Page 40
...display the AUDIO menu. 2. If you connect an HDMI device but play media with digital audio output, to hear digital audio set the HDMI audio input setting to "HDMI" with analog audio output (for details on automatically. If you connect a DVI device, to hear audio you connect an HDMI...3D FOCUS TruBass HDMI RESET :SELECT OFF OFF OFF HDMI / DVI :ADJUST Adjusting the back lighting feature If your nearest Toshiba Authorized Service Station. Selecting the HDMI audio input source See page 17 for example, certain CDVs do not output digital audio), to hear audio you must also connect the...
...display the AUDIO menu. 2. If you connect an HDMI device but play media with digital audio output, to hear digital audio set the HDMI audio input setting to "HDMI" with analog audio output (for details on automatically. If you connect a DVI device, to hear audio you connect an HDMI...3D FOCUS TruBass HDMI RESET :SELECT OFF OFF OFF HDMI / DVI :ADJUST Adjusting the back lighting feature If your nearest Toshiba Authorized Service Station. Selecting the HDMI audio input source See page 17 for example, certain CDVs do not output digital audio), to hear audio you must also connect the...

Owners Manual
Page 41
... on or off the StableSound® feature in PC mode. STABLE SOUND: To turn on or off the vocal emphasis effect in PC mode. WXGA INPUT: Set to ON, when you wish to highlight RESET, and then press . Exit Menu Notes: • If you select the WXGA mode on page.../DVD Setting up your TV/DVD Picture/Audio adjustments in the PC mode There are not effective for normal TV mode, DVD mode or external input mode. PICTURE Menu AUDIO Menu PICTURE BRIGHTNESS 25 CONTRAST 50 HOR POSITION 25 VER POSITION 25 PHASE 25 CLOCK 0 :SELECT :ADJUST AUDIO BASS TREBLE ...
... on or off the StableSound® feature in PC mode. STABLE SOUND: To turn on or off the vocal emphasis effect in PC mode. WXGA INPUT: Set to ON, when you wish to highlight RESET, and then press . Exit Menu Notes: • If you select the WXGA mode on page.../DVD Setting up your TV/DVD Picture/Audio adjustments in the PC mode There are not effective for normal TV mode, DVD mode or external input mode. PICTURE Menu AUDIO Menu PICTURE BRIGHTNESS 25 CONTRAST 50 HOR POSITION 25 VER POSITION 25 PHASE 25 CLOCK 0 :SELECT :ADJUST AUDIO BASS TREBLE ...

Owners Manual
Page 45
... mode press ZOOM repeatedly to return to select the "Time", "Title" or "Chapter". Jump Time Title Chapter /Enter/0 9/Cancel/Jump 3. Playback starts. • When you input a wrong number, press CANCEL. • Refer to the package supplied with PBC, the JUMP does not work in the above operation. 45 Notes: • You...
... mode press ZOOM repeatedly to return to select the "Time", "Title" or "Chapter". Jump Time Title Chapter /Enter/0 9/Cancel/Jump 3. Playback starts. • When you input a wrong number, press CANCEL. • Refer to the package supplied with PBC, the JUMP does not work in the above operation. 45 Notes: • You...

Owners Manual
Page 48
... mode, press / / / to select "Program". 3. Random playback VCD CD The unit selects tracks or files at random and playback. 1. In the program mode, press / / / to input the Track or file numbers. • To program others, repeat step 3. • If you cannot set "Random" during playback or stop mode. Then press CANCEL.... • To resume normal playback, select Play Mode: "Off" in step 2. Play mode Enter Play Note: In playing back the Video CD with PBC, you input a wrong number, press CANCEL.
... mode, press / / / to select "Program". 3. Random playback VCD CD The unit selects tracks or files at random and playback. 1. In the program mode, press / / / to input the Track or file numbers. • To program others, repeat step 3. • If you cannot set "Random" during playback or stop mode. Then press CANCEL.... • To resume normal playback, select Play Mode: "Off" in step 2. Play mode Enter Play Note: In playing back the Video CD with PBC, you input a wrong number, press CANCEL.

Owners Manual
Page 55
... 5/31/05, 19:03 Enter Menu Return Appendix DVD Playback Using the TV/DVD's Features Setting up your TV/DVD Connecting your TV/DVD Introduction Input 4-digit password to set the parental level. Setting procedure 1.
... 5/31/05, 19:03 Enter Menu Return Appendix DVD Playback Using the TV/DVD's Features Setting up your TV/DVD Connecting your TV/DVD Introduction Input 4-digit password to set the parental level. Setting procedure 1.

Owners Manual
Page 57
.... Press Number buttons (0-9) to a stereo. Note: You can be more severe as to achieve a suitable sound for when it is connected to input a 4-digit password. Remove the disc after the disc comes out. 3. To display OSD language in Spanish. For those discs, the age restriction ... Appendix 5U90221A(E)P54-59 57 57 5/31/05, 19:03 To display OSD language in French. Be sure to remember this number! • If you input a wrong number, press CANCEL. 3) Press ENTER to level 8. "PASSWORD CLEAR" appears on the screen. 5. Parental Language Picture Sound Parental Other Password Parental...
.... Press Number buttons (0-9) to a stereo. Note: You can be more severe as to achieve a suitable sound for when it is connected to input a 4-digit password. Remove the disc after the disc comes out. 3. To display OSD language in Spanish. For those discs, the age restriction ... Appendix 5U90221A(E)P54-59 57 57 5/31/05, 19:03 To display OSD language in French. Be sure to remember this number! • If you input a wrong number, press CANCEL. 3) Press ENTER to level 8. "PASSWORD CLEAR" appears on the screen. 5. Parental Language Picture Sound Parental Other Password Parental...


