Owner's Manual - English
Page 2
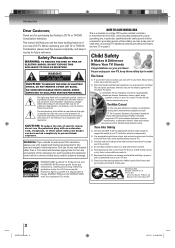
...large enough to the wall (but never screw anything directly into the TV). Use appropriate angle braces, straps, and anchors to advocate children's safety and educate consumers and their families about this Toshiba LCD TV or TV/DVD Combination television. Avoid placing any wall bracket other electronic components). ...or pull a TV over , causing unnecessary injury. NO USER-SERVICEABLE PARTS INSIDE. ENERGY STAR and the ENERGY STAR mark are like most consumers, you have more than a UL Listed wall bracket appropriate for the size and weight of cable entry as a VCR, remote control, or...
...large enough to the wall (but never screw anything directly into the TV). Use appropriate angle braces, straps, and anchors to advocate children's safety and educate consumers and their families about this Toshiba LCD TV or TV/DVD Combination television. Avoid placing any wall bracket other electronic components). ...or pull a TV over , causing unnecessary injury. NO USER-SERVICEABLE PARTS INSIDE. ENERGY STAR and the ENERGY STAR mark are like most consumers, you have more than a UL Listed wall bracket appropriate for the size and weight of cable entry as a VCR, remote control, or...

Owner's Manual - English
Page 10
Introduction Identification of controls Front Speaker Remote sensor 13 POWER indicator 21 Illustration of 19LV505 Side Left Side Disc slot 44 10 J50S0101A.indb 10 Adjusting the angle of the base Approx. ... MENU button 22 60 INPUT/ENTER button 16 POWER button 21 You can adjust the angle of 19LV505 08.1.9 4:44:52 PM Illustration of the TV-screen for 3° forward or for 10° backward from vertical angle. Hold the base of the...
Introduction Identification of controls Front Speaker Remote sensor 13 POWER indicator 21 Illustration of 19LV505 Side Left Side Disc slot 44 10 J50S0101A.indb 10 Adjusting the angle of the base Approx. ... MENU button 22 60 INPUT/ENTER button 16 POWER button 21 You can adjust the angle of 19LV505 08.1.9 4:44:52 PM Illustration of the TV-screen for 3° forward or for 10° backward from vertical angle. Hold the base of the...
Owner's Manual - English
Page 12
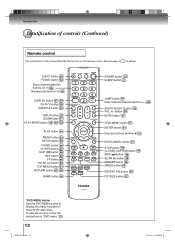
Introduction Identification of controls (Continued) Remote control The instructions in "DVD menu." 51 12 J50S0101A.indb 12 SE-R0305 POWER button 21 SLEEP button 27 JUMP button 47 ...48 ANGLE button 51 REPEAT A-B button 49 PIC SIZE button 37 08.1.9 4:44:56 PM See the page in for details. EJECT button 45 TV/DVD button 44 Direct channel selection buttons (0-9) 26 Numbered buttons (0-9) 30 DISPLAY button 27 53 CH / button 26 SUBTITLE button 52 INPUT button 16... RETURN button 55 60 GAME button 16 *DVD MENU button Use the DVD MENU button to display the menu included on the remote control.
Introduction Identification of controls (Continued) Remote control The instructions in "DVD menu." 51 12 J50S0101A.indb 12 SE-R0305 POWER button 21 SLEEP button 27 JUMP button 47 ...48 ANGLE button 51 REPEAT A-B button 49 PIC SIZE button 37 08.1.9 4:44:56 PM See the page in for details. EJECT button 45 TV/DVD button 44 Direct channel selection buttons (0-9) 26 Numbered buttons (0-9) 30 DISPLAY button 27 53 CH / button 26 SUBTITLE button 52 INPUT button 16... RETURN button 55 60 GAME button 16 *DVD MENU button Use the DVD MENU button to display the menu included on the remote control.

Owner's Manual - English
Page 13
... battery types or use AAA size batteries. • Dispose of batteries in mind. This will prevent battery acid from remote control if they are dead or if the remote control is not to a distance of approx. 5 meters. Approx. 5 meters Caution: • Never throw batteries into...battery compartment cover in the direction of the arrow. 2 Install two "R03/AAA" batteries (supplied), paying attention to replace batteries in the remote control, always replace both batteries with new ones. Always dispose of with the environment in a designated disposal area. • Batteries should ...
... battery types or use AAA size batteries. • Dispose of batteries in mind. This will prevent battery acid from remote control if they are dead or if the remote control is not to a distance of approx. 5 meters. Approx. 5 meters Caution: • Never throw batteries into...battery compartment cover in the direction of the arrow. 2 Install two "R03/AAA" batteries (supplied), paying attention to replace batteries in the remote control, always replace both batteries with new ones. Always dispose of with the environment in a designated disposal area. • Batteries should ...
Owner's Manual - English
Page 16
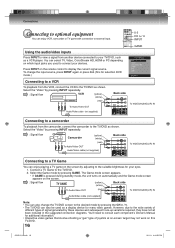
... shown. The Game mode screen appears. • If GAME is for your devices. Select the Game mode by pressing the CH / . • The TV/DVD can select TV, Video, ColorStream HD, HDMI or PC depending on which input jacks you used as a display device for additional information. • Interactive video games that... input source, press INPUT again or press 0-4. (5 is pressed during standby mode, the unit turns on automatically and the Game mode screen appears on the remote control to the TV/DVD. 2. To change the TV/DVD screen to your TV/DVD, such as shown.
... shown. The Game mode screen appears. • If GAME is for your devices. Select the Game mode by pressing the CH / . • The TV/DVD can select TV, Video, ColorStream HD, HDMI or PC depending on which input jacks you used as a display device for additional information. • Interactive video games that... input source, press INPUT again or press 0-4. (5 is pressed during standby mode, the unit turns on automatically and the Game mode screen appears on the remote control to the TV/DVD. 2. To change the TV/DVD screen to your TV/DVD, such as shown.
Owner's Manual - English
Page 22
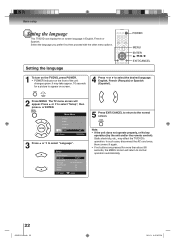
...: Select ENTER:Set 3 Press ▲ or ▼ to the normal screen. Setting the language POWER MENU ENTER / / / EXIT/CANCEL 1 To turn on the TV/DVD, press POWER. • POWER indicator on screen. 4 Press ◀ or ▶ to normal operation automatically. 22 J50S0101A.indb 22 08.1.9 4:45:06 PM ...ñol). 2 Press MENU. Note: • If the unit does not operate properly, or No key operation (by the unit and/or the remote control): Static electricity, etc., may take approx. 10 seconds for more than about 60 seconds, the MENU screen will appear. In such case, disconnect the...
...: Select ENTER:Set 3 Press ▲ or ▼ to the normal screen. Setting the language POWER MENU ENTER / / / EXIT/CANCEL 1 To turn on the TV/DVD, press POWER. • POWER indicator on screen. 4 Press ◀ or ▶ to normal operation automatically. 22 J50S0101A.indb 22 08.1.9 4:45:06 PM ...ñol). 2 Press MENU. Note: • If the unit does not operate properly, or No key operation (by the unit and/or the remote control): Static electricity, etc., may take approx. 10 seconds for more than about 60 seconds, the MENU screen will appear. In such case, disconnect the...
Owner's Manual - English
Page 27
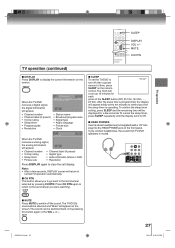
... will appear briefly every ten minutes to remind you to go back to clear the call display. The TV/DVD's sound will be silenced and "Mute" will be switched back on the remote control. The sound can be displayed for each press of time, press SLEEP on by pressing CH RTN.... TV operation SLEEP DISPLAY VOL +/- To confirm the sleep timer setting, press SLEEP and the remaining time will appear on...
... will appear briefly every ten minutes to remind you to go back to clear the call display. The TV/DVD's sound will be silenced and "Mute" will be switched back on the remote control. The sound can be displayed for each press of time, press SLEEP on by pressing CH RTN.... TV operation SLEEP DISPLAY VOL +/- To confirm the sleep timer setting, press SLEEP and the remaining time will appear on...
Owner's Manual - English
Page 34
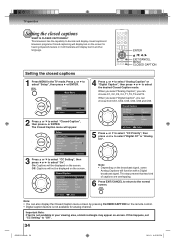
... the capability to the normal screen. : Select : Adjust Note: • You can also display the Closed Caption menu screen by pressing CLOSED CAPTION on the remote control. • Digital caption feature is not available in your viewing area, a black rectangle may appear on-screen. Main Menu Picture Audio Channel Lock Setup... select the desired Closed Caption mode. Off: Captions will not be displayed on the broadcast signal, some Analog Captions will display text on the screen. TV operation Setting the closed captions 1 Press MENU in the...
... the capability to the normal screen. : Select : Adjust Note: • You can also display the Closed Caption menu screen by pressing CLOSED CAPTION on the remote control. • Digital caption feature is not available in your viewing area, a black rectangle may appear on-screen. Main Menu Picture Audio Channel Lock Setup... select the desired Closed Caption mode. Off: Captions will not be displayed on the broadcast signal, some Analog Captions will display text on the screen. TV operation Setting the closed captions 1 Press MENU in the...

Owner's Manual - English
Page 37
... fill the width of the picture remains near its original proportion). the center of the screen, it is not available on the next page. TV operation Viewing the wide-screen picture formats You can be hidden. Natural picture size In some cases, this image will not work . •... Digital broadcasts may not allow you to the normal screen. However; Additionally this picture size on the remote control. 3 Press EXIT/CANCEL to return to change the picture size. • 19LV505/19LV506: In COMPONENT/HDMI mode with a scanning rate of 720p or 1080i, picture size feature will display ...
... fill the width of the picture remains near its original proportion). the center of the screen, it is not available on the next page. TV operation Viewing the wide-screen picture formats You can be hidden. Natural picture size In some cases, this image will not work . •... Digital broadcasts may not allow you to the normal screen. However; Additionally this picture size on the remote control. 3 Press EXIT/CANCEL to return to change the picture size. • 19LV505/19LV506: In COMPONENT/HDMI mode with a scanning rate of 720p or 1080i, picture size feature will display ...
Owner's Manual - English
Page 44
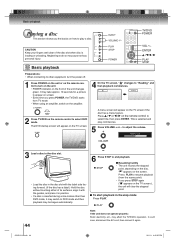
... the unit does not operate properly: Static electricity, etc., may cause serious personal injury. PLAY STOP POWER TV/DVD POWER VOL +/- EJECT VOLUME +/- to adjust the volume. Reading 2 Press TV/DVD on the remote control to select title, then press ENTER. Volume : 25 3 Load a disc in the disc slot....or unloading. ENTER / / / PLAY STOP 1 Press POWER on the unit or on the remote control to turn the power off. Basic playback Playing a disc This section shows you press POWER, the TV/DVD starts from the scene point). • If you press STOP again ("■" appears on ...
... the unit does not operate properly: Static electricity, etc., may cause serious personal injury. PLAY STOP POWER TV/DVD POWER VOL +/- EJECT VOLUME +/- to adjust the volume. Reading 2 Press TV/DVD on the remote control to select title, then press ENTER. Volume : 25 3 Load a disc in the disc slot....or unloading. ENTER / / / PLAY STOP 1 Press POWER on the unit or on the remote control to turn the power off. Basic playback Playing a disc This section shows you press POWER, the TV/DVD starts from the scene point). • If you press STOP again ("■" appears on ...
Owner's Manual - English
Page 45
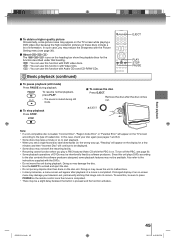
...muted during playback. Since this , be sure to unload and eject the disc. • Do not put any objects other than discs on the remote control once the movie is completed. • There may be a slight delay between the button is on the heading bar show the playable discs for... page 53. • Some playback operations of information. Also refer to the disc contents the software producers designed, some picture noise may appear on the TV screen while playing a DVD video disc because the high resolution pictures on -screen menu may damage your disc again (see pages 7 and 64). •...
...muted during playback. Since this , be sure to unload and eject the disc. • Do not put any objects other than discs on the remote control once the movie is completed. • There may be a slight delay between the button is on the heading bar show the playable discs for... page 53. • Some playback operations of information. Also refer to the disc contents the software producers designed, some picture noise may appear on the TV screen while playing a DVD video disc because the high resolution pictures on -screen menu may damage your disc again (see pages 7 and 64). •...

Owner's Manual - English
Page 64
..., it when you input a wrong number, press EXIT/CANCEL. ■ Set the new password 1) Press or to remove the disc. 2) While holding 7 down on the remote control and then press STOP on the screen. Your 8-character registration code is required every time when you change the parental level. • If you...
..., it when you input a wrong number, press EXIT/CANCEL. ■ Set the new password 1) Press or to remove the disc. 2) While holding 7 down on the remote control and then press STOP on the screen. Your 8-character registration code is required every time when you change the parental level. • If you...

Owner's Manual - English
Page 67
.... • Check the batteries are not recorded on AV amplifier. No picture. • TV/DVD selector is not set properly. • The unit is in the room. • Clear the..., slowmotion play, repeat play, or program play CD-ROMs, etc. PAGE 44 7 8 44 46 18, 19 - - 62 64 52 52 51 46 13 Others J50S0101A.indb 67 67 08.1.9 4:46:03 PM SYMPTOMS ... Parental setup. Audio soundtrack and/or subtitle language is set correctly. REMOTE CONTROL The remote control does not function. • Aim the remote control at the remote sensor. • Operate within approx. 5 meters or reduce the ...
.... • Check the batteries are not recorded on AV amplifier. No picture. • TV/DVD selector is not set properly. • The unit is in the room. • Clear the..., slowmotion play, repeat play, or program play CD-ROMs, etc. PAGE 44 7 8 44 46 18, 19 - - 62 64 52 52 51 46 13 Others J50S0101A.indb 67 67 08.1.9 4:46:03 PM SYMPTOMS ... Parental setup. Audio soundtrack and/or subtitle language is set correctly. REMOTE CONTROL The remote control does not function. • Aim the remote control at the remote sensor. • Operate within approx. 5 meters or reduce the ...
Owner's Manual - English
Page 70
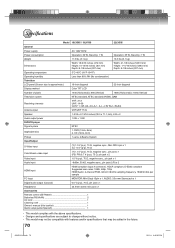
...(Coaxial) 0.5 V (p-p), 75 Ω, pin jack x 1 Headphone ø3.5mm stereo mini jack x 1 Accessories Remote control (SE-R0305 1 Batteries (R03/AAA 2 AC cord 1 Cleaning cloth 1 Ownerʼs manual (this booklet ...future. 70 J50S0101A.indb 70 08.1.9 4:46:05 PM Specifications Model 19LV505 / 19LV506 22LV505 General Power supply AC 120V 60Hz Power consumption Operation: 60 W, Stand by: 1...than 80% RH (No condensation) Television LCD panel (Screen size is approximate.) 19-inch diagonal 22-inch diagonal Display method Color TFT LCD Number of pixels 1440 (Horizontal) x ...
...(Coaxial) 0.5 V (p-p), 75 Ω, pin jack x 1 Headphone ø3.5mm stereo mini jack x 1 Accessories Remote control (SE-R0305 1 Batteries (R03/AAA 2 AC cord 1 Cleaning cloth 1 Ownerʼs manual (this booklet ...future. 70 J50S0101A.indb 70 08.1.9 4:46:05 PM Specifications Model 19LV505 / 19LV506 22LV505 General Power supply AC 120V 60Hz Power consumption Operation: 60 W, Stand by: 1...than 80% RH (No condensation) Television LCD panel (Screen size is approximate.) 19-inch diagonal 22-inch diagonal Display method Color TFT LCD Number of pixels 1440 (Horizontal) x ...
Printable Spec Sheet
Page 2
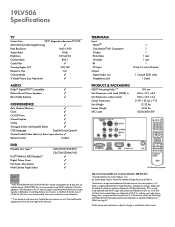
19LV506 Specifications TV Screen Size 18.9" diagonal widescreen TFT LCD ATSC/NTSC/QAM Digital Tuning ✓ Pixel... Select ✓ OSD Language English/French/Spanish Channel Label/Video Label w/ direct input selection ✓ Remote Control Unified DVD Playable Disc Types* DivX®/WMA & MP3 Playback* Digital Picture Zoom Fast Scan,...HDMI logo and High-Definition Multimedia Interface are registered trademarks of CD-RW for the size and weight of Toshiba America Consumer Products, L.L.C. TERMINALS Inputs HDMITM ColorStream® HD Component S-Video RCA-Video L-R Audio RF ...
19LV506 Specifications TV Screen Size 18.9" diagonal widescreen TFT LCD ATSC/NTSC/QAM Digital Tuning ✓ Pixel... Select ✓ OSD Language English/French/Spanish Channel Label/Video Label w/ direct input selection ✓ Remote Control Unified DVD Playable Disc Types* DivX®/WMA & MP3 Playback* Digital Picture Zoom Fast Scan,...HDMI logo and High-Definition Multimedia Interface are registered trademarks of CD-RW for the size and weight of Toshiba America Consumer Products, L.L.C. TERMINALS Inputs HDMITM ColorStream® HD Component S-Video RCA-Video L-R Audio RF ...


