
User Guide
Page 2
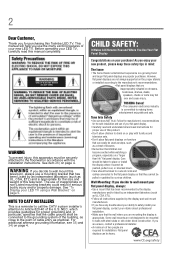
... your LED TV using a Wall Bracket:" on page 4. Before operating your flat panel display. • Carefully read this manual completely. If you are unsure, contact a professional installer. • A minimum of two people are inappropriately situated on the proper stands or installed according to walls with the installation instructions. 2 Dear Customer, Thank you for the size and weight of this television. Some wall mounts are mounting the display is a growing trend and larger flat panel displays...
... your LED TV using a Wall Bracket:" on page 4. Before operating your flat panel display. • Carefully read this manual completely. If you are unsure, contact a professional installer. • A minimum of two people are inappropriately situated on the proper stands or installed according to walls with the installation instructions. 2 Dear Customer, Thank you for the size and weight of this television. Some wall mounts are mounting the display is a growing trend and larger flat panel displays...
User Guide
Page 3
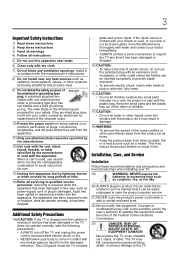
... provided plug does not fit into your outlet, consult an electrician for replacement of the obsolete outlet. 10) Protect the power cord from being walked on or pinched, particularly at all times. • Keep the product away from the damaged television. Servicing is required when the apparatus has been damaged in any ventilation openings. The LCD panel inside a wall or...
... provided plug does not fit into your outlet, consult an electrician for replacement of the obsolete outlet. 10) Protect the power cord from being walked on or pinched, particularly at all times. • Keep the product away from the damaged television. Servicing is required when the apparatus has been damaged in any ventilation openings. The LCD panel inside a wall or...
User Guide
Page 5
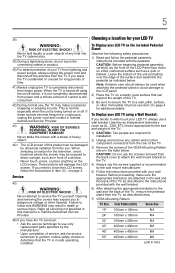
... the LCD screen. These actions will damage the LCD screen. Never attempt to a wall, pillar, surface, or other hazards. Choosing a location for long periods of this product can support the weight of the VESA Mounting Pattern show in mm) CAUTION: Before beginning pedestal assembly, carefully lay the front of the TV, remove the pedestal stand from mains power. Before proceeding, make occasional snapping or popping sounds. Service...
... the LCD screen. These actions will damage the LCD screen. Never attempt to a wall, pillar, surface, or other hazards. Choosing a location for long periods of this product can support the weight of the VESA Mounting Pattern show in mm) CAUTION: Before beginning pedestal assembly, carefully lay the front of the TV, remove the pedestal stand from mains power. Before proceeding, make occasional snapping or popping sounds. Service...
User Guide
Page 7
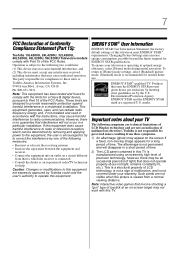
... light, remains constantly lit, etc.). Operation is viewed from that earn the ENERGY STAR prevent green house gas emissions by meeting strict guidelines set by Toshiba could void the user's authority to operate this television meet ENERGY STAR® requirements. ENERGY STAR® User Information ENERGY STAR User Information Statement: the factory default settings of this equipment. Environmental Protection Agency. To return to [Home] mode settings...
... light, remains constantly lit, etc.). Operation is viewed from that earn the ENERGY STAR prevent green house gas emissions by meeting strict guidelines set by Toshiba could void the user's authority to operate this television meet ENERGY STAR® requirements. ENERGY STAR® User Information ENERGY STAR User Information Statement: the factory default settings of this equipment. Environmental Protection Agency. To return to [Home] mode settings...

User Guide
Page 10
... about the remote control 42 Chapter 4: Menu Layout and Navigation 45 Main menu layout 45 Setup/Installation menu layout 47 Navigating the menu system 47 Chapter 5: Setting up your TV 49 Initial Setup 49 Storing channels in memory (optional 51 Auto Tuning 51 Setting channel skip 54 Setting the AV input mode 55 Setting the HDMI® audio mode 55 Viewing the digital signal meter 56 Setting the time zone 57 Viewing the system status 57 Resetting Factory Defaults 58
... about the remote control 42 Chapter 4: Menu Layout and Navigation 45 Main menu layout 45 Setup/Installation menu layout 47 Navigating the menu system 47 Chapter 5: Setting up your TV 49 Initial Setup 49 Storing channels in memory (optional 51 Auto Tuning 51 Setting channel skip 54 Setting the AV input mode 55 Setting the HDMI® audio mode 55 Viewing the digital signal meter 56 Setting the time zone 57 Viewing the system status 57 Resetting Factory Defaults 58
User Guide
Page 20
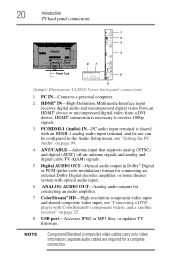
... AUDIO OUT-Optical audio output in Dolby® Digital or PCM (pulse-code modulation) format for connecting an external Dolby Digital decoder, amplifier, or home theater system with optical audio input. 6 ANALOG AUDIO OUT-Analog audio outputs for a complete connection. NOTE Component/Standard (composite) video cables carry only video information; HDMI® connection is necessary to receive 1080p signals. 3 PC/HDMI-1 (Audio) IN-PC audio input terminal is shared with an HDMI-1 analog audio input terminal, and its use can be configured in the Audio Setup menu, see "Connecting a DVD player...
... AUDIO OUT-Optical audio output in Dolby® Digital or PCM (pulse-code modulation) format for connecting an external Dolby Digital decoder, amplifier, or home theater system with optical audio input. 6 ANALOG AUDIO OUT-Analog audio outputs for a complete connection. NOTE Component/Standard (composite) video cables carry only video information; HDMI® connection is necessary to receive 1080p signals. 3 PC/HDMI-1 (Audio) IN-PC audio input terminal is shared with an HDMI-1 analog audio input terminal, and its use can be configured in the Audio Setup menu, see "Connecting a DVD player...
User Guide
Page 25
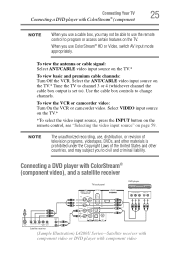
... of television programs, videotapes, DVDs, and other materials is set to change channels. To view the VCR or camcorder video: Turn On the VCR or camcorder video. Select VIDEO input source on the TV.* *To select the video input source, press the INPUT button on the remote control, see "Selecting the video input source" on the TV.* To view basic and premium cable channels: Turn Off the VCR. Connecting a DVD player with ColorStream® (component video), and a satellite receiver TV back panel DVD player COMPONENT VIDEO Y PB PR AUDIO...
... of television programs, videotapes, DVDs, and other materials is set to change channels. To view the VCR or camcorder video: Turn On the VCR or camcorder video. Select VIDEO input source on the TV.* *To select the video input source, press the INPUT button on the remote control, see "Selecting the video input source" on the TV.* To view basic and premium cable channels: Turn Off the VCR. Connecting a DVD player with ColorStream® (component video), and a satellite receiver TV back panel DVD player COMPONENT VIDEO Y PB PR AUDIO...
User Guide
Page 32
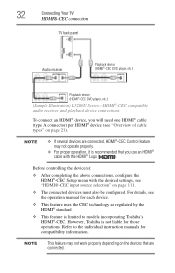
... the HDMI®-CEC Setup menu with the HDMI® Logo ( ). Refer to models incorporating Toshiba's HDMI®-CEC. 32 Connecting Your TV HDMI®-CEC connection TV back panel Audio receiver Playback device (HDMI®-CEC DVD player, etc.) Playback device (HDMI®-CEC DVD player, etc.) (Sample Illustration) L5200U Series-HDMI®-CEC compatible audio receiver and playback device connections To connect an HDMI® device, you use an HDMI® cable with the desired settings, see "Overview of cable types...
... the HDMI®-CEC Setup menu with the HDMI® Logo ( ). Refer to models incorporating Toshiba's HDMI®-CEC. 32 Connecting Your TV HDMI®-CEC connection TV back panel Audio receiver Playback device (HDMI®-CEC DVD player, etc.) Playback device (HDMI®-CEC DVD player, etc.) (Sample Illustration) L5200U Series-HDMI®-CEC compatible audio receiver and playback device connections To connect an HDMI® device, you use an HDMI® cable with the desired settings, see "Overview of cable types...
User Guide
Page 43
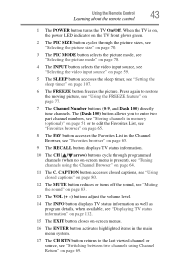
... on, the power LED indicator on the TV front glows green. 2 The PIC SIZE button cycles through programmed channels (when no on-screen menu is present), see "Setting the sleep timer" on page 64. 11 The C. Press again to the last viewed channel or source, see "Using the FREEZE feature" on page 69. Using the Remote Control 43 Learning about the remote control 1 The POWER button turns the TV On/Off. CAPTION button accesses closed captions, see "Using closed captions" on page...
... on, the power LED indicator on the TV front glows green. 2 The PIC SIZE button cycles through programmed channels (when no on-screen menu is present), see "Setting the sleep timer" on page 64. 11 The C. Press again to the last viewed channel or source, see "Using the FREEZE feature" on page 69. Using the Remote Control 43 Learning about the remote control 1 The POWER button turns the TV On/Off. CAPTION button accesses closed captions, see "Using closed captions" on page...
User Guide
Page 45
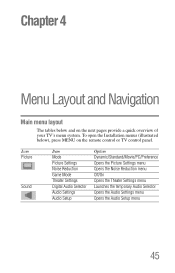
Icon Picture Sound Item Mode Picture Settings Noise Reduction Game Mode Theater Settings Digital Audio Selector Audio Settings Audio Setup Option Dynamic/Standard/Movie/PC/Preference Opens the Picture Settings menu Opens the Noise Reduction menu Off/On Opens the Theater Settings menu Launches the temporary Audio Selector Opens the Audio Settings menu Opens the Audio Setup menu 45 To open the Installation menus (illustrated below and on the remote control or TV control panel. Chapter 4 Menu Layout and Navigation Main menu layout The tables below...
Icon Picture Sound Item Mode Picture Settings Noise Reduction Game Mode Theater Settings Digital Audio Selector Audio Settings Audio Setup Option Dynamic/Standard/Movie/PC/Preference Opens the Picture Settings menu Opens the Noise Reduction menu Off/On Opens the Theater Settings menu Launches the temporary Audio Selector Opens the Audio Settings menu Opens the Audio Setup menu 45 To open the Installation menus (illustrated below and on the remote control or TV control panel. Chapter 4 Menu Layout and Navigation Main menu layout The tables below...
User Guide
Page 47
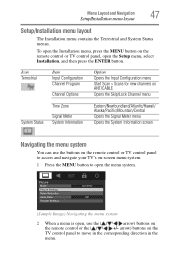
... Terrestrial Item Input Configuration Channel Program Channel Options Option Opens the Input Configuration menu Start Scan > Scans for new channels on ANT/CABLE Opens the Skip/Lock Channel menu System Status Time Zone Signal Meter System Information Eastern/Newfoundland/Atlantic/Hawaii/ Alaska/Pacific/Mountain/Central Opens the Signal Meter menu Opens the System Information screen Navigating the menu system You can use the buttons on the remote control or TV control panel to access and navigate...
... Terrestrial Item Input Configuration Channel Program Channel Options Option Opens the Input Configuration menu Start Scan > Scans for new channels on ANT/CABLE Opens the Skip/Lock Channel menu System Status Time Zone Signal Meter System Information Eastern/Newfoundland/Atlantic/Hawaii/ Alaska/Pacific/Mountain/Central Opens the Signal Meter menu Opens the System Information screen Navigating the menu system You can use the buttons on the remote control or TV control panel to access and navigate...
User Guide
Page 49
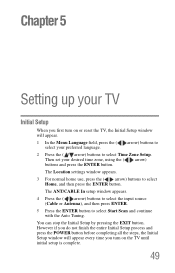
... every time you first turn on or reset the TV, the Initial Setup window will appear. 1 In the Menu Language field, press the ( / arrow) buttons to select your preferred language. 2 Press the ( / arrow) buttons to select Time Zone Setup. The Location settings window appears. 3 For normal home use, press the ( / arrow) buttons to select Start Scan and continue with the Auto Tuning. The ANT/CABLE In setup...
... every time you first turn on or reset the TV, the Initial Setup window will appear. 1 In the Menu Language field, press the ( / arrow) buttons to select your preferred language. 2 Press the ( / arrow) buttons to select Time Zone Setup. The Location settings window appears. 3 For normal home use, press the ( / arrow) buttons to select Start Scan and continue with the Auto Tuning. The ANT/CABLE In setup...
User Guide
Page 55
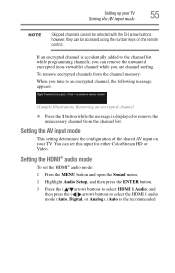
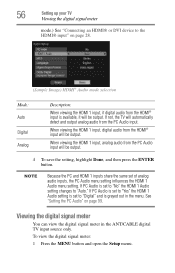
... CH arrow buttons; To remove encrypted channels from the channel list. If an encrypted channel is accidentally added to the channel list while programming channels, you can set the HDMI® audio mode: 1 Press the MENU button and open the Sound menu. 2 Highlight Audio Setup, and then press the ENTER button. 3 Press the ( / arrow) buttons to select HDMI 1 Audio, and then press the ( / arrow) buttons to select the HDMI 1 audio mode (Auto, Digital, or Analog). (Auto is displayed to an encrypted channel, the following...
... CH arrow buttons; To remove encrypted channels from the channel list. If an encrypted channel is accidentally added to the channel list while programming channels, you can set the HDMI® audio mode: 1 Press the MENU button and open the Sound menu. 2 Highlight Audio Setup, and then press the ENTER button. 3 Press the ( / arrow) buttons to select HDMI 1 Audio, and then press the ( / arrow) buttons to select the HDMI 1 audio mode (Auto, Digital, or Analog). (Auto is displayed to an encrypted channel, the following...
User Guide
Page 56
... detect and output analog audio from the HDMI® input will be output. NOTE Because the PC and HDMI 1 inputs share the same set to "No" the HDMI 1 Audio setting changes to "Auto." If PC Audio is set of analog audio inputs, the PC Audio menu setting influences the HDMI 1 Audio menu setting. When viewing the HDMI 1 input, digital audio from the PC Audio input. To view the digital signal meter: 1 Press the MENU button and open the Setup menu. 56 Setting up your TV Viewing the digital signal meter mode.) See "Connecting an HDMI® or...
... detect and output analog audio from the HDMI® input will be output. NOTE Because the PC and HDMI 1 inputs share the same set to "No" the HDMI 1 Audio setting changes to "Auto." If PC Audio is set of analog audio inputs, the PC Audio menu setting influences the HDMI 1 Audio menu setting. When viewing the HDMI 1 input, digital audio from the PC Audio input. To view the digital signal meter: 1 Press the MENU button and open the Setup menu. 56 Setting up your TV Viewing the digital signal meter mode.) See "Connecting an HDMI® or...
User Guide
Page 87
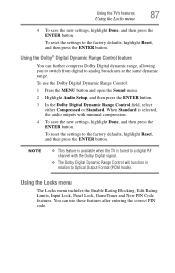
... correct PIN code. Using the TV's features 87 Using the Locks menu 4 To save the new settings, highlight Done, and then press the ENTER button. NOTE ❖ This feature is available when the TV is selected, the audio outputs with the Dolby Digital signal. ❖ The Dolby Digital Dynamic Range Control will function in relation to Optical Output Format (PCM mode). To reset the settings to the factory defaults, highlight Reset, and...
... correct PIN code. Using the TV's features 87 Using the Locks menu 4 To save the new settings, highlight Done, and then press the ENTER button. NOTE ❖ This feature is available when the TV is selected, the audio outputs with the Dolby Digital signal. ❖ The Dolby Digital Dynamic Range Control will function in relation to Optical Output Format (PCM mode). To reset the settings to the factory defaults, highlight Reset, and...
User Guide
Page 100
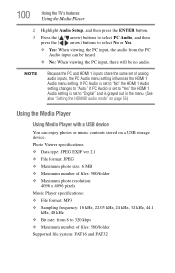
... the same set to "No" the HDMI 1 Audio setting changes to 320 kbps ❖ Maximum number of analog audio inputs, the PC Audio menu setting influences the HDMI 1 Audio menu setting. 100 Using the TV's features Using the Media Player 2 Highlight Audio Setup, and then press the ENTER button. 3 Press the ( / arrow) buttons to select PC Audio, and then press the ( / arrow) buttons to select No or Yes. ❖ Yes: When viewing the PC input, the audio from 8 to "Auto."
... the same set to "No" the HDMI 1 Audio setting changes to 320 kbps ❖ Maximum number of analog audio inputs, the PC Audio menu setting influences the HDMI 1 Audio menu setting. 100 Using the TV's features Using the Media Player 2 Highlight Audio Setup, and then press the ENTER button. 3 Press the ( / arrow) buttons to select PC Audio, and then press the ( / arrow) buttons to select No or Yes. ❖ Yes: When viewing the PC input, the audio from 8 to "Auto."
User Guide
Page 111
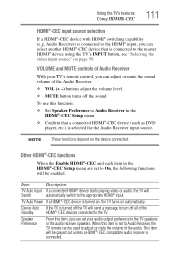
... video input source" on automatically. VOLUME and MUTE controls of Audio Receiver With your TV's remote control, you can adjust or mute the sound volume of the Audio Receiver. ❖ VOL (+ -) buttons adjust the volume level. ❖ MUTE button turns off all of the audio. TV Auto Power If a HDMI®-CEC device is selected for the Audio Receiver input source. Device Auto If the TV is turned off the TV will be grayed out unless a HDMI®-CEC compatible audio receiver is connected...
... video input source" on automatically. VOLUME and MUTE controls of Audio Receiver With your TV's remote control, you can adjust or mute the sound volume of the Audio Receiver. ❖ VOL (+ -) buttons adjust the volume level. ❖ MUTE button turns off all of the audio. TV Auto Power If a HDMI®-CEC device is selected for the Audio Receiver input source. Device Auto If the TV is turned off the TV will be grayed out unless a HDMI®-CEC compatible audio receiver is connected...
User Guide
Page 120
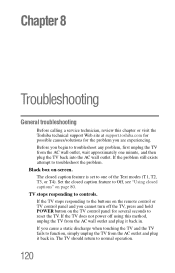
..., press and hold POWER button on the TV control panel for the problem you cannot turn off using this method, unplug the TV from the AC wall outlet and plug it back in . Set the closed caption feature to Off, see "Using closed caption feature is set to controls. Chapter 8 Troubleshooting General troubleshooting Before calling a service technician, review this chapter or visit the Toshiba technical support Web site at support.toshiba.com for possible causes...
..., press and hold POWER button on the TV control panel for the problem you cannot turn off using this method, unplug the TV from the AC wall outlet and plug it back in . Set the closed caption feature to Off, see "Using closed caption feature is set to controls. Chapter 8 Troubleshooting General troubleshooting Before calling a service technician, review this chapter or visit the Toshiba technical support Web site at support.toshiba.com for possible causes...

User Guide
Page 121
... cannot view signals from channel 3 or 4, ensure that particular input source. For device connection details, see "Connecting Your TV" on page 21. Picture problems General picture problems. Check the antenna/cable connections, see "Connecting Your TV" on page 21. Antenna reception may be poor. Troubleshooting Picture problems 121 Other problems. If your TV's problem is not addressed in this Troubleshooting section or the recommended solution has not worked, use the Reset Factory Defaults procedure, see "Using the Locks menu" on...
... cannot view signals from channel 3 or 4, ensure that particular input source. For device connection details, see "Connecting Your TV" on page 21. Picture problems General picture problems. Check the antenna/cable connections, see "Connecting Your TV" on page 21. Antenna reception may be poor. Troubleshooting Picture problems 121 Other problems. If your TV's problem is not addressed in this Troubleshooting section or the recommended solution has not worked, use the Reset Factory Defaults procedure, see "Using the Locks menu" on...
User Guide
Page 138
... program ratings displaying 93 unlocking programs 95 Q quick setup ANT/CABLE IN 50 menu language 50 R rating system 92 downloading additional 90 S safety icons 15 scrolling TheaterWide® picture 75 specifications acceptable signal formats 130 audio power 127 channel coverage 126 ColorStream® HD input 128 Digital audio output 128 dimensions 129 HDMI® input 128 HDMI® signal formats 130 mass (weight) 129 operating conditions 129 PC IN signal formats 130 PC input 128 power consumption 127 power maximum current 127 power source 127 speaker type...
... program ratings displaying 93 unlocking programs 95 Q quick setup ANT/CABLE IN 50 menu language 50 R rating system 92 downloading additional 90 S safety icons 15 scrolling TheaterWide® picture 75 specifications acceptable signal formats 130 audio power 127 channel coverage 126 ColorStream® HD input 128 Digital audio output 128 dimensions 129 HDMI® input 128 HDMI® signal formats 130 mass (weight) 129 operating conditions 129 PC IN signal formats 130 PC input 128 power consumption 127 power maximum current 127 power source 127 speaker type...


