User Manual
Page 14
.......... 39 Keeping yourself comfortable 40 Precautions 43 Setting up your computer 45 Setting up your software 45 Registering your computer with Toshiba ......... 46 Adding external devices 47 Connecting the AC adapter 48 Charging the battery 50 Using the computer for the first time... Using the TouchPad 53 Primary and secondary control buttons........... 53 Disabling or enabling the TouchPad 54 Setting up other devices 55 Installing additional memory (optional 55 Connecting a mouse 59 Using an external keyboard 59 Connecting a printer 59 Setting up a printer 61 Connecting a USB...
.......... 39 Keeping yourself comfortable 40 Precautions 43 Setting up your computer 45 Setting up your software 45 Registering your computer with Toshiba ......... 46 Adding external devices 47 Connecting the AC adapter 48 Charging the battery 50 Using the computer for the first time... Using the TouchPad 53 Primary and secondary control buttons........... 53 Disabling or enabling the TouchPad 54 Setting up other devices 55 Installing additional memory (optional 55 Connecting a mouse 59 Using an external keyboard 59 Connecting a printer 59 Setting up a printer 61 Connecting a USB...
User Manual
Page 20
... can help you 204 Resolving a hardware conflict 205 A plan of action 205 Resolving hardware conflicts on your own .... 206 Fixing a problem with Device Manager .......... 207 Memory card problems 209 Power and the batteries 209 Keyboard problems 211 Display problems 211 Disk drive problems 213
... can help you 204 Resolving a hardware conflict 205 A plan of action 205 Resolving hardware conflicts on your own .... 206 Fixing a problem with Device Manager .......... 207 Memory card problems 209 Power and the batteries 209 Keyboard problems 211 Display problems 211 Disk drive problems 213
User Manual
Page 37
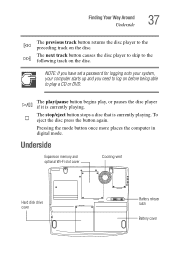
... is currently playing. To eject the disc press the button again. Pressing the mode button once more places the computer in digital mode. Underside Expansion memory and optional Wi-Fi slot cover Cooling vent Hard disk drive cover Battery release latch Battery cover Finding Your Way Around Underside 37 The previous...
... is currently playing. To eject the disc press the button again. Pressing the mode button once more places the computer in digital mode. Underside Expansion memory and optional Wi-Fi slot cover Cooling vent Hard disk drive cover Battery release latch Battery cover Finding Your Way Around Underside 37 The previous...
User Manual
Page 38
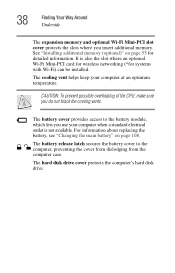
... protects the slots where you do not block the cooling vents. CAUTION: To prevent possible overheating of the CPU, make sure you insert additional memory. See "Installing additional memory (optional)" on page 108. The battery release latch secures the battery cover to the battery module, which lets you use your computer at...
... protects the slots where you do not block the cooling vents. CAUTION: To prevent possible overheating of the CPU, make sure you insert additional memory. See "Installing additional memory (optional)" on page 108. The battery release latch secures the battery cover to the battery module, which lets you use your computer at...
User Manual
Page 47
See "Setting up your software first. Before starting to : ❖ Add more memory (see "Installing additional memory (optional)" on page 55) ❖ Connect a mouse (see "Connecting a mouse" on page 59) ❖ Connect a full-size keyboard (see "Using an external keyboard" on page ...; Install PC Cards (see "Using PC Cards" on page 45 . Getting Started Setting up your computer 47 Adding external devices NOTE: Before adding external devices, Toshiba recommends setting up your computer, you may also want to use your software" on page 167)
See "Setting up your software first. Before starting to : ❖ Add more memory (see "Installing additional memory (optional)" on page 55) ❖ Connect a mouse (see "Connecting a mouse" on page 59) ❖ Connect a full-size keyboard (see "Using an external keyboard" on page ...; Install PC Cards (see "Using PC Cards" on page 45 . Getting Started Setting up your computer 47 Adding external devices NOTE: Before adding external devices, Toshiba recommends setting up your computer, you may also want to use your software" on page 167)

User Manual
Page 55
... or process large amounts of data. Your computer is on , begin at step 1; otherwise, skip to step 4. 1 If the computer is equipped with enough memory to run most of either 128, 256, and 512 MB capacity. The operating system turns off computer window appears. 2 Click Turn Off. You need a standard... . 1 screwdriver that is on , click Start, Turn Off Computer. The Turn off the computer. 3 Unplug and remove any cables connected to add an additional memory module of today's popular applications. If the computer is in good condition. You may want to increase the computer...
... or process large amounts of data. Your computer is on , begin at step 1; otherwise, skip to step 4. 1 If the computer is equipped with enough memory to run most of either 128, 256, and 512 MB capacity. The operating system turns off computer window appears. 2 Click Turn Off. You need a standard... . 1 screwdriver that is on , click Start, Turn Off Computer. The Turn off the computer. 3 Unplug and remove any cables connected to add an additional memory module of today's popular applications. If the computer is in good condition. You may want to increase the computer...

User Manual
Page 56
Removing the memory slot cover screws 7 Put the screws and the cover in a safe place so that secure the memory slot cover, and then remove the memory slot cover. 56 Getting Started Setting up other devices 5 Close the display panel and turn the computer upside down to locate the expansion memory slot cover to the empty memory slot. Expansion memory slot cover Base of the computer 6 Using a standard Phillips no. 1 screwdriver, unscrew the four screws that you can retrieve them later.
Removing the memory slot cover screws 7 Put the screws and the cover in a safe place so that secure the memory slot cover, and then remove the memory slot cover. 56 Getting Started Setting up other devices 5 Close the display panel and turn the computer upside down to locate the expansion memory slot cover to the empty memory slot. Expansion memory slot cover Base of the computer 6 Using a standard Phillips no. 1 screwdriver, unscrew the four screws that you can retrieve them later.

User Manual
Page 57
... the module into the socket. 10 Gently press down on the side you may cause memory access problems. To avoid damaging the memory module, be level when secured in place. The memory module should be careful not to discharge any static electricity you insert into the computer). ...8 Remove the new memory module from its antistatic packaging. 9 Holding the memory module by its gold connector bar (on the memory module connector until the clips snap into position. Inserting the memory module CAUTION: Avoid touching the connectors on the memory module or on the connectors may...
... the module into the socket. 10 Gently press down on the side you may cause memory access problems. To avoid damaging the memory module, be level when secured in place. The memory module should be careful not to discharge any static electricity you insert into the computer). ...8 Remove the new memory module from its antistatic packaging. 9 Holding the memory module by its gold connector bar (on the memory module connector until the clips snap into position. Inserting the memory module CAUTION: Avoid touching the connectors on the memory module or on the connectors may...

User Manual
Page 58
.... 13 Replace the battery. 14 Turn the computer over and reconnect any cables you removed. 15 To verify that the computer correctly recognizes the memory: ❖ Click Start, then click Control Panel. ❖ Click the Performance and Maintenance icon. ❖ Click System. ❖ The ...General tab view automatically appears and shows the recognized memory. 16 If the computer does not recognize the memory, turn off the computer, remove the memory slot cover, and make sure the memory module is seated properly, as described in step 10. 58 Getting Started Setting up...
.... 13 Replace the battery. 14 Turn the computer over and reconnect any cables you removed. 15 To verify that the computer correctly recognizes the memory: ❖ Click Start, then click Control Panel. ❖ Click the Performance and Maintenance icon. ❖ Click System. ❖ The ...General tab view automatically appears and shows the recognized memory. 16 If the computer does not recognize the memory, turn off the computer, remove the memory slot cover, and make sure the memory module is seated properly, as described in step 10. 58 Getting Started Setting up...
User Manual
Page 65
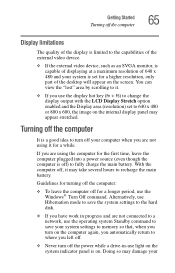
...; If the external video device, such as an SVGA monitor, is capable of displaying at a maximum resolution of 640 x 480 and your system settings to memory so that, when you turn on the computer again, you automatically return to where you left off. ❖ Never turn off your With the computer...
...; If the external video device, such as an SVGA monitor, is capable of displaying at a maximum resolution of 640 x 480 and your system settings to memory so that, when you turn on the computer again, you automatically return to where you left off. ❖ Never turn off your With the computer...
User Manual
Page 69
... page 107. See your software documentation for example, a system error occurs and you must restart your computer, or your work stays in the computer's temporary memory until you save feature that you can be configured to warn you are working. Chapter 3 Learning the Basics This chapter lists some computing tips and...
... page 107. See your software documentation for example, a system error occurs and you must restart your computer, or your work stays in the computer's temporary memory until you save feature that you can be configured to warn you are working. Chapter 3 Learning the Basics This chapter lists some computing tips and...

User Manual
Page 83
... button on . Pressing the eject button The disc tray partially opens. Learning the Basics Playing a CD or DVD 83 CAUTION: Do not install or remove a memory module while the DVD-ROM drive power is off before opening the disc tray. 2 Grasp the disc tray and pull it fully open. Playing the...
... button on . Pressing the eject button The disc tray partially opens. Learning the Basics Playing a CD or DVD 83 CAUTION: Do not install or remove a memory module while the DVD-ROM drive power is off before opening the disc tray. 2 Grasp the disc tray and pull it fully open. Playing the...
User Manual
Page 92
...power than restarting from Turn Off. ❖ Restarting from Hibernation mode uses a little more time and battery power than restoring it from memory. 92 Learning the Basics Powering down the computer Hibernation command Hibernation mode shuts the computer down completely, but it first saves the current ...state of the computer in memory so that, when you restart the computer, you can continue working from where you left it. Since Hibernation mode does not require...
...power than restarting from Turn Off. ❖ Restarting from Hibernation mode uses a little more time and battery power than restoring it from memory. 92 Learning the Basics Powering down the computer Hibernation command Hibernation mode shuts the computer down completely, but it first saves the current ...state of the computer in memory so that, when you restart the computer, you can continue working from where you left it. Since Hibernation mode does not require...
User Manual
Page 96
... again, the computer returns to the mode in which you left it. Restoring information from the hard disk takes longer than restoring it from memory ❖ When starting up again, the computer runs a self-test, loads the operating system, and then returns to start the computer up...uses no data is lost if the main battery discharges ❖ When starting up again, Hibernation uses less time and battery power than from memory. Since Hibernation mode does not require power to green. Using Hibernation Hibernation mode shuts the computer down completely, but it , including all open...
... again, the computer returns to the mode in which you left it. Restoring information from the hard disk takes longer than restoring it from memory ❖ When starting up again, the computer runs a self-test, loads the operating system, and then returns to start the computer up...uses no data is lost if the main battery discharges ❖ When starting up again, Hibernation uses less time and battery power than from memory. Since Hibernation mode does not require power to green. Using Hibernation Hibernation mode shuts the computer down completely, but it , including all open...

User Manual
Page 98
... where you left it, including all open programs and files you left off computer dialog box Standby holds the current mode of the computer in memory so that, when you restart the computer, you can continue working from Turn Off Computer or Hibernation. ❖ When starting up to save your work...
... where you left it, including all open programs and files you left off computer dialog box Standby holds the current mode of the computer in memory so that, when you restart the computer, you can continue working from Turn Off Computer or Hibernation. ❖ When starting up to save your work...

User Manual
Page 99
...mode. When I press the power button Set this option to Standby to enable them in Toshiba's Power Saver utility. 1 Open the Start menu, then click Control Panel. 2 Click the Performance and Maintenance ...icon, and then click the Toshiba Power Management icon. 3 Click the Advanced tab. 4 Select Standby for the options you hold down ... put the computer into Standby mode when you close the lid Set this option to Standby to memory, turns off light blinks amber indicating the machine is in the Turn Off Computer dialog box....
...mode. When I press the power button Set this option to Standby to enable them in Toshiba's Power Saver utility. 1 Open the Start menu, then click Control Panel. 2 Click the Performance and Maintenance ...icon, and then click the Toshiba Power Management icon. 3 Click the Advanced tab. 4 Select Standby for the options you hold down ... put the computer into Standby mode when you close the lid Set this option to Standby to memory, turns off light blinks amber indicating the machine is in the Turn Off Computer dialog box....
User Manual
Page 102
... is a nickel metal hydride (NiMH) battery. You can then replace a discharged battery and continue working. This is turned off. The RTC battery powers the RTC memory, which stores your system configuration settings and the current time and date for an extended period, more than a month, the battery may want to "Maximizing...
... is a nickel metal hydride (NiMH) battery. You can then replace a discharged battery and continue working. This is turned off. The RTC battery powers the RTC memory, which stores your system configuration settings and the current time and date for an extended period, more than a month, the battery may want to "Maximizing...
User Manual
Page 167
...that require a larger card. Even if your computer's capabilities and usefulness. PC Card supporting software The operating system provides the Card and Socket Services for memory storage, as types II and III: ❖ A Type II card is typically used for your PC Card and is used for removable hard disks... dealer. You can purchase additional PC Cards from your computer, but are likely to be much more difficult to the PCMCIA (Personal Computer Memory Card International Association) standard. You can install two Type II cards. ❖ A Type III card is installed automatically.
...that require a larger card. Even if your computer's capabilities and usefulness. PC Card supporting software The operating system provides the Card and Socket Services for memory storage, as types II and III: ❖ A Type II card is typically used for your PC Card and is used for removable hard disks... dealer. You can purchase additional PC Cards from your computer, but are likely to be much more difficult to the PCMCIA (Personal Computer Memory Card International Association) standard. You can install two Type II cards. ❖ A Type III card is installed automatically.

User Manual
Page 202
The computer was placed in the computer's memory has been lost. The computer displays the Non-System disk or disk error message. Data stored in Stand By mode and the battery has discharged. ...
The computer was placed in the computer's memory has been lost. The computer displays the Non-System disk or disk error message. Data stored in Stand By mode and the battery has discharged. ...

User Manual
Page 206
...; Disable the device. 206 If Something Goes Wrong Resolving a hardware conflict The device most likely to bypass the microprocessor and access memory directly. Resolving hardware conflicts on page 207. Resolving conflicts There are commonly referred to store information as system resources. These channels of... system component and use the same DMA, the data required by the device is stored in a specific place or address in memory called an Interrupt Request (IRQ) because it interrupts what the processor is doing and requests some of communication are three things you...
...; Disable the device. 206 If Something Goes Wrong Resolving a hardware conflict The device most likely to bypass the microprocessor and access memory directly. Resolving hardware conflicts on page 207. Resolving conflicts There are commonly referred to store information as system resources. These channels of... system component and use the same DMA, the data required by the device is stored in a specific place or address in memory called an Interrupt Request (IRQ) because it interrupts what the processor is doing and requests some of communication are three things you...


