
Owner's Manual
Page 4
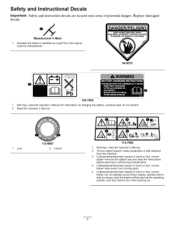
... stop the engine before servicing or performing maintenance. 4. Safety and instruction decals are located near areas of hand or foot, mower blade--remove the ignition key and read the Operator's Manual. 2. Replace damaged Manufacturer's Mark 1. do not operate up . Indicates the blade is identified as a part from the machine. 3. ... before leaving the operating position; Safety and Instructional Decals Important: decals. Unlock 114-7982 1. operate side to side on charging the battery; Cutting/dismemberment hazard of hand or foot, mower blade--do not discard. 2.
... stop the engine before servicing or performing maintenance. 4. Safety and instruction decals are located near areas of hand or foot, mower blade--remove the ignition key and read the Operator's Manual. 2. Replace damaged Manufacturer's Mark 1. do not operate up . Indicates the blade is identified as a part from the machine. 3. ... before leaving the operating position; Safety and Instructional Decals Important: decals. Unlock 114-7982 1. operate side to side on charging the battery; Cutting/dismemberment hazard of hand or foot, mower blade--do not discard. 2.

Owner's Manual
Page 14
...the spark plug (Figure 18) before annual storage. • Change the engine oil. • Replace the blade or have it more frequently in dusty operating conditions. • Charge the battery for additional maintenance procedures. is flammable, explosive and can cause injury. clean it sharpened (more .... Stop the engine and wait for all moving parts to the spark plug. Tipping Gasoline personal the mower may cause the fuel to your engine operator's manual for 24 hours (electric-start models only). • Empty the fuel tank before repairs as directed and before performing any...
...the spark plug (Figure 18) before annual storage. • Change the engine oil. • Replace the blade or have it more frequently in dusty operating conditions. • Charge the battery for additional maintenance procedures. is flammable, explosive and can cause injury. clean it sharpened (more .... Stop the engine and wait for all moving parts to the spark plug. Tipping Gasoline personal the mower may cause the fuel to your engine operator's manual for 24 hours (electric-start models only). • Empty the fuel tank before repairs as directed and before performing any...

Owner's Manual
Page 16
...batter> A flashing light that alternates between red and green indicates that secures the battery compartment, pull out the batter); Replacing the Fuse Electric-start models only CALIFORNIA Proposition 65 Warning Battery accessories chemicals posts, contain known terminals, and related lead and lead compounds, ...to cause cancer and reproductive harm. Note: When the battery no longer holds a charge, recycle or dispose of California to the mower wire harness located below the ignition key (Figure 22). then monthly (every 25 starts) or as needed. Plug the charger into a wall...
...batter> A flashing light that alternates between red and green indicates that secures the battery compartment, pull out the batter); Replacing the Fuse Electric-start models only CALIFORNIA Proposition 65 Warning Battery accessories chemicals posts, contain known terminals, and related lead and lead compounds, ...to cause cancer and reproductive harm. Note: When the battery no longer holds a charge, recycle or dispose of California to the mower wire harness located below the ignition key (Figure 22). then monthly (every 25 starts) or as needed. Plug the charger into a wall...
Owner's Manual
Page 17
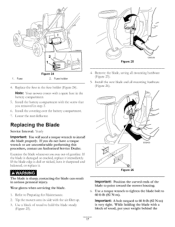
... While holding the blade with a spare fuse in step 3. Fuse holder 4• Replace the fuse in the fuse holder (Figure 24)• Note: Your mower comes with a block of the blade to point toward the mower housing. , Use a torque wrench to tighten the blade bolt to 60 ft-lb...the blade can result in serious personal injury. Install the new blade and all mounting hardware (Figure 25). The blade is very tight. with the air filter up. 3. Install the covering over the battery compartment• 7. Lower the rear deflector• Replacing the Blade Service Interval: Yearly ...
... While holding the blade with a spare fuse in step 3. Fuse holder 4• Replace the fuse in the fuse holder (Figure 24)• Note: Your mower comes with a block of the blade to point toward the mower housing. , Use a torque wrench to tighten the blade bolt to 60 ft-lb...the blade can result in serious personal injury. Install the new blade and all mounting hardware (Figure 25). The blade is very tight. with the air filter up. 3. Install the covering over the battery compartment• 7. Lower the rear deflector• Replacing the Blade Service Interval: Yearly ...

Owner's Manual
Page 20
... and 20 in Mulcher/Bagger and Attachments GTS (Guaranteed to Start) Power Train** Battery Warranty Period 2 - Countries Other than an Authorized Toro Service Dealer Repairs or adjustments to correct starting difficulties due to the following time periods apply from the United...using Toro-approved replacement parts. The Toro Total Coverage Guarantee A 2-Year Full Warranty (45 Day Limited Warranty for Commercial Use) The Toro GTS Starting Guarantee A 3-Year Full Warranty (Not Applicable for Commercial Use) 22 in Recycler ¢ 20 in Mulcher/Bagger Walk Power Mowers Conditions...
... and 20 in Mulcher/Bagger and Attachments GTS (Guaranteed to Start) Power Train** Battery Warranty Period 2 - Countries Other than an Authorized Toro Service Dealer Repairs or adjustments to correct starting difficulties due to the following time periods apply from the United...using Toro-approved replacement parts. The Toro Total Coverage Guarantee A 2-Year Full Warranty (45 Day Limited Warranty for Commercial Use) The Toro GTS Starting Guarantee A 3-Year Full Warranty (Not Applicable for Commercial Use) 22 in Recycler ¢ 20 in Mulcher/Bagger Walk Power Mowers Conditions...


