

Owner's Manual
Page 6
... hours; Product Overview 1 2 3 4 5 6 7 8 11 10 9 Figure 5 G009503 1. Oil fill/dipstick 12. Recoil start models only) Battery charger (electric-start handle 7. with oil until 6. Blade control bar 3. Cutting height lever (4) 9. Side-discharge deflector models only) 4. Important: Do ...Maintenance section. Side discharge chute 3. Handle 2. Ignition key (electric-start models only Refer to Changing the Engine Oil. [3 Charging the Battery No Parts Required Procedure Electric-start 8. Bag-on the dipstick reads Full. Handle knob (2) 6. Grass...
... hours; Product Overview 1 2 3 4 5 6 7 8 11 10 9 Figure 5 G009503 1. Oil fill/dipstick 12. Recoil start models only) Battery charger (electric-start handle 7. with oil until 6. Blade control bar 3. Cutting height lever (4) 9. Side-discharge deflector models only) 4. Important: Do ...Maintenance section. Side discharge chute 3. Handle 2. Ignition key (electric-start models only Refer to Changing the Engine Oil. [3 Charging the Battery No Parts Required Procedure Electric-start 8. Bag-on the dipstick reads Full. Handle knob (2) 6. Grass...

Owner's Manual
Page 10
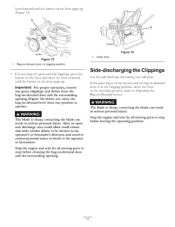
...Bag-on -demand feature allows you leave the mower (electric-start models only). Operating the Bag-on-Demand Lever The bag-on -Demand Lever) before bagging the clippings. If they do not stop properly, stop before recycling the clippings. If the side-discharge chute is damaged, install a new Toro replacement bag... while the grass bag is sharp; The blade is attached to the mower. • For bagging the grass and leaf clippings, press the button on the bag-on the bag rest in serious personal injury. Installing the Grass Bag 1. Install the grass bag, ensuring that the...
...Bag-on -demand feature allows you leave the mower (electric-start models only). Operating the Bag-on-Demand Lever The bag-on -Demand Lever) before bagging the clippings. If they do not stop properly, stop before recycling the clippings. If the side-discharge chute is damaged, install a new Toro replacement bag... while the grass bag is sharp; The blade is attached to the mower. • For bagging the grass and leaf clippings, press the button on the bag-on the bag rest in serious personal injury. Installing the Grass Bag 1. Install the grass bag, ensuring that the...
Owner's Manual
Page 11
...could allow small stones and other similar debris to be thrown in the operator's or bystander's direction and result in serious personal injury or death to stop before cleaning the bag-on-demand and the surrounding opening (Figure 16) before leaving the operating position. 11 Stop the engine and wait for... for all moving stop before you move the lever rearward until the button on the lever pops up . If the grass bag is on the mower and the bag-on-demand lever is in bagging position) For recycling the grass and leaf clippings, press the button on the lever and move the...
...could allow small stones and other similar debris to be thrown in the operator's or bystander's direction and result in serious personal injury or death to stop before cleaning the bag-on-demand and the surrounding opening (Figure 16) before leaving the operating position. 11 Stop the engine and wait for... for all moving stop before you move the lever rearward until the button on the lever pops up . If the grass bag is on the mower and the bag-on-demand lever is in bagging position) For recycling the grass and leaf clippings, press the button on the lever and move the...
Owner's Manual
Page 18
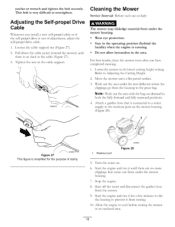
... the nut on -demand in an enclosed area. 18 Note: Wash out the area vdth the bag-on the cable support. ratchet or wrench and tighten the bolt securely. For best results, clean the mower soon after you install a new self-propel cable or if the self-propel drive is running. •...; Do not allow bystanders in the area. Lower the mower to cool before storing the mower in both the fully forward and fuEy rearward positions. 4. Start the engine and run it for the purpose of adjustment , adjust the self-propel drive cable. , Loosen the...
... the nut on -demand in an enclosed area. 18 Note: Wash out the area vdth the bag-on the cable support. ratchet or wrench and tighten the bolt securely. For best results, clean the mower soon after you install a new self-propel cable or if the self-propel drive is running. •...; Do not allow bystanders in the area. Lower the mower to cool before storing the mower in both the fully forward and fuEy rearward positions. 4. Start the engine and run it for the purpose of adjustment , adjust the self-propel drive cable. , Loosen the...

Parts Catalog
Page 3
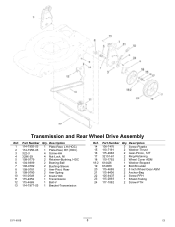
All Rights Reserved Contents Deck, Side Chute and Rear Door Assembly 4 Rear Bag Assembly 5 Engine and Blade Assembly 6 Front Wheel and Height-of-Cut Assembly 7 Transmission and Rear Wheel Drive Assembly 8 Handle Assembly 9 Electrical Assembly 10 Attachments and Accessories 11 © 2012-The Toro® Company Contact us at www.Toro.com. 8111 Lyndale Avenue South Bloomington, MN 55420 3 Printed in the USA.
All Rights Reserved Contents Deck, Side Chute and Rear Door Assembly 4 Rear Bag Assembly 5 Engine and Blade Assembly 6 Front Wheel and Height-of-Cut Assembly 7 Transmission and Rear Wheel Drive Assembly 8 Handle Assembly 9 Electrical Assembly 10 Attachments and Accessories 11 © 2012-The Toro® Company Contact us at www.Toro.com. 8111 Lyndale Avenue South Bloomington, MN 55420 3 Printed in the USA.

Parts Catalog
Page 4
..., Washout Port 26 3254-5 1 Washer-Tooth, Internal 27 3218-6 1 Nut-Jam 29 114-7987 1 Bumper 30 105-6849 2 Screw-Thread Forming 34 117-5928 1 Decal-Bag On Demand 3371-850B 4 A2 Description 1 117-1084 1 Housing ASM 1:2 94-8072 1 Decal-Danger 1:3 115-4676 1 Decal-Recycler 1:4 112-8867 1 Decal-Port, Washout 2 114-7963...
..., Washout Port 26 3254-5 1 Washer-Tooth, Internal 27 3218-6 1 Nut-Jam 29 114-7987 1 Bumper 30 105-6849 2 Screw-Thread Forming 34 117-5928 1 Decal-Bag On Demand 3371-850B 4 A2 Description 1 117-1084 1 Housing ASM 1:2 94-8072 1 Decal-Danger 1:3 115-4676 1 Decal-Recycler 1:4 112-8867 1 Decal-Port, Washout 2 114-7963...
Parts Catalog
Page 8
... 18 110-1792 2 Wheel Cover ASM 18:2 614426 1 Washer-Stepped 19 614650 2 Bolt-Shoulder 20 115-4695 2 8 Inch Wheel Gear ASM 21 115-8406 2 Anchor-Bag 22 105-9437 2 Screw-PPH 23 115-2893 1 Shield-Trailing 24 117-1092 2 Screw-PTH 3371-850B 8 C3 Part Number Qty. Part Number Qty. Description...
... 18 110-1792 2 Wheel Cover ASM 18:2 614426 1 Washer-Stepped 19 614650 2 Bolt-Shoulder 20 115-4695 2 8 Inch Wheel Gear ASM 21 115-8406 2 Anchor-Bag 22 105-9437 2 Screw-PPH 23 115-2893 1 Shield-Trailing 24 117-1092 2 Screw-PTH 3371-850B 8 C3 Part Number Qty. Part Number Qty. Description...


