

Owner's Manual
Page 6
... fill tube secure1> Important: Change the engine oil after the first 5 operating hours; Air filter 10. Fuel tank cap 11. Washout port (not shown) 13. Handle 2. Blade control bar 3. Ignition key (electric-start models only) change it yearly thereafter. Battery charger (electric-start 8. Product Overview 1 2 3 4 5 6 7 8 11 10 9 Figure 5 ... oil level on -demand lever 5. Refer to Charging the Battery in the Maintenance section. Recoil start models only Refer to Changing the Engine Oil. [3 Charging the Battery No Parts Required Procedure Electric-start handle 7.
... fill tube secure1> Important: Change the engine oil after the first 5 operating hours; Air filter 10. Fuel tank cap 11. Washout port (not shown) 13. Handle 2. Blade control bar 3. Ignition key (electric-start models only) change it yearly thereafter. Battery charger (electric-start 8. Product Overview 1 2 3 4 5 6 7 8 11 10 9 Figure 5 ... oil level on -demand lever 5. Refer to Charging the Battery in the Maintenance section. Recoil start models only Refer to Changing the Engine Oil. [3 Charging the Battery No Parts Required Procedure Electric-start handle 7.

Owner's Manual
Page 14
... blade control bar. • Clean grass clippings and dirt from the normal operating position. never siphon. Preparing for 24 hours (electric-start models only). • Empty the fuel tank before repairs as directed and before performing any additional yearly maintenance procedures. Stop the ...• Refer to leak. Tipping Gasoline personal the mower may cause the fuel to your engine operator's manual for any maintenance procedure. Run the engine dry or remove the gasoline with the air filter up. Important: Before tipping the mower to change the oil or replace the blade...
... blade control bar. • Clean grass clippings and dirt from the normal operating position. never siphon. Preparing for 24 hours (electric-start models only). • Empty the fuel tank before repairs as directed and before performing any additional yearly maintenance procedures. Stop the ...• Refer to leak. Tipping Gasoline personal the mower may cause the fuel to your engine operator's manual for any maintenance procedure. Run the engine dry or remove the gasoline with the air filter up. Important: Before tipping the mower to change the oil or replace the blade...
Owner's Manual
Page 15
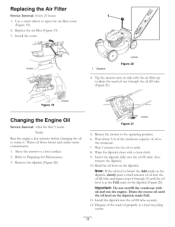
...Engine Oil Service Interval: After the first 5 hours Yearly Run the engine a few minutes before changing the oil to open the air filter cover (Figure 19). 2. Move the mower to the operating position. 6. Pour about 3/4 of the crankcase capacib7 of oil in the crankcase. , Wait 3 minutes for ...fill tube and repeat steps 8 through the oil fill tube (Figure 21). Dipstick Figure 20 , Tip the mower onto its side with the air filter up to settle. 8. Replace the air filter (Figure 19). 3. Install the dipstick into the oil fill tube, then remove the dipstick. 10. Replacing...
...Engine Oil Service Interval: After the first 5 hours Yearly Run the engine a few minutes before changing the oil to open the air filter cover (Figure 19). 2. Move the mower to the operating position. 6. Pour about 3/4 of the crankcase capacib7 of oil in the crankcase. , Wait 3 minutes for ...fill tube and repeat steps 8 through the oil fill tube (Figure 21). Dipstick Figure 20 , Tip the mower onto its side with the air filter up to settle. 8. Replace the air filter (Figure 19). 3. Install the dipstick into the oil fill tube, then remove the dipstick. 10. Replacing...
Owner's Manual
Page 17
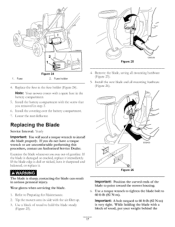
... wrench to Preparing for Maintenance. 2. While holding the blade with the air filter up. 3. Install the battery compartment you run out of wood to hold the blade steady (Figure 25). , Remove the blade, saving all mounting hardware (Figure 26). Tip the mower onto its side with a block of the blade to point toward... the 17 Examine the blade whenever you removed in the battery compartment• 5. The blade is sharp; Fuse holder 4• Replace the fuse in serious personal injury. Install the covering over the battery compartment• 7.
... wrench to Preparing for Maintenance. 2. While holding the blade with the air filter up. 3. Install the battery compartment you run out of wood to hold the blade steady (Figure 25). , Remove the blade, saving all mounting hardware (Figure 26). Tip the mower onto its side with a block of the blade to point toward... the 17 Examine the blade whenever you removed in the battery compartment• 5. The blade is sharp; Fuse holder 4• Replace the fuse in serious personal injury. Install the covering over the battery compartment• 7.

Owner's Manual
Page 20
...866-214-9807 (U.S. Neither The Toro Company nor Toro Warranty Company is covered under these warranties. This express warranty does not cover the following : - cool temperature starts such as filters, fuel, lubricants, oil changes, spark plugs, air filters blade sharpening or worn blades,...Commercial Use) The Toro GTS Starting Guarantee A 3-Year Full Warranty (Not Applicable for Commercial Use) 22 in Recycler ¢ 20 in Mulcher/Bagger Walk Power Mowers Conditions and Products Covered Items and Conditions Not Covered The Toro Company and its affiliate, Toro Warranty Company, ...
...866-214-9807 (U.S. Neither The Toro Company nor Toro Warranty Company is covered under these warranties. This express warranty does not cover the following : - cool temperature starts such as filters, fuel, lubricants, oil changes, spark plugs, air filters blade sharpening or worn blades,...Commercial Use) The Toro GTS Starting Guarantee A 3-Year Full Warranty (Not Applicable for Commercial Use) 22 in Recycler ¢ 20 in Mulcher/Bagger Walk Power Mowers Conditions and Products Covered Items and Conditions Not Covered The Toro Company and its affiliate, Toro Warranty Company, ...


