
Toro 20332 Support Question
Toro 20332 Support Question
Find answers below for this question about Toro 20332 - Recycler 190CC Personal Pace Lawn Mower.Need a Toro 20332 manual? We have 2 online manuals for this item!
Question posted by MUGANpetko on December 11th, 2013
How To Replace Air Filter On Toro Model 20331
The person who posted this question about this Toro product did not include a detailed explanation. Please use the "Request More Information" button to the right if more details would help you to answer this question.
Current Answers
Answer #1: Posted by freginold on January 17th, 2014 7:33 PM
freginold

Member since:
December 20th, 2011 Points: 23,253,895

Member since:
December 20th, 2011 Points: 23,253,895
Hi, you can find step-by-step instructions on how to replace your Toro 20331 air filter here:
http://diylawnmower.blogspot.com/2012/07/how-to-replace-air-filter-on-toro-20331.html
http://diylawnmower.blogspot.com/2012/07/how-to-replace-air-filter-on-toro-20331.html
Related Toro 20332 Manual Pages
Operation Manual - Page 1

... federal areas may have the model and serial numbers of the model and serial numbers on residential properties.
22in Recycler® Lawn Mower
Model No. 20332-Serial No. 312000001 and Up Model No. 20334-Serial No. 312000001 and Up Model No. 20352-Serial No. 312000001 and Up
Form No. 3371-667 Rev A
Operator's Manual
Replacement parts are responsible for product...
Operation Manual - Page 2

... and wait until the blade comes to potential personal injury hazards. never run.
• Disengage ...Replacements may ricochet back toward anyone enters the area.
• Do not operate machine barefooted or while wearing sandals. never up and down and behind rotary lawn mowers and the B71.1 specifications of the American National Standards Institute in serious injury or death. For models...
Operation Manual - Page 3

... use extreme care in contact with manufacturer's recommended parts, when necessary.
• Mower blades are often attracted to be sure the equipment is spilled on clothing, change the engine governor setting or overspeed the engine.
• Maintain or replace safety and instruction labels, as on a water heater or on other objects that...
Operation Manual - Page 4

... leaving the operating position; Cutting/dismemberment hazard of hand or foot, mower blade-remove the ignition key and read the Operator's Manual.
2. Safety...
Important: Safety and instruction decals are located near areas of hand or foot, mower blade-stay away from moving parts.
5. Manufacturer's Mark
1. Warning-read the ... mower blade-do not discard. 2. and look behind you when backing up and...
Operation Manual - Page 6

...the first 5 operating hours;
Blade control bar
9. Oil fill/dipstick
12. Grass bag 2. Battery charger (electric-start handle
7. change it yearly thereafter. Air filter
3. Washout port (not shown) 13. Recoil start models only)
6 Cutting height lever (4)
2. Drain the excess oil until the oil level on -demand lever
5. Handle
8.
Product Overview
3
Charging the Battery...
Operation Manual - Page 8

...Engine
1. To lower the mower, move the front cutting height levers rearward and the rear cutting height levers forward. Turn the ignition key (Figure 11) (electric-start models only) or pull the ...pull it sharply (Figure 12). Allow the rope to return to the same height as desired. Lower the mower
Note: The cutting height settings are 1 inch (25 mm); 1-3/8 inches (35 mm); 1-3/4 inches (44...
Operation Manual - Page 9

...).
Stop the engine and wait for all moving parts to recycle the grass and leaf clippings back into the lawn. Note: If the mower does not start models only). Recycling the Clippings
Your mower comes from the lawn. contacting the blade can also try reaching just under the personal pace handle to Operating the Bag-on -demand lever is...
Operation Manual - Page 10

...The blade is attached to the mower. • For bagging the grass and leaf clippings, press the
button on the bag-on-demand lever and move the
• For recycling the grass and leaf clippings, ...other similar debris to be thrown in the operator's or bystander's direction and result in serious personal injury or death to stop before cleaning the bag-on-demand door and the surrounding opening (...
Operation Manual - Page 11

... on the mower and the bag-on -Demand Lever).
Clean here
Figure 16
Side-discharging the Clippings
Use the side discharge for all moving parts to Operating the Bag-on -demand lever is in serious personal injury. contacting the blade can result in the bagging position, move the lever to the recycling position...
Operation Manual - Page 12

... wheels at a time.
This helps disperse the clippings over 6 inches (15 cm) tall, mow at a slower pace while mowing.
- Replace the blade or have it is late fall when grass growth begins to vibrate, immediately stop the engine, disconnect the wire from the spark plug, and examine the mower for the best lawn appearance.
Operation Manual - Page 13

... the spark plug wire from under the mower.
• Replace the air filter; Always tip the mower onto its side, with a hand pump;
Gasoline is flammable, explosive and can cause personal injury.
clean it sharpened (more frequently in dusty operating conditions. • Charge the battery for 24 hours (electric-start models only).
• Empty the fuel tank...
Operation Manual - Page 14

...the oil level is at a local recycling center.
14 Dispose of the used oil out through 10 until the oil level on the dipstick. Replace the air filter (Figure 19). 3. Refer to Preparing ... the dipstick. 10. Replacing the Air Filter
Service Interval: Every 25 hours 1. Dipstick
Figure 20
4. Tip the mower onto its side with the air filter up to settle. 8. Return the mower to warm it. Insert...
Operation Manual - Page 15

...mower wire harness
located below the ignition key (Figure 22).
• A green light indicates that the charger is fully charged or the charger is disconnected from the battery.
• A flashing light that alternates between red and green indicates that the battery is fully charged.
Replace... Replacing the Fuse
Electric-start models ...recycle or dispose of California to local codes.
Remove ...
Operation Manual - Page 16

... torqued to Preparing for Maintenance. 2.
Install the battery compartment with the air filter up. 3. If you removed in the battery compartment. 5. Figure 25
4. Examine the blade whenever you run out of wood to point toward the mower housing. 6. 1 2 3
1. Replace the fuse in serious personal injury. Figure 26
Important: Position the curved ends of wood, put...
Operation Manual - Page 18

... handle freely. 3. Removing the Mower from the spark plug.
7. On the last refueling of the year, add fuel stabilizer to local codes, or use it stops. Recycle it according to the fuel as... than 30 days.
• Do not store the mower in a heated area, you can no longer start models only). Charge the battery for 24 hours (electric-start model only). 2. Dispose of oil through the spark plug...
Operation Manual - Page 20

... starts such as your sole remedy under "Lawn Mowers") or access our web site at 866-214-9808 (Canadian customers)
Owner Responsibilities
You must be performed by you are warranted for any reason you may not apply to the failure of non-use , are using Toro-approved replacement parts. Some states do not allow...
Parts Catalog - Page 1

Original Instructions (EN) Form No. 3371-846 Rev A
22in Recycler® Lawn Mower
Model No. 20332-Serial No. 312000001 and Up
Parts Catalog
Register at www.Toro.com.
Parts Catalog - Page 2
... number has the form nX y. Service Assembly Reference Numbers Parts in service assemblies have reference numbers in an illustration has a reference number.
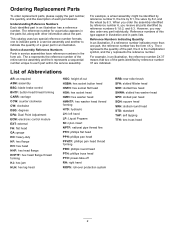
Ordering Replacement Parts
To order replacement parts, please supply the part number, the quantity, and the description of each part within the service assembly.
Understanding Reference Numbers Each identified part...
Parts Catalog - Page 3
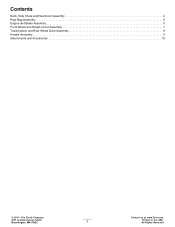
... and Blade Assembly 6 Front Wheel and Height-of-Cut Assembly 7 Transmission and Rear Wheel Drive Assembly 8 Handle Assembly 9 Attachments and Accessories 10
© 2011-The Toro® Company
Contact us at www.Toro.com.
8111 Lyndale Avenue South Bloomington, MN 55420
3
Printed in the USA.
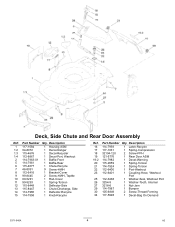
Parts Catalog - Page 4
...
2 114-7963-01 1 Baffle-Front
5 114-7961
1 Baffle-Rear
6 115-4677
1 Chute-Recycle
7 46-8091
9 Screw-HWH
8 112-6416
1 Bracket-Cover
9 99-8445
2 Screw-HWH,...Deflector-Side
13 115-8447
1 Chute-Discharge, Side
14 114-7960
1 Deflector-Recycle
15 114-7958
1 Knob-Recycle
Ref. Description
16 114-7959
1 Latch-Recycle
17 117-1031
1 Spring-Compression
18 32104-120
2 Screw-PPH
19 121-...
Similar Questions

How To Replace Air Filter For Toro 6.5 190cc
(Posted by cldw 10 years ago)

Toro Recycler Personal Pace Lawn Mower Wont Start
(Posted by barnejon 10 years ago)

How To Replace The Torsion Spring On A Toro Personal Pace Lawn Mower
(Posted by vlsteevette 10 years ago)

How To Change Oil On A Toro Recycler (22 ) 190cc Personal Pace Lawn Mower
(Posted by tinaScamp1 10 years ago)

Blade For Model 20037 Personal Pace Lawn Mower
where can i buy a replacement 21 inch bladefor my 2003 Toro model 20037 personal Pace lawn mower???
where can i buy a replacement 21 inch bladefor my 2003 Toro model 20037 personal Pace lawn mower???
(Posted by lynnegrede 12 years ago)