
Toro 20334 Support Question
Toro 20334 Support Question
Find answers below for this question about Toro 20334 - Personal Pace Electric Start Walk Power Mower.Need a Toro 20334 manual? We have 2 online manuals for this item!
Question posted by jdambrosi on September 29th, 2011
Stalls After Running For A Minute Or Two.
Engines runs for a minuter or two then chokes out and stalls. Seam like some how the choke closed.. Air filter is clean, gas is fresh.
Current Answers
Related Toro 20334 Manual Pages
Owner's Manual - Page 1
....com.
Serial No. CALIFORNIA Proposition 65 Warning
The engine exhaust from an Authorized Service Dealer or at www....Lawn Mower
Form No. 3363-863 Rev D
Model No. 20332mSerial No. 310000001 and Up Model No. 20332CmSerial No. 310000001 and Up Model No. 20334... or to register your product.
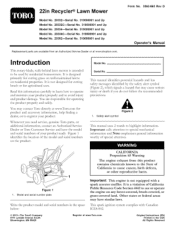
Introduction
This rotary-blade, walk-behind lawn mower is a violation of the model and serial numbers on ...
Owner's Manual - Page 2

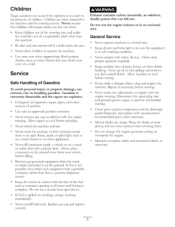
... standard B71.1-2003. Failure to potential personal injury hazards. Stay behind the handle when the engine is running machine unattended.
• Stop the engine and wait until the blade comes to vibrate abnormal13; walk;
Tall grass can hide obstacles.
• Do not mow on this mower could be
ordered through the engine manufacturer. Do not pull machine...
Owner's Manual - Page 3
...starting .
Remove gas-powered equipment from the truck or trailer and refuel it on other debris build-up oil or fuel spillage and remove any adjustments or repairs with a plastic liner. Keep the nozzle in contact with the engine running..., rather than the operator.
Be alert and turn mower off if a child enters the area.
Never remove gas cap or add fuel with the rim of grass,...
Owner's Manual - Page 5
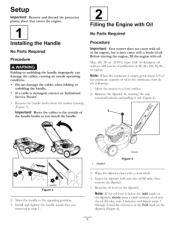
... or higher. Before starting the engine, fill the engine with a clean cloth. 4. Move ...the handle to a level surface.
2. Important: Route the cables to the outside of the handle knobs as you
removed in step I .
1. Move the mower to the operating position. 3. i
G009550
Figure 3
2. Insert the dipstick flay into the oil fill tube, wait 3 minutes...
Owner's Manual - Page 6

... oil until
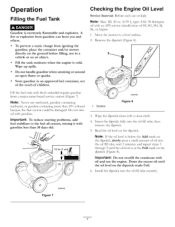
6. Air filter 10. Fuel tank cap
11. Recoil start
8. Spark plug
1
G009526
Figure 6
1. Install the dipstick into the oil fill tube secure1>
Important: Change the engine oil after the first 5 operating hours; Product Overview
1
2
3
4 5 6 7 8
11
10 9
Figure 5
G009503
1. Blade control bar 3. Grass bag 2. Handle 2. Ignition key (electric-start handle...
Owner's Manual - Page 7
....
4. Wipe the dipstick clean with
1. Important: To reduce starting problems, fuel stabilizer to a level surface.
2. Note: If the oil level is at the Full mark on an object.
Remove the dipstick (Figure 8).
with fresh unleaded regular gasoline from gasoline can burn you and others. Fill the tank outdoors when the engine is extremely flammable...
Owner's Manual - Page 8
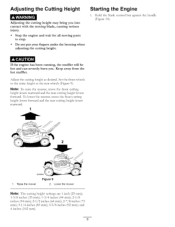
... adjusting the cutting height. Lower the mower
Note: The cutting height settings are 1 inch (25 ram);
1-3/8 inches (35 ram); 1-3/4 inches (44 ram); 2-1/8
inches (54 ram); 2-1/2 inches (64 ram); 2-7/8inches (73
ram); 3-1/4 inches (83 ram); 3-5/8 inches (92 ram); and
4 inches (102 ram). If the engine has been running, the muffler will be hot and...
Owner's Manual - Page 9

... mower does not start after self-propelling, stop walking, hold your sides, and the mower will automatically keep pace with your hands on the upper handle and your elbows at your hands in place, and allow the mower to roll a couple of inches (centimeters). Blade control bar
7
_/_'G009546
Figure 10
, Turn the ignition key (Figure 11) (electric-start...
Owner's Manual - Page 10

...serious personal injury.
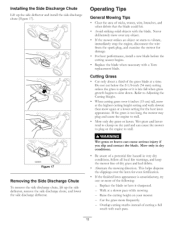
Check the grass bag frequently. Stop the engine and wait for all moving parts to recycle the grass and leaf clippings back into the lawn. Operating... grass bag when you leave the mower (electric-start models only).
Notches 2. Removing the Grass Bag
To remove the bag, reverse the steps above.
Stopping the Engine
To stop before leaving the operating ...
Owner's Manual - Page 11
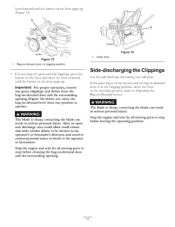
... in serious personal injury. Stop the engine and wait for cutting very tall grass.
contacting the blade can result in serious personal injury. Also... blade is in serious personal injury or death to door
G009582
1. parts to the operator or bystanders. Clean here
Figure 16
Side-...Lever). If the grass bag is on the mower and the bag-on-demand lever is sharp; lever forward until the...
Owner's Manual - Page 12
...lawn appearance is too long, the mower may plug and cause the engine to vibrate, immediately stop the engine, disconnect the wire from the spark plug, and examine the mower...the lawn for the best lawn appearance. Walk at a lower setting for even fertilization. then mow again at a slower pace ... aW object.
• If the mower strikes an object or starts to stall.
• Mow only dry grass ...
Owner's Manual - Page 14

... the engine oil.
• Check the engine oil level. • Ensure that the engine stops within 3 seconds after releasing the blade control bar. • Clean grass clippings and dirt from under the mower.
• Replace the air filter; replace it more frequently in dusty operating conditions. • Charge the battery for Maintenance
1. Preparing for 24 hours (electric-start models...
Owner's Manual - Page 15
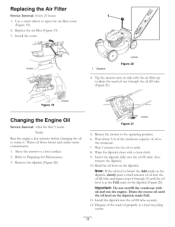
Use a screw driver to a level surface. 2. Dipstick
Figure 20
, Tip the mower onto its side with the air filter up to settle. 8. Move the mower to open the air filter cover
(Figure 19).
2.
Wipe the dipstick clean with
oil and run the engine. Insert the dipstick fury into the oil fill tube secure1>
12. Install the cover. Warm oil flows...
Owner's Manual - Page 16

...minutes until the battery is nearly fully charged. Note: There is charging the batter):
4
1.
Battery 4. Replacing the Fuse
Electric-start...electric starter, the fuse may have a two-color LED display that indicates the following states of the lead-acid battery according to the mower... 25 hours
Electric-start models only
If the battery does not charge or the engine does not run with a 40...
Owner's Manual - Page 17
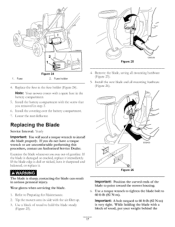
...mower housing. , Use a torque wrench to tighten the blade bolt to 60 ft-lb (82 N-m). Examine the blade whenever you removed in step 3.
Refer to 60 ft-lb (82 N-m) is very tight.
While holding the blade with a spare fuse in serious personal injury. Install the battery compartment you run...•
5.
Fuse
Figure 24 2. with the air filter up. 3. The blade is du_ or nicked,...
Owner's Manual - Page 18
...
Figure 28
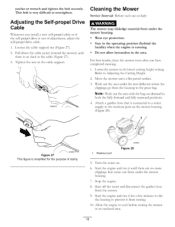
, Turn the water on the cable support. Start the engine and run it for the purpose of adjustment , adjust the self-propel drive cable.
, Loosen the cable support nut (Figure 27). 2. Adjusting the Self-propel Drive Cable
Whenever you have completed mowing. 1.
Cleaning the Mower
Service Interval: Before each use or daily
The...
Owner's Manual - Page 19

... handle. Remove the ignition key (electric-start models only).
2. hTiportant: Route the cables to local codes, or use it in your automobile. Do not store fuel without stabilizer more than 30 days, and do not store stabilized fuel more than 90 days. , Run the mower until the engine stops from running out of oil
through the...
Owner's Manual - Page 20

... cool temperature starts such as filters, fuel, lubricants, oil changes, spark plugs, air filters blade sharpening or...Starting Guarantee
A 3-Year Full Warranty (Not Applicable for Commercial Use)
22 in Recycler ¢
20 in Mulcher/Bagger Walk Power Mowers...maintain your sole remedy under "Lawn Mowers") or access our web site ...is defined as your product's engine in the fuel system
-
The...
Parts Catalog - Page 3
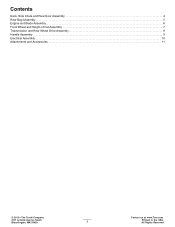
Contents
Deck, Side Chute and Rear Door Assembly 4 Rear Bag Assembly 5 Engine and Blade Assembly 6 Front Wheel and Height-of-Cut Assembly 7 Transmission and Rear Wheel Drive Assembly 8 Handle Assembly 9 Electrical Assembly 10 Attachments and Accessories 11
© 2012-The Toro® Company
Contact us at www.Toro.com.
8111 Lyndale Avenue South...
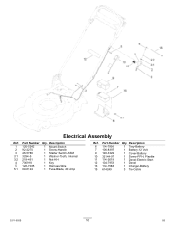
Parts Catalog - Page 10
...
7 106-8397
1 Battery-12 Volt
9 120-3329
1 Cover-Battery
10 32144-97
1 Screw-PPH, Plastite
11 114-2619
1 Decal-Electric Start
12 104-7953
1 Decal
13 114-1588
1 Charger-Battery
15 614249
3 Tie-Cable
3371-850B
10
D5 Description
1 120-5242
1 Mount...4 700918
1 Key
5 120-7035
1 Harness-Wire
5:1 99-6124
1 Fuse-Blade, 40 Amp
Ref. Part Number Qty. Electrical Assembly
Ref.
Similar Questions

Owners Manual For Toro 190 Cc Personal Pace Lawn Mower
(Posted by nelsontim1 9 years ago)

Toro Personal Pace Electric Starter Does Not Engage
(Posted by tejsmigg 9 years ago)

Toro 22 Recycler Personal Pace Wont Start
(Posted by chirielibir 10 years ago)

Electric Start Toro Law Mower Will Not Start Cold 20334
(Posted by pinoNtha 10 years ago)

Toro Self Propelled Lawn Mower Personal Pace Won't Pull The Mower 20332
(Posted by pksrsc 10 years ago)