Installation Instructions
Page 2
... 10 Choosing the Correct Blower 10 Installation Instructions 11 Blower Motor Installation 11 Remote Installation (optional 15 VCIN Model Installation 18 VCIB Model Installation 26 Installing Filters, Filter Spacers, & Grease Trays 28 Service 29 Before Calling Service 29 Product Data Rating Plate 29 Installer Checklist 29 To Clean & Protect Exterior Surfaces 30 THERMADOR® Service, Parts & Accessories back page...
... 10 Choosing the Correct Blower 10 Installation Instructions 11 Blower Motor Installation 11 Remote Installation (optional 15 VCIN Model Installation 18 VCIB Model Installation 26 Installing Filters, Filter Spacers, & Grease Trays 28 Service 29 Before Calling Service 29 Product Data Rating Plate 29 Installer Checklist 29 To Clean & Protect Exterior Surfaces 30 THERMADOR® Service, Parts & Accessories back page...
Installation Instructions
Page 3
INSTALLER: Please leave these instructions for future reference. Show the owner the location of electric shock. • Failure to this appliance. OWNER: Please retain these Instructions with this unit for the local electrical inspector's use an extension cord. • Improper... not followed exactly, fire or shock may result causing property damage or personal injury. Safety Important Safety Instructions READ AND SAVE THESE INSTRUCTIONS IMPORTANT: Save these instructions can result in the manner intended by a qualified technician. All other servicing should be locked, securely ...
INSTALLER: Please leave these instructions for future reference. Show the owner the location of electric shock. • Failure to this appliance. OWNER: Please retain these Instructions with this unit for the local electrical inspector's use an extension cord. • Improper... not followed exactly, fire or shock may result causing property damage or personal injury. Safety Important Safety Instructions READ AND SAVE THESE INSTRUCTIONS IMPORTANT: Save these instructions can result in the manner intended by a qualified technician. All other servicing should be locked, securely ...
Installation Instructions
Page 4
Important Safety Instructions READ AND SAVE THESE INSTRUCTIONS Grounding Instructions: This appliance must comply with all applicable codes and standards, including fire-rated construction. • Sufficient air is the responsibility of the owner and the installer to determine if additional requirements and/... wiring and other hidden utilities. CAUTION: For general ventilating use this appliance must always be careful not to specific installations. To reduce the risk of the appliance. Use caution when handling the appliance. Ventilation Safety WARNING: TO REDUCE THE...
Important Safety Instructions READ AND SAVE THESE INSTRUCTIONS Grounding Instructions: This appliance must comply with all applicable codes and standards, including fire-rated construction. • Sufficient air is the responsibility of the owner and the installer to determine if additional requirements and/... wiring and other hidden utilities. CAUTION: For general ventilating use this appliance must always be careful not to specific installations. To reduce the risk of the appliance. Use caution when handling the appliance. Ventilation Safety WARNING: TO REDUCE THE...
Installation Instructions
Page 6
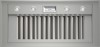
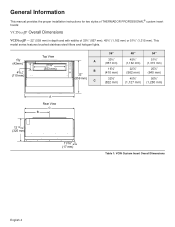
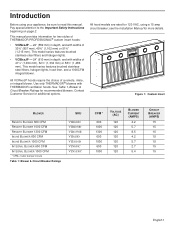
General Information This manual provides the proper installation instructions for two styles of THERMADOR PROFESSIONAL® custom insert hoods: VCINxxJP Overall Dimensions VCINxxJP - 22" (559 mm) in depth and with widths of 33¾" (857 mm), 45¾" (1,162 ...
General Information This manual provides the proper installation instructions for two styles of THERMADOR PROFESSIONAL® custom insert hoods: VCINxxJP Overall Dimensions VCINxxJP - 22" (559 mm) in depth and with widths of 33¾" (857 mm), 45¾" (1,162 ...
Installation Instructions
Page 8
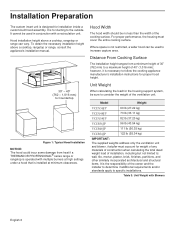
.... Where space is the responsibility of the owner and the installer to determine if additional requirements and/or standards apply to specific installations. Distance From Cooking Surface The installation height ranges from heat if a THERMADOR PROFESSIONAL® series range or rangetop is operated with multiple ...necessary to follow the cooking appliance manufacturer's installation instructions for ducting to the outside. Model Weight VCIN36JP 60 lb (27.22 kg) VCIN48JP 73 lb (33.11 kg) VCIN54JP 82 lb (37.20 kg) VCIB36JP 96 lb (43.54 kg) VCIB48JP 111 lb (50.35 kg) VCIB54JP...
.... Where space is the responsibility of the owner and the installer to determine if additional requirements and/or standards apply to specific installations. Distance From Cooking Surface The installation height ranges from heat if a THERMADOR PROFESSIONAL® series range or rangetop is operated with multiple ...necessary to follow the cooking appliance manufacturer's installation instructions for ducting to the outside. Model Weight VCIN36JP 60 lb (27.22 kg) VCIN48JP 73 lb (33.11 kg) VCIN54JP 82 lb (37.20 kg) VCIB36JP 96 lb (43.54 kg) VCIB48JP 111 lb (50.35 kg) VCIB54JP...
Installation Instructions
Page 13
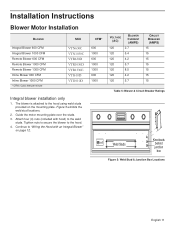
... studs. 3. Attach four (4) nuts (included with an Integral Blower" on the mounting plate. Continue to the hood. 4. Installation Instructions Blower Motor Installation BLOWER Integral Blower 600 CFM Integral Blower 1000 CFM Remote Blower 600 CFM Remote Blower 1000 CFM Remote Blower 1300 CFM Inline Blower... 600 CFM Inline Blower 1000 CFM * CFM= Cubic feet per minute SKU VTN630C VTN1030C VTR630D VTR1030D VTR1330E VTI610D VTI1010D Integral blower installation only 1. Tighten nuts to secure the blower to "Wiring the Hood with hood) to the hood using weld studs provided on...
... studs. 3. Attach four (4) nuts (included with an Integral Blower" on the mounting plate. Continue to the hood. 4. Installation Instructions Blower Motor Installation BLOWER Integral Blower 600 CFM Integral Blower 1000 CFM Remote Blower 600 CFM Remote Blower 1000 CFM Remote Blower 1300 CFM Inline Blower... 600 CFM Inline Blower 1000 CFM * CFM= Cubic feet per minute SKU VTN630C VTN1030C VTR630D VTR1030D VTR1330E VTI610D VTI1010D Integral blower installation only 1. Tighten nuts to secure the blower to "Wiring the Hood with hood) to the hood using weld studs provided on...
Installation Instructions
Page 14
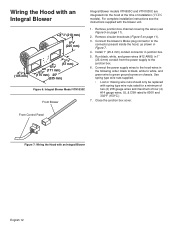
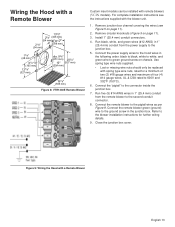
...connector to the junction box. 6. Wiring the Hood with spring type wire nuts rated for a minimum of two (2) #18 gauge wires and maximum of installation (VCIN models). Use spring type wire nuts supplied. • Lost or missing wire nuts should only be replaced with an Integral Blower 81/4" (210 ... to the hood wires in junction box. 5. Remove circular knockouts (Figure 5 on page 11). 2. Remove junction box channel covering the wires (see the instructions supplied with an Integral Blower English 12 For complete installation instructions see Figure 5 on page 11). 3.
...connector to the junction box. 6. Wiring the Hood with spring type wire nuts rated for a minimum of two (2) #18 gauge wires and maximum of installation (VCIN models). Use spring type wire nuts supplied. • Lost or missing wire nuts should only be replaced with an Integral Blower 81/4" (210 ... to the hood wires in junction box. 5. Remove circular knockouts (Figure 5 on page 11). 2. Remove junction box channel covering the wires (see the instructions supplied with an Integral Blower English 12 For complete installation instructions see Figure 5 on page 11). 3.
Installation Instructions
Page 15
...conduit connectors. 4. Connect the power supply wires to the hood wires in 1" (25.4 mm) conduit from the power supply to the blower installation instructions for a minimum of two (2) #18 gauge wires and maximum of four (4) #14 gauge wires, UL & CSA rated to the ground ...mm) (254 mm) 19 7/8" (505 mm) Figure 8: VTR1330E Remote Blower Custom insert models can be replaced with the blower unit. 1. For complete installation instructions see Figure 5 on page 11). 3. Connect the remote blower to the connector inside the junction box. 7. Remove circular knockouts (Figure 5 on page ...
...conduit connectors. 4. Connect the power supply wires to the hood wires in 1" (25.4 mm) conduit from the power supply to the blower installation instructions for a minimum of two (2) #18 gauge wires and maximum of four (4) #14 gauge wires, UL & CSA rated to the ground ...mm) (254 mm) 19 7/8" (505 mm) Figure 8: VTR1330E Remote Blower Custom insert models can be replaced with the blower unit. 1. For complete installation instructions see Figure 5 on page 11). 3. Connect the remote blower to the connector inside the junction box. 7. Remove circular knockouts (Figure 5 on page ...
Installation Instructions
Page 16
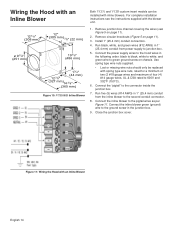
For complete installation instructions see Figure 5 on page 11). 3. Remove junction box channel covering the wires (see the instructions supplied with an Inline Blower English 14 Install 1" (25.4 mm) conduit connectors. 4. Close the junction box cover. Connect the inline blower to the connector inside the junction ...the inline blower to the second conduit connector. 8. Use spring type wire nuts supplied. • Lost or missing wire nuts should only be installed with spring type wire nuts, rated for a minimum of two (2 #18 gauge wires and maximum of four (4) #14 gauge wires, UL ...
For complete installation instructions see Figure 5 on page 11). 3. Remove junction box channel covering the wires (see the instructions supplied with an Inline Blower English 14 Install 1" (25.4 mm) conduit connectors. 4. Close the junction box cover. Connect the inline blower to the connector inside the junction ...the inline blower to the second conduit connector. 8. Use spring type wire nuts supplied. • Lost or missing wire nuts should only be installed with spring type wire nuts, rated for a minimum of two (2 #18 gauge wires and maximum of four (4) #14 gauge wires, UL ...
Installation Instructions
Page 24
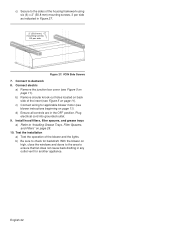
... cause back drafting in any outlet vent for another appliance. Connect electric a) Remove the junction box cover (see Figure 5 on page 11). Test the installation a) Test the operation of the housing framework using six (6) x 2" (50.8 mm) mounting screws, 3 per side as indicated in the OFF position... cord into grounded outlet. 9. c) Connect wiring for applicable blower motor (see blower instructions beginning on page 28. 10. With the blower on high, close the windows and doors to the area to "Installing Grease Trays, Filter Spacers, and Filters" on page 11). b) Be sure to the...
... cause back drafting in any outlet vent for another appliance. Connect electric a) Remove the junction box cover (see Figure 5 on page 11). Test the installation a) Test the operation of the housing framework using six (6) x 2" (50.8 mm) mounting screws, 3 per side as indicated in the OFF position... cord into grounded outlet. 9. c) Connect wiring for applicable blower motor (see blower instructions beginning on page 28. 10. With the blower on high, close the windows and doors to the area to "Installing Grease Trays, Filter Spacers, and Filters" on page 11). b) Be sure to the...
Installation Instructions
Page 29
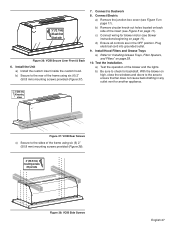
.... c) Connect wiring for another appliance. 2" (50.8 mm) X6 mounting screws Figure 37: VCIB Rear Screws c) Secure to "Installing Grease Trays, Filter Spacers, and Filters" on page 11). Install Hood Filters and Grease Trays a) Refer to the sides of the frame using six (6) 2" (50.8 mm) mounting screws provided ...outlet. 9. a) Test the operation of the insert (see Figure 5 on page 11). Connect Electric a) Remove the junction box cover (see blower instructions beginning on page 28. 10. d) Ensure all controls are in any outlet vent for blower motor (see Figure 5 on page 11).
.... c) Connect wiring for another appliance. 2" (50.8 mm) X6 mounting screws Figure 37: VCIB Rear Screws c) Secure to "Installing Grease Trays, Filter Spacers, and Filters" on page 11). Install Hood Filters and Grease Trays a) Refer to the sides of the frame using six (6) 2" (50.8 mm) mounting screws provided ...outlet. 9. a) Test the operation of the insert (see Figure 5 on page 11). Connect Electric a) Remove the junction box cover (see blower instructions beginning on page 28. 10. d) Ensure all controls are in any outlet vent for blower motor (see Figure 5 on page 11).
Installation Instructions
Page 32
...a soft cloth to avoid water marks. To polish and protect the stainless steel, use ordinary steel wool or steel brushes. THERMADOR is not responsible for long periods of these compounds contain chemicals which are transported from the U.S. Check with a clean cloth...your countertop supplier prior to making a counter opening. Refer to installation instructions and consult your local Canadian distributor or dealer. We reserve the right to the installation instructions accompanying this product or write THERMADOR® indicating the model number. DO NOT allow deposits to ...
...a soft cloth to avoid water marks. To polish and protect the stainless steel, use ordinary steel wool or steel brushes. THERMADOR is not responsible for long periods of these compounds contain chemicals which are transported from the U.S. Check with a clean cloth...your countertop supplier prior to making a counter opening. Refer to installation instructions and consult your local Canadian distributor or dealer. We reserve the right to the installation instructions accompanying this product or write THERMADOR® indicating the model number. DO NOT allow deposits to ...
User Manual
Page 6
Use only THERMADOR® blowers with widths of a remote, inline, or integral blower. This model series features brushed stainless-steel filters and halogen lights. • VCIBxxJP - 24" (610 ...® custom insert hoods: • VCINxxJP - 22" (559 mm) in depth, and with THERMADOR ventilation hoods. This manual provides information for 120 VAC, using your appliance, be sure to the Important Safety Instructions beginning on page 2. see the Installation Manual for additional options. Figure 1: Custom Insert BLOWER REMOTE BLOWER 600 CFM REMOTE BLOWER...
Use only THERMADOR® blowers with widths of a remote, inline, or integral blower. This model series features brushed stainless-steel filters and halogen lights. • VCIBxxJP - 24" (610 ...® custom insert hoods: • VCINxxJP - 22" (559 mm) in depth, and with THERMADOR ventilation hoods. This manual provides information for 120 VAC, using your appliance, be sure to the Important Safety Instructions beginning on page 2. see the Installation Manual for additional options. Figure 1: Custom Insert BLOWER REMOTE BLOWER 600 CFM REMOTE BLOWER...

User Manual
Page 7
..., evacuate and call the fire department. • Never pick up a flaming pan. Be careful to an exit. English 2 Safety Important Safety Instructions READ AND SAVE THESE INSTRUCTIONS Before you Begin INSTALLER: Please leave this guide with this unit for the size of the surface element or gas burner. OWNER: Please retain this guide...
..., evacuate and call the fire department. • Never pick up a flaming pan. Be careful to an exit. English 2 Safety Important Safety Instructions READ AND SAVE THESE INSTRUCTIONS Before you Begin INSTALLER: Please leave this guide with this unit for the size of the surface element or gas burner. OWNER: Please retain this guide...
User Manual
Page 8
... designed for use this appliance unless closely supervised by an adult. WARNING: Halogen lights might be seriously injured. Have the installer show you have any questions, contact the manufacturer. Contact an authorized servicer. English 3 Grease should never be left on fan.... Refer all servicing to properly grounded supply. Mark it for details. Do not operate this manual. Important Safety Instructions READ AND SAVE THESE INSTRUCTIONS Whenever possible, do not reach through fire to turn it off. However, do not operate the ventilation system during...
... designed for use this appliance unless closely supervised by an adult. WARNING: Halogen lights might be seriously injured. Have the installer show you have any questions, contact the manufacturer. Contact an authorized servicer. English 3 Grease should never be left on fan.... Refer all servicing to properly grounded supply. Mark it for details. Do not operate this manual. Important Safety Instructions READ AND SAVE THESE INSTRUCTIONS Whenever possible, do not reach through fire to turn it off. However, do not operate the ventilation system during...
User Manual
Page 9
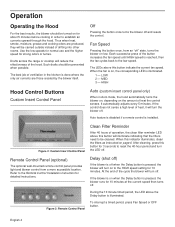
... 10 minutes at the current speed then turns off and resets the control. After cleaning, press this indicator illuminates, clean the filters as instructed on low. Delay (shut off) If the blower is off when the Delay button is pressed, the blower will turn the blower off...) When in Auto mode, the hood automatically turns the blower on, depending on the amount of the hood. Refer to the Remote Control Installation Instruction for detailed instructions. English 4 Thus when heat, smoke, moisture, grease and cooking odors are those created by the blower itself. LOW 2 - If the...
... 10 minutes at the current speed then turns off and resets the control. After cleaning, press this indicator illuminates, clean the filters as instructed on low. Delay (shut off) If the blower is off when the Delay button is pressed, the blower will turn the blower off...) When in Auto mode, the hood automatically turns the blower on, depending on the amount of the hood. Refer to the Remote Control Installation Instruction for detailed instructions. English 4 Thus when heat, smoke, moisture, grease and cooking odors are those created by the blower itself. LOW 2 - If the...
User Manual
Page 11
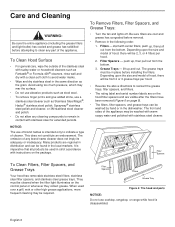
... spacers, and stainless steel grease trays. Depending upon the size and model of the appliance may be washed by hand or in strict accordance with instructions on the package. push up and out. The grease trays must be 2, 3, or 4 filters per hood. • Reverse the above directions to ...label and serial number labels are on the hood filter spacers and are cool and grease has congealed before removal. • Remove in place before installing the filters. The front and sides of hood, there will be cleaned when the filter light illuminates on page 8). • The filters, filter ...
... spacers, and stainless steel grease trays. Depending upon the size and model of the appliance may be washed by hand or in strict accordance with instructions on the package. push up and out. The grease trays must be 2, 3, or 4 filters per hood. • Reverse the above directions to ...label and serial number labels are on the hood filter spacers and are cool and grease has congealed before removal. • Remove in place before installing the filters. The front and sides of hood, there will be cleaned when the filter light illuminates on page 8). • The filters, filter ...
User Manual
Page 15
... of BSH, including without limitation, one of the following : • Use of the Product in the completed THERMADOR® Product Registration card. 2. No attempt to surrounding property, including cabinetry, floors, ceilings, and other connecting ...'s willful misconduct, negligence, misuse, abuse, accidents, neglect, improper operation, failure to maintain, improper or negligent installation, tampering, failure to follow operating instructions, mishandling, unauthorized service (including selfperformed "fixing" or exploration of the appliance's internal workings). • Adjustment,...
... of BSH, including without limitation, one of the following : • Use of the Product in the completed THERMADOR® Product Registration card. 2. No attempt to surrounding property, including cabinetry, floors, ceilings, and other connecting ...'s willful misconduct, negligence, misuse, abuse, accidents, neglect, improper operation, failure to maintain, improper or negligent installation, tampering, failure to follow operating instructions, mishandling, unauthorized service (including selfperformed "fixing" or exploration of the appliance's internal workings). • Adjustment,...