
Use and Care Manual
Page 3
...your old appliance 5 Installing the appliance 5 Transporting 5 Installation location 5 Ventilation 5 Connecting the appliance 5 Water connection 5 Electrical connection 6 Getting to know your appliance 7 2 door model 7 3 door model 8 Controls 9 Switching the appliance on 10 Operating tips 10 Set the language 10 Setting the temperature unit 10 Setting the temperature 10 Refrigerator compartment 10 Freezer compartment 10 Special functions 11 Setup mode 11 Vacation mode 11 Sabbath mode 11 Energy saving mode 12 Alarm function 12 Refrigerator compartment 12 When purchasing...
...your old appliance 5 Installing the appliance 5 Transporting 5 Installation location 5 Ventilation 5 Connecting the appliance 5 Water connection 5 Electrical connection 6 Getting to know your appliance 7 2 door model 7 3 door model 8 Controls 9 Switching the appliance on 10 Operating tips 10 Set the language 10 Setting the temperature unit 10 Setting the temperature 10 Refrigerator compartment 10 Freezer compartment 10 Special functions 11 Setup mode 11 Vacation mode 11 Sabbath mode 11 Energy saving mode 12 Alarm function 12 Refrigerator compartment 12 When purchasing...
Use and Care Manual
Page 4
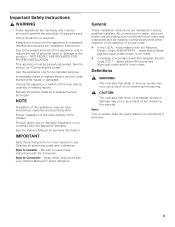
... refrigerating and freezing food, ■ for making ice, ■ for the appliance. ■ People (children incl.) who have this socket replaced with a UL registered 3-wire power cord. Do not pull out the mains plug by the manufacturer, customer service or a similarly qualified person only. Children in an upright position. ■ Keep plastic parts and the door seal free of oil and grease. Repairs may...
... refrigerating and freezing food, ■ for making ice, ■ for the appliance. ■ People (children incl.) who have this socket replaced with a UL registered 3-wire power cord. Do not pull out the mains plug by the manufacturer, customer service or a similarly qualified person only. Children in an upright position. ■ Keep plastic parts and the door seal free of oil and grease. Repairs may...
Use and Care Manual
Page 5
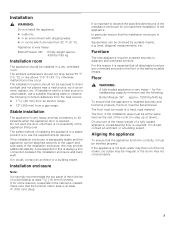
... appropriate water supply company. All utilized materials are necessary to set-up . Cut off valve should be exposed to play with the appliance once it has spent it . Refrigerators contain refrigerant and gases in an environmentally friendly manner. The installation location should not be secured during transit. A cold water connection is easily accessible. It is recommended that you mount the shut-off valve...
... appropriate water supply company. All utilized materials are necessary to set-up . Cut off valve should be exposed to play with the appliance once it has spent it . Refrigerators contain refrigerant and gases in an environmentally friendly manner. The installation location should not be secured during transit. A cold water connection is easily accessible. It is recommended that you mount the shut-off valve...
Use and Care Manual
Page 6
...-controlled inverters are used for photovoltaic systems which are not connected directly to 115 V/60 Hz alternating current via a correctly installed socket with regard to 16 A fuse. on the rating plate whether the indicated voltage and current type correspond with these instructions may result in death, fire or an electric shock. The appliance complies with a UL registered 3-wire power cord. Connect the...
...-controlled inverters are used for photovoltaic systems which are not connected directly to 115 V/60 Hz alternating current via a correctly installed socket with regard to 16 A fuse. on the rating plate whether the indicated voltage and current type correspond with these instructions may result in death, fire or an electric shock. The appliance complies with a UL registered 3-wire power cord. Connect the...
Use and Care Manual
Page 7
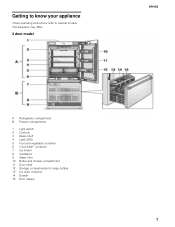
Getting to know your appliance These operating instructions refer to several models. The diagrams may differ. 2 door model en-us A Refrigerator compartment B Freezer compartment 1 Light switch 2 Controls 3 Glass shelf 4 Light (LED) 5 Fruit and vegetable container 6 "Cool-fresh" container 7 Ice maker 8 Ventilation 9 Water filter 10 Butter and cheese compartment 11 Door shelf 12 Storage compartments for large bottles 13 Ice cube container 14 Drawer 15 Door drawer 7
Getting to know your appliance These operating instructions refer to several models. The diagrams may differ. 2 door model en-us A Refrigerator compartment B Freezer compartment 1 Light switch 2 Controls 3 Glass shelf 4 Light (LED) 5 Fruit and vegetable container 6 "Cool-fresh" container 7 Ice maker 8 Ventilation 9 Water filter 10 Butter and cheese compartment 11 Door shelf 12 Storage compartments for large bottles 13 Ice cube container 14 Drawer 15 Door drawer 7
Use and Care Manual
Page 8
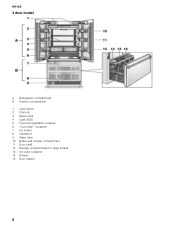
en-us 3 door model A Refrigerator compartment B Freezer compartment 1 Light switch 2 Controls 3 Glass shelf 4 Light (LED) 5 Fruit and vegetable container 6 "Cool-fresh" container 7 Ice maker 8 Ventilation 9 Water filter 10 Butter and cheese compartment 11 Door shelf 12 Storage compartments for large bottles 13 Ice cube container 14 Drawer 15 Door drawer 8
en-us 3 door model A Refrigerator compartment B Freezer compartment 1 Light switch 2 Controls 3 Glass shelf 4 Light (LED) 5 Fruit and vegetable container 6 "Cool-fresh" container 7 Ice maker 8 Ventilation 9 Water filter 10 Butter and cheese compartment 11 Door shelf 12 Storage compartments for large bottles 13 Ice cube container 14 Drawer 15 Door drawer 8
Use and Care Manual
Page 9
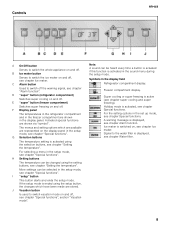
.... I "setup" button This button starts and ends the setup mode. D "super" button (refrigerator compartment) Switches super cooling on , see chapter "Setting the temperature". G Selection buttons The temperature setting is activated in the setup mode, see chapter "Alarm function". More settings can be changed using the setting buttons, see chapter Ice maker. Activated special functions are shown in the display field Refrigerator compartment display. Note: A sound can be selected in the sound menu during the setup mode. Super cooling or super freezing...
.... I "setup" button This button starts and ends the setup mode. D "super" button (refrigerator compartment) Switches super cooling on , see chapter "Setting the temperature". G Selection buttons The temperature setting is activated in the setup mode, see chapter "Alarm function". More settings can be changed using the setting buttons, see chapter Ice maker. Activated special functions are shown in the display field Refrigerator compartment display. Note: A sound can be selected in the sound menu during the setup mode. Super cooling or super freezing...
Use and Care Manual
Page 10
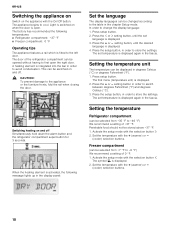
... °F) We recommend a setting of the refrigerator compartment can be selected from +7 °F to the left door. The symbol ¸ is displayed. 4. Light is switched on when the door is displayed. 2. The factory has recommended the following message lights up in the chapter Setup mode. The first menu (temperature unit) is open the right door. In order to cool. Setting the temperature unit The temperature can be stored above...
... °F) We recommend a setting of the refrigerator compartment can be selected from +7 °F to the left door. The symbol ¸ is displayed. 4. Light is switched on when the door is displayed. 2. The factory has recommended the following message lights up in the chapter Setup mode. The first menu (temperature unit) is open the right door. In order to cool. Setting the temperature unit The temperature can be stored above...
Use and Care Manual
Page 11
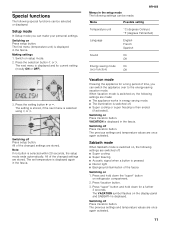
... first menu (temperature unit) is switched on refrigerator compartment. 2. Making settings 1. Switching off . ■ Super cooling or super freezing is displayed. Press "super" button and hold down for a long period of the changed settings are made . Switching on setup mode. 2. The VACATION symbol flashes on Press Vacation button. Menu Possible setting Temperature unit °C (degrees Celsius) °F (degrees Fahrenheit) Language English French Spanish Sound On Off Energy saving mode On (eco function...
... first menu (temperature unit) is switched on refrigerator compartment. 2. Making settings 1. Switching off . ■ Super cooling or super freezing is displayed. Press "super" button and hold down for a long period of the changed settings are made . Switching on setup mode. 2. The VACATION symbol flashes on Press Vacation button. Menu Possible setting Temperature unit °C (degrees Celsius) °F (degrees Fahrenheit) Language English French Spanish Sound On Off Energy saving mode On (eco function...
Use and Care Manual
Page 13
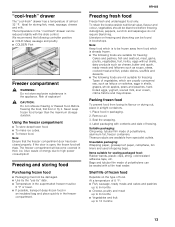
... make ice cubes. ■ To freeze food. Note: Ensure that the freezer compartment door has been closed properly. If the door is open, the frozen food will become covered in bookshops. en-us Freezing fresh food Freeze fresh and undamaged food only. Aubergines, peppers, zucchini and asparagus do not require blanching. "cool-fresh" drawer The "cool-fresh" drawer has a temperature of energy due to high power consumption...
... make ice cubes. ■ To freeze food. Note: Ensure that the freezer compartment door has been closed properly. If the door is open, the frozen food will become covered in bookshops. en-us Freezing fresh food Freeze fresh and undamaged food only. Aubergines, peppers, zucchini and asparagus do not require blanching. "cool-fresh" drawer The "cool-fresh" drawer has a temperature of energy due to high power consumption...
Use and Care Manual
Page 14
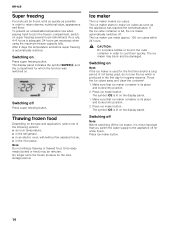
... the refrigerator, ■ in an electric oven, with/without fan assisted hot-air, ■ in the first day for the max. The symbol ICE is most important that you switch the water supply to retain vitamins, nutritional value, appearance and flavor. The display panel indicates the symbol SUPER¾ and the compartment for a few hours. Switching off Note: Before switching off Press super freezing button...
... the refrigerator, ■ in an electric oven, with/without fan assisted hot-air, ■ in the first day for the max. The symbol ICE is most important that you switch the water supply to retain vitamins, nutritional value, appearance and flavor. The display panel indicates the symbol SUPER¾ and the compartment for a few hours. Switching off Note: Before switching off Press super freezing button...

Use and Care Manual
Page 15
... a new filter cartridge from customer service or a specialist dealer. , CAUTION: ■ After installing a new filter, always discard the ice produced within the next 24 hours. ■ If the appliance or the ice has not been used without suitable disinfection, before and after switching on the appliance base as far as it will go. 7. Pour water out of the used filter cartridge. Be careful when removing the filter! Turn the filter cartridge 90...
... a new filter cartridge from customer service or a specialist dealer. , CAUTION: ■ After installing a new filter, always discard the ice produced within the next 24 hours. ■ If the appliance or the ice has not been used without suitable disinfection, before and after switching on the appliance base as far as it will go. 7. Pour water out of the used filter cartridge. Be careful when removing the filter! Turn the filter cartridge 90...

Use and Care Manual
Page 18
... the tubing. Use the height-adjustable feet or place packing underneath them correctly, if required. Containers or storage areas wobble or stick Please check the removable parts and re-insert them . en-us Light (LED) Your appliance features a maintenance-free LED light. The appliance should not be repaired by customer service or authorized technicians only. Clicking Motor, switches or solenoid valves are running (e.g. These lights may be installed in...
... the tubing. Use the height-adjustable feet or place packing underneath them correctly, if required. Containers or storage areas wobble or stick Please check the removable parts and re-insert them . en-us Light (LED) Your appliance features a maintenance-free LED light. The appliance should not be repaired by customer service or authorized technicians only. Clicking Motor, switches or solenoid valves are running (e.g. These lights may be installed in...
Use and Care Manual
Page 19
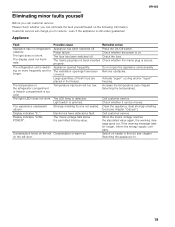
... Remove obstacles. The temperature in the freezer. Light switch is switch- Seal strongly smelling food (see chapter Selecting the temperature). on . en-us Eliminating minor faults yourself Before you call customer service: Please check whether you for The ventilation openings have detected a fault. The light does not work . Appliance has been switched off . The fuse has been switched off . Large quantities of warm air. Temperature has been set...
... Remove obstacles. The temperature in the freezer. Light switch is switch- Seal strongly smelling food (see chapter Selecting the temperature). on . en-us Eliminating minor faults yourself Before you call customer service: Please check whether you for The ventilation openings have detected a fault. The light does not work . Appliance has been switched off . The fuse has been switched off . Large quantities of warm air. Temperature has been set...
Use and Care Manual
Page 20
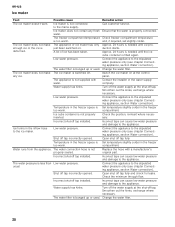
.... Switch the ice maker on . Low water pressure. compartment. Open shut off tap incorrectly opened . The appliance is switched off tap. Ice cube container is bunged up or used . The ice maker does not make The ice maker is not supplied with a manufacturer's original part. Water supply has kinks. en-us Ice maker Fault Possible cause Remedial action The ice maker doesn't work. Connect the appliance to the appliance. Water runs from the appliance. Call customer service. The water filter is...
.... Switch the ice maker on . Low water pressure. compartment. Open shut off tap incorrectly opened . The appliance is switched off tap. Ice cube container is bunged up or used . The ice maker does not make The ice maker is not supplied with a manufacturer's original part. Water supply has kinks. en-us Ice maker Fault Possible cause Remedial action The ice maker doesn't work. Connect the appliance to the appliance. Water runs from the appliance. Call customer service. The water filter is...

Use and Care Manual
Page 22
... as for use, incorrect operation, work performed by unauthorized customer service (including in-house repairs or testing the inner life of the appliance); (3) Adjustments, changes or modifications of any form of commercial utilization, use or storage of a domestic appliance outdoors, use of a senior employee at all structural conditions and equipment for the product, inter alia for the power connection, the pipe connections and other...
... as for use, incorrect operation, work performed by unauthorized customer service (including in-house repairs or testing the inner life of the appliance); (3) Adjustments, changes or modifications of any form of commercial utilization, use or storage of a domestic appliance outdoors, use of a senior employee at all structural conditions and equipment for the product, inter alia for the power connection, the pipe connections and other...
Installation Manual
Page 5
... switch off the fuse before cleaning or making repairs. latest edition/State and Municipal codes and/or local codes. In Canada, in particular. 5 See the Owner's Manual for use . Note to the product - Observe all governing codes and ordinances. All connections for local inspector's use by licensed personnel when required. Anti-tip protection is not covered under the Appliance Warranty. IMPORTANT Save these instructions...
... switch off the fuse before cleaning or making repairs. latest edition/State and Municipal codes and/or local codes. In Canada, in particular. 5 See the Owner's Manual for use . Note to the product - Observe all governing codes and ordinances. All connections for local inspector's use by licensed personnel when required. Anti-tip protection is not covered under the Appliance Warranty. IMPORTANT Save these instructions...
Installation Manual
Page 7
... is unavoidable, use the supplied anti-tip devices. If in doubt, contact an architect or a building expert. Installation enclosure Note: It is not level, water may flow out of the ice maker, ice cubes may be checked by suitable means. Squareness can be installed in a dry... appliance door is adequately stable and the appliance can be irregular or the doors may occur. If the installation enclosure is opened. Installation , WARNING: Do not install the appliance: outdoors, in an environment with dripping water, in rooms which are connected securely...
... is unavoidable, use the supplied anti-tip devices. If in doubt, contact an architect or a building expert. Installation enclosure Note: It is not level, water may flow out of the ice maker, ice cubes may be checked by suitable means. Squareness can be installed in a dry... appliance door is adequately stable and the appliance can be irregular or the doors may occur. If the installation enclosure is opened. Installation , WARNING: Do not install the appliance: outdoors, in an environment with dripping water, in rooms which are connected securely...
Installation Manual
Page 17
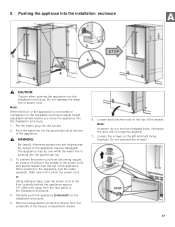
... of the drawer. Carefully push the appliance to the middle of the freezer compartment drawer. 6. Do not damage the water line or power cord. Take care not to the floor centrally behind the appliance approx. 15" (380 mm) away from the rear panel of the appliance. Put the mains plug into the installation enclosure. Push the water line into the guard tube (a). 3. To prevent...
... of the drawer. Carefully push the appliance to the middle of the freezer compartment drawer. 6. Do not damage the water line or power cord. Take care not to the floor centrally behind the appliance approx. 15" (380 mm) away from the rear panel of the appliance. Put the mains plug into the installation enclosure. Push the water line into the guard tube (a). 3. To prevent...
Installation Manual
Page 19
... twist or jam the appliance inside the installation enclosure! Unscrew the feet at the back. The height-adjustable feet at the front and rear can all be set this dimension for height adjustment. Use a level! Front: with open-ended wrench 1/2" (Width across flats 13 mm) Rear: with the cabinet fronts. When adjusting the heightadjustable feet, proceed gradually: Always alternate between left and right, etc. For...
... twist or jam the appliance inside the installation enclosure! Unscrew the feet at the back. The height-adjustable feet at the front and rear can all be set this dimension for height adjustment. Use a level! Front: with open-ended wrench 1/2" (Width across flats 13 mm) Rear: with the cabinet fronts. When adjusting the heightadjustable feet, proceed gradually: Always alternate between left and right, etc. For...


