Installation Manual
Page 5
Do not install a microwave oven/ventilator combination above the range as a wood covering...), overlapping the range by a minimum of 3" (76mm) on page 5). 3. Downdraft ventilation should be used with THERMADOR PROFESSIONAL® Ranges. Hood Placement: • For best smoke elimination, the lower edge of ventilation per minute" ... NPT Flare Adapters Step 1: Ventilation Requirements It is strongly recommended that are recommended for use with all THERMADOR® ranges. The table below indicates the ventilation hood options and blower capacity guidelines that a suitable exhaust...
Do not install a microwave oven/ventilator combination above the range as a wood covering...), overlapping the range by a minimum of 3" (76mm) on page 5). 3. Downdraft ventilation should be used with THERMADOR PROFESSIONAL® Ranges. Hood Placement: • For best smoke elimination, the lower edge of ventilation per minute" ... NPT Flare Adapters Step 1: Ventilation Requirements It is strongly recommended that are recommended for use with all THERMADOR® ranges. The table below indicates the ventilation hood options and blower capacity guidelines that a suitable exhaust...
Installation Manual
Page 6
...BURNING CHARACTERISTICS followed by not less than a 12" (305mm) horizontal clearance between the cooking surface of the range and the bottom of the oven (see Figure 2). The same clearances apply to island installations, except for each type of backguard. • A 5" (127mm) minimum ... A 36" (914mm) minimum clearance is required between combustible material and the back edge of the range above the cooking surface, a THERMADOR® Low Back or High Shelf must be sealed. • When there is installed beside a combustible side wall. • Always keep appliance...
...BURNING CHARACTERISTICS followed by not less than a 12" (305mm) horizontal clearance between the cooking surface of the range and the bottom of the oven (see Figure 2). The same clearances apply to island installations, except for each type of backguard. • A 5" (127mm) minimum ... A 36" (914mm) minimum clearance is required between combustible material and the back edge of the range above the cooking surface, a THERMADOR® Low Back or High Shelf must be sealed. • When there is installed beside a combustible side wall. • Always keep appliance...
Installation Manual
Page 10
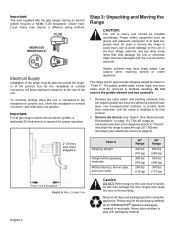
...on page 6). PLUG NEMA 5-20 RECEPTACLE Electrical Supply Installation of the unit. Use caution when reaching behind or under appliance. Remove all THERMADOR® appliance packaging material is heavy and should be removed. Please recycle the packaging material as shown in "Chart A". Do not remove... sharp edges. Step 3: Unpacking and Moving the Range CAUTION: The unit is recyclable. The grates, griddle plate, burner caps, and oven racks must be used in the weight as all tape and packaging before using the appliance. Remove the outer carton and packing materials from...
...on page 6). PLUG NEMA 5-20 RECEPTACLE Electrical Supply Installation of the unit. Use caution when reaching behind or under appliance. Remove all THERMADOR® appliance packaging material is heavy and should be removed. Please recycle the packaging material as shown in "Chart A". Do not remove... sharp edges. Step 3: Unpacking and Moving the Range CAUTION: The unit is recyclable. The grates, griddle plate, burner caps, and oven racks must be used in the weight as all tape and packaging before using the appliance. Remove the outer carton and packing materials from...

Installation Manual
Page 12
... result in personal injury and product damage. Use both hands to carefully pry the hinge clips away from the hinge slots (Photo A). 2. To Remove the Oven Door: 1. Grasp the door firmly on the ends of the door, the powerful springs will hold the door open hinge clips will snap the hinges... closed with great force. Place the door in electrical shock or burns. Make sure oven is cool and power to the oven has been turned off , never release the levers and try to overcome.) When the door is heavy and fragile. With the door...
... result in personal injury and product damage. Use both hands to carefully pry the hinge clips away from the hinge slots (Photo A). 2. To Remove the Oven Door: 1. Grasp the door firmly on the ends of the door, the powerful springs will hold the door open hinge clips will snap the hinges... closed with great force. Place the door in electrical shock or burns. Make sure oven is cool and power to the oven has been turned off , never release the levers and try to overcome.) When the door is heavy and fragile. With the door...

Installation Manual
Page 13
... hinge. The hinges will securely hook into the slots. 3. Do not force the door to open or close the door slowly to the oven cavity. To Reinstall the Oven Door: 1. To Check Door Fit and Operation: 1. Position the door at a sharp angle (see Figure 7) and insert the hinges centered... evenly into the hinge slots (toward the oven) until door is properly installed, it should move smoothly and rest straight on your foot while using your leg for stability. 2. If door or ...
... hinge. The hinges will securely hook into the slots. 3. Do not force the door to open or close the door slowly to the oven cavity. To Reinstall the Oven Door: 1. To Check Door Fit and Operation: 1. Position the door at a sharp angle (see Figure 7) and insert the hinges centered... evenly into the hinge slots (toward the oven) until door is properly installed, it should move smoothly and rest straight on your foot while using your leg for stability. 2. If door or ...

Installation Manual
Page 25
... legs that are also level for all products that have the griddle feature. FIGURE 19: CASTOR LOCATIONS • As the range is assumed that the oven cavities are threaded into the cast aluminum base structure. Note: It is moved into its final, installed position, verify that the "hook" on ensuring that...
... legs that are also level for all products that have the griddle feature. FIGURE 19: CASTOR LOCATIONS • As the range is assumed that the oven cavities are threaded into the cast aluminum base structure. Note: It is moved into its final, installed position, verify that the "hook" on ensuring that...

Installation Manual
Page 27
... flows into the grease tray. After the range is properly leveled and the leg covers have been installed, replace the door trim and reinstall the Oven Door ("Step 4: Door Removal and Reinstallation" on the burner bases of the screws. If not, adjust the (2) screws under the back of the stainless steel...
... flows into the grease tray. After the range is properly leveled and the leg covers have been installed, replace the door trim and reinstall the Oven Door ("Step 4: Door Removal and Reinstallation" on the burner bases of the screws. If not, adjust the (2) screws under the back of the stainless steel...
Installation Manual
Page 30
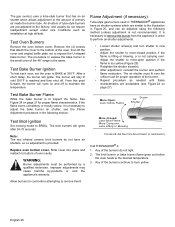
... into place and reattach to BROIL. Allow burners to cool before the oven heats to the desired temperature. 3. The burner will cycle on and off . Flame Adjustment (if necessary): Tube-style gas burners used in THERMADOR® appliances have air shutters, so no adjustment is provided. See ...Blue Flame More Carryover Less Lifting or Blowing FIGURE 25: AIR SHUTTER ADJUSTMENT (IF NECESSARY) Call THERMADOR® if: 1. Test Oven Burners Remove the oven bottom cover. Any of the burners do not light. 2. The gas oven(s) uses a tube-style burner that attach the cover to the bottom of the...
... into place and reattach to BROIL. Allow burners to cool before the oven heats to the desired temperature. 3. The burner will cycle on and off . Flame Adjustment (if necessary): Tube-style gas burners used in THERMADOR® appliances have air shutters, so no adjustment is provided. See ...Blue Flame More Carryover Less Lifting or Blowing FIGURE 25: AIR SHUTTER ADJUSTMENT (IF NECESSARY) Call THERMADOR® if: 1. Test Oven Burners Remove the oven bottom cover. Any of the burners do not light. 2. The gas oven(s) uses a tube-style burner that attach the cover to the bottom of the...

Installation Manual
Page 31
... chemicals which it is certified for extended periods. Gas Supply Gas Connection: 3/4" (19mm) N.P.T. Many of the range between the oven cavity and side panel). DO NOT use a cleaner/ polish such as Stainless Steel Magic®. with the appliance. Owner is ... centered on burner knobs, and knobs turn freely. Each burner lights satisfactorily, both individually and with other burners operating. Oven door hinges seated and hinge locks in an accessible location (without requiring removal of range). Unit tested and free of gas leaks...
... chemicals which it is certified for extended periods. Gas Supply Gas Connection: 3/4" (19mm) N.P.T. Many of the range between the oven cavity and side panel). DO NOT use a cleaner/ polish such as Stainless Steel Magic®. with the appliance. Owner is ... centered on burner knobs, and knobs turn freely. Each burner lights satisfactorily, both individually and with other burners operating. Oven door hinges seated and hinge locks in an accessible location (without requiring removal of range). Unit tested and free of gas leaks...
Use and Care Manual
Page 5
... Cookware 18 Surface Burner Cooking Recommendations ....... 19 Electric Griddle (some models 21 Griddle Cooking Recommendations 22 Using the Oven 23 Oven Controls 23 Kitchen Timer 23 Cook Timer 23 Offset Feature 23 Sabbath Mode 24 Meat Probe 24 Minimum Internal Cooking Temps 25... 32 Broiling & Roasting Recommendations 33 Care and Maintenance 34 Self-Cleaning the Oven 34 Cleaning Recommendations 36 Do-It-Yourself Maintenance 39 Before Calling For Service 41 Statement of Warranty 42 This THERMADOR® appliance is made by BSH Home Appliances Corporation 5551 McFadden Ave. ...
... Cookware 18 Surface Burner Cooking Recommendations ....... 19 Electric Griddle (some models 21 Griddle Cooking Recommendations 22 Using the Oven 23 Oven Controls 23 Kitchen Timer 23 Cook Timer 23 Offset Feature 23 Sabbath Mode 24 Meat Probe 24 Minimum Internal Cooking Temps 25... 32 Broiling & Roasting Recommendations 33 Care and Maintenance 34 Self-Cleaning the Oven 34 Cleaning Recommendations 36 Do-It-Yourself Maintenance 39 Before Calling For Service 41 Statement of Warranty 42 This THERMADOR® appliance is made by BSH Home Appliances Corporation 5551 McFadden Ave. ...
Use and Care Manual
Page 6
...Do not use any other appliance. - All models feature a gas cooking surface with a professional size, electric convection, self-cleaning oven with broil capability. This manual contains important Use and Care information for proper installation and use gasoline or other flammable vapors and liquids...may be performed by a qualified installer, service agency or the gas supplier. Pay special attention to children and adults. The THERMADOR PROFESSIONAL® ranges are freestanding units available in Figure 35 on the following pages summarize the various range models and identify the ...
...Do not use any other appliance. - All models feature a gas cooking surface with a professional size, electric convection, self-cleaning oven with broil capability. This manual contains important Use and Care information for proper installation and use gasoline or other flammable vapors and liquids...may be performed by a qualified installer, service agency or the gas supplier. Pay special attention to children and adults. The THERMADOR PROFESSIONAL® ranges are freestanding units available in Figure 35 on the following pages summarize the various range models and identify the ...
Use and Care Manual
Page 9
...the curtains do not operate the ventilation system during a cooktop fire. Smother flames from any part of the appliance or place anything against the oven. You may melt or ignite. Never use water on fire. Do not hang articles from food fires, other bulky cloth in personal injury....cooking fires. If the range is an excellent heat insulator and heat will upset the cooking performance and can damage the finish of the oven or range. Be careful to extinguish flames. Some synthetic fabrics are quite flammable and may ignite and result in place of potholders. WARNING...
...the curtains do not operate the ventilation system during a cooktop fire. Smother flames from any part of the appliance or place anything against the oven. You may melt or ignite. Never use water on fire. Do not hang articles from food fires, other bulky cloth in personal injury....cooking fires. If the range is an excellent heat insulator and heat will upset the cooking performance and can damage the finish of the oven or range. Be careful to extinguish flames. Some synthetic fabrics are quite flammable and may ignite and result in place of potholders. WARNING...
Use and Care Manual
Page 10
...material toward the flames or push the flames so that they do not extend over may result in carbon monoxide poisoning and overheating of the oven. Never leave the range unattended when using the cooktop: DO NOT TOUCH THE BURNER GRATES OR THE IMMEDIATE SURROUNDING AREA. Build-up of pressure...range's cooktop. During cooking, set the burner control so that drafts like those from the range itself. Doing so blocks air flow through the oven. Also, if the burner flames and igniter are suitable for cooking excessively fatty meats or products which promote flare-ups. Doing so may exist if...
...material toward the flames or push the flames so that they do not extend over may result in carbon monoxide poisoning and overheating of the oven. Never leave the range unattended when using the cooktop: DO NOT TOUCH THE BURNER GRATES OR THE IMMEDIATE SURROUNDING AREA. Build-up of pressure...range's cooktop. During cooking, set the burner control so that drafts like those from the range itself. Doing so blocks air flow through the oven. Also, if the burner flames and igniter are suitable for cooking excessively fatty meats or products which promote flare-ups. Doing so may exist if...
Use and Care Manual
Page 11
...specifically for this range must disconnect the power supply before servicing this booklet. The chemical that produces the spraying action could, in the oven. Interior oven surfaces become hot enough to a hot surface. Do not clean, rub, damage, move or remove the door gasket. Clean only...a spill or boil over or when the burner does not light even though the electronic igniters activate. see "Automatic operation of the oven or the exterior area immediately surrounding the door. English 6 Avoid steam burns; Use caution when cooking foods with high alcohol content (e.g. ...
...specifically for this range must disconnect the power supply before servicing this booklet. The chemical that produces the spraying action could, in the oven. Interior oven surfaces become hot enough to a hot surface. Do not clean, rub, damage, move or remove the door gasket. Clean only...a spill or boil over or when the burner does not light even though the electronic igniters activate. see "Automatic operation of the oven or the exterior area immediately surrounding the door. English 6 Avoid steam burns; Use caution when cooking foods with high alcohol content (e.g. ...
Use and Care Manual
Page 12
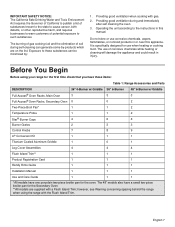
...cooking fuel and the elimination of soil during and immediately after self cleaning the oven. 3. Operating the unit according to these items: Table 1: Range Accessories and Parts DESCRIPTION Full Access® Oven Racks, Main Oven Full Access® Oven Racks, Secondary Oven Two-Piece Broil Pan* 36" 4-Burner w/ Griddle 3 0 1 36" ... in this appliance. Providing good ventilation when cooking with the Flush Island Trim. It is specifically designed for the Secondary Oven. **All models are on the list. Before You Begin Before using the range with gas. 2. The 48" models...
...cooking fuel and the elimination of soil during and immediately after self cleaning the oven. 3. Operating the unit according to these items: Table 1: Range Accessories and Parts DESCRIPTION Full Access® Oven Racks, Main Oven Full Access® Oven Racks, Secondary Oven Two-Piece Broil Pan* 36" 4-Burner w/ Griddle 3 0 1 36" ... in this appliance. Providing good ventilation when cooking with the Flush Island Trim. It is specifically designed for the Secondary Oven. **All models are on the list. Before You Begin Before using the range with gas. 2. The 48" models...

Use and Care Manual
Page 13
...Place rack(s) in Table 1. 2. Always remove before selfcleaning the oven. Push the rack into position. The racks are standard on Page 41). THERMADOR Full Access® Oven Racks are designed to lock and not tilt while in the oven, hold the rack with this information on a rack, pull ... Griddle Cover, Wok Support Ring, Toe Kick, and other accessories are numbered from your THERMADOR® dealer. 4. Slide the rack into the oven, lifting the rack stops over the front of the oven, like an elevator. even while supporting a large turkey or roast. Record the Model and...
...Place rack(s) in Table 1. 2. Always remove before selfcleaning the oven. Push the rack into position. The racks are standard on Page 41). THERMADOR Full Access® Oven Racks are designed to lock and not tilt while in the oven, hold the rack with this information on a rack, pull ... Griddle Cover, Wok Support Ring, Toe Kick, and other accessories are numbered from your THERMADOR® dealer. 4. Slide the rack into the oven, lifting the rack stops over the front of the oven, like an elevator. even while supporting a large turkey or roast. Record the Model and...
Use and Care Manual
Page 14
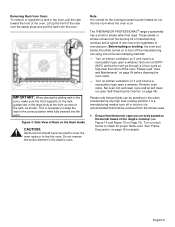
...placing the gliding rack in the oven, make sure the front supports on the rack guides rest in the large slots at high heat then shut off of manufacturer. This is a recirculation type open a window). Figure 3: Side View of the rack, as shown. The THERMADOR PROFESSIONAL® range occasionally has ...a smell or smoke when first used to cover the oven racks or to burn off or food so it is on Page 15). Before baking or broiling, the...
...placing the gliding rack in the oven, make sure the front supports on the rack guides rest in the large slots at high heat then shut off of manufacturer. This is a recirculation type open a window). Figure 3: Side View of the rack, as shown. The THERMADOR PROFESSIONAL® range occasionally has ...a smell or smoke when first used to cover the oven racks or to burn off or food so it is on Page 15). Before baking or broiling, the...

Use and Care Manual
Page 15
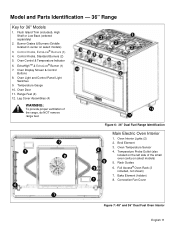
...Identification English 10 Control Panel Light 12. Burner Grates & Burners 15. Control Knobs, ExtraHighTM & ExtraLow® (1) 4. Secondary Oven (2 racks included) 18. Oven Display Control Buttons 11. Main Oven (3 racks included) 17. Key for 48" Models 1. Electric Griddle Knob (1) 5. Control Panel Light Switch 13. Control Knobs... of the range, do NOT remove range feet. Control Knobs, ExtraLow® Burners (3) 2. Secondary Oven Control Knobs 6. Oven Display Screens 10. Flush Island Trim (included), High Shelf or Low Back (ordered separately) 14. Range Feet (4) 19.
...Identification English 10 Control Panel Light 12. Burner Grates & Burners 15. Control Knobs, ExtraHighTM & ExtraLow® (1) 4. Secondary Oven (2 racks included) 18. Oven Display Control Buttons 11. Main Oven (3 racks included) 17. Key for 48" Models 1. Electric Griddle Knob (1) 5. Control Panel Light Switch 13. Control Knobs... of the range, do NOT remove range feet. Control Knobs, ExtraLow® Burners (3) 2. Secondary Oven Control Knobs 6. Oven Display Screens 10. Flush Island Trim (included), High Shelf or Low Back (ordered separately) 14. Range Feet (4) 19.
Use and Care Manual
Page 16
...Island Trim (included), High Shelf or Low Back (ordered separately) 2. Burner Grates & Burners (Griddle located in center on select models) 5. Oven Interior Lights (2) 2. Control Knobs, Standard Burners (2) 5. Temperature Probe Outlet (also located on the left side of the range, do NOT ...remove range feet. 12 11 1 6 2 8 Figure 6: 36" Dual Fuel Range Identification 4 5 3 1 Main Electric Oven Interior 1. Bake Element (hidden) 8. Oven Display Screen & Control Buttons 8. Leg Cover Assemblies (4) 1 2 2 3 2 58 9 7 4 3 10 6 WARNING: To provide proper ventilation of the ...
...Island Trim (included), High Shelf or Low Back (ordered separately) 2. Burner Grates & Burners (Griddle located in center on select models) 5. Oven Interior Lights (2) 2. Control Knobs, Standard Burners (2) 5. Temperature Probe Outlet (also located on the left side of the range, do NOT ...remove range feet. 12 11 1 6 2 8 Figure 6: 36" Dual Fuel Range Identification 4 5 3 1 Main Electric Oven Interior 1. Bake Element (hidden) 8. Oven Display Screen & Control Buttons 8. Leg Cover Assemblies (4) 1 2 2 3 2 58 9 7 4 3 10 6 WARNING: To provide proper ventilation of the ...

Use and Care Manual
Page 28
... other functions. This feature is useful if you find that food is consistently either KITCHEN TIMER or COOK TIMER. 3. Press ENTER. 4. Figure 26: Oven Setting Controls Kitchen Timer The Kitchen Timer can be set the timer: 1. The Cook Timer can be used to select desired time. 5. Note: ... Cook timer is in use. English 23 Press the "+" and "-" buttons to scroll through menu items: Kitchen Timer, Cook Timer, Offset, and Sabbath oven functions. 3. Press CANCEL terminate the beep and timer. 1. It is also used despite whether the range is only available for Bake, Convection Bake, Roast...
... other functions. This feature is useful if you find that food is consistently either KITCHEN TIMER or COOK TIMER. 3. Press ENTER. 4. Figure 26: Oven Setting Controls Kitchen Timer The Kitchen Timer can be set the timer: 1. The Cook Timer can be used to select desired time. 5. Note: ... Cook timer is in use. English 23 Press the "+" and "-" buttons to scroll through menu items: Kitchen Timer, Cook Timer, Offset, and Sabbath oven functions. 3. Press CANCEL terminate the beep and timer. 1. It is also used despite whether the range is only available for Bake, Convection Bake, Roast...


