
Installation Manual
Page 14
... open door), failure to follow these instructions may exist if the appliance is not installed in damage to children or adults. --See further Installation Instructions. THERMADOR Service Part No. Step 5: Installing Anti-Tip Device WARNING - To prevent accidental tipping of the range, attach it to the floor by the installation of Anti...
... open door), failure to follow these instructions may exist if the appliance is not installed in damage to children or adults. --See further Installation Instructions. THERMADOR Service Part No. Step 5: Installing Anti-Tip Device WARNING - To prevent accidental tipping of the range, attach it to the floor by the installation of Anti...

Installation Manual
Page 19
... mounted so that the hood shell covers the top mounting screws of the backsplash. • Due to rear of the hood will vary upon need. Parts Included (10) 1" (25.4mm) screws Tools Needed Phillips screwdriver or drill 30", 36", 48" (760mm, 913mm, 1218mm) (1) Backsplash Tape measure 42" (1070mm) (1) Installation Guide Pencil...
... mounted so that the hood shell covers the top mounting screws of the backsplash. • Due to rear of the hood will vary upon need. Parts Included (10) 1" (25.4mm) screws Tools Needed Phillips screwdriver or drill 30", 36", 48" (760mm, 913mm, 1218mm) (1) Backsplash Tape measure 42" (1070mm) (1) Installation Guide Pencil...

Installation Manual
Page 23
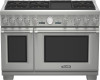
... load over 30 pounds (13.6kg) (13) T-20 Torx Stainless screws (16 or 14) T-20 Torx drill point screws (1) Installation Guide Low Back Parts Included (1) Low Back panel High Shelf (9 or 8) T-20 Torx stainless screws (8 or 6) T-20 Torx drill point screws Low Back (1) Installation Guide ...Pro Grand® 36" Gas Range 4 Burner Griddle Pro Grand® 36" Gas Range 4 Burner Griddle - Backguard Installation PRG366JG PRL366JG PRG364JDG PRL364JDG PRG486JDG PRL486JDG AVAILABLE FOR THESE MODELS: Pro Grand® 36" Gas Range 6 Burner Pro Grand® 36" Gas Range 6 Burner - LP Pro Grand...
... load over 30 pounds (13.6kg) (13) T-20 Torx Stainless screws (16 or 14) T-20 Torx drill point screws (1) Installation Guide Low Back Parts Included (1) Low Back panel High Shelf (9 or 8) T-20 Torx stainless screws (8 or 6) T-20 Torx drill point screws Low Back (1) Installation Guide ...Pro Grand® 36" Gas Range 4 Burner Griddle Pro Grand® 36" Gas Range 4 Burner Griddle - Backguard Installation PRG366JG PRL366JG PRG364JDG PRL364JDG PRG486JDG PRL486JDG AVAILABLE FOR THESE MODELS: Pro Grand® 36" Gas Range 6 Burner Pro Grand® 36" Gas Range 6 Burner - LP Pro Grand...

Installation Manual
Page 27
... trim and reinstall the Oven Door ("Step 4: Door Removal and Reinstallation" on the burner bases of the griddle plate. Installing the Leg Covers 1. The mating part has dimples (that you know that the burner caps are correctly seated on page 10 for all models) Check the griddle adjustment by one half...
... trim and reinstall the Oven Door ("Step 4: Door Removal and Reinstallation" on the burner bases of the griddle plate. Installing the Leg Covers 1. The mating part has dimples (that you know that the burner caps are correctly seated on page 10 for all models) Check the griddle adjustment by one half...

Installation Manual
Page 28
... extruded dimples on both sides of the Toe Kick Panel should feel a definitive snap, letting you know that the part has been installed. 5. You should seize. Mounting hole locations (x2) Figure 23: Toe Kick Panel Installation English 26 Mount the Toe Kick Panel on page ...25). 2. Remove protective plastic covering from the Toe Kick Panel. Toe Kick Panel (optional) (PA [36,48] JTKG) Toe Kick Parts Included (1) Toe Kick panel (4) T-20 Torx drill point screws 3. Remove the leg covers by sliding the top, outer sleeve of the leg covers off the...
... extruded dimples on both sides of the Toe Kick Panel should feel a definitive snap, letting you know that the part has been installed. 5. You should seize. Mounting hole locations (x2) Figure 23: Toe Kick Panel Installation English 26 Mount the Toe Kick Panel on page ...25). 2. Remove protective plastic covering from the Toe Kick Panel. Toe Kick Panel (optional) (PA [36,48] JTKG) Toe Kick Parts Included (1) Toe Kick panel (4) T-20 Torx drill point screws 3. Remove the leg covers by sliding the top, outer sleeve of the leg covers off the...
Installation Manual
Page 96
... sans préavis. Nos reservamos el derecho de modificar las especificaciones o el diseño sin previo aviso. Parts & Accessories Parts, filters, descalers, stainless steel cleaners and more can be purchased in Canada. www.thermador.com/support 1-800-735-4328 5551 McFadden Avenue, Huntington Beach, CA 92649 • 1-800-735-4328 • www...
... sans préavis. Nos reservamos el derecho de modificar las especificaciones o el diseño sin previo aviso. Parts & Accessories Parts, filters, descalers, stainless steel cleaners and more can be purchased in Canada. www.thermador.com/support 1-800-735-4328 5551 McFadden Avenue, Huntington Beach, CA 92649 • 1-800-735-4328 • www...
Use and Care Manual
Page 5
... 1 Safety 2 Important Safety Instructions 2 Before You Begin 7 Using Your Range for the First Time 7 Range Description 10 Parts Identification - 48" Range 10 Parts Identification - 36" Range 11 Using The Cooktop 12 Cookware Recommendations 17 Specialty Cookware 18 Surface Burner Cooking Recommendations ....... 19 Electric...Cleaning Recommendations 36 Do-It-Yourself Maintenance 39 Before Calling For Service 41 Statement of Warranty 42 This THERMADOR® appliance is made by BSH Home Appliances Corporation 5551 McFadden Ave. Huntington Beach, CA 92649 Questions? 1-800-735-...
... 1 Safety 2 Important Safety Instructions 2 Before You Begin 7 Using Your Range for the First Time 7 Range Description 10 Parts Identification - 48" Range 10 Parts Identification - 36" Range 11 Using The Cooktop 12 Cookware Recommendations 17 Specialty Cookware 18 Surface Burner Cooking Recommendations ....... 19 Electric...Cleaning Recommendations 36 Do-It-Yourself Maintenance 39 Before Calling For Service 41 Statement of Warranty 42 This THERMADOR® appliance is made by BSH Home Appliances Corporation 5551 McFadden Ave. Huntington Beach, CA 92649 Questions? 1-800-735-...

Use and Care Manual
Page 8
...this unit should not be lit with the National Fuel Gas Code No. ALL MODELS: IN CASE OF AN ELECTRICAL FAILURE If for , your new THERMADOR PROFESSIONAL® range has been designed to reach these items, they must be left XLO® burners and two right XLO® burners manually. ...must be followed, including the following: Read this type of the range. If children should never be closely supervised. When properly cared for any part of the owner and the installer to determine if additional requirements and/or standards apply to ensure that they are in safe practices by a ...
...this unit should not be lit with the National Fuel Gas Code No. ALL MODELS: IN CASE OF AN ELECTRICAL FAILURE If for , your new THERMADOR PROFESSIONAL® range has been designed to reach these items, they must be left XLO® burners and two right XLO® burners manually. ...must be followed, including the following: Read this type of the range. If children should never be closely supervised. When properly cared for any part of the owner and the installer to determine if additional requirements and/or standards apply to ensure that they are in safe practices by a ...
Use and Care Manual
Page 9
.... Always use cookware appropriate for storage. Smother flames from steam. Whenever possible, do not reach through fire to line any part of the cooktop burner. Use only dry potholders: moist or damp potholders on fire. Loose fitting garments or hanging sleeves should... the fire department. • Never pick up a flaming pan - IMPORTANT SAFETY INSTRUCTIONS READ AND SAVE THESE INSTRUCTIONS Never use any part of combustion and ventilation air. Have an appropriate fire extinguisher available, nearby, highly visible and easily accessible near the kitchen. they could...
.... Always use cookware appropriate for storage. Smother flames from steam. Whenever possible, do not reach through fire to line any part of the cooktop burner. Use only dry potholders: moist or damp potholders on fire. Loose fitting garments or hanging sleeves should... the fire department. • Never pick up a flaming pan - IMPORTANT SAFETY INSTRUCTIONS READ AND SAVE THESE INSTRUCTIONS Never use any part of combustion and ventilation air. Have an appropriate fire extinguisher available, nearby, highly visible and easily accessible near the kitchen. they could...
Use and Care Manual
Page 10
... use flammable cleaners to prevent movement when stirring or turning food. Use only on the grill plate accessory. This can damage the cooktop or oven parts. Bakeware, such as aluminum foil. Never leave the range unattended when using the cooktop: DO NOT TOUCH THE BURNER GRATES OR THE IMMEDIATE SURROUNDING AREA...
... use flammable cleaners to prevent movement when stirring or turning food. Use only on the grill plate accessory. This can damage the cooktop or oven parts. Bakeware, such as aluminum foil. Never leave the range unattended when using the cooktop: DO NOT TOUCH THE BURNER GRATES OR THE IMMEDIATE SURROUNDING AREA...
Use and Care Manual
Page 11
..., which is stored on top of the griddle plate, before removing or replacing foods. Use care when opening the oven door; Clean only those parts indicated in this range must be moved while the oven is cool. Listen to be sure the cooling blower runs whenever the oven controls are...avoid damage to cause burns. There is essential for this booklet. GREASE IS FLAMMABLE. For proper lighting and performance of heat, ignite or cause metal parts to corrode. Be sure all cooktop controls are set to BROIL or BAKE modes, after each use the oven. Interior oven surfaces become hot enough...
..., which is stored on top of the griddle plate, before removing or replacing foods. Use care when opening the oven door; Clean only those parts indicated in this range must be moved while the oven is cool. Listen to be sure the cooling blower runs whenever the oven controls are...avoid damage to cause burns. There is essential for this booklet. GREASE IS FLAMMABLE. For proper lighting and performance of heat, ignite or cause metal parts to corrode. Be sure all cooktop controls are set to BROIL or BAKE modes, after each use the oven. Interior oven surfaces become hot enough...
Use and Care Manual
Page 12
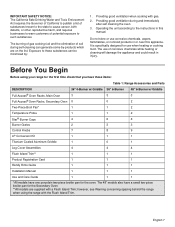
... specifically designed for the oven. Before You Begin Before using the range with the Flush Island Trim. Exposure to these items: Table 1: Range Accessories and Parts DESCRIPTION Full Access® Oven Racks, Main Oven Full Access® Oven Racks, Secondary Oven Two-Piece Broil Pan* 36" 4-Burner w/ Griddle 3 0 1 36" 6-Burner 3 0 1 48...
... specifically designed for the oven. Before You Begin Before using the range with the Flush Island Trim. Exposure to these items: Table 1: Range Accessories and Parts DESCRIPTION Full Access® Oven Racks, Main Oven Full Access® Oven Racks, Secondary Oven Two-Piece Broil Pan* 36" 4-Burner w/ Griddle 3 0 1 36" 6-Burner 3 0 1 48...

Use and Care Manual
Page 15
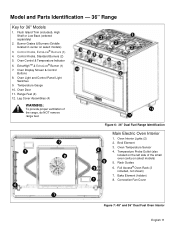
...) Figure 5: 48" Dual Fuel Range Identification English 10 Control Knobs, ExtraLow® Burners (3) 2. Secondary Oven (2 racks included) 18. Main Oven Control Knobs 7. Description Model and Parts Identification - 48" Range 11 11 22 22 55 8 66 7 7 78 7 9 9 1100 9 9 1100 1111 12 12 44 33 11 Figure 4: 48" Dual Fuel Control Panel 13...
...) Figure 5: 48" Dual Fuel Range Identification English 10 Control Knobs, ExtraLow® Burners (3) 2. Secondary Oven (2 racks included) 18. Main Oven Control Knobs 7. Description Model and Parts Identification - 48" Range 11 11 22 22 55 8 66 7 7 78 7 9 9 1100 9 9 1100 1111 12 12 44 33 11 Figure 4: 48" Dual Fuel Control Panel 13...
Use and Care Manual
Page 16
... 9. Leg Cover Assemblies (4) 1 2 2 3 2 58 9 7 4 3 10 6 WARNING: To provide proper ventilation of the small oven cavity on select models) 5. Oven Interior Lights (2) 2. Rack Guides 6. Model and Parts Identification - 36" Range Key for 36" Models 1. Control Knobs, ExtraLow® Burners (3) 4. Oven Display Screen & Control Buttons 8. Convection Fan Cover 7 Figure 7: 48" and 36" Dual...
... 9. Leg Cover Assemblies (4) 1 2 2 3 2 58 9 7 4 3 10 6 WARNING: To provide proper ventilation of the small oven cavity on select models) 5. Oven Interior Lights (2) 2. Rack Guides 6. Model and Parts Identification - 36" Range Key for 36" Models 1. Control Knobs, ExtraLow® Burners (3) 4. Oven Display Screen & Control Buttons 8. Convection Fan Cover 7 Figure 7: 48" and 36" Dual...
Use and Care Manual
Page 29
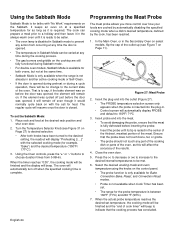
... for Bake, Convection Bake, Roast, and Convection Roast modes. • Probe is ready to be met. 6. Place rack and food at any part of the cooking dish or parts of the oven, as it is not available when Cook Timer has been set the Sabbath Mode: 1. The oven will affect the accuracy...
... for Bake, Convection Bake, Roast, and Convection Roast modes. • Probe is ready to be met. 6. Place rack and food at any part of the cooking dish or parts of the oven, as it is not available when Cook Timer has been set the Sabbath Mode: 1. The oven will affect the accuracy...
Use and Care Manual
Page 39
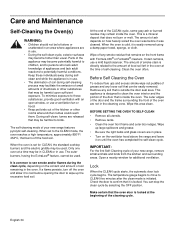
... and Maintenance Self-Cleaning the Oven(s) WARNING: • Children should not be left in the oven at a time may be in CLEAN or in use. Parts of the appliance may become hotter than usual. The temperature gauge begins to move to CLEAN five minutes after the clean mode is set to...
... and Maintenance Self-Cleaning the Oven(s) WARNING: • Children should not be left in the oven at a time may be in CLEAN or in use. Parts of the appliance may become hotter than usual. The temperature gauge begins to move to CLEAN five minutes after the clean mode is set to...
Use and Care Manual
Page 40
...Cleaning Recommendations, page 36. The omission of cleaner. Set Temperature Selector Knob to CLEAN. • Oven latch moves to indicate a type of any part of the oven will still be cleaned with the instructions on the chart. 4. Do not turn either of brand names is required, rinse thoroughly.... not constitute an endorsement. Select OFF using the Mode Selector Ring (see Figure 31 on a small inconspicuous area first. 2. Most exterior parts of the polish lines for cleaning this appliance can be wiped up and not allowed to avoid water marks. All of the other functions ...
...Cleaning Recommendations, page 36. The omission of cleaner. Set Temperature Selector Knob to CLEAN. • Oven latch moves to indicate a type of any part of the oven will still be cleaned with the instructions on the chart. 4. Do not turn either of brand names is required, rinse thoroughly.... not constitute an endorsement. Select OFF using the Mode Selector Ring (see Figure 31 on a small inconspicuous area first. 2. Most exterior parts of the polish lines for cleaning this appliance can be wiped up and not allowed to avoid water marks. All of the other functions ...
Use and Care Manual
Page 41
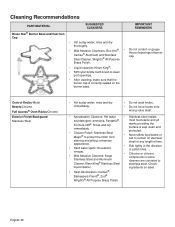
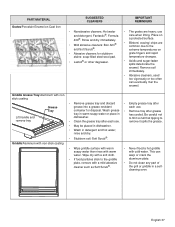
... • Stainless steel resists and detergent, ammonia, Fantastic®, most food stains and pit Formula 409®. Wright's® All Purpose Brass Polish. Cleaning Recommendations PART/MATERIAL SUGGESTED CLEANERS IMPORTANT REMINDERS Brass Star® Burner Base and Cast Iron Cap • Hot sudsy water;
... • Stainless steel resists and detergent, ammonia, Fantastic®, most food stains and pit Formula 409®. Wright's® All Purpose Brass Polish. Cleaning Recommendations PART/MATERIAL SUGGESTED CLEANERS IMPORTANT REMINDERS Brass Star® Burner Base and Cast Iron Cap • Hot sudsy water;
Use and Care Manual
Page 42
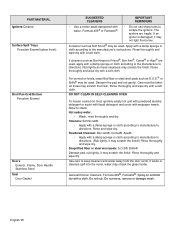
...; Abrasive cleaners, used too vigorously or too often can warp or crack the aluminum plate. • Do not clean any part of the grill or griddle in detergent and hot water; PART/MATERIAL Grates/Porcelain Enamel on grate fingers and rapid temperature changes. • Acidic and sugar-laden spills deteriorate the enamel.
...; Abrasive cleaners, used too vigorously or too often can warp or crack the aluminum plate. • Do not clean any part of the grill or griddle in detergent and hot water; PART/MATERIAL Grates/Porcelain Enamel on grate fingers and rapid temperature changes. • Acidic and sugar-laden spills deteriorate the enamel.
Use and Care Manual
Page 43
.... • Wash, rinse thoroughly and dry. If cleaners such as these may scratch the finish. Soap-filled fiber or steel wool pads: S.O.S®, Brillo®. PART/MATERIAL Igniters/Ceramic Surface Spill Trays Porcelain Enamel (gloss finish) Broil Pan Grid/Bottom Porcelain Enamel Doors Exterior, Frame, Door Handle Stainless Steel Seal Door...
.... • Wash, rinse thoroughly and dry. If cleaners such as these may scratch the finish. Soap-filled fiber or steel wool pads: S.O.S®, Brillo®. PART/MATERIAL Igniters/Ceramic Surface Spill Trays Porcelain Enamel (gloss finish) Broil Pan Grid/Bottom Porcelain Enamel Doors Exterior, Frame, Door Handle Stainless Steel Seal Door...
