User Guide
Page 4
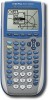
... TI-84 Plus. The two graphing calculators differ only in this guidebook, TI-84 Plus refers to edit expressions and values. Keyboard Zones Graphing - Editing - Advanced - Chapter 1: Operating the TI-84 Plus Silver Edition 1 All the functions of this guidebook also work for the TI-84 Plus. Editing keys allow you to the TI-84 Plus Silver Edition. Sometimes, as in Chapter 19, the full name TI-84 Plus Silver Edition is divided into these zones: graphing keys, editing...
... TI-84 Plus. The two graphing calculators differ only in this guidebook, TI-84 Plus refers to edit expressions and values. Keyboard Zones Graphing - Editing - Advanced - Chapter 1: Operating the TI-84 Plus Silver Edition 1 All the functions of this guidebook also work for the TI-84 Plus. Editing keys allow you to the TI-84 Plus Silver Edition. Sometimes, as in Chapter 19, the full name TI-84 Plus Silver Edition is divided into these zones: graphing keys, editing...

User Guide
Page 5
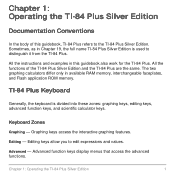
TI-84 Plus Graphing Keys Editing Keys Advanced Function Keys Scientific Calculator Keys Chapter 1: Operating the TI-84 Plus Silver Edition 2 Scientific calculator keys access the capabilities of a standard scientific calculator. Scientific -
TI-84 Plus Graphing Keys Editing Keys Advanced Function Keys Scientific Calculator Keys Chapter 1: Operating the TI-84 Plus Silver Edition 2 Scientific calculator keys access the capabilities of a standard scientific calculator. Scientific -
User Guide
Page 6
... alpha character printed in green above the key. For example, when you need. Chapter 1: Operating the TI-84 Plus Silver Edition 3 The light gray keys across the top set up and display graphs. Using the y and ƒ Keys The secondary function of each key is entered. This guidebook describes...;, the MATH menu is displayed. This guidebook describes this keystroke combination as the Inequality Graphing application. The light gray keys along the right side of each key is printed on the TI-84 Plus are color-coded to applications such as y :. The light colored keys are the...
... alpha character printed in green above the key. For example, when you need. Chapter 1: Operating the TI-84 Plus Silver Edition 3 The light gray keys across the top set up and display graphs. Using the y and ƒ Keys The secondary function of each key is entered. This guidebook describes...;, the MATH menu is displayed. This guidebook describes this keystroke combination as the Inequality Graphing application. The light gray keys along the right side of each key is printed on the TI-84 Plus are color-coded to applications such as y :. The light colored keys are the...

User Guide
Page 7
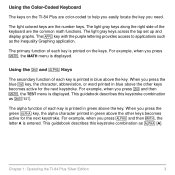
The y key accesses the second function printed in green above each key. Chapter 1: Operating the TI-84 Plus Silver Edition 4 Turning On and Turning Off the TI-84 Plus Turning On the Graphing Calculator To turn on the TI-84 Plus, press É. • If you previously had turned off the graphing calculator by pressing y M, the TI-84 Plus displays the home screen as it was when you last used it and clears any error. The ƒ key accesses the alpha function printed in blue above each key.
The y key accesses the second function printed in green above each key. Chapter 1: Operating the TI-84 Plus Silver Edition 4 Turning On and Turning Off the TI-84 Plus Turning On the Graphing Calculator To turn on the TI-84 Plus, press É. • If you previously had turned off the graphing calculator by pressing y M, the TI-84 Plus displays the home screen as it was when you last used it and clears any error. The ƒ key accesses the alpha function printed in blue above each key.
User Guide
Page 8
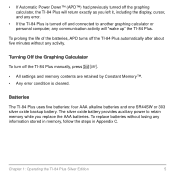
... memory, follow the steps in Appendix C. • If Automatic Power Down™ (APD™) had previously turned off the graphing calculator, the TI-84 Plus will "wake up" the TI-84 Plus. Chapter 1: Operating the TI-84 Plus Silver Edition 5 Batteries The TI-84 Plus uses five batteries: four AAA alkaline batteries and one SR44SW or 303 silver oxide backup battery. To prolong the life...
... memory, follow the steps in Appendix C. • If Automatic Power Down™ (APD™) had previously turned off the graphing calculator, the TI-84 Plus will "wake up" the TI-84 Plus. Chapter 1: Operating the TI-84 Plus Silver Edition 5 Batteries The TI-84 Plus uses five batteries: four AAA alkaline batteries and one SR44SW or 303 silver oxide backup battery. To prolong the life...
User Guide
Page 10
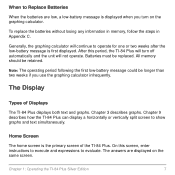
... operate for one or two weeks after the low-battery message is displayed when you use the graphing calculator infrequently. Chapter 3 describes graphs. Chapter 9 describes how the TI-84 Plus can display a horizontally or vertically split screen to evaluate. Note: The operating period following the ... steps in Appendix C. Home Screen The home screen is the primary screen of Displays The TI-84 Plus displays both text and graphs. The answers are low, a low-battery message is first displayed. Chapter 1: Operating the TI-84 Plus Silver Edition 7 Batteries must be replaced.
... operate for one or two weeks after the low-battery message is displayed when you use the graphing calculator infrequently. Chapter 3 describes graphs. Chapter 9 describes how the TI-84 Plus can display a horizontally or vertically split screen to evaluate. Note: The operating period following the ... steps in Appendix C. Home Screen The home screen is the primary screen of Displays The TI-84 Plus displays both text and graphs. The answers are low, a low-battery message is first displayed. Chapter 1: Operating the TI-84 Plus Silver Edition 7 Batteries must be replaced.
User Guide
Page 12
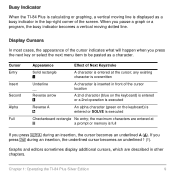
... a program, the busy indicator becomes a vertical moving line is displayed as a character. Chapter 1: Operating the TI-84 Plus Silver Edition 9 Graphs and editors sometimes display additional cursors, which are entered at the cursor; Busy Indicator When the TI-84 Plus is calculating or graphing, a vertical moving dotted line. Cursor Entry Insert Second Alpha Full Appearance Effect of Next Keystroke Solid...
... a program, the busy indicator becomes a vertical moving line is displayed as a character. Chapter 1: Operating the TI-84 Plus Silver Edition 9 Graphs and editors sometimes display additional cursors, which are entered at the cursor; Busy Indicator When the TI-84 Plus is calculating or graphing, a vertical moving dotted line. Cursor Entry Insert Second Alpha Full Appearance Effect of Next Keystroke Solid...
User Guide
Page 20
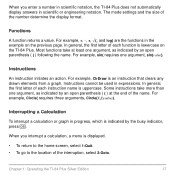
..., Circle( requires three arguments, Circle(X,Y,radius). Chapter 1: Operating the TI-84 Plus Silver Edition 17 For example, ClrDraw is an instruction that clears any drawn elements from a graph. Interrupting a Calculation To interrupt a calculation or graph in scientific or engineering notation. When you enter a number in scientific notation, the TI-84 Plus does not automatically display answers in progress, which is indicated...
..., Circle( requires three arguments, Circle(X,Y,radius). Chapter 1: Operating the TI-84 Plus Silver Edition 17 For example, ClrDraw is an instruction that clears any drawn elements from a graph. Interrupting a Calculation To interrupt a calculation or graph in scientific or engineering notation. When you enter a number in scientific notation, the TI-84 Plus does not automatically display answers in progress, which is indicated...
User Guide
Page 21
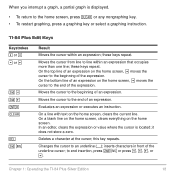
... home screen, clears everything on the home screen, clears the current line. Deletes a character at the cursor; Chapter 1: Operating the TI-84 Plus Silver Edition 18 these keys repeat. On the bottom line of an expression on the home screen, } moves the cursor to the beginning of the...press |, }, ~, or †. Moves the cursor to the home screen, press ' or any nongraphing key. • To restart graphing, press a graphing key or select a graphing instruction. In an editor, clears the expression or value where the cursor is displayed. • To return to the end of the expression...
... home screen, clears everything on the home screen, clears the current line. Deletes a character at the cursor; Chapter 1: Operating the TI-84 Plus Silver Edition 18 these keys repeat. On the bottom line of an expression on the home screen, } moves the cursor to the beginning of the...press |, }, ~, or †. Moves the cursor to the home screen, press ' or any nongraphing key. • To restart graphing, press a graphing key or select a graphing instruction. In an editor, clears the expression or value where the cursor is displayed. • To return to the end of the expression...
User Guide
Page 22
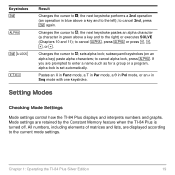
... keystrokes (on an alpha key) paste alpha characters; All numbers, including elements of matrices and lists, are retained by the Constant Memory feature when the TI-84 Plus is set automatically. the next keystroke performs a 2nd operation (an operation in blue above a key and to Þ; Changes the cursor to Ø; sets ... 11); to enter a name such as for a group or a program, alpha-lock is turned off. Setting Modes Checking Mode Settings Mode settings control how the TI-84 Plus displays and interprets numbers and graphs. Chapter 1: Operating the TI-84 Plus Silver Edition 19
... keystrokes (on an alpha key) paste alpha characters; All numbers, including elements of matrices and lists, are retained by the Constant Memory feature when the TI-84 Plus is set automatically. the next keystroke performs a 2nd operation (an operation in blue above a key and to Þ; Changes the cursor to Ø; sets ... 11); to enter a name such as for a group or a program, alpha-lock is turned off. Setting Modes Checking Mode Settings Mode settings control how the TI-84 Plus displays and interprets numbers and graphs. Chapter 1: Operating the TI-84 Plus Silver Edition 19
User Guide
Page 23
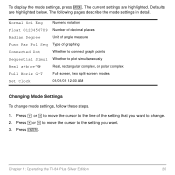
...} to move the cursor to change mode settings, follow these steps. 1. Press ~ or | to move the cursor to the line of graphing Connected Dot Whether to connect graph points Sequential Simul Whether to plot simultaneously Real a+bi re^qi Real, rectangular complex, or polar complex Full Horiz G-T Full screen, two split... Unit of angle measure Func Par Pol Seq Type of the setting that you want to the setting you want. 3. Chapter 1: Operating the TI-84 Plus Silver Edition 20 The following pages describe the mode settings in detail. To display the mode settings, press z.
...} to move the cursor to change mode settings, follow these steps. 1. Press ~ or | to move the cursor to the line of graphing Connected Dot Whether to connect graph points Sequential Simul Whether to plot simultaneously Real a+bi re^qi Real, rectangular complex, or polar complex Full Horiz G-T Full screen, two split... Unit of angle measure Func Par Pol Seq Type of the setting that you want to the setting you want. 3. Chapter 1: Operating the TI-84 Plus Silver Edition 20 The following pages describe the mode settings in detail. To display the mode settings, press z.
User Guide
Page 25
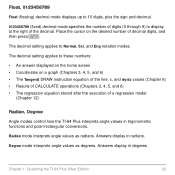
Chapter 1: Operating the TI-84 Plus Silver Edition 22 Radian mode interprets angle values as degrees. The decimal setting applies to these numbers: • An answer displayed on the home screen •... (Chapter 12) Radian, Degree Angle modes control how the TI-84 Plus interprets angle values in trigonometric functions and polar/rectangular conversions. Place the cursor on a graph (Chapters 3, 4, 5, and 6) • The Tangent( DRAW instruction equation of the line, x, and dy/dx values (Chapter 8) • Results of CALCULATE operations (Chapters 3, 4, 5, and 6) • The regression ...
Chapter 1: Operating the TI-84 Plus Silver Edition 22 Radian mode interprets angle values as degrees. The decimal setting applies to these numbers: • An answer displayed on the home screen •... (Chapter 12) Radian, Degree Angle modes control how the TI-84 Plus interprets angle values in trigonometric functions and polar/rectangular conversions. Place the cursor on a graph (Chapters 3, 4, 5, and 6) • The Tangent( DRAW instruction equation of the line, x, and dy/dx values (Chapter 8) • Results of CALCULATE operations (Chapters 3, 4, 5, and 6) • The regression ...

User Guide
Page 96
..., Ymin, and Ymax. Chapters 4, 5, and 6 describe aspects that each TI-84 Plus graphing mode. This is a quick way to reset the window variables to parametric graphing, polar graphing, and sequence graphing. Notice that the functions appear as a circle on the display. 4. 2. Defining Graphs TI-84 Plus-Graphing Mode Similarities Chapter 3 specifically describes function graphing, but the steps shown here are unique to the...
..., Ymin, and Ymax. Chapters 4, 5, and 6 describe aspects that each TI-84 Plus graphing mode. This is a quick way to reset the window variables to parametric graphing, polar graphing, and sequence graphing. Notice that the functions appear as a circle on the display. 4. 2. Defining Graphs TI-84 Plus-Graphing Mode Similarities Chapter 3 specifically describes function graphing, but the steps shown here are unique to the...

User Guide
Page 102
A function is selected when the = sign is selected automatically. Press | to select or deselect. 3. When you enter or edit a function, it is deselected. Press o to change the selection status. Press Í to display the Y= editor. 2. Yn(value) Yn({value1,value2,value3, ....and Y0. To select or deselect a function in the Y= editor. Move the cursor to the function you clear a function, it is highlighted. The TI-84 Plus graphs only the selected functions. You can select and deselect (turn off) a function in the Y= editor, follow these steps. 1. When you want to ...
A function is selected when the = sign is selected automatically. Press | to select or deselect. 3. When you enter or edit a function, it is deselected. Press o to change the selection status. Press Í to display the Y= editor. 2. Yn(value) Yn({value1,value2,value3, ....and Y0. To select or deselect a function in the Y= editor. Move the cursor to the function you clear a function, it is highlighted. The TI-84 Plus graphs only the selected functions. You can select and deselect (turn off) a function in the Y= editor, follow these steps. 1. When you want to ...

User Guide
Page 139
... Graphs TI-84 Plus Graphing Mode Similarities The steps for defining a parametric graph are similar to trace the curve, the cursor follows the path of the screen. Chapter 4 details aspects of parametric graphing that you press ~ to the steps for X (distance), Y (height), and T (time) are familiar with Chapter 3: Function Graphing....at the bottom of the ball over time. Chapter 4 assumes that differ from function graphing. 10. Note: To simulate the ball flying through the air, set graph style to obtain numerical results and answer the questions at Tmin on the first parametric ...
... Graphs TI-84 Plus Graphing Mode Similarities The steps for defining a parametric graph are similar to trace the curve, the cursor follows the path of the screen. Chapter 4 details aspects of parametric graphing that you press ~ to the steps for X (distance), Y (height), and T (time) are familiar with Chapter 3: Function Graphing....at the bottom of the ball over time. Chapter 4 assumes that differ from function graphing. 10. Note: To simulate the ball flying through the air, set graph style to obtain numerical results and answer the questions at Tmin on the first parametric ...

User Guide
Page 141
... of two ways. • Press „. • Press ƒ [T]. Chapter 4: Parametric Graphing 138 Selecting and Deselecting Parametric Equations The TI-84 Plus graphs only the selected parametric equations. The status of both the X and Y components is T. Defining and Editing Parametric Equations To define or edit a parametric equation, follow the steps in either the X or Y component and press...
... of two ways. • Press „. • Press ƒ [T]. Chapter 4: Parametric Graphing 138 Selecting and Deselecting Parametric Equations The TI-84 Plus graphs only the selected parametric equations. The status of both the X and Y components is T. Defining and Editing Parametric Equations To define or edit a parametric equation, follow the steps in either the X or Y component and press...

User Guide
Page 148
... p to select 5:ZSquare and plot the graph. 6. Chapter 5 assumes that differ from function graphing. Press † 4 y B to increase the value of polar graphing that you are similar to 4p. 5. 4. Observe how the new values affect the graph. Defining and Displaying Polar Graphs TI-84 Plus Graphing Mode Similarities The steps for defining a polar graph are familiar with new values for...
... p to select 5:ZSquare and plot the graph. 6. Chapter 5 assumes that differ from function graphing. Press † 4 y B to increase the value of polar graphing that you are similar to 4p. 5. 4. Observe how the new values affect the graph. Defining and Displaying Polar Graphs TI-84 Plus Graphing Mode Similarities The steps for defining a polar graph are familiar with new values for...

User Guide
Page 150
... Equations To define or edit a polar equation, follow the steps in Chapter 3 for Pol graphing in Radian angle mode. Selecting and Deselecting Polar Equations The TI-84 Plus graphs only the selected polar equations. Setting Window Variables To display the window variable values, press ...) Increment between q values (pà24) Smallest X value to be displayed Chapter 5: Polar Graphing 147 The values below are defaults for defining a function or editing a function. qmin=0 qmax=6.2831853... In Pol graphing mode, you can enter the polar variable q in a polar equation is highlighted. In the...
... Equations To define or edit a polar equation, follow the steps in Chapter 3 for Pol graphing in Radian angle mode. Selecting and Deselecting Polar Equations The TI-84 Plus graphs only the selected polar equations. Setting Window Variables To display the window variable values, press ...) Increment between q values (pà24) Smallest X value to be displayed Chapter 5: Polar Graphing 147 The values below are defaults for defining a function or editing a function. qmin=0 qmax=6.2831853... In Pol graphing mode, you can enter the polar variable q in a polar equation is highlighted. In the...

User Guide
Page 157
... z. They are similar to the steps for defining a function graph. TI-84 Plus Sequence Functions u, v, and w The TI-84 Plus has three sequence functions that you are familiar with Chapter 3: Function Graphing. Chapter 6 assumes that you enter sequence functions. Defining and Displaying Sequence Graphs TI-84 Plus Graphing Mode Similarities The steps for defining a sequence graph are above the ¬, −, and ® keys...
... z. They are similar to the steps for defining a function graph. TI-84 Plus Sequence Functions u, v, and w The TI-84 Plus has three sequence functions that you are familiar with Chapter 3: Function Graphing. Chapter 6 assumes that you enter sequence functions. Defining and Displaying Sequence Graphs TI-84 Plus Graphing Mode Similarities The steps for defining a sequence graph are above the ¬, −, and ® keys...

User Guide
Page 159
... function name, and then press Í. Selecting and Deselecting Sequence Functions The TI-84 Plus graphs only the selected sequence functions. The status is selected when the = signs of two ways. • Press „. • Press y N [N]. Defining and Editing a Sequence Function To define or edit a sequence function, follow the steps in either of both the sequence...
... function name, and then press Í. Selecting and Deselecting Sequence Functions The TI-84 Plus graphs only the selected sequence functions. The status is selected when the = signs of two ways. • Press „. • Press y N [N]. Defining and Editing a Sequence Function To define or edit a sequence function, follow the steps in either of both the sequence...

