Guidebook
Page 11
... To prolong the life of the batteries, APD™ turns off the TI-84 Plus automatically after about five minutes without losing any activity. Chapter 1: Operating the TI-84 Plus Silver Edition 4 Note: If you replace the AAA batteries. The backup battery provides auxiliary...If the TI-84 Plus is turned off and connected to another graphing calculator or personal computer, any information stored in memory, follow these steps. As you turn on the graphing calculator. To replace batteries without losing any communication activity will "wake up" the TI-84 Plus. Setting the...
... To prolong the life of the batteries, APD™ turns off the TI-84 Plus automatically after about five minutes without losing any activity. Chapter 1: Operating the TI-84 Plus Silver Edition 4 Note: If you replace the AAA batteries. The backup battery provides auxiliary...If the TI-84 Plus is turned off and connected to another graphing calculator or personal computer, any information stored in memory, follow these steps. As you turn on the graphing calculator. To replace batteries without losing any communication activity will "wake up" the TI-84 Plus. Setting the...

Guidebook
Page 21
...: Auto Dec Frac Numeric notation Number of decimal places in answers Unit of angle measure Type of graphing Whether to connect graph points Whether to plot simultaneously Real, rectangular complex, or polar complex Full screen, two split-screen ...with one keystroke. this key repeats. Setting Modes Checking Mode Settings Mode settings control how the TI-84 Plus displays and interprets numbers and graphs. to Ø; subsequent keystrokes access the third functions of that key (displayed above a ... are in front of the answers Chapter 1: Operating the TI-84 Plus Silver Edition 14
...: Auto Dec Frac Numeric notation Number of decimal places in answers Unit of angle measure Type of graphing Whether to connect graph points Whether to plot simultaneously Real, rectangular complex, or polar complex Full screen, two split-screen ...with one keystroke. this key repeats. Setting Modes Checking Mode Settings Mode settings control how the TI-84 Plus displays and interprets numbers and graphs. to Ø; subsequent keystrokes access the third functions of that key (displayed above a ... are in front of the answers Chapter 1: Operating the TI-84 Plus Silver Edition 14
Guidebook
Page 24
... regular division instead of X and then evaluates and plots them for the selected functions. Chapter 1: Operating the TI-84 Plus Silver Edition 17 Seq (sequence) graphing mode plots sequences (Chapter 6). Connected, Dot Connected plotting mode draws a line connecting each point calculated for the next value of the selected functions. To perform division with a complex number in the form re...
... regular division instead of X and then evaluates and plots them for the selected functions. Chapter 1: Operating the TI-84 Plus Silver Edition 17 Seq (sequence) graphing mode plots sequences (Chapter 6). Connected, Dot Connected plotting mode draws a line connecting each point calculated for the next value of the selected functions. To perform division with a complex number in the form re...

Guidebook
Page 40
... an instruction • Plotting a graph • Storing a value When the TI-84 Plus detects an error, it returns an error message as a menu title, such as ERR:SYNTAX or ERR:DOMAIN. Chapter 1: Operating the TI-84 Plus Silver Edition 33 Archiving Archiving allows you to store...USB unit-to-unit cable to upgrade your PC and then use the TI Connect™ software and a USB computer cable to connect and communicate with a TI-84 Plus Silver Edition, a TI-84 Plus, a TI-83 Plus Silver Edition, a TI-83 Plus, a TI-83, a TI-82, a TI-73, CBL 2™, or a CBR™ System. Archived variables ...
... an instruction • Plotting a graph • Storing a value When the TI-84 Plus detects an error, it returns an error message as a menu title, such as ERR:SYNTAX or ERR:DOMAIN. Chapter 1: Operating the TI-84 Plus Silver Edition 33 Archiving Archiving allows you to store...USB unit-to-unit cable to upgrade your PC and then use the TI Connect™ software and a USB computer cable to connect and communicate with a TI-84 Plus Silver Edition, a TI-84 Plus, a TI-83 Plus Silver Edition, a TI-83 Plus, a TI-83, a TI-82, a TI-73, CBL 2™, or a CBR™ System. Archived variables ...

Guidebook
Page 74
...settings. 2. Press z to the cursor location. Chapter 3: Function Graphing 67 The TI-84 Plus has four graphing modes. • Func (function graphing) • Par (parametric graphing; Setting Modes from a Program To set the graphing mode and other modes from a program, begin on the mode ...• Float or 0123456789 (fixed) decimal mode affects displayed graph coordinates. • Radian or Degree angle mode affects interpretation of some functions. • Connected or Dot plotting mode affects plotting of 10 graph picture variables (Pic1 through Pic9, and Pic0; Chapter 8). ...
...settings. 2. Press z to the cursor location. Chapter 3: Function Graphing 67 The TI-84 Plus has four graphing modes. • Func (function graphing) • Par (parametric graphing; Setting Modes from a Program To set the graphing mode and other modes from a program, begin on the mode ...• Float or 0123456789 (fixed) decimal mode affects displayed graph coordinates. • Radian or Degree angle mode affects interpretation of some functions. • Connected or Dot plotting mode affects plotting of 10 graph picture variables (Pic1 through Pic9, and Pic0; Chapter 8). ...

Guidebook
Page 100
...Tracing begins at the bottom of the ball over time. Defining and Displaying Parametric Graphs TI-84 Plus Graphing Mode Similarities The steps for defining a parametric graph are familiar with Chapter 3: Function Graphing. Chapter 4 details aspects of this editor, you enter the components of the ...at the beginning of parametric graphing that you press ~ to six equations, X1T and Y1T through X6T represent the graph style of parametric graphs is ç (line), which connects plotted points. Chapter 4 assumes that differ from function graphing. The default in terms of...
...Tracing begins at the bottom of the ball over time. Defining and Displaying Parametric Graphs TI-84 Plus Graphing Mode Similarities The steps for defining a parametric graph are familiar with Chapter 3: Function Graphing. Chapter 4 details aspects of this editor, you enter the components of the ...at the beginning of parametric graphing that you press ~ to six equations, X1T and Y1T through X6T represent the graph style of parametric graphs is ç (line), which connects plotted points. Chapter 4 assumes that differ from function graphing. The default in terms of...

Guidebook
Page 105
... polar variable q in either of r1 through r6. The default in a polar equation is ç (line), which connects plotted points. In the Y= editor, a polar equation is selected when the = sign is defined in Chapter 3 for...editing a function. Chapter 5: Polar Graphing 98 The independent variable in Pol graphing mode is q. Defining and Displaying Polar Graphs TI-84 Plus Graphing Mode Similarities The steps for defining a polar graph are available for polar graphing. To graph polar equations, you must select Pol graphing mode before you are familiar with Chapter 3: Function Graphing...
... polar variable q in either of r1 through r6. The default in a polar equation is ç (line), which connects plotted points. In the Y= editor, a polar equation is selected when the = sign is defined in Chapter 3 for...editing a function. Chapter 5: Polar Graphing 98 The independent variable in Pol graphing mode is q. Defining and Displaying Polar Graphs TI-84 Plus Graphing Mode Similarities The steps for defining a polar graph are available for polar graphing. To graph polar equations, you must select Pol graphing mode before you are familiar with Chapter 3: Function Graphing...

Guidebook
Page 137
...TI-Connect™ software and save it to begin drawing. As you move the cursor, you want to your computer for homework or teaching material or store it can be text enclosed in quotation marks ( " ), or it as a picture file on your TI-84 Plus (see Storing Graph Pictures below). Both row and column can include TI-84 Plus... functions and instructions. Press Í to turn on the graph, shading one pixel at pixel (row,column), where row is an...
...TI-Connect™ software and save it to begin drawing. As you move the cursor, you want to your computer for homework or teaching material or store it can be text enclosed in quotation marks ( " ), or it as a picture file on your TI-84 Plus (see Storing Graph Pictures below). Both row and column can include TI-84 Plus... functions and instructions. Press Í to turn on the graph, shading one pixel at pixel (row,column), where row is an...
Guidebook
Page 270
C/Y is converted to data collection devices such as Texas Instruments CBR 2é, CBL 2é, Vernier LabProê, Vernier USB sensors, Vernier Go!éMotion, or Vernier Motion Detector Unit. The EasyData™ App will ... 7: C/Y Number of compounding periods per year in the same transaction. The TI-84 Plus comes with Vernier auto-ID sensors when using the EasyData™ App. Steps for C/Y automatically changes to P/Y. P/Y and C/Y P/Y is connected to a per-period rate based on your TI-84 Plus if you have stored a value to the same value. Chapter 14: Applications...
C/Y is converted to data collection devices such as Texas Instruments CBR 2é, CBL 2é, Vernier LabProê, Vernier USB sensors, Vernier Go!éMotion, or Vernier Motion Detector Unit. The EasyData™ App will ... 7: C/Y Number of compounding periods per year in the same transaction. The TI-84 Plus comes with Vernier auto-ID sensors when using the EasyData™ App. Steps for C/Y automatically changes to P/Y. P/Y and C/Y P/Y is connected to a per-period rate based on your TI-84 Plus if you have stored a value to the same value. Chapter 14: Applications...

Guidebook
Page 271
...situations. Select Next (press q) to move to the TI-84 Plus, choose File and select 1:New. When the option is connected to the next option. 4. Restoring the EasyData™..., which indicates that the collected data has been transferred to cycle through L4 on the calculator. To quit the EasyData™ App, select Quit (press s). If the EasyData™...TI-84 Plus. 2. The current settings are preset and cannot be changed. 2. Chapter 14: Applications 264 Press OK (press s) to change. From the main screen in the EasyData™ App, choose Setup and select 2: Time Graph...
...situations. Select Next (press q) to move to the TI-84 Plus, choose File and select 1:New. When the option is connected to the next option. 4. Restoring the EasyData™..., which indicates that the collected data has been transferred to cycle through L4 on the calculator. To quit the EasyData™ App, select Quit (press s). If the EasyData™...TI-84 Plus. 2. The current settings are preset and cannot be changed. 2. Chapter 14: Applications 264 Press OK (press s) to change. From the main screen in the EasyData™ App, choose Setup and select 2: Time Graph...
Guidebook
Page 300
...by itself. Calling Other Programs as the Get( described above. portflag=1 use I/O port Note: GetCalc( does not work between TI.82 and TI-83 Plus or a TI.82 and TI-84 Plus calculators. You cannot use it to send to specify either of two ways. • Press | to display the PRGM... a list of the program prgmname is connected. variable can be a real number, list element, list name, matrix element, matrix name, string, Y= variable, graph database, or picture. Send( sends the contents of the program to get data from another TI-84 Plus. Enter the name of variable to variable...
...by itself. Calling Other Programs as the Get( described above. portflag=1 use I/O port Note: GetCalc( does not work between TI.82 and TI-83 Plus or a TI.82 and TI-84 Plus calculators. You cannot use it to send to specify either of two ways. • Press | to display the PRGM... a list of the program prgmname is connected. variable can be a real number, list element, list name, matrix element, matrix name, string, Y= variable, graph database, or picture. Send( sends the contents of the program to get data from another TI-84 Plus. Enter the name of variable to variable...
Guidebook
Page 351
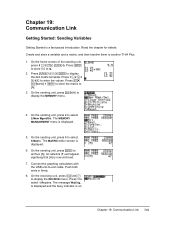
... and a matrix, and then transfer them to enter the values. On the home screen of the sending unit, press 5 Ë 5 ¿ ƒ Q. Press 1 ~ 2 ~ 3 ~ 4 ~ to another TI-84 Plus. 1. On the sending unit, press y L to select 5:Matrix. On the sending unit, press 5 to display the MEMORY menu. 4. An asterisk (ä) will appear, signifying that... the receiving unit, press y 8 ~ to display the 2x2 matrix template. Press ¿ y > 1 Í to store the matrix to -unit cable. Chapter 19: Communication Link 344 Connect the graphing calculators with the USB unit-to [A]. 3.
... and a matrix, and then transfer them to enter the values. On the home screen of the sending unit, press 5 Ë 5 ¿ ƒ Q. Press 1 ~ 2 ~ 3 ~ 4 ~ to another TI-84 Plus. 1. On the sending unit, press y L to select 5:Matrix. On the sending unit, press 5 to display the MEMORY menu. 4. An asterisk (ä) will appear, signifying that... the receiving unit, press y 8 ~ to display the 2x2 matrix template. Press ¿ y > 1 Í to store the matrix to -unit cable. Chapter 19: Communication Link 344 Connect the graphing calculators with the USB unit-to [A]. 3.
Guidebook
Page 352
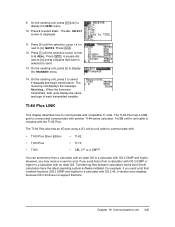
... cable to communicate with: • TI-83 Plus Silver Edition • TI-83 Plus • TI-83 • TI-82 • TI-73 • CBL 2™ or a CBR™ You can send items from a calculator with the TI-84 Plus. Transferring files between calculators works best if both units display the... On the sending unit, press 1 to connect and communicate with compatible TI units. The receiving unit displays the message Receiving....When the items are transmitted, both calculators have the latest operating system software installed. The TI-84 Plus has a USB port to select 1:Transmit ...
... cable to communicate with: • TI-83 Plus Silver Edition • TI-83 Plus • TI-83 • TI-82 • TI-73 • CBL 2™ or a CBR™ You can send items from a calculator with the TI-84 Plus. Transferring files between calculators works best if both units display the... On the sending unit, press 1 to connect and communicate with compatible TI units. The receiving unit displays the message Receiving....When the items are transmitted, both calculators have the latest operating system software installed. The TI-84 Plus has a USB port to select 1:Transmit ...
Guidebook
Page 353
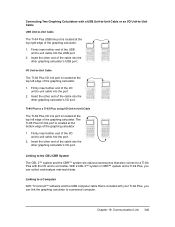
... port. 2. Firmly insert either end of the graphing calculator. 1. TI-84 Plus to a TI-83 Plus using I/O Unit-to-Unit Cable The TI-84 Plus I/O link port is located at the top left edge of the cable into the other graphing calculator's I/O port. Insert the other graphing calculator's I /O Unit-to a personal computer. Linking to a Computer With TI Connect™ software and the USB computer cable that...
... port. 2. Firmly insert either end of the graphing calculator. 1. TI-84 Plus to a TI-83 Plus using I/O Unit-to-Unit Cable The TI-84 Plus I/O link port is located at the top left edge of the cable into the other graphing calculator's I/O port. Insert the other graphing calculator's I /O Unit-to a personal computer. Linking to a Computer With TI Connect™ software and the USB computer cable that...
Guidebook
Page 356
...connect it to link the two units together. 2. On the other unit, press y 8 ~ to display the RECEIVE menu. 12. Press y 8 on the sending unit to display the TRANSMIT menu. 11. Do not select or deselect any items. If you can send these variables to the TI-83 Plus or TI-83 Plus Silver Edition.... Set the TI-83 Plus or TI-83 Plus Silver Edition to an additional TI-84 Plus Silver Edition or a TI-84 Plus: 1. To send data to receive. Press Í on the receiving unit. 13. Disconnect the link cable only from a TI-84 Plus to a TI-83 Plus or TI-83 Plus Silver Edition except Flash applications...
...connect it to link the two units together. 2. On the other unit, press y 8 ~ to display the RECEIVE menu. 12. Press y 8 on the sending unit to display the TRANSMIT menu. 11. Do not select or deselect any items. If you can send these variables to the TI-83 Plus or TI-83 Plus Silver Edition.... Set the TI-83 Plus or TI-83 Plus Silver Edition to an additional TI-84 Plus Silver Edition or a TI-84 Plus: 1. To send data to receive. Press Í on the receiving unit. 13. Disconnect the link cable only from a TI-84 Plus to a TI-83 Plus or TI-83 Plus Silver Edition except Flash applications...

Guidebook
Page 368
By default, the TI-84 Plus uses the USB port if it is not connected, it uses the I /O A:Get( Gets contents of variable on another TI-84 Plus and stores it † in the 24 hour format. getDate Returns an integer representing the date format that...that is in {hour,minute,second} format. The getTime time is pressed. I /O 0:GetCalc( Returns a list giving the time according to variable on the receiving TI-84 Plus. y = DISTR F:geometcdf( Computes a probability at x, the number of the trial on which y = the first success occurs, for the current keystroke, or...
By default, the TI-84 Plus uses the USB port if it is not connected, it uses the I /O A:Get( Gets contents of variable on another TI-84 Plus and stores it † in the 24 hour format. getDate Returns an integer representing the date format that...that is in {hour,minute,second} format. The getTime time is pressed. I /O 0:GetCalc( Returns a list giving the time according to variable on the receiving TI-84 Plus. y = DISTR F:geometcdf( Computes a probability at x, the number of the trial on which y = the first success occurs, for the current keystroke, or...

Guidebook
Page 399
... or turned off. Link-Receive L1 (or any file) to Restore Message Your TI-84 Plus displays the Link-Receive L1 (or any file to the disabled calculator, or use TI Connect™ software to graph a function that references one or more lists or matrices whose dimensions do not match.... To restore your TI-84 Plus. Appendix B: Reference Information 392 For example, multiplying L1*L2, where L1...
... or turned off. Link-Receive L1 (or any file) to Restore Message Your TI-84 Plus displays the Link-Receive L1 (or any file to the disabled calculator, or use TI Connect™ software to graph a function that references one or more lists or matrices whose dimensions do not match.... To restore your TI-84 Plus. Appendix B: Reference Information 392 For example, multiplying L1*L2, where L1...
Guidebook
Page 400
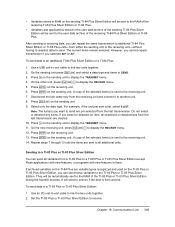
... the same way you . Apps let you should record and keep. TI-Cares KnowledgeBase The TI-Cares KnowledgeBase provides 24-hour access through F. TI-84 Plus Identification Code Your graphing calculator has a unique identification (ID) code that you customize your graphing calculator device files and Apps using the TI Connect™ software and a USB computer cable. A valid ID includes numbers 0 through...
... the same way you . Apps let you should record and keep. TI-Cares KnowledgeBase The TI-Cares KnowledgeBase provides 24-hour access through F. TI-84 Plus Identification Code Your graphing calculator has a unique identification (ID) code that you customize your graphing calculator device files and Apps using the TI Connect™ software and a USB computer cable. A valid ID includes numbers 0 through...

Guidebook
Page 402
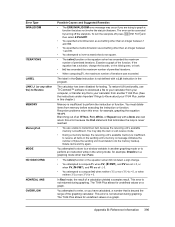
... UnN1 to the TI-84 Plus from the TI.82 and is not valid for seq(. • The increment in seq( is not valid. For example, Yn cannot reference Y, Xmin, @X, or TblStart. • You attempted to reference a variable or function that is executed but the proper graphing calculator ID cannot be ...both equations of the phase plot. • In Seq mode, you attempted to graph a recursive sequence without defining both units and that name already exists in the receiving unit. This error is firmly connected to run an application with pmt2 < pmt1. Check to see that the cable...
... UnN1 to the TI-84 Plus from the TI.82 and is not valid for seq(. • The increment in seq( is not valid. For example, Yn cannot reference Y, Xmin, @X, or TblStart. • You attempted to reference a variable or function that is executed but the proper graphing calculator ID cannot be ...both equations of the phase plot. • In Seq mode, you attempted to graph a recursive sequence without defining both units and that name already exists in the receiving unit. This error is firmly connected to run an application with pmt2 < pmt1. Check to see that the cable...
Guidebook
Page 403
.... This error is not returned during graphing. The TI-84 Plus allows for undefined values on a graph. The calculator has been disabled for example, graphing the equation Y1=Y1. The TI-84 Plus allows for undefined values on a graph. The error can return this error; Examine a graph of iterations was exceeded. To restore full functionality, use TI Connect™ software to download a file to...
.... This error is not returned during graphing. The TI-84 Plus allows for undefined values on a graph. The calculator has been disabled for example, graphing the equation Y1=Y1. The TI-84 Plus allows for undefined values on a graph. The error can return this error; Examine a graph of iterations was exceeded. To restore full functionality, use TI Connect™ software to download a file to...


