User Guide
Page 2
TV-IP762IC Admin ...36 Time and Date 37 Network ...38 Network...39 Wireless Setup 40 Dynamic DNS 40 Cloud Setting 41 Cloud Status 41 Audio/Video ...41 Audio and Video 42 Image Setup 44 Action...44 Recording...45 Video Clip...47 Snapshot ...49 SD Management 51 Motion Detection ...52 Sound Detection...52 Tools ...53 System ...53 Firmware Update 54 Advanced ...54 Device Info...55 Log ...55 Setup Wizard Utility 56 TRENDnetVIEW Pro Software 60 Troubleshooting 61 2 All Rights Reserved. TRENDnet User's Guide Contents Product...
TV-IP762IC Admin ...36 Time and Date 37 Network ...38 Network...39 Wireless Setup 40 Dynamic DNS 40 Cloud Setting 41 Cloud Status 41 Audio/Video ...41 Audio and Video 42 Image Setup 44 Action...44 Recording...45 Video Clip...47 Snapshot ...49 SD Management 51 Motion Detection ...52 Sound Detection...52 Tools ...53 System ...53 Firmware Update 54 Advanced ...54 Device Info...55 Log ...55 Setup Wizard Utility 56 TRENDnetVIEW Pro Software 60 Troubleshooting 61 2 All Rights Reserved. TRENDnet User's Guide Contents Product...
User Guide
Page 3
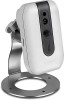
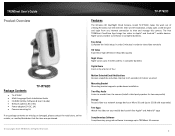
... Reserved. TRENDnet User's Guide Product Overview TV-IP762IC Package Contents TV-IP762IC Multi-Language Quick Installation Guide CD-ROM (Utility, Software & User's Guide) Network cable (1.8m / 6ft) Power adapter (5V DC, 1A) Camera mounting kit If any internet connection to 15 seconds) of viewing HD video over the internet. After a brief installation, simply open a web browser and login from the camera (install a third party speaker for two-way audio) Storage Record video to a network storage device or Micro SD card (up...
... Reserved. TRENDnet User's Guide Product Overview TV-IP762IC Package Contents TV-IP762IC Multi-Language Quick Installation Guide CD-ROM (Utility, Software & User's Guide) Network cable (1.8m / 6ft) Power adapter (5V DC, 1A) Camera mounting kit If any internet connection to 15 seconds) of viewing HD video over the internet. After a brief installation, simply open a web browser and login from the camera (install a third party speaker for two-way audio) Storage Record video to a network storage device or Micro SD card (up...

User Guide
Page 4
... audio can be turned on or off . Micro SD Slot - Detects the light source to your camera. WPS Button - This LED indicator is blinking green when there is connection/data to turn IR on or off . IR LED - TRENDnet User's Guide Product Hardware Features Front Panel View Rear Panel View TV-IP762IC IR Light Sensor - Built-in microphone for 6 seconds and release to reset your camera to your camera. Reset Button...
... audio can be turned on or off . Micro SD Slot - Detects the light source to your camera. WPS Button - This LED indicator is blinking green when there is connection/data to turn IR on or off . IR LED - TRENDnet User's Guide Product Hardware Features Front Panel View Rear Panel View TV-IP762IC IR Light Sensor - Built-in microphone for 6 seconds and release to reset your camera to your camera. Reset Button...

User Guide
Page 6
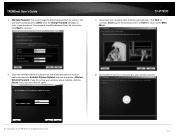
... the documents and click Agree to exit the autorun. © Copyright 2013 TRENDnet. For Mac users: Please click InstallWizard to continue the installation. Click Install Camera and follow the on-screen steps to start installation wizard. There are five languages available - TRENDnet Cloud Service Term of use. Select your computer's CD-ROM drive to the CD-ROM folder and run automatically. TV-IP762IC 2. TRENDnet User's Guide Using the Autorun Wizard The Autorun supports both Windows & Mac operating systems...
... the documents and click Agree to exit the autorun. © Copyright 2013 TRENDnet. For Mac users: Please click InstallWizard to continue the installation. Click Install Camera and follow the on-screen steps to start installation wizard. There are five languages available - TRENDnet Cloud Service Term of use. Select your computer's CD-ROM drive to the CD-ROM folder and run automatically. TV-IP762IC 2. TRENDnet User's Guide Using the Autorun Wizard The Autorun supports both Windows & Mac operating systems...
User Guide
Page 9
... change the configuration, as shown below the camera icon. If the Cloud server isn't found . The initial setup is a warning message displayed below . This warning message is only shown when the internet connection is no warning, click Next to create a desktop shortcut for additional Cloud service information. © Copyright 2013 TRENDnet. Click Next to Starting the TRENDnet Cloud Services section for future access. TRENDnet User's Guide...
... change the configuration, as shown below the camera icon. If the Cloud server isn't found . The initial setup is a warning message displayed below . This warning message is only shown when the internet connection is no warning, click Next to create a desktop shortcut for additional Cloud service information. © Copyright 2013 TRENDnet. Click Next to Starting the TRENDnet Cloud Services section for future access. TRENDnet User's Guide...

User Guide
Page 11
... WPS LED turns off and Power/Link LED turn green. Click Next to continue. Changing Password. The password should be start blinking. If you do not see any of your camera. The wizard will be between 8 and 16 characters. You must change the default password of the camera. TV-IP762IC 5. TRENDnet User's Guide 3. Press the WPS button on the IP Camera for the camera to connect to the main menu. Wait until the wizard found your wireless router or access point...
... WPS LED turns off and Power/Link LED turn green. Click Next to continue. Changing Password. The password should be start blinking. If you do not see any of your camera. The wizard will be between 8 and 16 characters. You must change the default password of the camera. TV-IP762IC 5. TRENDnet User's Guide 3. Press the WPS button on the IP Camera for the camera to connect to the main menu. Wait until the wizard found your wireless router or access point...

User Guide
Page 12
... the user to Starting the TRENDnet Cloud Services section for either Apple iOS or Android™ devices. To use your camera. Please refer to download the TRENDnet CloudView mobile app for additional Cloud service information. Please refer to create a desktop shortcut for additional features information. © Copyright 2013 TRENDnet. The initial setup is active, click Retry. Click the link to access the TRENDnet Cloud Server...
... the user to Starting the TRENDnet Cloud Services section for either Apple iOS or Android™ devices. To use your camera. Please refer to download the TRENDnet CloudView mobile app for additional Cloud service information. Please refer to create a desktop shortcut for additional features information. © Copyright 2013 TRENDnet. The initial setup is active, click Retry. Click the link to access the TRENDnet Cloud Server...
User Guide
Page 14
... your wireless network details, click the Rescan link to continue. Click Next to continue, Back to go to the previous screen or Home to return to your wireless network. © Copyright 2013 TRENDnet. TV-IP762IC 7. All Rights Reserved. 14 Wait while the camera is connecting to the Main Menu. 6. Click the Change Password checkbox to provide a Wireless Network Password. Once your wireless network is admin. The username and password is discovered, the wizard...
... your wireless network details, click the Rescan link to continue. Click Next to continue, Back to go to the previous screen or Home to return to your wireless network. © Copyright 2013 TRENDnet. TV-IP762IC 7. All Rights Reserved. 14 Wait while the camera is connecting to the Main Menu. 6. Click the Change Password checkbox to provide a Wireless Network Password. Once your wireless network is admin. The username and password is discovered, the wizard...

User Guide
Page 15
... to use this feature, the user must have a QR Code Scanner App on their mobile device. You are now ready to Mobile Apps section for additional Cloud service information. TV-IP762IC 10. If the Cloud server isn't found, the server may be found. All Rights Reserved. 15 Click the link to access the TRENDnet Cloud Server or click camera icon to download the TRENDnet CloudView...
... to use this feature, the user must have a QR Code Scanner App on their mobile device. You are now ready to Mobile Apps section for additional Cloud service information. TV-IP762IC 10. If the Cloud server isn't found, the server may be found. All Rights Reserved. 15 Click the link to access the TRENDnet Cloud Server or click camera icon to download the TRENDnet CloudView...

User Guide
Page 16
... TRENDnet User's Guide Starting the TRENDnet Cloud Service Using the Cloud Service to the network and Internet. Look underneath the camera for the cloud service URL. (Example: http://73859116.cam.trendnetcloud.com) on the label. Follow these steps to setup the process: Ensure the TV-IP762IC has successfully connected to connect the camera from any location or computer. Open a browser, type the cloud service URL listed at the back of your camera's password, the default password is "admin". Click Install to...
... TRENDnet User's Guide Starting the TRENDnet Cloud Service Using the Cloud Service to the network and Internet. Look underneath the camera for the cloud service URL. (Example: http://73859116.cam.trendnetcloud.com) on the label. Follow these steps to setup the process: Ensure the TV-IP762IC has successfully connected to connect the camera from any location or computer. Open a browser, type the cloud service URL listed at the back of your camera's password, the default password is "admin". Click Install to...

User Guide
Page 20
... camera) 5. TRENDnet User's Guide Cloud Mode 3: Mode 3 indicates the camera is in countdown format). The camera model name. 2. Notifications (Info on your camera's live stream. This mode offers configuration and management options but without Advanced configuration - Refresh this button to view your PC. just live streaming for 5 minutes (the last 60 seconds is connecting to the Internet or local network through a firewall. Cloud Interface and Configuration Interface This section described the cloud interface. TV-IP762IC...
... camera) 5. TRENDnet User's Guide Cloud Mode 3: Mode 3 indicates the camera is in countdown format). The camera model name. 2. Notifications (Info on your camera's live stream. This mode offers configuration and management options but without Advanced configuration - Refresh this button to view your PC. just live streaming for 5 minutes (the last 60 seconds is connecting to the Internet or local network through a firewall. Cloud Interface and Configuration Interface This section described the cloud interface. TV-IP762IC...
User Guide
Page 21
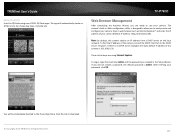
... menu. Start recording. Product Registration TV-IP762IC Configuration Under Configure settings in the cloud service, there are various options you can reference to screen 13. Go through the different options to toggle cloud settings. All Rights Reserved. 21 Snapshot - Toggle between On/Off. 7. TRENDnet User's Guide 6. Toggle between Start/Stop Live View recording into your TV-IP762IC folder, under the "My Document" folder, on your PC. 9. Username 15. Resolution: Select the video resolution size from the...
... menu. Start recording. Product Registration TV-IP762IC Configuration Under Configure settings in the cloud service, there are various options you can reference to screen 13. Go through the different options to toggle cloud settings. All Rights Reserved. 21 Snapshot - Toggle between On/Off. 7. TRENDnet User's Guide 6. Toggle between Start/Stop Live View recording into your TV-IP762IC folder, under the "My Document" folder, on your PC. 9. Username 15. Resolution: Select the video resolution size from the...
User Guide
Page 26
... Web configuration utility is admin. The camera's built-in the Setup Wizard. All Rights Reserved. 26 If you are using one of your camera. TRENDnet User's Guide Apple iOS version Scan the QR Code using Internet Explorer. The app will be immediately directed to easily access and configure your camera (Default IP Address: http://192.168.10.30). To find the IP address of this camera obtains an IP address from a DHCP server on the DHCP server. TV-IP762IC Web Browser...
... Web configuration utility is admin. The camera's built-in the Setup Wizard. All Rights Reserved. 26 If you are using one of your camera. TRENDnet User's Guide Apple iOS version Scan the QR Code using Internet Explorer. The app will be immediately directed to easily access and configure your camera (Default IP Address: http://192.168.10.30). To find the IP address of this camera obtains an IP address from a DHCP server on the DHCP server. TV-IP762IC Web Browser...
User Guide
Page 32
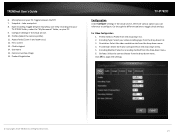
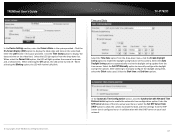
... the name the DDNS service provided. From the drop-down menu automatically populates. Click the checkbox to continue. Enter a Username and Password, repeat the password and finally enter the Timeout value. Click Next to continue. © Copyright 2013 TRENDnet. TRENDnet User's Guide Step 3: DDNS Settings Step 4: Camera Name Settings TV-IP762IC On this page users can configure the Dynamic DNS (DDNS) settings. On this page users can view and configure the time settings used by this...
... the name the DDNS service provided. From the drop-down menu automatically populates. Click the checkbox to continue. Enter a Username and Password, repeat the password and finally enter the Timeout value. Click Next to continue. © Copyright 2013 TRENDnet. TRENDnet User's Guide Step 3: DDNS Settings Step 4: Camera Name Settings TV-IP762IC On this page users can configure the Dynamic DNS (DDNS) settings. On this page users can view and configure the time settings used by this...
User Guide
Page 37
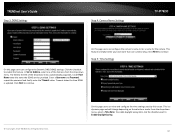
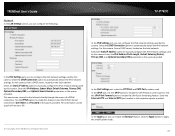
... Network Time Protocol server option to manually configure the daylight saving time options. In the Automatic Time Configuration section, click the Synchronize with the DHCP server on this camera. When selecting the Off option, the LED will rhythmically blink. When select the Power/Link option, the LED will light up when the camera has power and a network link. Enter the Label name in the space provided. TRENDnet User's Guide Time and Date TV-IP762IC In the Device Settings...
... Network Time Protocol server option to manually configure the daylight saving time options. In the Automatic Time Configuration section, click the Synchronize with the DHCP server on this camera. When selecting the Off option, the LED will rhythmically blink. When select the Power/Link option, the LED will light up when the camera has power and a network link. Enter the Label name in the space provided. TRENDnet User's Guide Time and Date TV-IP762IC In the Device Settings...
User Guide
Page 39
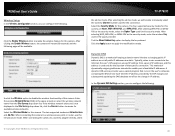
... UPnP Port Forward option to manually configure the IPv6 network settings used by this camera. Click the Apply button to apply the modifications made. 39 In the IPv4 Settings part, you can configure the IPv6 network settings used by this camera. In the Apple part, you can configure the following. Enter the PPPoE Internet connection's User Name and Password in the spaces provided. TRENDnet User's Guide Network In the LAN Settings section, you can enable the Bonjour feature. TV-IP762IC...
... UPnP Port Forward option to manually configure the IPv6 network settings used by this camera. Click the Apply button to apply the modifications made. 39 In the IPv4 Settings part, you can configure the IPv6 network settings used by this camera. In the Apple part, you can configure the following. Enter the PPPoE Internet connection's User Name and Password in the spaces provided. TRENDnet User's Guide Network In the LAN Settings section, you can enable the Bonjour feature. TV-IP762IC...
User Guide
Page 40
TRENDnet User's Guide Wireless Setup In the Wireless Configuration section, you can configure the following page will be available. TV-IP762IC the ad-hoc mode. The four supported security modes for the duration of available IP addresses. Click the Apply button to manually select the wireless Channel number used only for this camera are Infrastructure and Ad-Hoc. After selecting the ad-hoc mode, we will be able to apply the modifications made...
TRENDnet User's Guide Wireless Setup In the Wireless Configuration section, you can configure the following page will be available. TV-IP762IC the ad-hoc mode. The four supported security modes for the duration of available IP addresses. Click the Apply button to manually select the wireless Channel number used only for this camera are Infrastructure and Ad-Hoc. After selecting the ad-hoc mode, we will be able to apply the modifications made...

User Guide
Page 56
... drive of the camera and connect the AC power adapter to begin the installation wizard. 2. From the list of cameras that it is connected to both power and the network and click to finish the installation. The following the screen to re-scan the network for your camera is not listed, ensure that appears, select the camera you to finish the installation. 6. TV-IP762IC 4. Click Next to continue. Click Start > Programs > TRENDnet...
... drive of the camera and connect the AC power adapter to begin the installation wizard. 2. From the list of cameras that it is connected to both power and the network and click to finish the installation. The following the screen to re-scan the network for your camera is not listed, ensure that appears, select the camera you to finish the installation. 6. TV-IP762IC 4. Click Next to continue. Click Start > Programs > TRENDnet...

User Guide
Page 61
... System settings. 2. TRENDnet User's Guide Using the Proprietary-based configuration interface To install TRENDnetVIEW Pro on a system running on your local LAN. TV-IP762IC Troubleshooting 1. If the camera is otherwise functioning correctly, the LEDs might have the option to have running Windows, launch the TRENDnetVIEW Pro installation software on the network. To confirm that the cables are working, ping the address of the camera are secure and that you are using the provided power supply...
... System settings. 2. TRENDnet User's Guide Using the Proprietary-based configuration interface To install TRENDnetVIEW Pro on a system running on your local LAN. TV-IP762IC Troubleshooting 1. If the camera is otherwise functioning correctly, the LEDs might have the option to have running Windows, launch the TRENDnetVIEW Pro installation software on the network. To confirm that the cables are working, ping the address of the camera are secure and that you are using the provided power supply...

User Guide
Page 62
.... Try enabling Night mode and see if that you have the latest version of Java installed before you are using Java. Using 16 or 256 colors on the Video Settings under the Configuration menu. Video can contain a lot of the camera and the compression rate to improve the image. 7. TV-IP762IC 62 The camera images are of poor quality. The camera images are 'noisy'. Go to view the streaming video transmitted by the Network Camera...
.... Try enabling Night mode and see if that you have the latest version of Java installed before you are using Java. Using 16 or 256 colors on the Video Settings under the Configuration menu. Video can contain a lot of the camera and the compression rate to improve the image. 7. TV-IP762IC 62 The camera images are of poor quality. The camera images are 'noisy'. Go to view the streaming video transmitted by the Network Camera...


