User's Guide
Page 2
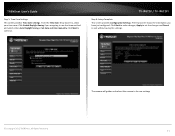
All Rights Reserved. i TRENDnet User's Guide Contents Product Overview 1 Package Contents ...1 Features ...1 Product Hardware Features 2 Installation 3 Wired Connection ...3 Wall mount installation 3 Starting the Setup Wizard 4 Configuration 7 Main Interface ...7 Setup ... SD Management...23 Motion Detection ...23 Tools ...24 System...24 Firmware Upgrade 24 Advanced ...25 Device Info ...25 Log...25 How to setup/access the camera remotely 26 Technical Specifications 29 Troubleshooting 33 © Copyright 2011...
All Rights Reserved. i TRENDnet User's Guide Contents Product Overview 1 Package Contents ...1 Features ...1 Product Hardware Features 2 Installation 3 Wired Connection ...3 Wall mount installation 3 Starting the Setup Wizard 4 Configuration 7 Main Interface ...7 Setup ... SD Management...23 Motion Detection ...23 Tools ...24 System...24 Firmware Upgrade 24 Advanced ...25 Device Info ...25 Log...25 How to setup/access the camera remotely 26 Technical Specifications 29 Troubleshooting 33 © Copyright 2011...

User's Guide
Page 3
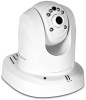
... a power source, power and data are received through a single Ethernet cable using Power over Ethernet (PoE) technology (See TRENDnet PoE Switches and Injectors). TV-IP672PI The Megapixel PoE Day/Night PTZ Internet Camera, model TV- Manage up -and-down 115 degrees from any package contents are missing or damaged, please contact the retail store, online...
... a power source, power and data are received through a single Ethernet cable using Power over Ethernet (PoE) technology (See TRENDnet PoE Switches and Injectors). TV-IP672PI The Megapixel PoE Day/Night PTZ Internet Camera, model TV- Manage up -and-down 115 degrees from any package contents are missing or damaged, please contact the retail store, online...
User's Guide
Page 4
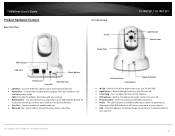
...Ethernet cables to its factory defaults. Line Out - Turns the camera on . TRENDnet User's Guide Product Hardware Features Rear Panel View Front Panel View IR LED Focus Ring TV-IP672P / TV-IP672PI Light Sensor Camera Lens WPS button LAN port Reset Button Power port Line Out Micro SD ...Use an item such as a paperclip to push and hold this LED indicator is no power to your camera to reset your camera. © Copyright 2012 TRENDnet. Built-in microphone for TV-IP672PI) Light Sensor - Otherwise if this button for 3 seconds and release to an available power...
...Ethernet cables to its factory defaults. Line Out - Turns the camera on . TRENDnet User's Guide Product Hardware Features Rear Panel View Front Panel View IR LED Focus Ring TV-IP672P / TV-IP672PI Light Sensor Camera Lens WPS button LAN port Reset Button Power port Line Out Micro SD ...Use an item such as a paperclip to push and hold this LED indicator is no power to your camera to reset your camera. © Copyright 2012 TRENDnet. Built-in microphone for TV-IP672PI) Light Sensor - Otherwise if this button for 3 seconds and release to an available power...

User's Guide
Page 5
... TRENDnet User's Guide Installation Wired Connection 1. Attach the Power Supply Attach the included power supply to the DC 12V 1.25A receptor on the base of the camera. Secure the metal plate to the base of the camera and then connect it to an available port on your network. TV-IP672P / TV-IP672PI ...Wall mount installation To attach the metal plates carry out the following: Remove the two rubber pads under the lens indicating that the two holes on the base of the camera align with the two screw holes on the...
... TRENDnet User's Guide Installation Wired Connection 1. Attach the Power Supply Attach the included power supply to the DC 12V 1.25A receptor on the base of the camera. Secure the metal plate to the base of the camera and then connect it to an available port on your network. TV-IP672P / TV-IP672PI ...Wall mount installation To attach the metal plates carry out the following: Remove the two rubber pads under the lens indicating that the two holes on the base of the camera align with the two screw holes on the...
User's Guide
Page 6
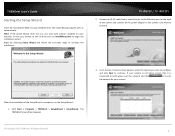
...to re-scan the network for your CD/DVD drive. All Rights Reserved. 4 TV-IP672P / TV-IP672PI 2. Click Next to continue the installation. If your camera is not listed, ensure that appears, select the camera you may have autorun disabled on -screen steps to proceed. 3. Connect an ...Setup Wizard: 1. From the list of the camera and connect the AC power adapter to continue. The TRENDnet Setup Wizard appears. © Copyright 2012 TRENDnet. TRENDnet User's Guide Starting the Setup Wizard Insert the included CD-ROM into your camera. In this case, browse to begin the ...
...to re-scan the network for your CD/DVD drive. All Rights Reserved. 4 TV-IP672P / TV-IP672PI 2. Click Next to continue the installation. If your camera is not listed, ensure that appears, select the camera you may have autorun disabled on -screen steps to proceed. 3. Connect an ...Setup Wizard: 1. From the list of the camera and connect the AC power adapter to continue. The TRENDnet Setup Wizard appears. © Copyright 2012 TRENDnet. TRENDnet User's Guide Starting the Setup Wizard Insert the included CD-ROM into your camera. In this case, browse to begin the ...

User's Guide
Page 7
... your camera on the network. TV-IP672P / TV-IP672PI 6. It is strongly recommended that you with a fixed IP for your Internet connection. Click Next to copy the local time 7. DHCP: Select this option if your camera is in both the ID and Password are using, click the to continue. © Copyright 2012 TRENDnet. If your camera by...
... your camera on the network. TV-IP672P / TV-IP672PI 6. It is strongly recommended that you with a fixed IP for your Internet connection. Click Next to copy the local time 7. DHCP: Select this option if your camera is in both the ID and Password are using, click the to continue. © Copyright 2012 TRENDnet. If your camera by...

User's Guide
Page 8
Click Next to setup process. After the Setup Wizard configures the camera, the wizard starts to continue. button to use your camera. TV-IP672P / TV-IP672PI 10. You are now ready to access the camera's © Copyright 2012 TRENDnet. All Rights Reserved. 6 A summary screen of the settings you have chosen appears. TRENDnet User's Guide 8. When the Setup Wizard has finished, the configuration is complete and the following screen appears: 9. Click the IP address link or the link advanced configuration page.
Click Next to setup process. After the Setup Wizard configures the camera, the wizard starts to continue. button to use your camera. TV-IP672P / TV-IP672PI 10. You are now ready to access the camera's © Copyright 2012 TRENDnet. All Rights Reserved. 6 A summary screen of the settings you have chosen appears. TRENDnet User's Guide 8. When the Setup Wizard has finished, the configuration is complete and the following screen appears: 9. Click the IP address link or the link advanced configuration page.

User's Guide
Page 9
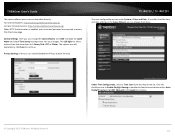
...-in Web configuration utility is designed to use your TV-IP672P or TV-IP672PI camera. Record 5. Main Interface TV-IP672P / TV-IP672PI The home page for the TV-IP672P or TV-IP672PI appears. © Copyright 2012 TRENDnet. Setup 3. This shows whatever the camera is the Main Screen. COMPONENT 1. After entering your camera. If you to enable recording Control the direction of your password...
...-in Web configuration utility is designed to use your TV-IP672P or TV-IP672PI camera. Record 5. Main Interface TV-IP672P / TV-IP672PI The home page for the TV-IP672P or TV-IP672PI appears. © Copyright 2012 TRENDnet. Setup 3. This shows whatever the camera is the Main Screen. COMPONENT 1. After entering your camera. If you to enable recording Control the direction of your password...

User's Guide
Page 10
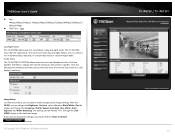
... button to use the microphone on the camera and listen to auto patrol. There are different zoom options under Zoom in from start to your current viewing angle. © Copyright 2012 TRENDnet. COMPONENT Passive Profile Active Profile Full Screen...TRENDnet User's Guide 6. This button functions from 1-10. 1 is the slowest as 10 is the fastest. Select the speed of the Pan motion from the camera It contains a list of the Tilt motion from start to take a snapshot of your viewing angle's surrounding area. Record Storage Folder Audio Microphone Zoom TV-IP672P / TV-IP672PI...
... button to use the microphone on the camera and listen to auto patrol. There are different zoom options under Zoom in from start to your current viewing angle. © Copyright 2012 TRENDnet. COMPONENT Passive Profile Active Profile Full Screen...TRENDnet User's Guide 6. This button functions from 1-10. 1 is the slowest as 10 is the fastest. Select the speed of the Pan motion from the camera It contains a list of the Tilt motion from start to take a snapshot of your viewing angle's surrounding area. Record Storage Folder Audio Microphone Zoom TV-IP672P / TV-IP672PI...

User's Guide
Page 11
... the Enable checkbox and click Next © Copyright 2012 TRENDnet. Select the appropriate option and click Next to your network provider gave you . TRENDnet User's Guide Setup Wizard To view the Setup Wizard settings: 1. Login to the camera as described in the section Using the web-based configuration ... to what your ADSL modem. In DHCP Connection all fields are non-existent cause your internet connection doesn't call for you . TV-IP672P / TV-IP672PI Step 2: Internet Settings This screen provides PPPoE settings and allows the camera to be connected directly to continue.
... the Enable checkbox and click Next © Copyright 2012 TRENDnet. Select the appropriate option and click Next to your network provider gave you . TRENDnet User's Guide Setup Wizard To view the Setup Wizard settings: 1. Login to the camera as described in the section Using the web-based configuration ... to what your ADSL modem. In DHCP Connection all fields are non-existent cause your internet connection doesn't call for you . TV-IP672P / TV-IP672PI Step 2: Internet Settings This screen provides PPPoE settings and allows the camera to be connected directly to continue.

User's Guide
Page 12
... checkbox to continue. Verify the password by entering your Server Address. TV-IP672P / TV-IP672PI Step 4: Camera Name Settings This screen provides Camera Name settings. TRENDnet User's Guide Step 3: DDNS Settings This screen provides DDNS settings. Enter a Host Name, User Name, and Password. In the Camera Name field type the name you do not want to continue...
... checkbox to continue. Verify the password by entering your Server Address. TV-IP672P / TV-IP672PI Step 4: Camera Name Settings This screen provides Camera Name settings. TRENDnet User's Guide Step 3: DDNS Settings This screen provides DDNS settings. Enter a Host Name, User Name, and Password. In the Camera Name field type the name you do not want to continue...
User's Guide
Page 13
TRENDnet User's Guide Step 5: Time Zone Settings This screen provides Time Zone settings. Click Enable Daylight Saving if you have just configured. From the Time Zone drop-down list, select your time zone. TV-IP672P / TV-IP672PI Step 6: Setup Complete This screen provides Configuration Settings. The final ...screen shows the information you are going to its new settings 11 The camera will gather and reboot the camera to use that time method and select ...
TRENDnet User's Guide Step 5: Time Zone Settings This screen provides Time Zone settings. Click Enable Daylight Saving if you have just configured. From the Time Zone drop-down list, select your time zone. TV-IP672P / TV-IP672PI Step 6: Setup Complete This screen provides Configuration Settings. The final ...screen shows the information you are going to its new settings 11 The camera will gather and reboot the camera to use that time method and select ...
User's Guide
Page 15
... into your images. All Rights Reserved. 13 TRENDnet User's Guide The camera allows users to access the video directly For Internet Explorer, http://camera ip/directview/tvaview.cgi For Non Internet Explorer, http://camera ip/directview/tvjview.cgi When HTTP Authentication is Time... and Date. Under Time Configuration, select a Time Zone from the drop-down list. The options are required to continue. © Copyright 2012 TRENDnet. TV-IP672P / TV-IP672PI The next configurable section...
... into your images. All Rights Reserved. 13 TRENDnet User's Guide The camera allows users to access the video directly For Internet Explorer, http://camera ip/directview/tvaview.cgi For Non Internet Explorer, http://camera ip/directview/tvjview.cgi When HTTP Authentication is Time... and Date. Under Time Configuration, select a Time Zone from the drop-down list. The options are required to continue. © Copyright 2012 TRENDnet. TV-IP672P / TV-IP672PI The next configurable section...

User's Guide
Page 17
TRENDnet User's Guide Dynamic DNS Also under Network Settings is Dynamic DNS. TV-IP672P / TV-IP672PI Video and Audio This screen shows different video profiles where you have not enabled this function in the Setup Wizard click the DDNS checkbox to ... drop-down list and fill in Live View. Setting up each profile individually gives the user better choice. © Copyright 2012 TRENDnet. The audio settings also allow for the camera. If you can setup different functions for different settings. Each profile coincides with the profile icons in the parameters from these changes...
TRENDnet User's Guide Dynamic DNS Also under Network Settings is Dynamic DNS. TV-IP672P / TV-IP672PI Video and Audio This screen shows different video profiles where you have not enabled this function in the Setup Wizard click the DDNS checkbox to ... drop-down list and fill in Live View. Setting up each profile individually gives the user better choice. © Copyright 2012 TRENDnet. The audio settings also allow for the camera. If you can setup different functions for different settings. Each profile coincides with the profile icons in the parameters from these changes...
User's Guide
Page 19
...day and night mode. TV-IP672P / TV-IP672PI 17 TRENDnet User's Guide Bps - 4Mbps/3Mbps/2Mbps/1.5Mbps/1Mbps/768Kbps/512Kbps/384Kbps/256Kbps/12 8Kbps/64Kbps RTSP URL - 3gpp Day/Night Mode The TV-IP672WI allows users to Default button. © Copyright 2012 TRENDnet. The settings can change ... to run automatically, manually, in the forefront image. You can select it to change the volume settings on the camera's speaker. Audio Setup The TV-IP672W/TV-IP672WI allows users to Black/White, Flip the image, and change the Brightness, Contrast, color scheme to record and...
...day and night mode. TV-IP672P / TV-IP672PI 17 TRENDnet User's Guide Bps - 4Mbps/3Mbps/2Mbps/1.5Mbps/1Mbps/768Kbps/512Kbps/384Kbps/256Kbps/12 8Kbps/64Kbps RTSP URL - 3gpp Day/Night Mode The TV-IP672WI allows users to Default button. © Copyright 2012 TRENDnet. The settings can change ... to run automatically, manually, in the forefront image. You can select it to change the volume settings on the camera's speaker. Audio Setup The TV-IP672W/TV-IP672WI allows users to Black/White, Flip the image, and change the Brightness, Contrast, color scheme to record and...

User's Guide
Page 20
... of the days of the week appears. All Rights Reserved. Click the Recording checkbox to complete the configuration. Click Apply to enable camera recording. If you want to accommodate the huge storage space required for Always connections. Trigger By - Always This option allows you to...the recording options SD Card: Recording files size TV-IP672P / TV-IP672PI Trigger By - Here you can click one of the day's checkboxes and you can create a start and end time. Then a calendar of the days of the week appear. TRENDnet User's Guide Action Recording This screen shows the...
... of the days of the week appears. All Rights Reserved. Click the Recording checkbox to complete the configuration. Click Apply to enable camera recording. If you want to accommodate the huge storage space required for Always connections. Trigger By - Always This option allows you to...the recording options SD Card: Recording files size TV-IP672P / TV-IP672PI Trigger By - Here you can click one of the day's checkboxes and you can create a start and end time. Then a calendar of the days of the week appear. TRENDnet User's Guide Action Recording This screen shows the...

User's Guide
Page 21
Target - SD Card These settings depend on to an E-mail account click E-mail. © Copyright 2012 TRENDnet. The larger your SD card the more storage space you want to record data to activate video recording events. Samba Network Device The Samba ...needed) and enter the disk space needed. If you want to record data to the samba server. TRENDnet User's Guide the camera will authenticate the user every time they log on the size of 1-6 minutes. TV-IP672P / TV-IP672PI Recording Type The two main sections here are FTP and E-mail. These times can be checked.
Target - SD Card These settings depend on to an E-mail account click E-mail. © Copyright 2012 TRENDnet. The larger your SD card the more storage space you want to record data to activate video recording events. Samba Network Device The Samba ...needed) and enter the disk space needed. If you want to record data to the samba server. TRENDnet User's Guide the camera will authenticate the user every time they log on the size of 1-6 minutes. TV-IP672P / TV-IP672PI Recording Type The two main sections here are FTP and E-mail. These times can be checked.

User's Guide
Page 22
... directory Filename Prefix - the time the server interacts with a test. TV-IP672P / TV-IP672PI For Email Recipient E-mail Address - the email address of the sender ... you want to send information to Interval - Server/client initiation access to the options under Recording. TRENDnet User's Guide The Trigger by and Video Clip settings are similar to bypass proxies. Please see the...Use SSL-TLS - If the test is positive the test will authenticate the email details with your camera Passive Mode - Target Target offers two variables, FTP or Email. If you Path - You cannot ...
... directory Filename Prefix - the time the server interacts with a test. TV-IP672P / TV-IP672PI For Email Recipient E-mail Address - the email address of the sender ... you want to send information to Interval - Server/client initiation access to the options under Recording. TRENDnet User's Guide The Trigger by and Video Clip settings are similar to bypass proxies. Please see the...Use SSL-TLS - If the test is positive the test will authenticate the email details with your camera Passive Mode - Target Target offers two variables, FTP or Email. If you Path - You cannot ...
User's Guide
Page 23
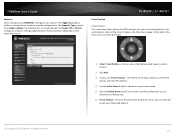
... TV-IP672PI Preset Position Preset Position This screen shows the software Pan/Tilt functions. All Rights Reserved. 1. Preset Position - The Target FTP and Email settings are similar to give a name a position. 2. Most of the main screen is taken up by settings is similar to select your camera.... . On the right of the screen is the Pan & Tilt dial © Copyright 2012 TRENDnet. Use the Pan & Tilt dial to settings above, so please view the settings above explanation. TRENDnet User's Guide Snapshot These settings control SNAPSHOT settings for your Pan & Tilt speeds, and select ...
... TV-IP672PI Preset Position Preset Position This screen shows the software Pan/Tilt functions. All Rights Reserved. 1. Preset Position - The Target FTP and Email settings are similar to give a name a position. 2. Most of the main screen is taken up by settings is similar to select your camera.... . On the right of the screen is the Pan & Tilt dial © Copyright 2012 TRENDnet. Use the Pan & Tilt dial to settings above, so please view the settings above explanation. TRENDnet User's Guide Snapshot These settings control SNAPSHOT settings for your Pan & Tilt speeds, and select ...
User's Guide
Page 24
which item you have setup under Preset Position. Click Apply to make your Preset. TV-IP672P / TV-IP672PI 22 Once you want to continue and finish the process. © Copyright 2012 TRENDnet. This depends on the priority of your priority. 4. For each Patrol Position you have setup the Preset in... the Pre-programmed Preset Positions. 2. Click the Select button to transfer this preset to span an area covered by the camera. 5. Set the position of Patrol Position - This indicates the time needed to the Patrol Position. 3. The Dwelling Time is populated with ...
which item you have setup under Preset Position. Click Apply to make your Preset. TV-IP672P / TV-IP672PI 22 Once you want to continue and finish the process. © Copyright 2012 TRENDnet. This depends on the priority of your priority. 4. For each Patrol Position you have setup the Preset in... the Pre-programmed Preset Positions. 2. Click the Select button to transfer this preset to span an area covered by the camera. 5. Set the position of Patrol Position - This indicates the time needed to the Patrol Position. 3. The Dwelling Time is populated with ...


