User's Guide
Page 2
...i TRENDnet User's Guide Contents Product Overview 1 Package Contents ...1 Features ...1 Product Hardware Features 2 Installation 3 Wired Connection ...3 Wall mount installation 3 Starting the Setup Wizard 4 Configuration 7 Main Interface ...7 Setup Wizard ...9 System ...12 Network...14 Dynamic DNS ...15 Video and Audio ...15 Video and Audio ...16 Day/Night Mode...17 Audio Setup ...17 Image Setup ...17 Action...18 Recording ...18 Video Clip ...19 Table of Contents Snapshot ...21 Preset Position ...21 SD Management...23 Motion Detection ...23 Tools ...24 System...24 Firmware Upgrade 24...
...i TRENDnet User's Guide Contents Product Overview 1 Package Contents ...1 Features ...1 Product Hardware Features 2 Installation 3 Wired Connection ...3 Wall mount installation 3 Starting the Setup Wizard 4 Configuration 7 Main Interface ...7 Setup Wizard ...9 System ...12 Network...14 Dynamic DNS ...15 Video and Audio ...15 Video and Audio ...16 Day/Night Mode...17 Audio Setup ...17 Image Setup ...17 Action...18 Recording ...18 Video Clip ...19 Table of Contents Snapshot ...21 Preset Position ...21 SD Management...23 Motion Detection ...23 Tools ...24 System...24 Firmware Upgrade 24...

User's Guide
Page 3
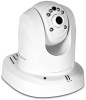
... Internet connection. IP672PI, provides day and night security over a large area. Manage up to four video profiles to record HD video while streaming low resolution video to a compatible smart phone at up -anddown 115 degrees from any Internet connection. Advanced features include adjustable motion detection recording areas, email alerts, scheduled recording sessions, pan/tilt Auto-Patrol, H.264/MPEG-4/MJPEG image compression, date-and-time overlays, a Micro-SD card slot for backup storage, two-way audio (speakers not included), an adjustable lens...
... Internet connection. IP672PI, provides day and night security over a large area. Manage up to four video profiles to record HD video while streaming low resolution video to a compatible smart phone at up -anddown 115 degrees from any Internet connection. Advanced features include adjustable motion detection recording areas, email alerts, scheduled recording sessions, pan/tilt Auto-Patrol, H.264/MPEG-4/MJPEG image compression, date-and-time overlays, a Micro-SD card slot for backup storage, two-way audio (speakers not included), an adjustable lens...
User's Guide
Page 4
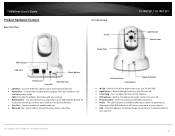
...camera. Reset Button - Note: Use only the adapter that came with your wired network devices. Power Port - Privacy button Microphone Power/Link LED IR LED - Insert a Micro-SD card to enable audio out Micro SD Lot - TRENDnet User's Guide Product Hardware Features Rear Panel View Front Panel View IR LED Focus Ring TV-IP672P / TV-IP672PI Light Sensor Camera Lens WPS button LAN port Reset Button Power port Line Out Micro SD slot LAN Port - Connect speaker to store camera video files. Turn to adjust the focus of the camera...
...camera. Reset Button - Note: Use only the adapter that came with your wired network devices. Power Port - Privacy button Microphone Power/Link LED IR LED - Insert a Micro-SD card to enable audio out Micro SD Lot - TRENDnet User's Guide Product Hardware Features Rear Panel View Front Panel View IR LED Focus Ring TV-IP672P / TV-IP672PI Light Sensor Camera Lens WPS button LAN port Reset Button Power port Line Out Micro SD slot LAN Port - Connect speaker to store camera video files. Turn to adjust the focus of the camera...

User's Guide
Page 5
... camera on a wireless network, see below for instructions on the base of the camera. Secure the metal plate to the ceiling or a wall. A blue LED will light up under the base of the Camera. Slide the metal plate onto the base of the camera, making sure that the camera has power. © Copyright 2012 TRENDnet. See the diagram below for more information. 2. All Rights Reserved. 3 TV-IP672P / TV-IP672PI Wall mount installation...
... camera on a wireless network, see below for instructions on the base of the camera. Secure the metal plate to the ceiling or a wall. A blue LED will light up under the base of the Camera. Slide the metal plate onto the base of the camera, making sure that the camera has power. © Copyright 2012 TRENDnet. See the diagram below for more information. 2. All Rights Reserved. 3 TV-IP672P / TV-IP672PI Wall mount installation...
User's Guide
Page 6
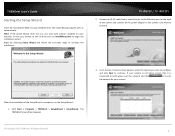
... AC power adapter to the camera. When the installation of cameras that it is complete, run , you wish to configure and click Next to the CD drive and run automatically. Click Start > Programs > TRENDnet > SetupWizard > SetupWizard. Note: If the Install Wizard does not run the Setup Wizard: 1. TV-IP672P / TV-IP672PI 2. In this case, browse to continue. Click Next to re-scan the network...
... AC power adapter to the camera. When the installation of cameras that it is complete, run , you wish to configure and click Next to the CD drive and run automatically. Click Start > Programs > TRENDnet > SetupWizard > SetupWizard. Note: If the Install Wizard does not run the Setup Wizard: 1. TV-IP672P / TV-IP672PI 2. In this case, browse to continue. Click Next to re-scan the network...

User's Guide
Page 7
... network. Select the radio button for the time zone it is connected to continue. © Copyright 2012 TRENDnet. Enter a name for your ISP requires a PPPoE authentication to confirm the new password. TRENDnet User's Guide 4. TV-IP672P / TV-IP672PI 6. Login to your connection type and click Next to a router and DHCP is strongly recommended that you with a fixed IP for the camera in . It is enabled. By default, both password...
... network. Select the radio button for the time zone it is connected to continue. © Copyright 2012 TRENDnet. Enter a name for your ISP requires a PPPoE authentication to confirm the new password. TRENDnet User's Guide 4. TV-IP672P / TV-IP672PI 6. Login to your connection type and click Next to a router and DHCP is strongly recommended that you with a fixed IP for the camera in . It is enabled. By default, both password...

User's Guide
Page 9
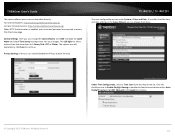
... TV-IP672PI camera. All Rights Reserved. COMPONENT 1. The camera's built-in Web configuration utility is admin. Open a web browser such as Internet Explorer® and enter the IP address of the camera, zoom in or out, and software Pan & Tilt functions. 7 Live View 2. Motion Trigger 4. Setup provides all of the configuration options on the TVIP672W/WI Click this button to activate motion Click this button to enable recording Control the direction of your camera. To log in, use your camera. Directional Controller...
... TV-IP672PI camera. All Rights Reserved. COMPONENT 1. The camera's built-in Web configuration utility is admin. Open a web browser such as Internet Explorer® and enter the IP address of the camera, zoom in or out, and software Pan & Tilt functions. 7 Live View 2. Motion Trigger 4. Setup provides all of the configuration options on the TVIP672W/WI Click this button to activate motion Click this button to enable recording Control the direction of your camera. To log in, use your camera. Directional Controller...

User's Guide
Page 10
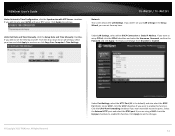
... Passive Profile Active Profile Full Screen Mode Snapshot DESCRIPTION This profile, in yellow, is expanded to full screen Click this button to use the microphone on the camera and listen to the desired position from 1 times, 2 times, and 4 times. Live View 13. This button stops the Pan & Patrol motion. Select the speed of the Pan motion from start to Pan. Record Storage Folder Audio Microphone Zoom TV-IP672P / TV-IP672PI Start recording the current video stream. Click this icon to select...
... Passive Profile Active Profile Full Screen Mode Snapshot DESCRIPTION This profile, in yellow, is expanded to full screen Click this button to use the microphone on the camera and listen to the desired position from 1 times, 2 times, and 4 times. Live View 13. This button stops the Pan & Patrol motion. Select the speed of the Pan motion from start to Pan. Record Storage Folder Audio Microphone Zoom TV-IP672P / TV-IP672PI Start recording the current video stream. Click this icon to select...

User's Guide
Page 11
... cause your ADSL modem. Enter a username and password. Select the appropriate option and click Next to start the Setup Wizard. TRENDnet User's Guide Setup Wizard To view the Setup Wizard settings: 1. Login to Internet Connection Setup Wizard screen appears. The Welcome to the camera as described in the section Using the web-based configuration interface.Click on the Setup tab on the right side of the screen, click Next to continue. Under...
... cause your ADSL modem. Enter a username and password. Select the appropriate option and click Next to start the Setup Wizard. TRENDnet User's Guide Setup Wizard To view the Setup Wizard settings: 1. Login to Internet Connection Setup Wizard screen appears. The Welcome to the camera as described in the section Using the web-based configuration interface.Click on the Setup tab on the right side of the screen, click Next to continue. Under...
User's Guide
Page 15
... LED light has three options from the drop-down list: Power/Link, Off, or Flicker. Under Time Configuration, select a Time Zone from the drop-down list. The options are required to access the direct view page. Click Save to continue. © Copyright 2012 TRENDnet. TV-IP672P / TV-IP672PI The next configurable section under System is enabled, user name and password are selfexplanatory. If you didn't set the time and...
... LED light has three options from the drop-down list: Power/Link, Off, or Flicker. Under Time Configuration, select a Time Zone from the drop-down list. The options are required to access the direct view page. Click Save to continue. © Copyright 2012 TRENDnet. TV-IP672P / TV-IP672PI The next configurable section under System is enabled, user name and password are selfexplanatory. If you didn't set the time and...
User's Guide
Page 16
... RTSP port. Click Apply to enable this function. Under LAN Settings, select either DHCP Connection or Static IP Address. If you wish to enable this function. TV-IP672P / TV-IP672PI Network This screen shows the LAN Settings. The Status will change from Disabled to continue. Under Port Settings, select the HTTP Port (80 is the default) and also select the RTSP Port (554). Under Set Date and Time Manually, click the Setup Date and Time Manually...
... RTSP port. Click Apply to enable this function. Under LAN Settings, select either DHCP Connection or Static IP Address. If you wish to enable this function. TV-IP672P / TV-IP672PI Network This screen shows the LAN Settings. The Status will change from Disabled to continue. Under Port Settings, select the HTTP Port (80 is the default) and also select the RTSP Port (554). Under Set Date and Time Manually, click the Setup Date and Time Manually...
User's Guide
Page 19
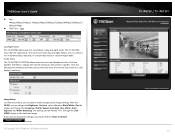
... viewed "live" through the LIVE VIDEO display in the forefront image. Click the Microphone checkbox and select your preference from the volume drop-down list. TRENDnet User's Guide Bps - 4Mbps/3Mbps/2Mbps/1.5Mbps/1Mbps/768Kbps/512Kbps/384Kbps/256Kbps/12 8Kbps/64Kbps RTSP URL - 3gpp Day/Night Mode The TV-IP672WI allows users to Default button. © Copyright 2012 TRENDnet. Image Setup Just like any camera, you can change the Brightness, Contrast, color...
... viewed "live" through the LIVE VIDEO display in the forefront image. Click the Microphone checkbox and select your preference from the volume drop-down list. TRENDnet User's Guide Bps - 4Mbps/3Mbps/2Mbps/1.5Mbps/1Mbps/768Kbps/512Kbps/384Kbps/256Kbps/12 8Kbps/64Kbps RTSP URL - 3gpp Day/Night Mode The TV-IP672WI allows users to Default button. © Copyright 2012 TRENDnet. Image Setup Just like any camera, you can change the Brightness, Contrast, color...

User's Guide
Page 20
... appear. If you setup. TRENDnet User's Guide Action Recording This screen shows the SD Card parameters. You are three main sections: Trigger By: Always, Motion, Schedule, Recording: Configure the recording options SD Card: Recording files size TV-IP672P / TV-IP672PI Trigger By - Click the Recording checkbox to complete the configuration. Always This option allows you select Always bear in mind that the Recording Type should be Video and that the...
... appear. If you setup. TRENDnet User's Guide Action Recording This screen shows the SD Card parameters. You are three main sections: Trigger By: Always, Motion, Schedule, Recording: Configure the recording options SD Card: Recording files size TV-IP672P / TV-IP672PI Trigger By - Click the Recording checkbox to complete the configuration. Always This option allows you select Always bear in mind that the Recording Type should be Video and that the...
User's Guide
Page 28
... a new entry. TV-IP672P / TV-IP672PI 2. Go to Camera's DDNS Setting page; Public Port: The port used ) © Copyright 2012 TRENDnet. click Enable to setup/access the camera remotely You can either setup the Dynamic DNS connection via camera itself or your home router. In the Port Number section, assign an HTTP port of the listed DDNS providers is used on your Camera. LAN Server: The local IP address of your Camera. Configure DDNS on remote side to access to your Camera. 26 Then...
... a new entry. TV-IP672P / TV-IP672PI 2. Go to Camera's DDNS Setting page; Public Port: The port used ) © Copyright 2012 TRENDnet. click Enable to setup/access the camera remotely You can either setup the Dynamic DNS connection via camera itself or your home router. In the Port Number section, assign an HTTP port of the listed DDNS providers is used on your Camera. LAN Server: The local IP address of your Camera. Configure DDNS on remote side to access to your Camera. 26 Then...
User's Guide
Page 31
... audio with echo canceling Pan & Tilt Pan: -170° ~ +170° Tilt: up to 32 cameras Record/Playback/Motion Detection/Audio IPv4, ARP, TCP, UDP, ICMP DHCP Client, NTP Client, DNS Client, DDNS Client, SMTP Client, FTP Client HTTP Samba Client PPPoE UPnP LLTD RTP (Real Time Protocol) RTCP (Real Time Control Protocol) RTSP (Real Time Streaming Protocol) 3GPP (video only) Web based administration Up to factory default Privacy Button Privacy mode on/off © Copyright 2012 TRENDnet. TRENDnet User's Guide Technical Specifications TV-IP672P Camera...
... audio with echo canceling Pan & Tilt Pan: -170° ~ +170° Tilt: up to 32 cameras Record/Playback/Motion Detection/Audio IPv4, ARP, TCP, UDP, ICMP DHCP Client, NTP Client, DNS Client, DDNS Client, SMTP Client, FTP Client HTTP Samba Client PPPoE UPnP LLTD RTP (Real Time Protocol) RTCP (Real Time Control Protocol) RTSP (Real Time Streaming Protocol) 3GPP (video only) Web based administration Up to factory default Privacy Button Privacy mode on/off © Copyright 2012 TRENDnet. TRENDnet User's Guide Technical Specifications TV-IP672P Camera...
User's Guide
Page 32
... - TRENDnet User's Guide Backup / Restore Log Micro SD Settings Image Video Setting 3GPP Recording Event Action Port Settings Save/retrieve configuration files System log up to 4 profiles Required storage: 32MB (minimum per profile) Recording type: event based (motion detection and digital input trigger), continuous, and scheduled Trigger event: motion detection or digital input signal Action: send real-time snapshot or video recording to 7.5 meters IEEE 802.3u 10/100Mbps Auto-MDIX Fast Ethernet IEEE 802.3af Power over Ethernet (PoE...
... - TRENDnet User's Guide Backup / Restore Log Micro SD Settings Image Video Setting 3GPP Recording Event Action Port Settings Save/retrieve configuration files System log up to 4 profiles Required storage: 32MB (minimum per profile) Recording type: event based (motion detection and digital input trigger), continuous, and scheduled Trigger event: motion detection or digital input signal Action: send real-time snapshot or video recording to 7.5 meters IEEE 802.3u 10/100Mbps Auto-MDIX Fast Ethernet IEEE 802.3af Power over Ethernet (PoE...

User's Guide
Page 33
... Record/Playback/Motion Detection/Audio IPv4, ARP, TCP, UDP, ICMP DHCP Client, NTP Client, DNS Client, DDNS Client, SMTP Client, FTP Client HTTP Samba Client PPPoE UPnP LLTD RTP (Real Time Protocol) RTCP (Real Time Control Protocol) RTSP (Real Time Streaming Protocol) 3GPP (video only) © Copyright 2012 TRENDnet. TRENDnet User's Guide LED Reset Button Privacy Button Power Consumption Power Dimension Weight Temperature Humidity Certifications Requirement Management Interface To Run software SecurView Pro Software Network Protocols Power, Link/Act Reset to factory default Privacy mode...
... Record/Playback/Motion Detection/Audio IPv4, ARP, TCP, UDP, ICMP DHCP Client, NTP Client, DNS Client, DDNS Client, SMTP Client, FTP Client HTTP Samba Client PPPoE UPnP LLTD RTP (Real Time Protocol) RTCP (Real Time Control Protocol) RTSP (Real Time Streaming Protocol) 3GPP (video only) © Copyright 2012 TRENDnet. TRENDnet User's Guide LED Reset Button Privacy Button Power Consumption Power Dimension Weight Temperature Humidity Certifications Requirement Management Interface To Run software SecurView Pro Software Network Protocols Power, Link/Act Reset to factory default Privacy mode...

User's Guide
Page 35
... of the camera are secure and that you do not light up. The Power LED and Ethernet Activity LED do . White vertical lines appear on the Video Settings under the Configuration menu. The power supply or camera might be viewed through the web browser interface. Another possible problem may need to upgrade your Web browser software in a low-light environment, the images can be accessed locally but not remotely This might be that you are using Internet Explorer with a version number lower...
... of the camera are secure and that you do not light up. The Power LED and Ethernet Activity LED do . White vertical lines appear on the Video Settings under the Configuration menu. The power supply or camera might be viewed through the web browser interface. Another possible problem may need to upgrade your Web browser software in a low-light environment, the images can be accessed locally but not remotely This might be that you are using Internet Explorer with a version number lower...

Quick Installation Guide
Page 3
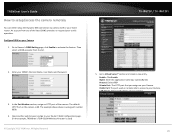
... location. See the User's Guide for ease of access. 6. Your camera is now connected to the management interface. 2 Insert the Utility CD-ROM into your computer. 2. Install the camera in your network. Congratulations! Click Install Camera and follow the instructions. 5. Hardware Installation and Configuration 1. Click TV-IP672PI to confirm access to your web browser, save the link of the following methods: 4. 2. Do not install or mount the IP camera until after you...
... location. See the User's Guide for ease of access. 6. Your camera is now connected to the management interface. 2 Insert the Utility CD-ROM into your computer. 2. Install the camera in your network. Congratulations! Click Install Camera and follow the instructions. 5. Hardware Installation and Configuration 1. Click TV-IP672PI to confirm access to your web browser, save the link of the following methods: 4. 2. Do not install or mount the IP camera until after you...

Quick Installation Guide
Page 5
..., please install the SecurView Pro software. Connect the power adapter to the TPE-113GI and then to the TPE-113GI's DATA IN port. Connect a network cable from a switch or router (e.g. TEW-639GR) to a power outlet 2. Connect a network cable from the TV-IP672PI to the SecurView Pro User's Guide on the CD for the complementary management software. 4 Using the TV-IP672PI with an Injector (TPE-113GI) TPE-113GI Non-PoE Non-PoE PoE TV-IP672PI 1-100m PoE 1. Install the software by clicking Install SecurView in the Autorun window and...
..., please install the SecurView Pro software. Connect the power adapter to the TPE-113GI and then to the TPE-113GI's DATA IN port. Connect a network cable from a switch or router (e.g. TEW-639GR) to a power outlet 2. Connect a network cable from the TV-IP672PI to the SecurView Pro User's Guide on the CD for the complementary management software. 4 Using the TV-IP672PI with an Injector (TPE-113GI) TPE-113GI Non-PoE Non-PoE PoE TV-IP672PI 1-100m PoE 1. Install the software by clicking Install SecurView in the Autorun window and...


