Datasheet
Page 1
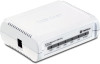
...-In-One multi-functional printers • Supports Windows 7/Vista/XP operating systems • DHCP supported with automatic IP address negotiation • Supports TCP/IP Ethernet protocol, and UPnP • Supports LPD/LPR printing on a wired router, wireless router, or networked switch. digital cameras, iPods™, flash drives, hard drives, printers and memory card readers • Compliant with USB 2.0 high speed data communication • Supports most USB peripheral devices into...
...-In-One multi-functional printers • Supports Windows 7/Vista/XP operating systems • DHCP supported with automatic IP address negotiation • Supports TCP/IP Ethernet protocol, and UPnP • Supports LPD/LPR printing on a wired router, wireless router, or networked switch. digital cameras, iPods™, flash drives, hard drives, printers and memory card readers • Compliant with USB 2.0 high speed data communication • Supports most USB peripheral devices into...
Datasheet
Page 2
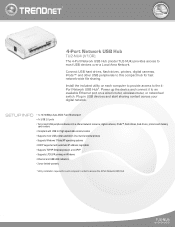
... NETWORKING SOLUTION 4-Port Network USB Hub (TU2-NU4) PACKAGE CONTENTS • TU2-NU4 • Multi-Language Quick Installation Guide • CD-ROM (Utility & User's Guide) • Power adapter (5V DC, 3A) • Cat. 5 Ethernet cable (1.5m / 5ft.) Notebook with Mini Wireless N Speed USB Adapter (TEW-649UB) Wireless N Home Router (TEW-652BRP) 10/100Mbps PCI Adapter (TE100-PCIWN) 10/100Mbps USB Wireless USB Storage USB Printers 5-Port Gigabit GREENnet...
... NETWORKING SOLUTION 4-Port Network USB Hub (TU2-NU4) PACKAGE CONTENTS • TU2-NU4 • Multi-Language Quick Installation Guide • CD-ROM (Utility & User's Guide) • Power adapter (5V DC, 3A) • Cat. 5 Ethernet cable (1.5m / 5ft.) Notebook with Mini Wireless N Speed USB Adapter (TEW-649UB) Wireless N Home Router (TEW-652BRP) 10/100Mbps PCI Adapter (TE100-PCIWN) 10/100Mbps USB Wireless USB Storage USB Printers 5-Port Gigabit GREENnet...

User's Guide
Page 2
... mentioned herein may change product specifications without notice. USB Server User Manual Copyright Notice Copyright Incorporated 2009. Disclaimer Incorporated shall not be registered trademarks of the Microsoft Corporation. Trademarks mentioned in this product does not infringe upon any patent rights. Incorporated reserves the right to change without notice. Trademarks Microsoft, Windows 7, VISTA and XP are properties...
... mentioned herein may change product specifications without notice. USB Server User Manual Copyright Notice Copyright Incorporated 2009. Disclaimer Incorporated shall not be registered trademarks of the Microsoft Corporation. Trademarks mentioned in this product does not infringe upon any patent rights. Incorporated reserves the right to change without notice. Trademarks Microsoft, Windows 7, VISTA and XP are properties...

User's Guide
Page 3
USB Server User Manual TABLE OF CONTENT Introduction...4 Features ...4 Unpacking ...4 Software Installation ...5 Utility ...6 Menu bar ...6 Using the utility for USB Servers 7 General Configuration ...8 Maintenance ...9 Using utility for USB Devices ...9 Configuration with Web-based UI 11 Network Information/Setting 12 Restart ...12 Factory Default ...13 Update Firmware ...13 Change Password ...14 Specifications ...15 Limited Warranty...16 3
USB Server User Manual TABLE OF CONTENT Introduction...4 Features ...4 Unpacking ...4 Software Installation ...5 Utility ...6 Menu bar ...6 Using the utility for USB Servers 7 General Configuration ...8 Maintenance ...9 Using utility for USB Devices ...9 Configuration with Web-based UI 11 Network Information/Setting 12 Restart ...12 Factory Default ...13 Update Firmware ...13 Change Password ...14 Specifications ...15 Limited Warranty...16 3
User's Guide
Page 4
... in -one multi-functional printers • Compliant with USB 2.0 high speed data communication • Supports USB storage devices such as hard drives, flash driver and memory card readers • Turns most USB peripheral devices into a shared network resource • Supports most USB devices over a Local Area Network. Install the included utility on a wired router, wireless router, or networked switch. USB Server User Manual Introduction The 4-Port Network USB Hub (model TU2-NU4) provides access to...
... in -one multi-functional printers • Compliant with USB 2.0 high speed data communication • Supports USB storage devices such as hard drives, flash driver and memory card readers • Turns most USB peripheral devices into a shared network resource • Supports most USB devices over a Local Area Network. Install the included utility on a wired router, wireless router, or networked switch. USB Server User Manual Introduction The 4-Port Network USB Hub (model TU2-NU4) provides access to...

User's Guide
Page 7
Idle period is set to 3 minutes. Using the utility for the utility to refresh all connected servers and all connected USB devices. 7 Refresh Server List: Click this option on the type of devices (USB storage or USB printers) after idle period. USB Server User Manual Basic: Check option to have utility automatically run during PC start up Display: Check this option to display selected server information Auto Disconnect: Enable this option for USB Servers The utility allows you to apply settings changes to the USB server (TU2NU4). Help About: Display utility information.
Idle period is set to 3 minutes. Using the utility for the utility to refresh all connected servers and all connected USB devices. 7 Refresh Server List: Click this option on the type of devices (USB storage or USB printers) after idle period. USB Server User Manual Basic: Check option to have utility automatically run during PC start up Display: Check this option to display selected server information Auto Disconnect: Enable this option for USB Servers The utility allows you to apply settings changes to the USB server (TU2NU4). Help About: Display utility information.
User's Guide
Page 8
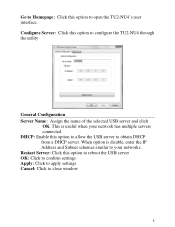
... this option to reboot the USB server OK: Click to confirm settings Apply: Click to apply settings Cancel: Click to close window 8 This is disable, enter the IP Address and Subnet schemes similar to open the TU2-NU4's user interface. Restart Server: Click this option to allow the USB server to configure the TU2-NU4 through the utility General Configuration...
... this option to reboot the USB server OK: Click to confirm settings Apply: Click to apply settings Cancel: Click to close window 8 This is disable, enter the IP Address and Subnet schemes similar to open the TU2-NU4's user interface. Restart Server: Click this option to allow the USB server to configure the TU2-NU4 through the utility General Configuration...
User's Guide
Page 9
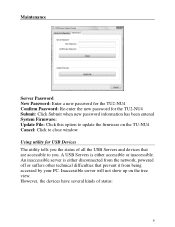
... difficulties that are accessible to update the firmware on the tree view. Inaccessible server will not show up on the TU-NU4 Cancel: Click to close window Using utility for the TU2-NU4 Submit: Click Submit when new password information has been entered System Firmware: Update File: Click this option to you the status of status: 9 A USB Servers is either accessible...
... difficulties that are accessible to update the firmware on the tree view. Inaccessible server will not show up on the TU-NU4 Cancel: Click to close window Using utility for the TU2-NU4 Submit: Click Submit when new password information has been entered System Firmware: Update File: Click this option to you the status of status: 9 A USB Servers is either accessible...
User's Guide
Page 10
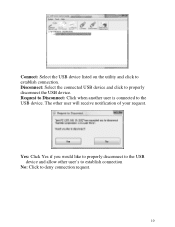
The other user's to establish connection No: Click to deny connection request. 10 Request to Disconnect: Click when another user is connected to establish connection. USB Server User Manual Connect: Select the USB device listed on the utility and click to the USB device. Yes: Click Yes if you would like to properly disconnect to properly disconnect the USB device. Disconnect: Select the connected USB device and click to the USB device and allow other user will receive notification of your request.
The other user's to establish connection No: Click to deny connection request. 10 Request to Disconnect: Click when another user is connected to establish connection. USB Server User Manual Connect: Select the USB device listed on the utility and click to the USB device. Yes: Click Yes if you would like to properly disconnect to properly disconnect the USB device. Disconnect: Select the connected USB device and click to the USB device and allow other user will receive notification of your request.

User's Guide
Page 13
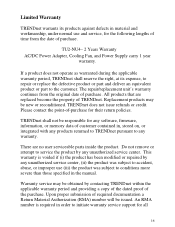
... the "Factory Default" button to restore the factory default settings. USB Server User Manual With the "Reset Server" button you will be able to upload the lat firmware for the reset function to work . Update Firmware This link takes to work . However, if there is by default blank. Password is a password, you must enter it for this link takes you the...
... the "Factory Default" button to restore the factory default settings. USB Server User Manual With the "Reset Server" button you will be able to upload the lat firmware for the reset function to work . Update Firmware This link takes to work . However, if there is by default blank. Password is a password, you must enter it for this link takes you the...

User's Guide
Page 14
... current password. 14 USB Server User Manual Please first click on the "Browse" button to browse to the firmware you would like to upload and then click on "Save". If you are setting the password for the first time, you must enter current password, input new password and re-input new password for this operation if there is not password set. Change Password...
... current password. 14 USB Server User Manual Please first click on the "Browse" button to browse to the firmware you would like to upload and then click on "Save". If you are setting the password for the first time, you must enter current password, input new password and re-input new password for this operation if there is not password set. Change Password...

User's Guide
Page 15
... User Manual Specifications Hardware Standards LAN Port USB Ports LED Indicators TCP/IP Protocol Supported Supported OS Buttons Power Supply Power Consumption Dimensions (LxWxH) Weight Temperature Humidity Certifications IEEE 802.3 (10Base‐T), IEEE 802.3u (100Base‐TX), USB 1.1/2.0 1 x 10/100Mbps Auto‐MDIX Ethernet port 4 x USB 2.0 Power, LAN, USB Port 1‐4 DHCP Windows 2000/XP (32/64bit)/2003 Server/ Vista...
... User Manual Specifications Hardware Standards LAN Port USB Ports LED Indicators TCP/IP Protocol Supported Supported OS Buttons Power Supply Power Consumption Dimensions (LxWxH) Weight Temperature Humidity Certifications IEEE 802.3 (10Base‐T), IEEE 802.3u (100Base‐TX), USB 1.1/2.0 1 x 10/100Mbps Auto‐MDIX Ethernet port 4 x USB 2.0 Power, LAN, USB Port 1‐4 DHCP Windows 2000/XP (32/64bit)/2003 Server/ Vista...
User's Guide
Page 16
... unauthorized service center. TRENDnet does not issue refunds or credit. Please contact the point-of-purchase for the following lengths of time from the original date of TRENDnet. TU2-NU4- 2 Years Warranty AC/DC Power Adapter, Cooling Fan, and Power Supply carry 1 year warranty. USB Server User Manual Limited Warranty TRENDnet warrants its expense, to repair or replace the defective product or part and...
... unauthorized service center. TRENDnet does not issue refunds or credit. Please contact the point-of-purchase for the following lengths of time from the original date of TRENDnet. TU2-NU4- 2 Years Warranty AC/DC Power Adapter, Cooling Fan, and Power Supply carry 1 year warranty. USB Server User Manual Limited Warranty TRENDnet warrants its expense, to repair or replace the defective product or part and...
User's Guide
Page 17
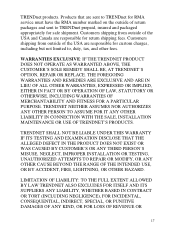
...limited to TRENDnet for RMA service must have the RMA number marked on the outside of return packages and sent to TRENDnet prepaid, insured...DAMAGES OF ANY KIND, OR FOR LOSS OF REVENUE OR 17 USB Server User Manual TRENDnet products. THE FOREGOING WARRANTIES AND REMEDIES ARE EXCLUSIVE AND ARE ...TRENDNET PRODUCT DOES NOT OPERATE AS WARRANTED ABOVE, THE CUSTOMER'S SOLE REMEDY SHALL BE, AT TRENDNET'S OPTION, REPAIR OR REPLACE. TRENDNET NEITHER ASSUMES NOR AUTHORIZES ANY OTHER PERSON TO ASSUME FOR IT ANY OTHER LIABILITY IN CONNECTION WITH THE SALE, INSTALLATION MAINTENANCE OR USE OF TRENDNET...
...limited to TRENDnet for RMA service must have the RMA number marked on the outside of return packages and sent to TRENDnet prepaid, insured...DAMAGES OF ANY KIND, OR FOR LOSS OF REVENUE OR 17 USB Server User Manual TRENDnet products. THE FOREGOING WARRANTIES AND REMEDIES ARE EXCLUSIVE AND ARE ...TRENDNET PRODUCT DOES NOT OPERATE AS WARRANTED ABOVE, THE CUSTOMER'S SOLE REMEDY SHALL BE, AT TRENDNET'S OPTION, REPAIR OR REPLACE. TRENDNET NEITHER ASSUMES NOR AUTHORIZES ANY OTHER PERSON TO ASSUME FOR IT ANY OTHER LIABILITY IN CONNECTION WITH THE SALE, INSTALLATION MAINTENANCE OR USE OF TRENDNET...
Quick Installation Guide
Page 2
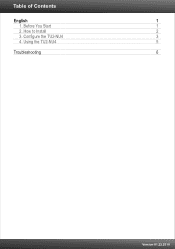
How to Install 2 3. Configure the TU2-NU4 3 4. Before You Start 1 2. Using the TU2-NU4 5 Troubleshooting 6 Version 01.22.2010 Table of Contents English 1 1.
How to Install 2 3. Configure the TU2-NU4 3 4. Before You Start 1 2. Using the TU2-NU4 5 Troubleshooting 6 Version 01.22.2010 Table of Contents English 1 1.
Quick Installation Guide
Page 3
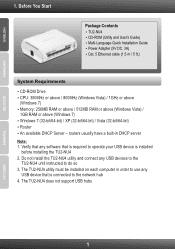
... use any USB device that is installed before installing the TU2-NU4 2. The TU2-NU4 utility must be installed on each computer in DHCP server Note: 1. TU2-NU4 ? Cat. 5 Ethernet cable (1.5 m / 5 ft.) System Requirements ? CD-ROM Drive ? Router ? Multi-Language Quick Installation Guide ? Memory: 256MB RAM or above / 512MB RAM or above (Windows Vista) / 1GB RAM or above (Windows 7) ? An available DHCP Server - Power Adapter (5V DC, 3A) ? CD-ROM (Utility and User's Guide...
... use any USB device that is installed before installing the TU2-NU4 2. The TU2-NU4 utility must be installed on each computer in DHCP server Note: 1. TU2-NU4 ? Cat. 5 Ethernet cable (1.5 m / 5 ft.) System Requirements ? CD-ROM Drive ? Router ? Multi-Language Quick Installation Guide ? Memory: 256MB RAM or above / 512MB RAM or above (Windows Vista) / 1GB RAM or above (Windows 7) ? An available DHCP Server - Power Adapter (5V DC, 3A) ? CD-ROM (Utility and User's Guide...
Quick Installation Guide
Page 4
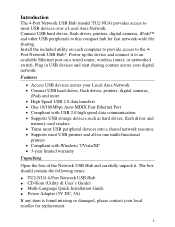
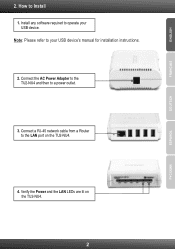
Connect the AC Power Adapter to the TU2-NU4 and then to Install 1. Verify the Power and the LAN LEDs are lit on the TU2-NU4. 4. Note: Please refer to your USB device. How to a power outlet. 3. Install any software required to the LAN port on the TU2-NU4. 2 ESPAÑOL ENGLISH FRANÇAIS DEUTSCH 2. Connect a RJ-45 network cable from a Router to operate your USB device's manual for installation instructions. 2.
Connect the AC Power Adapter to the TU2-NU4 and then to Install 1. Verify the Power and the LAN LEDs are lit on the TU2-NU4. 4. Note: Please refer to your USB device. How to a power outlet. 3. Install any software required to the LAN port on the TU2-NU4. 2 ESPAÑOL ENGLISH FRANÇAIS DEUTSCH 2. Connect a RJ-45 network cable from a Router to operate your USB device's manual for installation instructions. 2.
Quick Installation Guide
Page 6
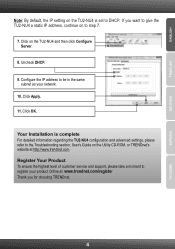
... TRENDnet. 4 Your Installation is set to DHCP. Uncheck DHCP. 9. Click Apply. 11. Click OK. ENGLISH FRANÇAIS DEUTSCH ESPAÑOL Note: By default, the IP setting on the TU2-NU4 is complete For detailed information regarding the TU2-NU4 configuration and advanced settings, please refer to the Troubleshooting section, User's Guide on the Utility CD-ROM, or TRENDnet's website at : www.trendnet...
... TRENDnet. 4 Your Installation is set to DHCP. Uncheck DHCP. 9. Click Apply. 11. Click OK. ENGLISH FRANÇAIS DEUTSCH ESPAÑOL Note: By default, the IP setting on the TU2-NU4 is complete For detailed information regarding the TU2-NU4 configuration and advanced settings, please refer to the Troubleshooting section, User's Guide on the Utility CD-ROM, or TRENDnet's website at : www.trendnet...
Quick Installation Guide
Page 7
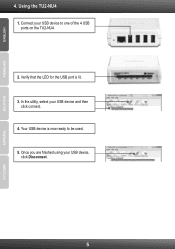
Using the TU2-NU4 1. Verify that the LED for the USB port is now ready to one of the 4 USB ports on the TU2-NU4. 2. In the utility, select your USB device, click Disconnect. 5 ESPAÑOL Your USB device is lit. 3. Once you are finished using your USB device and then click connect. 4. Connect your USB device to be used. 5. ENGLISH FRANÇAIS DEUTSCH 4.
Using the TU2-NU4 1. Verify that the LED for the USB port is now ready to one of the 4 USB ports on the TU2-NU4. 2. In the utility, select your USB device, click Disconnect. 5 ESPAÑOL Your USB device is lit. 3. Once you are finished using your USB device and then click connect. 4. Connect your USB device to be used. 5. ENGLISH FRANÇAIS DEUTSCH 4.

Quick Installation Guide
Page 8
...Windows 7/ Vista, if the installation menu does not appear automatically, click on the Windows Icon on the bottom left hand corner of the screen, click on your computer. 4. Make sure the RJ-45 network cable is the letter assigned to your CD-ROM Driver... The USB device is working properly by plugging it into a USB port on the Utility CD-ROM or contact TRENDnet's Technical Support Department. 6 The user will be connected to the User's Guide included on your keyboard. 2. What should I do ? 1. Power cycle the TU2-NU4 to force all USB devices have any software firewall ...
...Windows 7/ Vista, if the installation menu does not appear automatically, click on the Windows Icon on the bottom left hand corner of the screen, click on your computer. 4. Make sure the RJ-45 network cable is the letter assigned to your CD-ROM Driver... The USB device is working properly by plugging it into a USB port on the Utility CD-ROM or contact TRENDnet's Technical Support Department. 6 The user will be connected to the User's Guide included on your keyboard. 2. What should I do ? 1. Power cycle the TU2-NU4 to force all USB devices have any software firewall ...


