
User Manual
Page 6
...190; IP Address: 192.168.0.10 ¾ Subnet Mask: 255.255.255.0 )Note: The TL-PS110U is produced without password by increasing network printer performance and management. Connect with USB2.0 printer Connect with host-based printers, e.g. If not, please contact your printers at convenient locations ...print server does not support printing with USB1.1 printer )Note: The Status LED should be flash five times when POST. TL-PS110U Single USB2.0 Port Fast Ethernet Print Server Chapter 1. Introduction 1.1 Product Overview The external print servers enhance capability by letting you place ...
...190; IP Address: 192.168.0.10 ¾ Subnet Mask: 255.255.255.0 )Note: The TL-PS110U is produced without password by increasing network printer performance and management. Connect with USB2.0 printer Connect with host-based printers, e.g. If not, please contact your printers at convenient locations ...print server does not support printing with USB1.1 printer )Note: The Status LED should be flash five times when POST. TL-PS110U Single USB2.0 Port Fast Ethernet Print Server Chapter 1. Introduction 1.1 Product Overview The external print servers enhance capability by letting you place ...
User Manual
Page 7
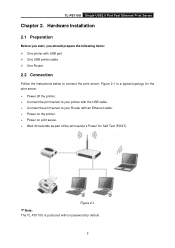
TL-PS110U Single USB2.0 Port Fast Ethernet Print Server Chapter 2. Figure 2-1 is produced without password by default. 2 Hardware Installation 2.1 Preparation Before you start, you should prepare the following items: &#... 2.2 Connection Follow the instructions below to your Router with the USB cable. ¾ Connect the print server to connect the print server. Figure 2-1 )Note: The TL-PS110U is a typical typology for the print server. ¾ Power off the printer. ¾ Connect the print server to your printer with an Ethernet cable. ¾...
TL-PS110U Single USB2.0 Port Fast Ethernet Print Server Chapter 2. Figure 2-1 is produced without password by default. 2 Hardware Installation 2.1 Preparation Before you start, you should prepare the following items: &#... 2.2 Connection Follow the instructions below to your Router with the USB cable. ¾ Connect the print server to connect the print server. Figure 2-1 )Note: The TL-PS110U is a typical typology for the print server. ¾ Power off the printer. ¾ Connect the print server to your printer with an Ethernet cable. ¾...
User Manual
Page 8
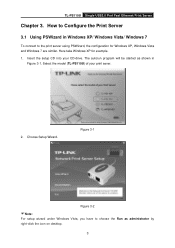
Insert the setup CD into your print sever. 2. Choose Setup Wizard. TL-PS110U Single USB2.0 Port Fast Ethernet Print Server Chapter 3. How to the print server using PSWizard, the configuration for example. 1. The autorun program will be started as administrator ... choose the Run as shown in Windows XP/ Windows Vista/ Windows 7 To connect to Configure the Print Server 3.1 Using PSWizard in Figure 3-1. Select the model (TL-PS110U) of your CD-drive. Here take Windows XP for Windows XP, Windows Vista and Windows 7 are similar.
Insert the setup CD into your print sever. 2. Choose Setup Wizard. TL-PS110U Single USB2.0 Port Fast Ethernet Print Server Chapter 3. How to the print server using PSWizard, the configuration for example. 1. The autorun program will be started as administrator ... choose the Run as shown in Windows XP/ Windows Vista/ Windows 7 To connect to Configure the Print Server 3.1 Using PSWizard in Figure 3-1. Select the model (TL-PS110U) of your CD-drive. Here take Windows XP for Windows XP, Windows Vista and Windows 7 are similar.
User Manual
Page 9
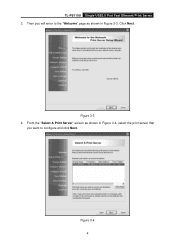
Figure 3-3 4. Then you want to the "Welcome" page as shown in Figure 3-3. Figure 3-4 4 Click Next. From the "Select A Print Server" screen as shown in Figure 3-4, select the print server that you will enter to configure and click Next. TL-PS110U Single USB2.0 Port Fast Ethernet Print Server 3.
Figure 3-3 4. Then you want to the "Welcome" page as shown in Figure 3-3. Figure 3-4 4 Click Next. From the "Select A Print Server" screen as shown in Figure 3-4, select the print server that you will enter to configure and click Next. TL-PS110U Single USB2.0 Port Fast Ethernet Print Server 3.
User Manual
Page 10
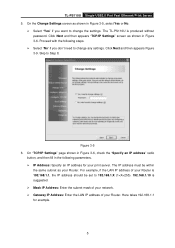
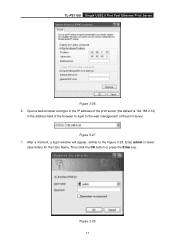
... "TCP/IP Settings" screen as your Router. Click Next and then appears Figure 3-9. For example, if the LAN IP address of your print server. TL-PS110U Single USB2.0 Port Fast Ethernet Print Server 5. On the Change Settings screen as shown in Figure 3-5, select Yes or No. ¾ Select "Yes" if you... settings. On "TCP/IP Settings" page shown in Figure 3-6, check the "Specify an IP address" radio button, and then fill in Figure 3-6. The TL-PS110U is 192.168.1.1, the IP address should be within the same subnet as shown in the following steps. ¾ Select "No" if you want to...
... "TCP/IP Settings" screen as your Router. Click Next and then appears Figure 3-9. For example, if the LAN IP address of your print server. TL-PS110U Single USB2.0 Port Fast Ethernet Print Server 5. On the Change Settings screen as shown in Figure 3-5, select Yes or No. ¾ Select "Yes" if you... settings. On "TCP/IP Settings" page shown in Figure 3-6, check the "Specify an IP address" radio button, and then fill in Figure 3-6. The TL-PS110U is 192.168.1.1, the IP address should be within the same subnet as shown in the following steps. ¾ Select "No" if you want to...
User Manual
Page 11
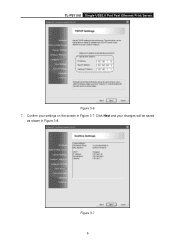
TL-PS110U Single USB2.0 Port Fast Ethernet Print Server Figure 3-6 7. Click Next and your settings on the screen in Figure 3-8. Figure 3-7 6 Confirm your changes will be saved as shown in Figure 3-7.
TL-PS110U Single USB2.0 Port Fast Ethernet Print Server Figure 3-6 7. Click Next and your settings on the screen in Figure 3-8. Figure 3-7 6 Confirm your changes will be saved as shown in Figure 3-7.
User Manual
Page 12
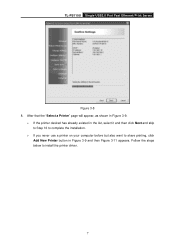
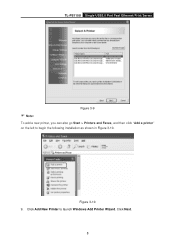
TL-PS110U Single USB2.0 Port Fast Ethernet Print Server Figure 3-8 8. Follow the steps below to share printing, click Add New Printer button in the list, select it and then click Next and skip to Step 16 to complete the installation. ¾ If you never use a printer on your computer before but also want to install the printer driver. 7 After that the "Select a Printer" page will appear, as shown in Figure 3-9. ¾ If the printer desired has already existed in Figure 3-9 and then Figure 3-11 appears.
TL-PS110U Single USB2.0 Port Fast Ethernet Print Server Figure 3-8 8. Follow the steps below to share printing, click Add New Printer button in the list, select it and then click Next and skip to Step 16 to complete the installation. ¾ If you never use a printer on your computer before but also want to install the printer driver. 7 After that the "Select a Printer" page will appear, as shown in Figure 3-9. ¾ If the printer desired has already existed in Figure 3-9 and then Figure 3-11 appears.
User Manual
Page 13
TL-PS110U Single USB2.0 Port Fast Ethernet Print Server ) Note: Figure 3-9 To add a new printer, you can also go Start > Printers and Faxes, and then click "Add a printer" on the left to launch Windows Add Printer Wizard. Click Next. 8 Figure 3-10 9. Click Add New Printer to begin the following installation as shown in Figure 3-10.
TL-PS110U Single USB2.0 Port Fast Ethernet Print Server ) Note: Figure 3-9 To add a new printer, you can also go Start > Printers and Faxes, and then click "Add a printer" on the left to launch Windows Add Printer Wizard. Click Next. 8 Figure 3-10 9. Click Add New Printer to begin the following installation as shown in Figure 3-10.
User Manual
Page 14
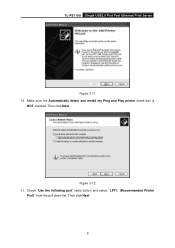
Check "Use the following port" radio button and select "LPT1: (Recommended Printer Port)" from the pull-down list. TL-PS110U Single USB2.0 Port Fast Ethernet Print Server Figure 3-11 10. Then click Next. Then click Next. 9 Figure 3-12 11. Make sure the Automatically detect and install my Plug and Play printer check box is NOT checked.
Check "Use the following port" radio button and select "LPT1: (Recommended Printer Port)" from the pull-down list. TL-PS110U Single USB2.0 Port Fast Ethernet Print Server Figure 3-11 10. Then click Next. Then click Next. 9 Figure 3-12 11. Make sure the Automatically detect and install my Plug and Play printer check box is NOT checked.
User Manual
Page 15
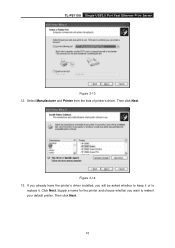
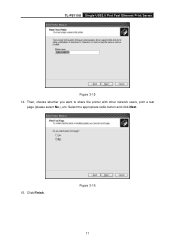
Supply a name for the printer and choose whether you will be asked whether to keep it or to make it . Then click Next. If you already have the printer's driver installed, you want to replace it your default printer. TL-PS110U Single USB2.0 Port Fast Ethernet Print Server Figure 3-13 12. Click Next. Select Manufacturer and Printer from the lists of printer's driver. Figure 3-14 13. Then click Next. 10
Supply a name for the printer and choose whether you will be asked whether to keep it or to make it . Then click Next. If you already have the printer's driver installed, you want to replace it your default printer. TL-PS110U Single USB2.0 Port Fast Ethernet Print Server Figure 3-13 12. Click Next. Select Manufacturer and Printer from the lists of printer's driver. Figure 3-14 13. Then click Next. 10
User Manual
Page 16
TL-PS110U Single USB2.0 Port Fast Ethernet Print Server Figure 3-15 14. Figure 3-16 11 Then, choose whether you want to share the printer with other network users, print a test page (please select No.), etc. Click Finish. Select the appropriate radio-button and click Next. 15.
TL-PS110U Single USB2.0 Port Fast Ethernet Print Server Figure 3-15 14. Figure 3-16 11 Then, choose whether you want to share the printer with other network users, print a test page (please select No.), etc. Click Finish. Select the appropriate radio-button and click Next. 15.
User Manual
Page 17
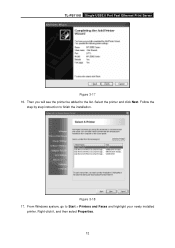
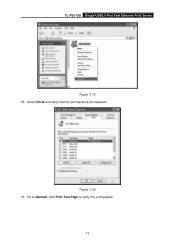
Right-click it, and then select Properties. 12 Figure 3-18 17. Follow the step by step instruction to the list. TL-PS110U Single USB2.0 Port Fast Ethernet Print Server Figure 3-17 16. Select the printer and click Next. Then you will see the printer be added to finish the installation. From Windows system, go to Start > Printers and Faxes and highlight your newly installed printer.
Right-click it, and then select Properties. 12 Figure 3-18 17. Follow the step by step instruction to the list. TL-PS110U Single USB2.0 Port Fast Ethernet Print Server Figure 3-17 16. Select the printer and click Next. Then you will see the printer be added to finish the installation. From Windows system, go to Start > Printers and Faxes and highlight your newly installed printer.
User Manual
Page 18
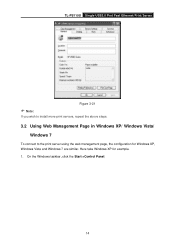
click Print Test Page to General; Go to verify the configuration. 13 Select Ports and verify that the print server's port appears. Figure 3-20 19. TL-PS110U Single USB2.0 Port Fast Ethernet Print Server Figure 3-19 18.
click Print Test Page to General; Go to verify the configuration. 13 Select Ports and verify that the print server's port appears. Figure 3-20 19. TL-PS110U Single USB2.0 Port Fast Ethernet Print Server Figure 3-19 18.
User Manual
Page 19
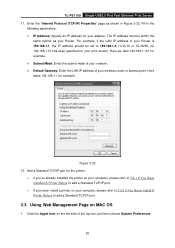
On the Windows taskbar, click the Start->Control Panel. 14 Here take Windows XP for Windows XP, Windows Vista and Windows 7 are similar. TL-PS110U Single USB2.0 Port Fast Ethernet Print Server Figure 3-21 ) Note: If you wish to install more print servers, repeat the above steps. 3.2 Using Web Management Page in Windows XP/ Windows Vista/ Windows 7 To connect to the print server using the web management page, the configuration for example. 1.
On the Windows taskbar, click the Start->Control Panel. 14 Here take Windows XP for Windows XP, Windows Vista and Windows 7 are similar. TL-PS110U Single USB2.0 Port Fast Ethernet Print Server Figure 3-21 ) Note: If you wish to install more print servers, repeat the above steps. 3.2 Using Web Management Page in Windows XP/ Windows Vista/ Windows 7 To connect to the print server using the web management page, the configuration for example. 1.
User Manual
Page 20
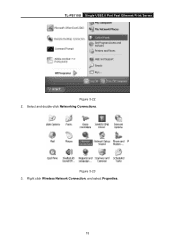
Right click Wireless Network Connection, and select Properties. 15 Select and double-click Networking Connections. Figure 3-23 3. TL-PS110U Single USB2.0 Port Fast Ethernet Print Server Figure 3-22 2.
Right click Wireless Network Connection, and select Properties. 15 Select and double-click Networking Connections. Figure 3-23 3. TL-PS110U Single USB2.0 Port Fast Ethernet Print Server Figure 3-22 2.
User Manual
Page 21
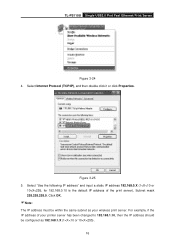
Select Internet Protocol (TCP/IP), and then double click it or click Properties. Figure 3-25 5. TL-PS110U Single USB2.0 Port Fast Ethernet Print Server Figure 3-24 4. Select "Use the following IP address" and input a static IP address 192.168.0.X (1
Select Internet Protocol (TCP/IP), and then double click it or click Properties. Figure 3-25 5. TL-PS110U Single USB2.0 Port Fast Ethernet Print Server Figure 3-24 4. Select "Use the following IP address" and input a static IP address 192.168.0.X (1
User Manual
Page 22
After a moment, a login window will appear, similar to the web management of the browser to login to the Figure 3-28. Figure 3-28 17 Then click the OK button or press the Enter key. Enter admin in the address field of the print server. Open a web-browser and type in the IP address of the print server (the default is 192.168.0.10) in lower case letters for the User Name. TL-PS110U Single USB2.0 Port Fast Ethernet Print Server Figure 3-26 6. Figure 3-27 7.
After a moment, a login window will appear, similar to the web management of the browser to login to the Figure 3-28. Figure 3-28 17 Then click the OK button or press the Enter key. Enter admin in the address field of the print server. Open a web-browser and type in the IP address of the print server (the default is 192.168.0.10) in lower case letters for the User Name. TL-PS110U Single USB2.0 Port Fast Ethernet Print Server Figure 3-26 6. Figure 3-27 7.
User Manual
Page 23
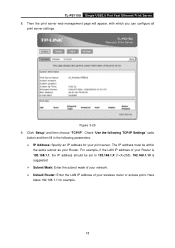
Click "Setup" and then choose "TCP/IP". TL-PS110U Single USB2.0 Port Fast Ethernet Print Server 8. Figure 3-29 9. Check "Use the following TCP/IP Settings" radio button and then fill in the following parameters. ¾ IP Address: Specify an IP address for your Router is 192.168.1.1, the IP address should be within the same subnet as your Router. For example, if the LAN IP address of your print server. The IP address must be set to 192.168.1.X (1 Then the print server web management page will appear, with which you can configure all print server settings.
Click "Setup" and then choose "TCP/IP". TL-PS110U Single USB2.0 Port Fast Ethernet Print Server 8. Figure 3-29 9. Check "Use the following TCP/IP Settings" radio button and then fill in the following parameters. ¾ IP Address: Specify an IP address for your Router is 192.168.1.1, the IP address should be within the same subnet as your Router. For example, if the LAN IP address of your print server. The IP address must be set to 192.168.1.X (1 Then the print server web management page will appear, with which you can configure all print server settings.

User Manual
Page 24
TL-PS110U Single USB2.0 Port Fast Ethernet Print Server Figure 3-30 10. Figure 3-31 19 Click Save & Restart and then wait the print server to save the changes and restart.
TL-PS110U Single USB2.0 Port Fast Ethernet Print Server Figure 3-30 10. Figure 3-31 19 Click Save & Restart and then wait the print server to save the changes and restart.
User Manual
Page 25
Fill in Figure 3-32. The IP address must be set to 192.168.1.X (1 For example, if the LAN IP address of your Router is 192.168.1.1, the IP address should be within the same subnet as shown in the following parameters. ¾ IP Address: Specify an IP address for your Router. Enter the "Internet Protocol (TCP/IP) Properties" page as your adapter. TL-PS110U Single USB2.0 Port Fast Ethernet Print Server 11.
Fill in Figure 3-32. The IP address must be set to 192.168.1.X (1 For example, if the LAN IP address of your Router is 192.168.1.1, the IP address should be within the same subnet as shown in the following parameters. ¾ IP Address: Specify an IP address for your Router. Enter the "Internet Protocol (TCP/IP) Properties" page as your adapter. TL-PS110U Single USB2.0 Port Fast Ethernet Print Server 11.


